Honey Garlic Meatball Skillet Easy and Hearty Meal
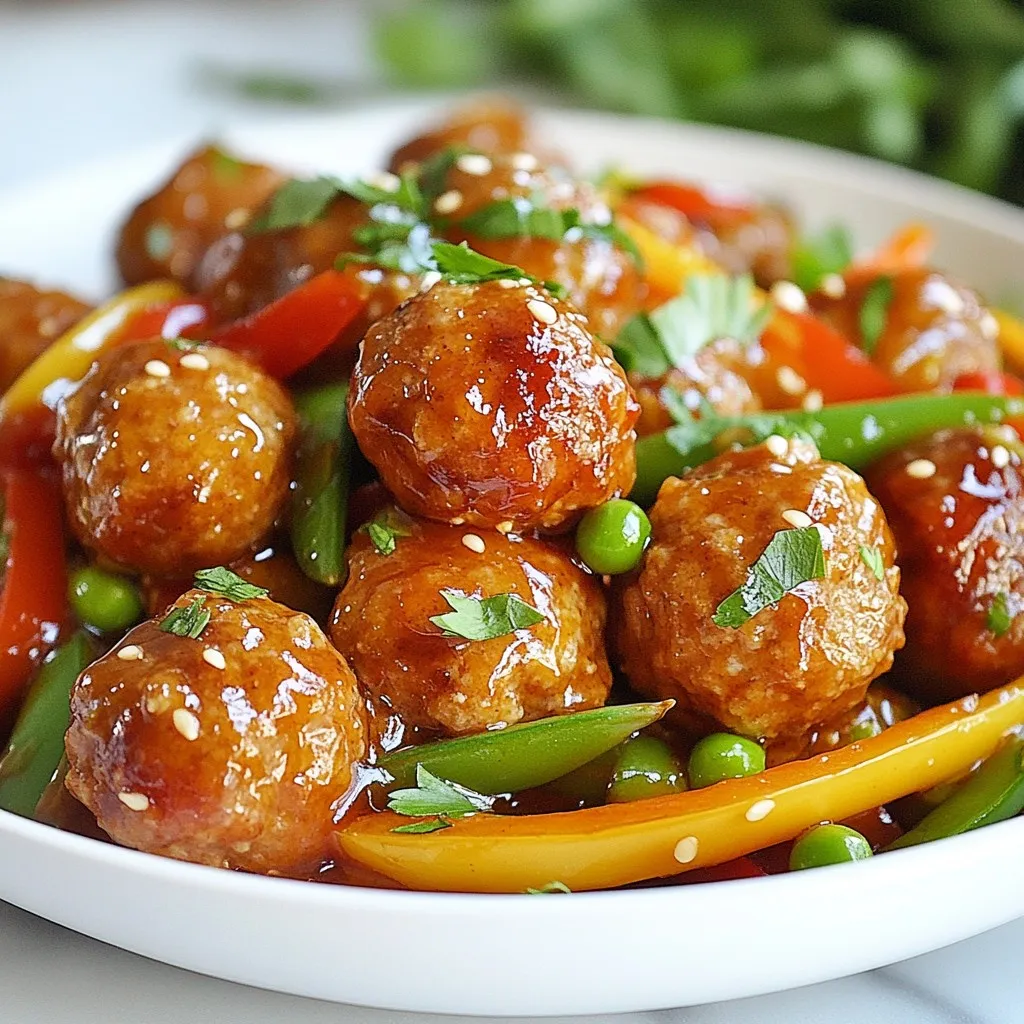

Looking for a simple yet hearty meal that packs a flavor punch? Try my Honey Garlic Meatball Skillet! This dish combines juicy meatballs with a sweet and savory sauce that will have everyone asking for seconds. Plus, it’s easy to make and perfect for weeknight dinners. Join me as I guide you through the ingredients and steps to create this comforting recipe that you’ll love to share!
Why I Love This Recipe
- Deliciously Sweet and Savory: The combination of honey and garlic creates a mouthwatering sauce that perfectly balances sweetness with savory flavors, making every bite irresistible.
- Quick and Easy: This recipe comes together in about 40 minutes, making it a fantastic choice for busy weeknights when you want a homemade meal without the fuss.
- Customizable Ingredients: Feel free to swap in your favorite ground meat or veggies, allowing you to tailor this dish to your taste preferences or dietary needs.
- Great for Meal Prep: These meatballs store well in the fridge or freezer, making them a convenient option for meal prep throughout the week.
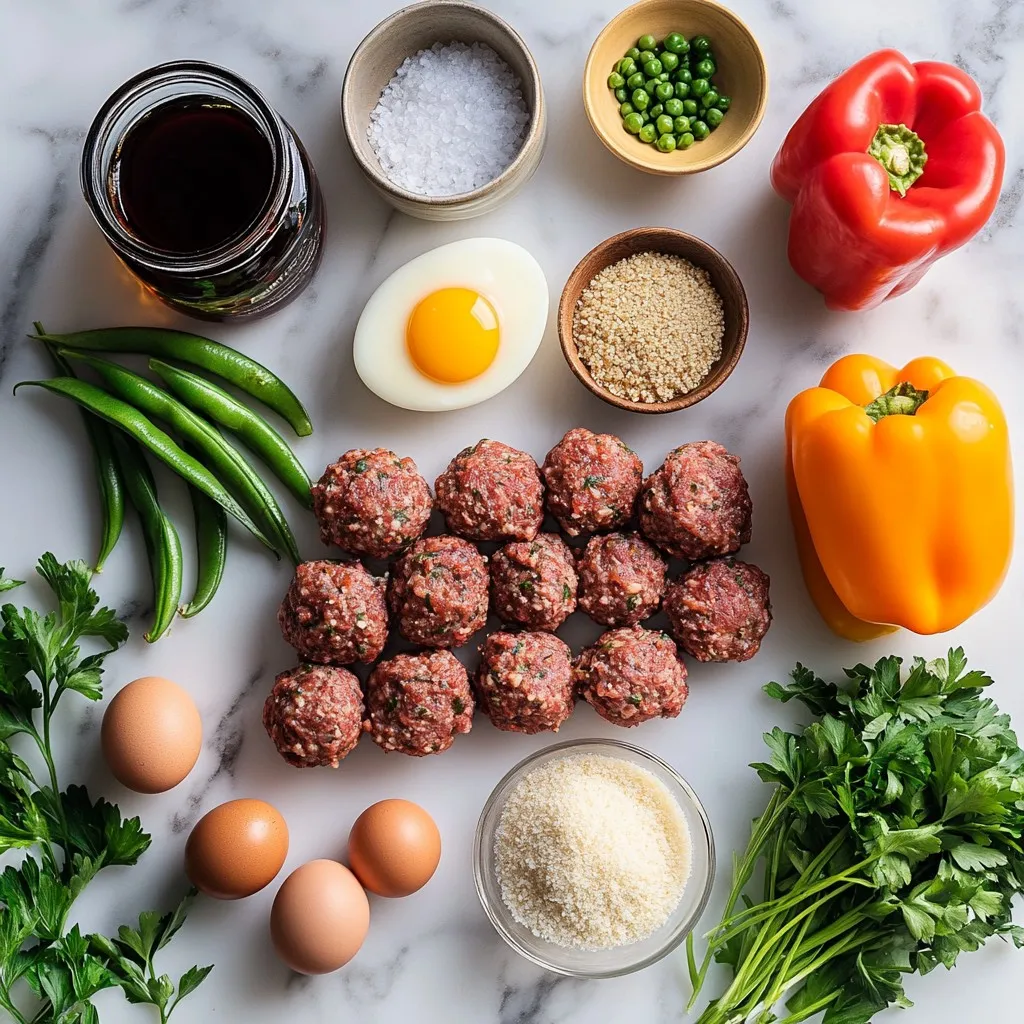
Ingredients
Main Ingredients
– 1 lb ground beef or ground turkey
– 1/2 cup breadcrumbs (preferably panko for extra crunch)
– 1/4 cup freshly grated Parmesan cheese
– 1 large egg, beaten
– 2 cloves of garlic, finely minced
– 1 teaspoon onion powder
– 1 teaspoon dried oregano
– Salt and black pepper to taste
– 1 cup honey
– 1/4 cup soy sauce (or gluten-free tamari)
– 1 tablespoon rice vinegar
– 2 tablespoons sesame oil
These main ingredients create a hearty base for your dish. The ground meat provides protein, while the breadcrumbs add texture. Parmesan cheese enriches the flavors. Honey, soy sauce, and rice vinegar form a sweet and tangy sauce that makes this dish shine.
Optional Ingredients
– 1/2 teaspoon red pepper flakes for spice
– 1 bell pepper (any color), thinly sliced
– 1 cup snap peas or tender green beans
– Chopped fresh parsley or sliced green onions for garnish
You can spice things up with red pepper flakes. Fresh vegetables like bell pepper and snap peas add color and crunch. Garnishing with parsley or green onions gives a fresh finish. Adjust these optional ingredients to fit your taste. This flexibility makes each meal unique and fun!
Step-by-Step Instructions
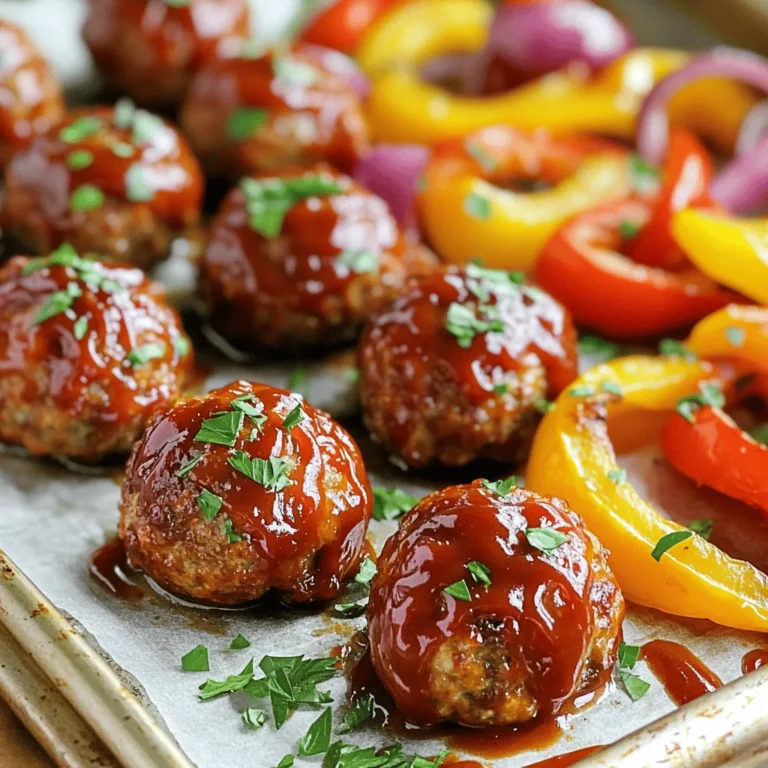
Preheat the Oven
– Set your oven to 400°F (200°C).
– Line a baking sheet with parchment paper for easy cleanup.
Prepare the Meatball Mixture
– In a large bowl, mix ground beef or turkey, breadcrumbs, cheese, egg, garlic, onion powder, oregano, and a pinch of salt and pepper.
– Use your hands to mix gently. This keeps the meatballs tender and not tough.
Bake the Meatballs
– Shape the mixture into meatballs about 1 inch wide.
– Space them evenly on the baking sheet.
– Bake for 15-20 minutes. Check the internal temperature. It should be 165°F (74°C).
Tips & Tricks
Perfecting the Meatballs
To make the best meatballs, don’t overmix the meat. Mix until the ingredients come together. If you mix too much, your meatballs can become tough.
Make each meatball the same size. Aim for about one inch in diameter. This helps them cook evenly. If one is larger, it may not cook through while smaller ones might dry out.
Honey Garlic Sauce Tips
Simmer the sauce to get the right thickness. Cook it gently over medium heat. If you cook it too fast, it may burn. Stir often and let it bubble softly for a few minutes.
You can adjust the sauce’s taste. Add more honey for sweetness or more soy sauce for saltiness. If you like spice, sprinkle in more red pepper flakes. Taste as you go to get it just right.
Serving Suggestions
Serve the meatballs in a large, shallow bowl. Drizzle extra honey garlic sauce on top for a nice look.
For side dishes, fluffy rice or quinoa is perfect. They soak up the sauce well. You can also add a fresh salad for a crunchy bite.
For extra flavor, top with chopped parsley or sliced green onions. This adds color and freshness to your meal. Enjoy the delicious mix of sweet and savory!
Pro Tips
- Use Fresh Ingredients: Fresh garlic and herbs enhance the flavor significantly compared to dried versions. Always opt for fresh when possible.
- Adjust the Sweetness: Feel free to tweak the amount of honey in the sauce to suit your taste preference. You can also substitute with maple syrup for a different flavor profile.
- Experiment with Protein: Try using ground chicken or a meat substitute for a healthier or vegetarian option. Just ensure that cooking times may vary depending on the protein used.
- One-Pan Wonder: For a complete meal, consider adding precooked rice or quinoa directly into the skillet in the last few minutes of cooking to soak up the sauce.

Variations
Different Protein Options
You can swap ground beef or turkey for ground chicken. Ground chicken makes a lighter meatball. If you prefer plant-based options, try lentils or chickpeas. Just mash them and mix with breadcrumbs. These options keep the dish hearty and flavorful.
Sauce Adjustments
Want a spicier sauce? Add more red pepper flakes or a dash of hot sauce. For a sweeter taste, increase the honey in the sauce. You can also use maple syrup for a different flavor. If you have dietary needs, swap soy sauce for coconut aminos. This keeps it gluten-free while still tasty.
Vegetable Swaps
Use seasonal vegetables like zucchini or carrots for a fresh twist. You can also try broccoli or asparagus for more crunch. These swaps change the texture and color of your dish. Mix it up with what you have or what’s in season.
Storage Info
How to Store Leftovers
After enjoying your meal, let the leftovers cool first. Place the meatballs and veggies in an airtight container. This keeps the dish fresh. Refrigerate them for up to three days. Using glass containers helps you see what’s inside. Plastic containers work too, but ensure they seal well.
Reheating Tips
To reheat the meatballs, you have a few good options. The best method is to use the stovetop. Heat a skillet over medium heat, add a splash of water, and cover it. This keeps the meatballs moist. If you use the microwave, place the meatballs in a bowl. Add a touch of water and cover them. Heat in short bursts, checking often to avoid drying out.
Freeze for Later
Freezing is a great way to save these meatballs for later. First, let them cool completely. Place them in a freezer-safe bag or container. Make sure to remove as much air as possible. You can freeze the meatballs and sauce together or separately. When you are ready to enjoy them, thaw them overnight in the fridge. Reheat them as mentioned before. This way, the texture stays just right.
FAQs
How long do honey garlic meatballs last in the fridge?
Honey garlic meatballs last about 3 to 4 days in the fridge. Store them in an airtight container. This keeps them fresh and tasty for your next meal.
Can I make honey garlic meatballs ahead of time?
Yes, you can make honey garlic meatballs ahead of time. Prepare them, bake, and let them cool. Store them in the fridge for up to 4 days. Reheat them on the stove or in the microwave. Add a splash of sauce to keep them moist.
What can I serve with honey garlic meatballs?
You can serve honey garlic meatballs with fluffy rice or quinoa. Steamed vegetables like broccoli or carrots work well too. A fresh salad adds a nice crunch. For a heartier meal, serve with mashed potatoes or noodles. These sides balance the meal and enhance the flavors.
This blog post covered everything you need to know about making honey garlic meatballs. We explored key ingredients, easy preparation steps, and helpful tips for perfecting the dish. You learned about variations, from protein options to sauce adjustments, ensuring you can personalize your meatballs. Lastly, we discussed storing and reheating leftovers for the best taste.
Now, you have all the tools to create a delicious meal your family will love. Enjoy the process and get creative in the kitche

Honey Garlic Meatball Skillet Delight
Ingredients
- 1 lb ground beef or ground turkey
- 0.5 cup breadcrumbs (preferably panko)
- 0.25 cup freshly grated Parmesan cheese
- 1 large egg, beaten
- 2 cloves garlic, finely minced
- 1 teaspoon onion powder
- 1 teaspoon dried oregano
- to taste salt and black pepper
- 1 cup honey
- 0.25 cup soy sauce or gluten-free tamari
- 1 tablespoon rice vinegar
- 0.5 teaspoon red pepper flakes (optional)
- 2 tablespoons sesame oil
- 1 bell pepper thinly sliced
- 1 cup snap peas or tender green beans
- for garnish chopped fresh parsley or sliced green onions
Instructions
- Preheat the Oven: Set your oven to 400°F (200°C) and line a baking sheet with parchment paper for easy cleanup.
- Make the Meatball Mixture: In a large mixing bowl, combine the ground beef or turkey, breadcrumbs, grated Parmesan, beaten egg, minced garlic, onion powder, oregano, and a generous pinch of salt and pepper. Use your hands to mix gently until all ingredients are just combined; avoid overmixing.
- Shape the Meatballs: Using your hands, form the mixture into bite-sized meatballs, roughly 1 inch in diameter. Place the meatballs evenly spaced on the prepared baking sheet.
- Bake the Meatballs: Bake in the preheated oven for 15-20 minutes, or until the meatballs are golden brown and cooked through, checking with a meat thermometer for an internal temperature of 165°F (74°C).
- Prepare Honey Garlic Sauce: While the meatballs are baking, make the honey garlic sauce. In a small saucepan over medium heat, combine honey, soy sauce, rice vinegar, and red pepper flakes. Whisk to combine and bring the mixture to a gentle simmer, then lower the heat and let simmer for 5-7 minutes until the sauce thickens slightly.
- Sauté the Vegetables: In a large skillet, heat the sesame oil over medium heat. Add the sliced bell pepper and snap peas (or green beans), sautéing for about 3-4 minutes until they begin to soften and brighten in color.
- Combine and Heat: Once the meatballs are ready, carefully add them to the skillet along with the honey garlic sauce. Gently toss everything together to thoroughly coat the meatballs and vegetables in the sweet and savory sauce. Allow it to cook for an additional 2-3 minutes to heat through.
- Serve: Dish out the Honey Garlic Meatballs and vegetables onto plates, garnishing with freshly chopped parsley or sliced green onions for a touch of color and flavor.

![- 1 pound boneless, skinless chicken breasts - 6 cups low-sodium chicken broth - 1 medium onion, finely chopped - 2 cloves garlic, minced - 2 medium carrots, diced - 2 stalks celery, diced - 1 cup orzo pasta - 3 large eggs - 1/2 cup freshly squeezed lemon juice (about 2-3 lemons) This soup starts with tender chicken. I prefer boneless, skinless chicken breasts. They cook fast and stay juicy. Next, low-sodium chicken broth gives the soup its rich base. Fresh veggies add flavor and nutrition. Onion, garlic, carrots, and celery create a perfect mix. I chop them finely for even cooking. Orzo pasta makes the soup filling. It cooks well in the broth, soaking up all the flavors. To achieve that creamy texture, I use eggs and lemon juice. The eggs blend with the broth, creating a silky finish. Fresh lemon juice brightens the soup, making every bite refreshing. - 1 teaspoon dried oregano - 1 teaspoon sea salt - 1/2 teaspoon freshly ground black pepper - 2 tablespoons extra-virgin olive oil Seasoning is key in this recipe. Dried oregano adds a hint of earthiness. Sea salt and black pepper enhance the natural flavors. I always choose extra-virgin olive oil for sautéing. It has a wonderful taste and is healthy too. - Fresh parsley, finely chopped - Lemon wedges for serving Garnishes make a dish special. Fresh parsley adds color and freshness. I sprinkle it on top before serving. Lemon wedges are great for those who want extra zing. They brighten the dish and add a punch of flavor. For the full recipe, check out the Mediterranean Lemon Chicken Orzo Soup! It’s a perfect guide to make this comforting dish. Start by chopping the vegetables. You will need to dice the onion, carrots, and celery. Next, shred the cooked chicken. This can be done easily with two forks. For the egg mixture, whisk together the eggs and lemon juice in a medium bowl. Make sure they blend well. In a large pot, heat two tablespoons of olive oil over medium heat. Once hot, add the chopped onion, diced carrots, and celery. Sauté these vegetables for about 5 to 7 minutes. They should become tender and fragrant. Now, stir in two minced garlic cloves. Cook for one more minute. You want the garlic to smell wonderful, but not brown. Add the chicken breasts into the pot. Pour in six cups of low-sodium chicken broth. Increase the heat slightly and bring it to a gentle simmer. Let the chicken cook for 15 to 20 minutes. Once fully cooked, carefully remove the chicken from the pot and set it aside to cool. When cool, shred the chicken into bite-sized pieces. Return to the pot and add one cup of orzo pasta. Let the soup simmer for 8 to 10 minutes, stirring to prevent sticking. In your mixing bowl, you have the whisked eggs with lemon juice. Now, temper the eggs by slowly adding a ladleful of hot broth from the pot. Whisk constantly to prevent the eggs from cooking too quickly. Gradually mix the egg mixture back into the soup. This will give your soup a creamy texture. Now it’s time to adjust the seasoning. Taste the soup and add sea salt and black pepper as needed. Finally, garnish your soup with fresh parsley before serving. This adds a nice color and fresh flavor. Enjoy your comforting bowl of Greek lemon chicken soup! For the full recipe, see the detailed instructions above. - Choosing the right type of chicken: I recommend using boneless, skinless chicken breasts. This cut cooks quickly and stays tender in the soup. It also absorbs the rich flavors of the broth well. - Adjusting salt levels for broth versus soup: Start with low-sodium chicken broth. Taste as you cook, and add salt as needed. This way, you control the saltiness without overwhelming the dish. - Techniques for tempering eggs properly: To prevent egg curdling, whisk the eggs and lemon juice in a bowl. Slowly add hot broth while whisking. This warms the eggs without cooking them. - Continuous whisking for a smooth texture: Keep whisking as you add the broth. This ensures a creamy, smooth texture in your soup. It’s key for that authentic Greek flavor. - Suggestions for family dinners or special occasions: Greek Lemon Chicken Soup is perfect for family dinners. Serve it on cozy nights or special occasions like holidays. It brings warmth and comfort to the table. - Pairing with sides for a complete meal: I love pairing this soup with a fresh Greek salad or crusty bread. These sides complement the soup and make a full meal. Enjoy your cooking adventure with this classic dish! Check out the [Full Recipe] for step-by-step details on making this delightful soup. {{image_4}} If you can't find orzo, don't worry! You can use other small pasta shapes, like ditalini or acini di pepe. Both work great in this soup. For those who need gluten-free options, try rice or quinoa. These grains add texture and flavor while keeping the dish gluten-free. You can make your soup even better by adding greens. Spinach or kale works well. Simply toss them in during the last few minutes of cooking. This adds color and nutrients. You can also enhance the flavor by using herbs. Fresh dill or basil adds a lovely aroma and taste. Try adding a handful of either herb for a bright twist. If you want a meatless version, you can replace the chicken with plant-based proteins. Tofu or chickpeas are good choices. They soak up the soup's flavors nicely. Use vegetable broth instead of chicken broth to keep the taste rich and savory. This way, everyone can enjoy a bowl of this comforting soup! For the full recipe, check out the Mediterranean Lemon Chicken Orzo Soup . To keep your Greek Lemon Chicken Soup fresh, let it cool first. Pour it into airtight containers. Make sure to store it in the fridge. It should stay good for about 3 to 4 days. Always label your containers with the date. This helps you track how long it’s been there. When reheating, do it gently. You can use the stove or microwave. If using the stove, heat it on low heat. Stir often to prevent sticking. If it seems thick, add a splash of broth or water. This keeps the soup nice and smooth. To freeze Greek Lemon Chicken Soup, let it cool completely. Pour it into freezer-safe bags or containers. Remove as much air as possible. It can last up to 3 months in the freezer. When you’re ready to eat, thaw it in the fridge overnight. Reheat gently to enjoy the same great flavor. Greek Lemon Chicken Soup, also known as Avgolemono, is a classic dish. It features tender chicken, bright lemon, and creamy eggs. This soup warms the heart and soul, especially during cold months. It is a staple in Greek homes and often appears at family gatherings. The mix of flavors showcases the essence of Greek cooking. To achieve a creamy texture, temper the eggs. Whisk eggs and lemon juice together in a bowl. Gradually add hot broth while whisking. This method prevents the eggs from scrambling. Slowly stir the egg mixture back into the soup. This creates a smooth and velvety finish. Avoid boiling the soup after adding the egg to keep it creamy. Yes, you can make this soup ahead of time. Prepare the soup but skip adding the egg mixture until serving. Store the soup in an airtight container in the fridge for up to three days. When ready to serve, reheat gently and add the egg mixture. This keeps the soup fresh and creamy. This soup pairs well with a simple Greek salad. You can also serve it with warm pita bread or crusty bread. For a lighter meal, consider grilled vegetables on the side. These options enhance the flavors and create a lovely dining experience. In this post, I shared how to make Greek Lemon Chicken Soup. You learned about the key ingredients, like chicken, orzo, and the egg-lemon mixture that gives the soup its creamy texture. I provided steps for preparation, cooking, and tips for keeping the soup delicious and authentic. Don't hesitate to mix it up with different ingredients or share it with others. Enjoy this comforting dish anytime!](https://goldendishy.com/wp-content/uploads/2025/06/4ca94f54-e42c-42a8-b75c-f7048ee8bbd9-768x768.webp)