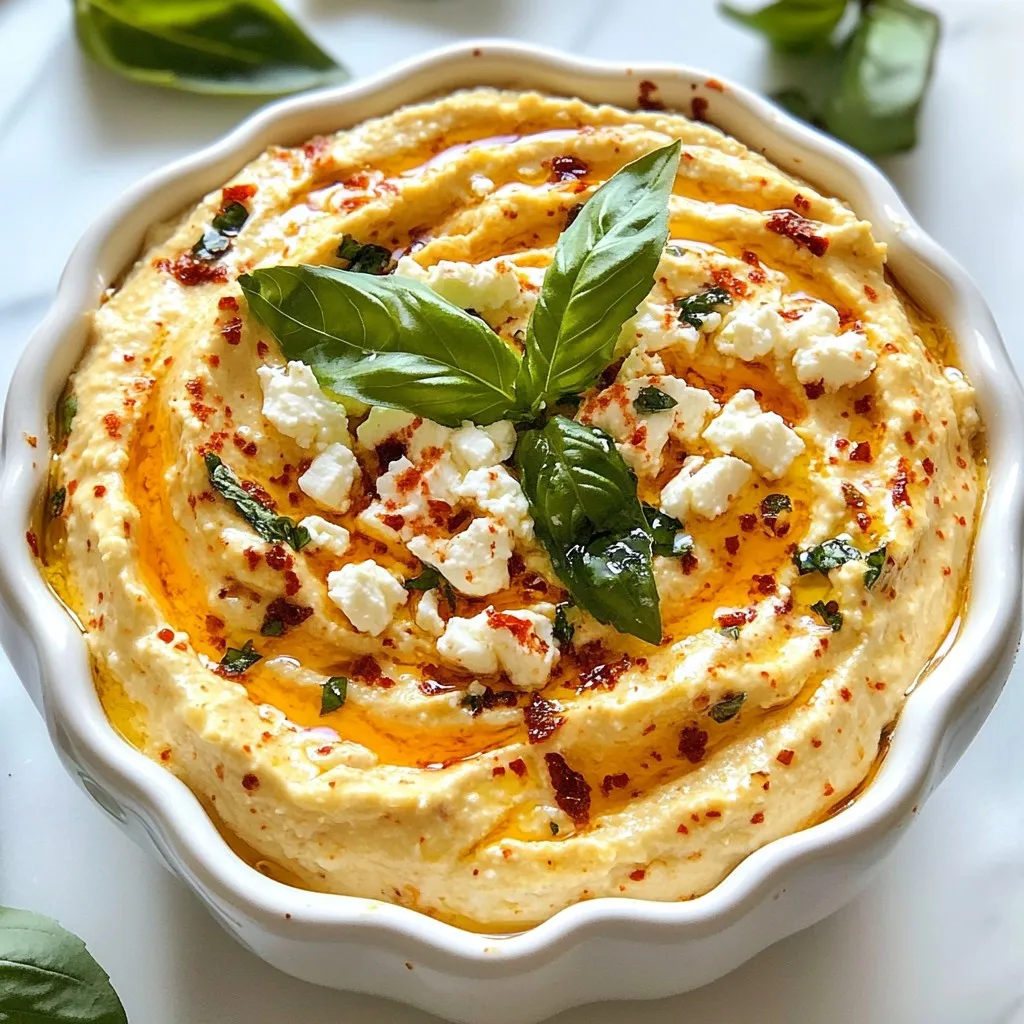
Sun Dried Tomato Feta Dip Vibrant and Flavorful Snack


Are you ready to elevate your snack game? My Sun Dried Tomato Feta Dip is vibrant, flavorful, and easy to make. With just a few simple ingredients like sun-dried tomatoes, feta cheese, and garlic, you can whip up a delicious dip that’s perfect for any gathering. Whether you’re entertaining guests or enjoying a quiet night in, this dip is sure to impress. Let’s get started!
Why I Love This Recipe
- Bold Flavors: This dip combines the rich taste of sun-dried tomatoes with creamy feta and cream cheese, creating a delightful flavor explosion in every bite.
- Easy to Make: With just a few simple ingredients and quick steps, this recipe is perfect for any skill level, making it an ideal choice for last-minute gatherings.
- Versatile Pairing: Whether served with pita chips, veggies, or crusty bread, this dip is adaptable and sure to please a crowd, no matter the occasion.
- Garnish for Visual Appeal: The fresh basil not only adds a pop of color but also enhances the aroma, making it as beautiful as it is delicious.
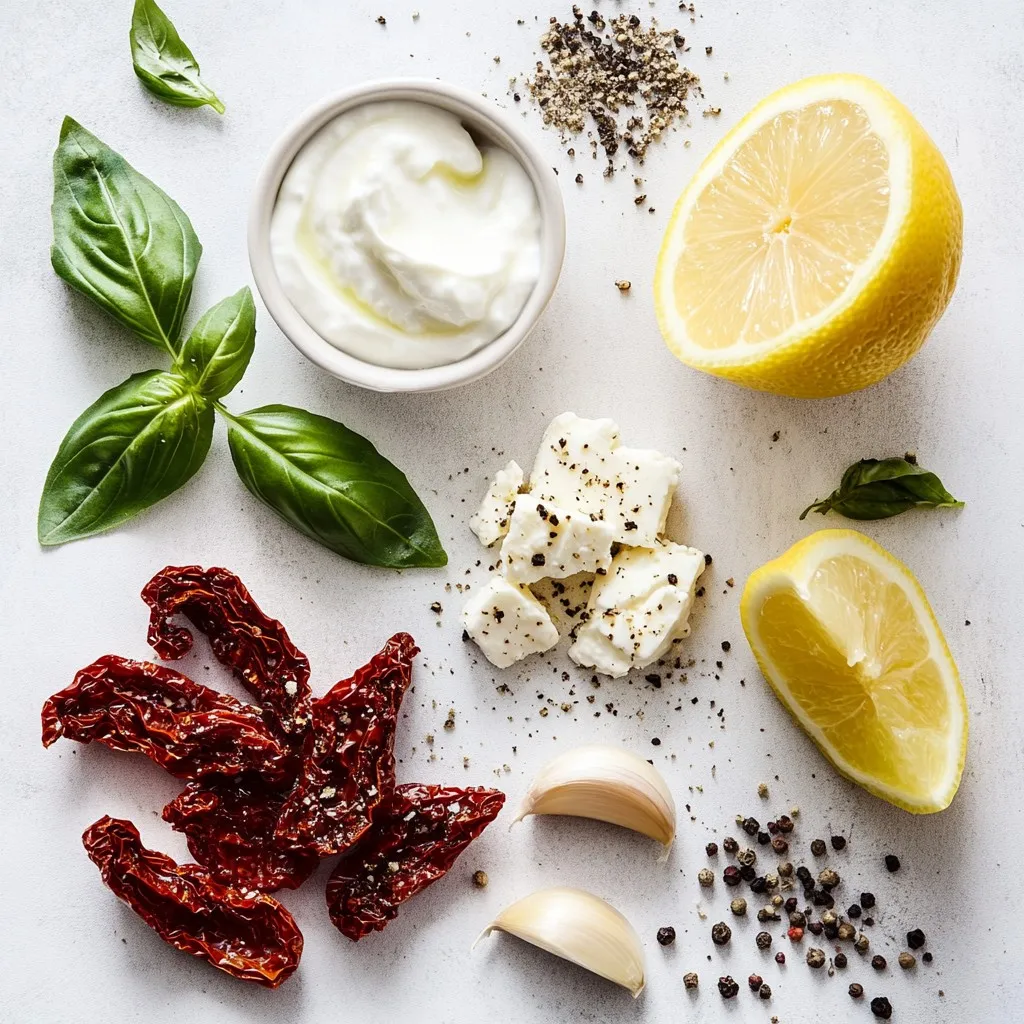
Ingredients
List of Essential Ingredients
– 1 cup sun-dried tomatoes (packed in oil, drained)
– 1 cup feta cheese, crumbled
– 1/2 cup cream cheese, softened at room temperature
– 2 tablespoons Greek yogurt
– 1 garlic clove, finely minced
– 1 teaspoon dried oregano
– 1 tablespoon freshly squeezed lemon juice
– Salt and freshly cracked pepper to taste
– Fresh basil leaves, for garnish
To create the base of this dip, you need sun-dried tomatoes. They give a deep flavor and a nice chew. Feta cheese adds saltiness and tang. Cream cheese provides a creamy texture, making the dip smooth. Greek yogurt lightens it up and adds a bit of tang. Garlic gives it a kick, and oregano brings in an earthy note. Lemon juice brightens all the flavors. Salt and pepper balance the taste. Fresh basil on top makes it look pretty and adds freshness.
Optional Ingredients for Enhanced Flavor
– Additional herbs (e.g., parsley, chives)
– Hot sauce for a spicy kick
– A drizzle of olive oil
You can play with flavors by adding more herbs like parsley or chives. If you like heat, a few drops of hot sauce can spice things up. A drizzle of olive oil not only enhances flavor but also makes the dip richer. Feel free to mix and match these options to find what you love best.
Step-by-Step Instructions
Preparation Phase
Start by placing 1 cup of drained sun-dried tomatoes, 1 cup of crumbled feta cheese, and 1/2 cup of softened cream cheese into a food processor. Pulse this mixture a few times. You want it to blend well but still keep a chunky texture. This adds depth and makes the dip interesting.
Mixing Ingredients
Now it’s time to add more flavor. Toss in 2 tablespoons of Greek yogurt, 1 finely minced garlic clove, 1 teaspoon of dried oregano, and 1 tablespoon of freshly squeezed lemon juice. Don’t forget a pinch of salt and freshly cracked pepper. Blend everything until it turns creamy and smooth. This step is key for a rich taste.
Final Touches
After blending, taste your dip. Adjust the seasoning if needed. You might want to add a bit more salt or pepper. Once satisfied, transfer the dip into a serving bowl. Use a spatula to create a gentle swirl on top. For a finishing touch, layer fresh basil leaves on top. This adds color and a lovely aroma. Serve immediately with pita chips, veggie sticks, or crusty bread. If you want a deeper flavor, chill the dip for at least 30 minutes before serving.
Tips & Tricks
Making the Dip Ahead of Time
You can make this dip ahead of time. Just refrigerate it for up to two days. This helps the flavors blend better. For even more flavor, let it rest for at least 30 minutes before serving.
Presentation Suggestions
Garnishing makes a dip look great. Try adding fresh basil leaves on top. You can also drizzle olive oil for shine. Serve your dip on a wooden board. Add pita chips, veggie sticks, or bread slices around it. This gives a nice touch to your appetizer spread.
Common Mistakes to Avoid
Be careful not to over-process the dip. A chunky texture adds interest. If the dip turns out too bland, check your seasoning. Adjust salt and pepper to fit your taste. Balancing flavors is key for a tasty dip.
Pro Tips
- Use Quality Ingredients: The flavor of your dip largely depends on the quality of the sun-dried tomatoes and feta cheese. Opt for high-quality products for the best taste.
- Adjust Consistency: If you prefer a thinner dip, add a splash of olive oil or a bit more Greek yogurt until you reach your desired consistency.
- Flavor Development: Allow the dip to chill in the refrigerator for at least 30 minutes before serving. This will enhance the flavors as they meld together.
- Garnish Creatively: Experiment with different garnishes like toasted pine nuts or a drizzle of balsamic glaze for added flavor and presentation.
Variations
Flavor Variations
You can spice up your sun-dried tomato feta dip in fun ways. Add jalapeños for a spicy kick. Just chop them finely and blend them in. The heat of the jalapeños brings a bold flavor that contrasts nicely with the creamy cheese.
Another twist is to go Greek-inspired. Mix in kalamata olives and capers. These ingredients add a briny depth and enhance the Mediterranean feel of the dip. The salty olives balance the sweetness of the sun-dried tomatoes, creating a delightful taste.
Dietary Variations
If you want a vegan version, you can swap out the cheese. Use plant-based cheese that mimics feta. Many brands offer tasty alternatives that work well. You can also use cashew cream for a creamy base.
For gluten-free options, serve the dip with veggie sticks or gluten-free crackers. Carrot and cucumber sticks add a fresh crunch. This makes the dip not only tasty but also healthy!
Storage Info
Proper Storage Techniques
To keep your sun-dried tomato feta dip fresh, use the right containers. I recommend glass jars or airtight plastic containers. These options will help maintain the dip’s flavor and texture.
Airtight storage is key. It prevents air from getting in and drying out your dip. Make sure to seal the container tightly after each use. This small step keeps your dip tasty for longer.
Shelf Life and Freezing Tips
In the refrigerator, your dip can last about 3 to 5 days. Store it in the airtight container to maximize freshness. Always check for any changes in smell or texture before enjoying it.
If you want to keep it longer, freezing is a great option. I suggest dividing the dip into smaller portions. This way, you can thaw only what you need. When stored in the freezer, it can last for up to 3 months. Just remember to label your containers with the date. To use, thaw it in the fridge overnight. Then, give it a good stir before serving.
FAQs
Can I use fresh tomatoes instead of sun-dried?
Using fresh tomatoes is possible but not ideal. Fresh tomatoes have more water. This can make your dip watery. Sun-dried tomatoes have a concentrated flavor. They add a rich taste to the dip that fresh tomatoes cannot match. If you choose fresh tomatoes, use less cream cheese. This keeps your dip creamy and thick. Also, consider adding dried herbs to boost flavor.
How can I make the dip spicier?
To add heat to the dip, try these tips:
– Mix in chopped jalapeños or red pepper flakes for instant spice.
– Use spicy feta cheese instead of regular feta for added kick.
– Add a splash of hot sauce for a quick flavor boost.
– Experiment with smoked paprika for a warm, smoky heat.
Start with small amounts. You can always add more spice later.
What to serve with sun-dried tomato feta dip?
You can enjoy this dip with many tasty dippers. Here are my favorites:
– Pita chips for a crunchy texture.
– Fresh vegetable sticks like carrots, cucumbers, and bell peppers.
– Crusty bread slices for a hearty option.
– Crackers, especially whole-grain or cheese-flavored ones.
Pairing the dip with olives adds a nice touch. It enhances the flavor and creates a fun snack spread.
This blog covered a tasty sun-dried tomato feta dip. We explored key ingredients, like feta and garlic. I shared steps to make it creamy and flavorful. I gave tips for great presentation and common mistakes to avoid. We also looked at fun variations and how to store the dip properly. Remember, a good dip brings people together! Enjoy making and sharing this easy, delicious treat. Your taste buds will thank yo

Sun-Dried Tomato Feta Dip Delight
Ingredients
- 1 cup sun-dried tomatoes (packed in oil, drained)
- 1 cup feta cheese, crumbled
- 1 2 tablespoons Greek yogurt
- 1 2 tablespoons cream cheese, softened at room temperature
- 1 clove garlic, finely minced
- 1 teaspoon dried oregano
- 1 tablespoon freshly squeezed lemon juice
- to taste salt and freshly cracked pepper
- for garnish fresh basil leaves
Instructions
- Begin by placing the drained sun-dried tomatoes, crumbled feta cheese, and softened cream cheese into a food processor. Pulse the mixture until everything is combined and retains a slightly chunky texture for added depth.
- Next, incorporate the Greek yogurt, minced garlic, dried oregano, and lemon juice into the mixture. Season with a pinch of salt and freshly cracked pepper. Blend until the dip achieves a smooth and creamy consistency.
- Taste your dip and adjust the seasoning as needed, adding more salt and pepper according to your personal preference.
- Carefully transfer the prepared dip into a decorative serving bowl. With a spatula, create a gentle swirl on the surface to enhance its visual appeal.
- To finish, layer fresh basil leaves on top of the dip for a vibrant pop of color and aromatic flavor.
- Serve the dip right away with an assortment of pita chips, crisp vegetable sticks, or slices of crusty bread. Alternatively, for an even more robust flavor development, refrigerate the dip for at least 30 minutes before serving.

![- 1 can (15 oz) chickpeas, thoroughly drained and rinsed - 1 large cucumber, diced into bite-sized pieces - 1 cup cherry tomatoes, halved for a burst of flavor - 1 red bell pepper, diced for sweetness and crunch - 1 small red onion, finely chopped for subtle sharpness - 1/4 cup fresh parsley, roughly chopped for a fresh aroma - 1/4 cup feta cheese, crumbled (optional; adds creaminess) - Juice of 2 fresh lemons, providing that zesty kick - 3 tablespoons extra-virgin olive oil for richness - 1 teaspoon Dijon mustard for a hint of tang - 1 teaspoon honey (or maple syrup for a vegan option) to balance flavors - Salt and freshly ground black pepper to taste This salad is packed with nutrients. It has about 200 calories per serving. You get protein from chickpeas, fiber from veggies, and healthy fats from olive oil. Plus, it provides vitamins A and C. This makes it not just tasty, but also good for you. Start by gathering a large mixing bowl. Add the chickpeas, diced cucumber, halved cherry tomatoes, red bell pepper, red onion, and parsley. Mix these fresh ingredients well. You want each piece to shine in your salad. If you enjoy cheese, sprinkle in the crumbled feta for a creamy touch. This adds a nice contrast to the crunch of the veggies. For the dressing, take a smaller bowl. Whisk together the lemon juice and olive oil. This forms the base of your zesty dressing. Next, add the Dijon mustard and honey. These ingredients give a perfect balance of flavor. Season with salt and black pepper. Whisk until the mixture looks smooth and well combined. Now it’s time to bring everything together. Drizzle the dressing over your salad mix. Use a spatula or wooden spoon to toss gently. You want all the ingredients to be evenly coated without mashing them. If you added feta, do a light toss to keep the cheese intact. Taste your salad and adjust the seasoning if needed. Cover it and let it chill in the fridge for at least 30 minutes. This helps the flavors meld beautifully. For the full recipe, you can refer back to the recipe card. To make your Zesty Lemon Chickpea Salad shine, focus on seasoning. Start with salt and pepper. Taste as you go. You may want more lemon juice for tang. If you like a sweeter flavor, drizzle more honey. For different dressings, try balsamic vinegar or apple cider vinegar. You can also mix in tahini for creaminess. Each option gives a new twist to the salad. Serving your salad well makes it more enticing. Use a large, colorful bowl for a rustic look. Add fresh parsley on top for a pop of green. You can even place lemon wedges around the bowl for a bright touch. If you want individual servings, use clear cups. This way, the layers show off the bright colors. A light drizzle of olive oil on each cup adds elegance. Prepping this salad in advance is easy. Make it a few hours before serving. The flavors develop more when they sit. For best results, chill the salad for at least 30 minutes. This helps the flavors mix well. You can store leftovers in the fridge for up to three days. Just keep the dressing separate if you want it fresh. For the full experience, check out the Full Recipe. {{image_4}} You can make this salad even better by adding veggies. Try adding avocados. They bring creaminess and healthy fats. Carrots can add a nice crunch. You can also toss in diced mango or apple. These fruits add sweetness and a fun twist. Want to make this salad heartier? Add some protein! Grilled chicken works great for meat lovers. Shrimp is a tasty option too. For a plant-based choice, use tofu. It soaks up flavors well and adds nutrition. Switch up the dressing for a new taste! Try using different vinegars, like balsamic or apple cider. You can also squeeze in more citrus juice for extra zing. For a creamier touch, mix in yogurt or tahini. Both add richness and make the salad more filling. Check out the [Full Recipe] to see how these variations can fit into your meal! Store your Zesty Lemon Chickpea Salad in a sealed container. This keeps it fresh and tasty. It lasts about 3 to 5 days in the fridge. Make sure to check for any signs of spoilage before eating. Freezing this salad is not ideal. The vegetables may lose their crunch. If you want to freeze it, consider freezing just the chickpeas. Place them in an airtight bag. When you want to use them, thaw overnight in the fridge. Leftover salad is great for new meals! You can add it to wraps for a quick lunch. Toss it in grain bowls for added flavor. Or, layer it in sandwiches for a fresh twist. You can even mix it into soups for a hearty touch. Enjoy creating new dishes with your leftover salad! For the full recipe, refer to the [Full Recipe]. Yes, you can make this salad ahead of time. In fact, it often tastes better after chilling. The flavors mix well when you let it sit. I suggest making it a few hours before serving. Just cover it with plastic wrap and place it in the fridge. This way, the lemon juice and olive oil soak into the chickpeas and veggies. You will enjoy a zesty and bright flavor profile! Yes, this salad is gluten-free. Chickpeas, fresh veggies, and the dressing contain no gluten. If you want to check other ingredients, always read the labels. Most items are safe, but it’s best to confirm. This makes the salad a great option for those with gluten sensitivities. You can serve it to everyone without worry! If you can’t eat chickpeas, no problem! You can use other beans like black beans or kidney beans. These will add protein and texture. Another option is to use cooked quinoa or lentils. These alternatives keep the salad hearty and filling. Each will bring a unique taste, so feel free to explore. Get creative based on what you have! This blog post provided a clear guide to making a Zesty Lemon Chickpea Salad. We covered the key ingredients, from fresh veggies to the zesty dressing. You learned how to prepare, dress, and assemble the salad for the best flavor. I shared tips for meal prep, variations to try, and how to store leftovers. Remember, this salad is not just easy to make; it’s also packed with nutrients. Enjoy your creation, explore the variations, and make it your own!](https://goldendishy.com/wp-content/uploads/2025/07/e89bc11c-d040-4055-8bd2-d62839faab5f-768x768.webp)
. To start, you need to preheat your grill or oven. If you choose to grill, set it to medium-high heat. This will help create a nice char on the corn. If baking sounds better, preheat your oven to 400°F (200°C). Both methods work well, giving you tasty corn. Next, prepare the garlic butter mixture. In a mixing bowl, combine melted unsalted butter, minced garlic, smoked paprika, sea salt, and black pepper. Whisk this mix together until all the ingredients blend well. The aroma will fill your kitchen, making it hard to wait for the corn! Now, it’s time to coat the corn. Take each ear of corn and brush it with your garlic butter mix. Make sure to cover every kernel. This ensures each bite bursts with flavor. For grilling, place the corn on the grill grates. Rotate it every 2-3 minutes until charred and tender, about 10-12 minutes total. If baking, wrap the corn in aluminum foil and bake for 20-25 minutes, turning halfway. After cooking, sprinkle grated Parmesan cheese on top while it’s still hot. Optionally, drizzle with fresh lemon juice for added flavor. Finally, garnish your corn with chopped parsley for a bright finish. Enjoy your Garlic Parmesan Corn on the Cob! For a complete guide, check out the Full Recipe. Grilling corn on the cob can be fun and easy. First, soak the husked corn in water for 15 minutes before grilling. This helps keep the corn moist. When you're ready, heat your grill to medium-high. Place the corn directly on the grates. Rotate the corn every 2-3 minutes. This gives it even cooking and a nice char. In about 10-12 minutes, the corn will be bright and tender. For the best garlic flavor, use fresh garlic. Mince the cloves finely to release the oils. Mix it well with the melted butter before brushing it on the corn. If you want a stronger taste, let the garlic sit in the butter for a bit. This helps the flavors blend. You can also add a touch of garlic powder if you like more depth. If you prefer a bit of heat, add a pinch of cayenne pepper to your garlic butter. For those who enjoy a milder taste, skip the pepper entirely. You can also adjust the smoked paprika amount. Start with less, then taste as you go. Everyone has different spice levels, so make it your own. Remember, you can always add more spice, but you can’t take it out! For the full recipe, check out the Garlic Parmesan Corn on the Cob section. {{image_4}} To change up the flavor, you can add more spices. Try adding chili powder for heat. You can also mix in some Italian herbs, like oregano or basil. They give a fresh lift. If you love herbs, fresh cilantro is a great choice. Just chop it fine and add it to your garlic butter mix. This will make your corn taste even better! Parmesan is great, but other cheeses can work too. For a creamier taste, use feta cheese. It adds a nice tang. If you want something sharper, try aged cheddar. It gives a bold kick. You can even use vegan cheese if you prefer. Just make sure it melts well. Each cheese choice will give your corn a unique twist. Serving corn on the cob can be fun and playful. Try cutting the corn into smaller pieces for easy sharing. You can also serve it on skewers for a fun touch. Drizzle it with a spicy sauce for extra flavor. If you want a fancy look, sprinkle some microgreens on top. They add color and freshness. For the full recipe, check out the detailed steps to make this dish shine! After enjoying your Garlic Parmesan Corn on the Cob, you may have some left. It’s best to store it in an airtight container. Let the corn cool to room temperature first. Wrap each ear in plastic wrap or foil for extra protection. This keeps it fresh and tasty for later. Store the container in the fridge. It can last about 3 to 4 days. When you’re ready to enjoy the leftover corn, reheating it is simple. You can use the microwave, grill, or oven. For the microwave, place the corn on a plate and cover it with a damp paper towel. Heat in short bursts of 30 seconds. Check to see if it’s warm. If using the grill, wrap the corn in foil to avoid drying out. Heat for about 5 to 7 minutes. For the oven, preheat to 350°F (175°C) and bake wrapped corn for 10 to 15 minutes. Freezing is a great option if you want to save the corn for a long time. Husk the corn and cut the kernels off the cob if you prefer. Place the kernels in a freezer bag, removing as much air as possible. Label the bag with the date. You can also freeze whole cobs. Wrap each cob in plastic wrap and place it in a freezer bag. The corn can last up to 6 months in the freezer. When you’re ready to use it, thaw in the fridge overnight before reheating. You can pair Garlic Parmesan Corn on the Cob with many easy side dishes. Some great options include: - Grilled chicken or fish - Fresh salad with vinaigrette - Coleslaw for crunch - Roasted potatoes for heartiness - Tomato and mozzarella salad for freshness These sides complement the sweet, buttery flavor of the corn. They also create a colorful plate. Yes, you can make Garlic Parmesan Corn on the Cob in the oven. Preheat your oven to 400°F (200°C). Wrap the corn tightly in aluminum foil to keep it moist. Bake for 20-25 minutes. Turn the foil halfway through cooking. This method gives you tender corn, full of flavor. To prevent the corn from sticking to the grill, follow these tips: - Preheat the grill to medium-high heat. - Brush the grill grates with oil before placing the corn. - Make sure to coat the corn with the garlic butter mixture. This keeps it moist and adds flavor. - Rotate the corn every few minutes to avoid sticking. These steps help you achieve perfectly grilled corn every time. Enjoy your cooking! Making Garlic Parmesan Corn on the Cob is simple and fun. We covered the best ingredients, tools, and methods. Preheating is key, and the garlic butter really adds flavor. You learned grilling tips and how to customize with herbs or spices. Don't forget about storage and reheating for later. Enjoy your delicious corn, and share it with friends. Each bite can bring smiles, making it worth the effort. Now, get cooking!](https://goldendishy.com/wp-content/uploads/2025/07/bd43f489-c25e-441e-8123-0082a4d55c21-768x768.webp)
![- 2 medium zucchinis, grated - 2 medium carrots, grated - 1/2 cup all-purpose flour - 1/4 cup grated Parmesan cheese - 1 large egg - 2 green onions, finely chopped - 2 cloves garlic, minced - 1 teaspoon dried oregano - 1/2 teaspoon salt - 1/4 teaspoon black pepper - Olive oil for frying These ingredients form the base of your zucchini carrot fritters. The grated zucchini and carrots give them a fresh taste and bright color. The flour and cheese help bind everything together, while the egg adds richness. Don’t forget the seasonings! They bring out all the flavors. - Fresh herbs like parsley or dill - Additional cheese variants such as feta or cheddar These optional ingredients can elevate your fritters. Fresh herbs add a burst of flavor and color. You can also mix in different cheeses for a unique twist. - Gluten-free options: Use almond flour or gluten-free flour - Dairy-free alternatives: Replace cheese with nutritional yeast If you need to make dietary changes, these substitutions work well. Gluten-free flour keeps the fritters light and fluffy. Nutritional yeast adds a cheesy flavor without dairy. You can still enjoy delicious fritters that fit your needs. Check the [Full Recipe] for more details! - Grating Vegetables Start by grating the zucchinis and carrots. I use a box grater for this. It makes the job easy and quick. - Removing Excess Moisture After grating, place the vegetables in a clean kitchen towel. Twist and squeeze to remove as much liquid as possible. This step is key. It helps the fritters stay firm and not soggy. - Combining Dry and Wet Ingredients In a large bowl, mix the drained zucchini and carrot with flour, Parmesan cheese, egg, green onions, garlic, oregano, salt, and pepper. Stir well to combine. You want a smooth and even mixture. - Ensuring a Cohesive Mixture Check that all ingredients are mixed thoroughly. The batter should hold together well. This cohesive mixture is vital for great fritters. - Heating the Skillet Heat a non-stick skillet over medium heat. Add a couple of tablespoons of olive oil. Wait until the oil is hot and shimmering but not smoking. - Frying Tips for Crispiness Scoop about 2 tablespoons of the fritter mix into the skillet. Flatten each scoop gently with a spatula. This helps them cook evenly. Fry each fritter for about 3-4 minutes on each side. Look for a golden brown color and a crispy texture. If needed, fry in batches, adding more oil as you go. Serve them warm, and enjoy the tasty crunch! For the full recipe, check out the [Full Recipe]. To make great zucchini carrot fritters, moisture removal is key. Grated vegetables hold a lot of water. If you don’t squeeze them dry, your fritters turn out soggy. After grating, use a clean kitchen towel. Place the veggies in the towel and twist it tightly. This method gets rid of extra liquid, ensuring crispy fritters. Cooking temperature control is also important. Use medium heat for frying. If the temperature is too low, the fritters will absorb too much oil. If it's too high, they will burn on the outside and stay raw inside. A good test is to add a small bit of batter to the pan. If it sizzles right away, you're ready to go! For dipping sauces, yogurt pairs perfectly. You can also try a spicy mayo or tzatziki. These sauces enhance the flavors and add creaminess. For sides, serve your fritters with a crisp salad or roasted veggies. Both options balance the meal nicely. Adding spices can elevate your fritters. Try a pinch of cayenne for heat or smoked paprika for depth. Herbs like dill or parsley can also add freshness. You can mix in other vegetables too. Finely chopped bell peppers or spinach work well. They add color and nutrition, making your fritters even better. For the full recipe, check out the complete guide above! {{image_4}} You can switch up the flavors in your zucchini carrot fritters to keep things interesting. - Spicy Zucchini Carrot Fritters: Add some heat! Mix in chopped jalapeños or red pepper flakes. This will give your fritters a nice kick. You can also serve them with a spicy dipping sauce. - Mediterranean-Inspired Fritters: Want a fresh twist? Use feta cheese, fresh dill, and olives in your batter. These flavors will transport you to the sunny Mediterranean coast. You can easily modify this recipe to fit your dietary needs. - Vegan Version: Replace the egg with a flaxseed or chia seed mix. Combine 1 tablespoon of seeds with 2.5 tablespoons of water. Let it sit until it becomes gel-like. This will bind your fritters well. - Low-Carb Options: For a low-carb twist, swap all-purpose flour for almond flour. This keeps your fritters tasty and lower in carbs. The shape and size of your fritters can change how you serve them. - Mini Bites for Appetizers: Form smaller fritters for easy snacking. They are perfect for parties and gatherings. Just adjust the cooking time to avoid burning. - Larger Fritters for Main Dishes: Make bigger fritters for a hearty meal. Serve them with a salad for a complete dish. They also hold up nicely on a bun for a veggie burger. You can find the full recipe for zucchini carrot fritters above. Enjoy experimenting with these variations to suit your taste! How do you store leftover fritters? Place them in an airtight container. Use parchment paper between layers to keep them crisp. This helps prevent sogginess. What are the best practices for freshness? Store fritters in the fridge for up to three days. Keep the container sealed tight. This keeps them tasty and prevents drying out. Should you freeze fritters before or after cooking? You can freeze them both ways. For the best texture, freeze them uncooked. It helps keep them crisp when cooked later. What are the thawing and reheating tips? Thaw the fritters in the fridge overnight. Reheat them in a skillet over medium heat. Add a little oil for that crispy edge. How long do refrigerated fritters last? They stay good for about three days in the fridge. After that, the texture and flavor may change. What is the freezer storage timeframe? Frozen fritters can last up to two months. Make sure they are in a sealed bag or container. This protects against freezer burn. For more details, check the [Full Recipe]. Yes, you can use frozen zucchini or carrots. However, they will change the texture and flavor. Frozen veggies often hold more water. This extra moisture can make fritters soggy. If you use frozen, let them thaw and squeeze out the water. After that, they can work well in your fritters. To make fritters crispy, focus on a few key tips. First, remove as much moisture as possible from the grated vegetables. Use a clean towel to squeeze out water. Next, heat your oil until it's hot but not smoking. Fry fritters in small batches and leave space between them. This way, they cook evenly. You have many tasty options for dips. Here are some favorites: - Greek yogurt with lemon juice - Spicy sriracha mayo - Creamy ranch dressing - Simple tzatziki sauce These dips add flavor and complement the fritters well. They enhance the meal, making it even more enjoyable. For a full recipe, check the details above! Zucchini and carrot fritters are simple to make and delicious. We covered essential ingredients, like grated veggies, flour, and cheese. You learned how to prepare, mix, and fry the batter for perfect bites. I shared tips to ensure crispness and flavor, plus variations for diets. Don’t forget to store any extras properly! Now you can enjoy these fritters at any meal, with great dips, or as snacks. Have fun cooking and experimenting with these ideas!](https://goldendishy.com/wp-content/uploads/2025/06/18ed450f-8e43-4a66-9091-0bc3385fc8fe-768x768.webp)