Roasted Cauliflower Tacos Flavorful and Simple Meal


Looking for a delicious meal that’s easy to make? Roasted cauliflower tacos might be your new favorite option! They offer a perfect blend of flavors and textures. Plus, with a few simple ingredients and some handy tips, you can craft these tasty tacos in no time. Ready to impress your taste buds? Let’s dive into this simple and flavorful recipe!
Why I Love This Recipe
- Flavorful Roasting: The roasted cauliflower develops a rich, caramelized flavor that pairs perfectly with the spices.
- Healthy Ingredients: Packed with nutritious vegetables and healthy fats, these tacos are a guilt-free indulgence.
- Customizable Toppings: Feel free to add your favorite toppings like salsa, hot sauce, or different vegetables to make them your own.
- Quick and Easy: With minimal prep and cooking time, these tacos are perfect for a weeknight dinner.
Ingredients
Main Ingredients
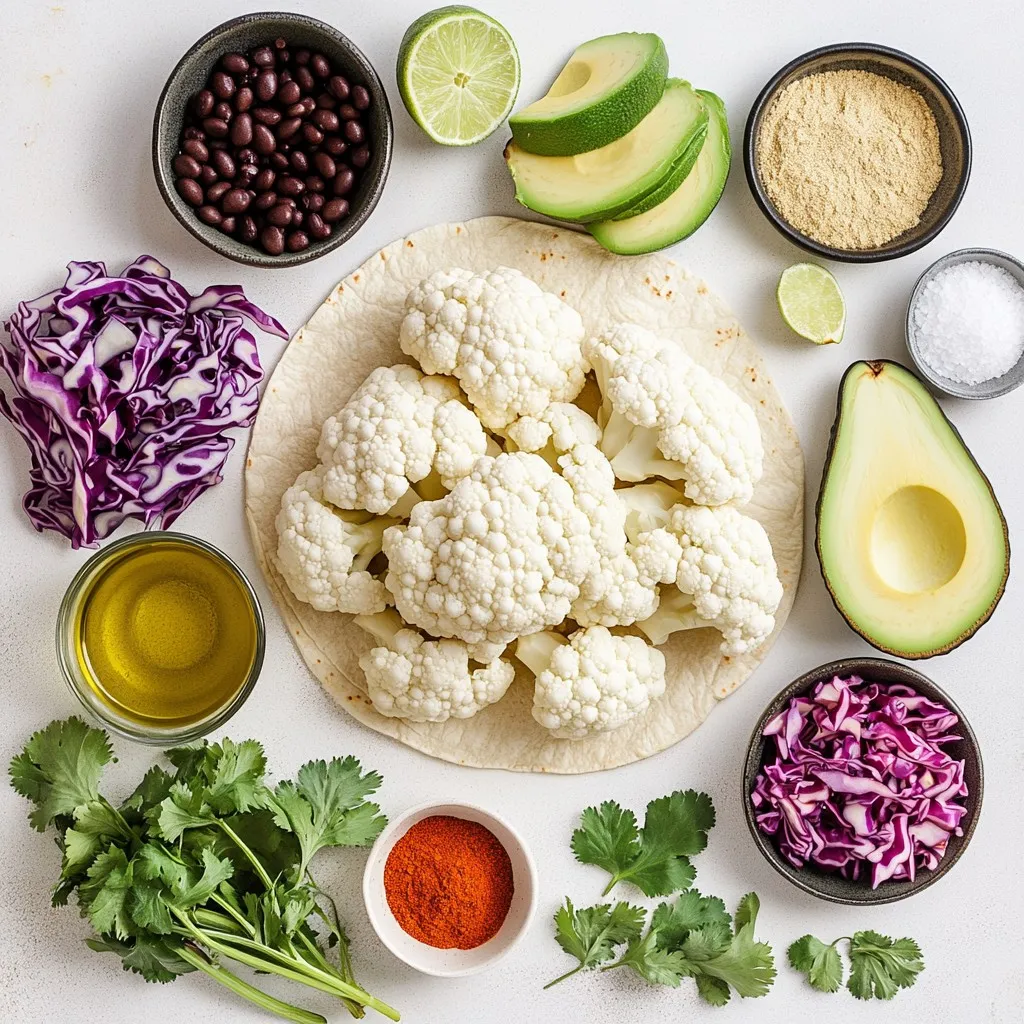
– 1 medium cauliflower, cut into bite-sized florets
– 2 tablespoons extra-virgin olive oil
– 1 teaspoon smoked paprika
– 1 teaspoon ground cumin
– 1 teaspoon garlic powder
– Sea salt and freshly cracked black pepper, to taste
– 8 small corn tortillas
– 1 cup canned black beans, drained and rinsed
– 1 ripe avocado, sliced
– 1 cup red cabbage, finely shredded
– 1/4 cup fresh cilantro, chopped
– Lime wedges, for serving
Roasted cauliflower tacos are simple and tasty. You need fresh cauliflower florets as the star. They give a nice texture and flavor. The olive oil adds richness, making them crisp. Smoked paprika provides a warm, smoky taste. Ground cumin and garlic powder add depth to the dish.
For toppings, I love using black beans. They add protein and make the meal filling. Avocado slices bring creaminess, while red cabbage adds a crunchy bite. Fresh cilantro brightens the tacos and adds color. Lime wedges are great for squeezing on top. This mix of ingredients makes tasty tacos everyone will enjoy.
Step-by-Step Instructions
Preparing the Cauliflower
Preheating the oven: Start by preheating your oven to 450°F (230°C). This high heat helps the cauliflower roast well.
Mixing seasonings: In a big bowl, mix together two tablespoons of olive oil, one teaspoon of smoked paprika, one teaspoon of ground cumin, and one teaspoon of garlic powder. Add a pinch of sea salt and fresh black pepper.
Coating the cauliflower: Take one medium cauliflower, cut it into bite-sized florets, and toss them in the bowl. Use your hands or a spatula to coat all the florets with the seasoning mix. Each piece should be well covered.
Roasting Process
Spreading on a baking sheet: Spread the seasoned cauliflower in a single layer on a baking sheet. Make sure the pieces are not crowded so they can roast evenly.
Cooking time and flipping tips: Roast the cauliflower for 25 to 30 minutes. Flip them halfway through cooking to brown them on all sides. When they are golden and tender, they are ready to come out.
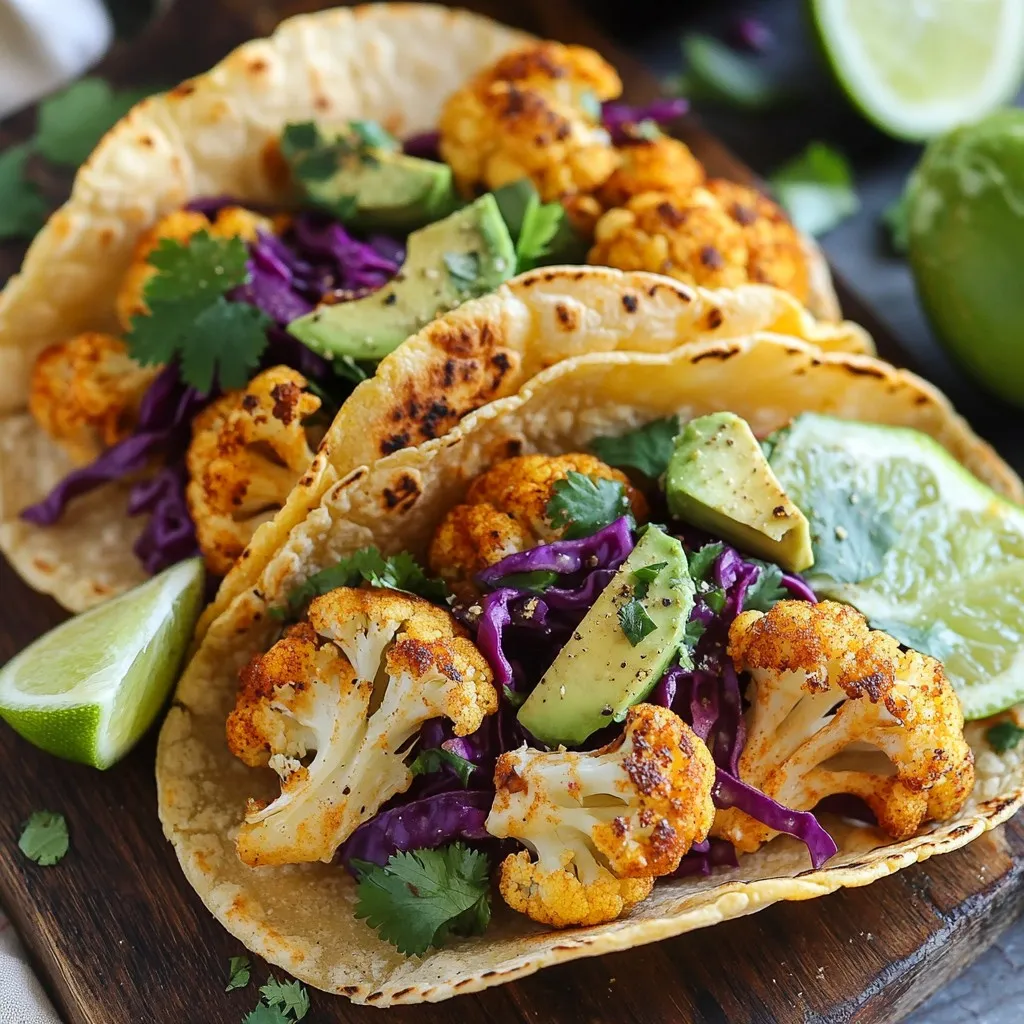
Assembling the Tacos
Warming the tortillas: While the cauliflower roasts, heat eight small corn tortillas. Place them in a dry skillet over medium heat. Heat each side for about one minute until they are soft. Wrap them in a towel to keep warm.
Building the taco layers: Once the cauliflower is roasted, it’s time to assemble the tacos. On each warm tortilla, add a scoop of roasted cauliflower. Top it with black beans, slices of avocado, and some shredded red cabbage for crunch.
Final touch: Sprinkle chopped cilantro on top and serve your tacos with lime wedges for a fresh squeeze of flavor.
Tips & Tricks
Achieving Perfectly Roasted Cauliflower
To make the best roasted cauliflower, set your oven to 450°F (230°C). This high heat helps the cauliflower brown well. Roast the florets for 25-30 minutes. Flip them halfway through cooking for even browning. The perfect texture is golden and tender when you pierce it with a fork.
Tortilla Preparation
Choose small corn tortillas for this dish. They add a nice flavor and texture. Warm them in a dry skillet over medium heat for about 1 minute on each side. This makes them soft and easy to fold. You can also heat them in the oven, wrapped in foil, if you prefer.
Enhancing Flavor
Spice things up with smoked paprika, garlic powder, or ground cumin. These spices will make your tacos burst with flavor. For toppings, try fresh cilantro, sliced avocado, or crunchy red cabbage. A squeeze of lime adds a bright touch. Pair your tacos with salsa for extra zest and enjoyment.
Pro Tips
- Choose the Right Cauliflower: Select a medium-sized cauliflower with tightly packed florets and vibrant green leaves for the best flavor and texture.
- Experiment with Spices: Feel free to mix in other spices like chili powder or turmeric for an added flavor kick and health benefits.
- Keep Tortillas Warm: After warming the tortillas, keep them wrapped in a towel to maintain their softness until serving.
- Customize Your Toppings: Use your favorite toppings such as pickled onions or a dollop of sour cream to personalize your tacos!
Variations
Protein Additions
You can easily make these tacos heartier. One way is by adding more beans. Black beans provide a great protein boost. Simply mix them in with the roasted cauliflower. You can also add pinto beans for extra flavor.
Another option is to use plant-based meats. Look for items like soy chorizo or lentil patties. These can add a nice texture and taste. Just cook them according to the package instructions, and mix them with your cauliflower.
Creative Topping Ideas
Toppings can really make your tacos shine. Try alternative veggie toppings for more crunch. Radishes or sliced jalapeños can add a fresh kick. You might also enjoy some diced tomatoes or corn for sweetness.
For added flavor, consider sauces or dressings. A zesty lime crema or spicy chipotle sauce works wonders. Just drizzle a bit on top before serving. This will elevate your tacos and make them even more enjoyable.
Different Tortilla Choices
Tortillas are the base of your tacos. You can switch things up with whole wheat or flour tortillas. Whole wheat adds a nutty flavor and extra fiber. Flour tortillas are soft and easy to fold.
If you need gluten-free options, corn tortillas are a perfect choice. They are tasty and easy to find. Just warm them up in a dry skillet and fill them with your delicious toppings. Enjoy the flexibility of making these tacos your own!
Storage Info
Refrigeration Tips
To store leftover roasted cauliflower, let it cool first. Place it in an airtight container. Keep it in the fridge for up to three days. This will help keep the flavor fresh. For the tortillas, wrap them in foil or plastic. This keeps them soft and prevents them from drying out.
Reheating Recommendations
To reheat tacos, use a skillet over medium heat. This warms them nicely without making them soggy. You can also microwave them for about 30 seconds. Just be careful not to overheat, or they will lose their crunch. If you want to keep the texture, try reheating the cauliflower in the oven. This helps it stay crispy.
Freezing Options
You can freeze roasted cauliflower for later use. Place cooled florets in a freezer bag. Squeeze out all the air before sealing it. It will last for up to three months. To thaw, put the bag in the fridge overnight. For meals, you can roast it again or add it to soups and stews.
FAQs
How do I know when the roasted cauliflower is done?
You can tell when the roasted cauliflower is done by looking for a few signs. First, the florets should be golden brown. This color means they are caramelizing well. Second, they should feel tender when you pierce them with a fork. If they are soft, they are ready to go!
– Signs of doneness:
– Golden brown color
– Tender texture when pierced
Can I make this recipe ahead of time?
Yes, you can make this recipe ahead of time. Roasted cauliflower can last in the fridge for about three to four days. Just store it in an airtight container. You can also warm it up before serving.
– Preparing in advance:
– Roast cauliflower and let it cool.
– Store in an airtight container.
– Storage recommendations:
– Keep in the fridge for up to four days.
– Reheat in the oven for best results.
What are some side dishes to serve with Roasted Cauliflower Tacos?
Roasted cauliflower tacos taste great with many side dishes. You can serve them with a fresh salad or some Mexican rice. These sides add color and flavor. They also help balance the meal.
– Suggestions for complementary sides:
– Fresh garden salad
– Mexican rice or quinoa
– Spicy black bean soup
– Balancing flavors and textures:
– Choose crunchy sides to contrast the soft tacos.
– Add zesty dips like salsa or guacamole for extra flavor.
This blog post covered everything you need for tasty roasted cauliflower tacos. We explored key ingredients, from cauliflower florets to your favorite toppings. I shared steps for preparing and roasting the cauliflower, plus tips for perfect tortillas. You can customize these tacos with proteins or creative toppings. Finally, don’t forget storage tips for leftovers! Enjoy the fun of making and sharing these tacos. They bring flavor and joy to your meal

Roasted Cauliflower Tacos
Ingredients
- 1 medium cauliflower, cut into bite-sized florets
- 2 tablespoons extra-virgin olive oil
- 1 teaspoon smoked paprika
- 1 teaspoon ground cumin
- 1 teaspoon garlic powder
- to taste sea salt and freshly cracked black pepper
- 8 small corn tortillas
- 1 cup canned black beans, drained and rinsed
- 1 ripe avocado, sliced
- 1 cup red cabbage, finely shredded
- 1 4 fresh cilantro, chopped
- for serving lime wedges
Instructions
- Preheat the oven to 450°F (230°C).
- In a large mixing bowl, combine the cauliflower florets with olive oil, smoked paprika, ground cumin, garlic powder, and a generous pinch of sea salt and black pepper. Toss well until all florets are fully coated.
- Spread the seasoned cauliflower florets in a single layer on a baking sheet. Roast for 25-30 minutes, flipping halfway through, until golden and tender.
- While the cauliflower is roasting, warm the corn tortillas in a dry skillet over medium heat for about 1 minute on each side until soft and pliable. Stack and wrap in a clean kitchen towel to keep warm.
- On each warm tortilla, add a generous scoop of the roasted cauliflower.
- Top the cauliflower with black beans, slices of avocado, and shredded red cabbage.
- Sprinkle chopped cilantro over the top and serve immediately with lime wedges.


![- 1 pound boneless, skinless chicken breasts - 6 cups low-sodium chicken broth - 1 medium onion, finely chopped - 2 cloves garlic, minced - 2 medium carrots, diced - 2 stalks celery, diced - 1 cup orzo pasta - 3 large eggs - 1/2 cup freshly squeezed lemon juice (about 2-3 lemons) This soup starts with tender chicken. I prefer boneless, skinless chicken breasts. They cook fast and stay juicy. Next, low-sodium chicken broth gives the soup its rich base. Fresh veggies add flavor and nutrition. Onion, garlic, carrots, and celery create a perfect mix. I chop them finely for even cooking. Orzo pasta makes the soup filling. It cooks well in the broth, soaking up all the flavors. To achieve that creamy texture, I use eggs and lemon juice. The eggs blend with the broth, creating a silky finish. Fresh lemon juice brightens the soup, making every bite refreshing. - 1 teaspoon dried oregano - 1 teaspoon sea salt - 1/2 teaspoon freshly ground black pepper - 2 tablespoons extra-virgin olive oil Seasoning is key in this recipe. Dried oregano adds a hint of earthiness. Sea salt and black pepper enhance the natural flavors. I always choose extra-virgin olive oil for sautéing. It has a wonderful taste and is healthy too. - Fresh parsley, finely chopped - Lemon wedges for serving Garnishes make a dish special. Fresh parsley adds color and freshness. I sprinkle it on top before serving. Lemon wedges are great for those who want extra zing. They brighten the dish and add a punch of flavor. For the full recipe, check out the Mediterranean Lemon Chicken Orzo Soup! It’s a perfect guide to make this comforting dish. Start by chopping the vegetables. You will need to dice the onion, carrots, and celery. Next, shred the cooked chicken. This can be done easily with two forks. For the egg mixture, whisk together the eggs and lemon juice in a medium bowl. Make sure they blend well. In a large pot, heat two tablespoons of olive oil over medium heat. Once hot, add the chopped onion, diced carrots, and celery. Sauté these vegetables for about 5 to 7 minutes. They should become tender and fragrant. Now, stir in two minced garlic cloves. Cook for one more minute. You want the garlic to smell wonderful, but not brown. Add the chicken breasts into the pot. Pour in six cups of low-sodium chicken broth. Increase the heat slightly and bring it to a gentle simmer. Let the chicken cook for 15 to 20 minutes. Once fully cooked, carefully remove the chicken from the pot and set it aside to cool. When cool, shred the chicken into bite-sized pieces. Return to the pot and add one cup of orzo pasta. Let the soup simmer for 8 to 10 minutes, stirring to prevent sticking. In your mixing bowl, you have the whisked eggs with lemon juice. Now, temper the eggs by slowly adding a ladleful of hot broth from the pot. Whisk constantly to prevent the eggs from cooking too quickly. Gradually mix the egg mixture back into the soup. This will give your soup a creamy texture. Now it’s time to adjust the seasoning. Taste the soup and add sea salt and black pepper as needed. Finally, garnish your soup with fresh parsley before serving. This adds a nice color and fresh flavor. Enjoy your comforting bowl of Greek lemon chicken soup! For the full recipe, see the detailed instructions above. - Choosing the right type of chicken: I recommend using boneless, skinless chicken breasts. This cut cooks quickly and stays tender in the soup. It also absorbs the rich flavors of the broth well. - Adjusting salt levels for broth versus soup: Start with low-sodium chicken broth. Taste as you cook, and add salt as needed. This way, you control the saltiness without overwhelming the dish. - Techniques for tempering eggs properly: To prevent egg curdling, whisk the eggs and lemon juice in a bowl. Slowly add hot broth while whisking. This warms the eggs without cooking them. - Continuous whisking for a smooth texture: Keep whisking as you add the broth. This ensures a creamy, smooth texture in your soup. It’s key for that authentic Greek flavor. - Suggestions for family dinners or special occasions: Greek Lemon Chicken Soup is perfect for family dinners. Serve it on cozy nights or special occasions like holidays. It brings warmth and comfort to the table. - Pairing with sides for a complete meal: I love pairing this soup with a fresh Greek salad or crusty bread. These sides complement the soup and make a full meal. Enjoy your cooking adventure with this classic dish! Check out the [Full Recipe] for step-by-step details on making this delightful soup. {{image_4}} If you can't find orzo, don't worry! You can use other small pasta shapes, like ditalini or acini di pepe. Both work great in this soup. For those who need gluten-free options, try rice or quinoa. These grains add texture and flavor while keeping the dish gluten-free. You can make your soup even better by adding greens. Spinach or kale works well. Simply toss them in during the last few minutes of cooking. This adds color and nutrients. You can also enhance the flavor by using herbs. Fresh dill or basil adds a lovely aroma and taste. Try adding a handful of either herb for a bright twist. If you want a meatless version, you can replace the chicken with plant-based proteins. Tofu or chickpeas are good choices. They soak up the soup's flavors nicely. Use vegetable broth instead of chicken broth to keep the taste rich and savory. This way, everyone can enjoy a bowl of this comforting soup! For the full recipe, check out the Mediterranean Lemon Chicken Orzo Soup . To keep your Greek Lemon Chicken Soup fresh, let it cool first. Pour it into airtight containers. Make sure to store it in the fridge. It should stay good for about 3 to 4 days. Always label your containers with the date. This helps you track how long it’s been there. When reheating, do it gently. You can use the stove or microwave. If using the stove, heat it on low heat. Stir often to prevent sticking. If it seems thick, add a splash of broth or water. This keeps the soup nice and smooth. To freeze Greek Lemon Chicken Soup, let it cool completely. Pour it into freezer-safe bags or containers. Remove as much air as possible. It can last up to 3 months in the freezer. When you’re ready to eat, thaw it in the fridge overnight. Reheat gently to enjoy the same great flavor. Greek Lemon Chicken Soup, also known as Avgolemono, is a classic dish. It features tender chicken, bright lemon, and creamy eggs. This soup warms the heart and soul, especially during cold months. It is a staple in Greek homes and often appears at family gatherings. The mix of flavors showcases the essence of Greek cooking. To achieve a creamy texture, temper the eggs. Whisk eggs and lemon juice together in a bowl. Gradually add hot broth while whisking. This method prevents the eggs from scrambling. Slowly stir the egg mixture back into the soup. This creates a smooth and velvety finish. Avoid boiling the soup after adding the egg to keep it creamy. Yes, you can make this soup ahead of time. Prepare the soup but skip adding the egg mixture until serving. Store the soup in an airtight container in the fridge for up to three days. When ready to serve, reheat gently and add the egg mixture. This keeps the soup fresh and creamy. This soup pairs well with a simple Greek salad. You can also serve it with warm pita bread or crusty bread. For a lighter meal, consider grilled vegetables on the side. These options enhance the flavors and create a lovely dining experience. In this post, I shared how to make Greek Lemon Chicken Soup. You learned about the key ingredients, like chicken, orzo, and the egg-lemon mixture that gives the soup its creamy texture. I provided steps for preparation, cooking, and tips for keeping the soup delicious and authentic. Don't hesitate to mix it up with different ingredients or share it with others. Enjoy this comforting dish anytime!](https://goldendishy.com/wp-content/uploads/2025/06/4ca94f54-e42c-42a8-b75c-f7048ee8bbd9-768x768.webp)
![To make Avocado Lime Crema Tacos, you need some fresh and simple ingredients. Here’s what you will need: - Fresh produce: - 2 ripe avocados - 1 cup cherry tomatoes, halved - 1 cup shredded red cabbage - 1/2 cup fresh cilantro leaves, roughly chopped - Pantry staples: - 8 small corn tortillas - 1/2 cup Greek yogurt - 2 tablespoons fresh lime juice - Zest of 1 lime - 1 clove garlic, finely minced - 1/4 teaspoon ground cumin - Sea salt, to taste - Optional toppings: - Sliced jalapeños - Radish slices - Crumbled feta cheese When you gather these ingredients, aim for ripe avocados. They will make your crema smooth and creamy. Fresh cilantro adds a burst of flavor to the tacos. You can also adjust the optional toppings based on your taste. If you want more heat, add jalapeños. For a crunchy touch, sprinkle some radish slices. You can find the full recipe in the article for detailed steps. Enjoy the fresh tastes of these tacos! To start, grab your food processor. Add the ripe avocados, Greek yogurt, fresh lime juice, lime zest, minced garlic, ground cumin, and a pinch of sea salt. Blend it all together until smooth and creamy. If it seems too thick, add a bit more lime juice. Taste it and adjust the salt or lime juice to your liking. A little extra zing can really elevate the flavor! Use a non-stick skillet for this step. Heat it over medium heat. Toast each corn tortilla for about 30 seconds on one side. Flip it and toast for another 30 seconds. The tortillas should feel warm and soft. Once done, stack them and wrap them in a clean kitchen towel to keep them warm. This keeps them from getting dry. Now, take a warm tortilla and spread a generous dollop of your avocado lime crema right in the center. Next, add a handful of shredded red cabbage for crunch. Layer on some halved cherry tomatoes for a fresh bite. Finally, sprinkle chopped fresh cilantro on top for a burst of flavor. For a fun twist, try adding some sliced jalapeños for heat, radish slices for crunch, or crumbled feta cheese for a savory touch. Serve your tacos right away. Enjoy them while they are fresh and bursting with flavor! Remember, you can find the full recipe [here]. You can switch up the base in your crema. Try sour cream or Greek yogurt for a tangy twist. If you want a dairy-free option, use silken tofu or cashew cream. For extra flavor, add herbs like cilantro or dill. You can also mix in spices such as smoked paprika or chipotle for a smoky kick. To balance flavors, add a mix of textures. Use crunchy cabbage, juicy tomatoes, and creamy crema. These layers make each bite exciting. To avoid tearing the tortillas, warm them first. Heat them in a skillet for about 30 seconds on each side. This softens them, making them easier to fold without breaking. Pair your tacos with simple sides. A fresh salad or rice works well. You might also enjoy them with a light drink like agua fresca or sparkling water. For garnishes, lime wedges and extra cilantro make your tacos look vibrant and fresh. These touches enhance both taste and presentation. For the Full Recipe, refer to the earlier section. {{image_4}} For a tasty vegetarian or vegan taco, swap Greek yogurt for cashew cream or coconut yogurt. Both options keep the creamy texture and flavor. You can also add black beans or roasted chickpeas for protein. These legumes add a nice texture and a mild flavor. Toss in some grilled zucchini or bell peppers for extra color and taste. Fresh herbs like mint or basil can bring a surprise twist. If you want to add protein, consider grilled chicken or shrimp. Marinate chicken in lime juice, garlic, and cumin for at least 30 minutes before grilling. For shrimp, a quick toss with olive oil and lime juice works well. Both options cook fast, making them easy to prepare. You could also try seared steak or fish for a heartier bite. Just remember to let the meat rest before slicing to keep it juicy. Tacos can take on many flavors based on where you are. In Mexico, you might find tacos with carne asada, topped with fresh cilantro and onions. In California, fish tacos with mango salsa are popular. Seasonal ingredients can also add a fresh touch. In summer, add sweet corn or peaches. In fall, roasted butternut squash or cranberries can provide a warm, cozy vibe. Each variation opens a new door to flavor! For full recipe details, check out the [Full Recipe]. You can store leftover tacos in different ways. If you have assembled tacos, wrap them in foil or plastic wrap. This keeps them fresh for a short time. Unassembled tacos store better. Keep the tortillas, crema, and toppings separate. Use airtight containers for each. This helps keep everything fresh. - Assembled Tacos: Wrap well in foil or plastic wrap. - Unassembled Tacos: Store tortillas, crema, and toppings in airtight containers. Store everything in the fridge. Consume within two days for best taste. To reheat tortillas, use a skillet. Heat it on medium for a few minutes. Place the tortilla for about 15 seconds on each side. This warms them without losing their texture. For the crema, avoid reheating. Instead, store it in the fridge. Use it cold or at room temperature. This keeps the fresh flavor. - Tortilla Method: Heat on medium in a skillet for 15 seconds per side. - Crema Storage: Keep it cold or at room temperature. These simple steps ensure your Avocado Lime Crema Tacos stay delicious! You can add heat with sliced jalapeños. Place them on top of the crema. For more heat, use hot sauce. A few drops can spice things up without being too much. Try different hot sauces to find your favorite flavor. This small change can make your tacos zing! Yes, you can make the crema ahead of time. Store it in an airtight container in the fridge. It stays fresh for about two days. To keep the color bright, add a little extra lime juice. Stir before using to bring back its smooth texture. If you can't find corn tortillas, use flour tortillas instead. They are soft and easy to fold. You can also use lettuce leaves for a low-carb option. For gluten-free diets, look for rice or almond flour tortillas. Each option gives a unique taste to your tacos. Yes, this recipe is great for meal prep. You can prepare the crema and store it in the fridge. Warm the tortillas before serving. Assemble the tacos just before eating to keep everything fresh. This way, you have tasty meals ready for the week with little effort. For the full recipe, check out the details above! In this article, we explored how to make tasty Avocado Lime Crema Tacos. We covered the essential ingredients, step-by-step instructions, and helpful tips for perfecting your taco assembly. You can easily customize your crema and taco fillings to suit your taste. Remember, you can prepare these tacos in advance and store leftovers for later enjoyment. Embrace these ideas to make your taco nights fun and delicious! With a little practice, you’ll impress family and friends with your new skills. Enjoy every bite!](https://goldendishy.com/wp-content/uploads/2025/07/f06e457d-602e-41ec-b362-5499d4ba2f55-768x768.webp)