
Garlic Butter Lemon Asparagus Simple and Tasty Dish
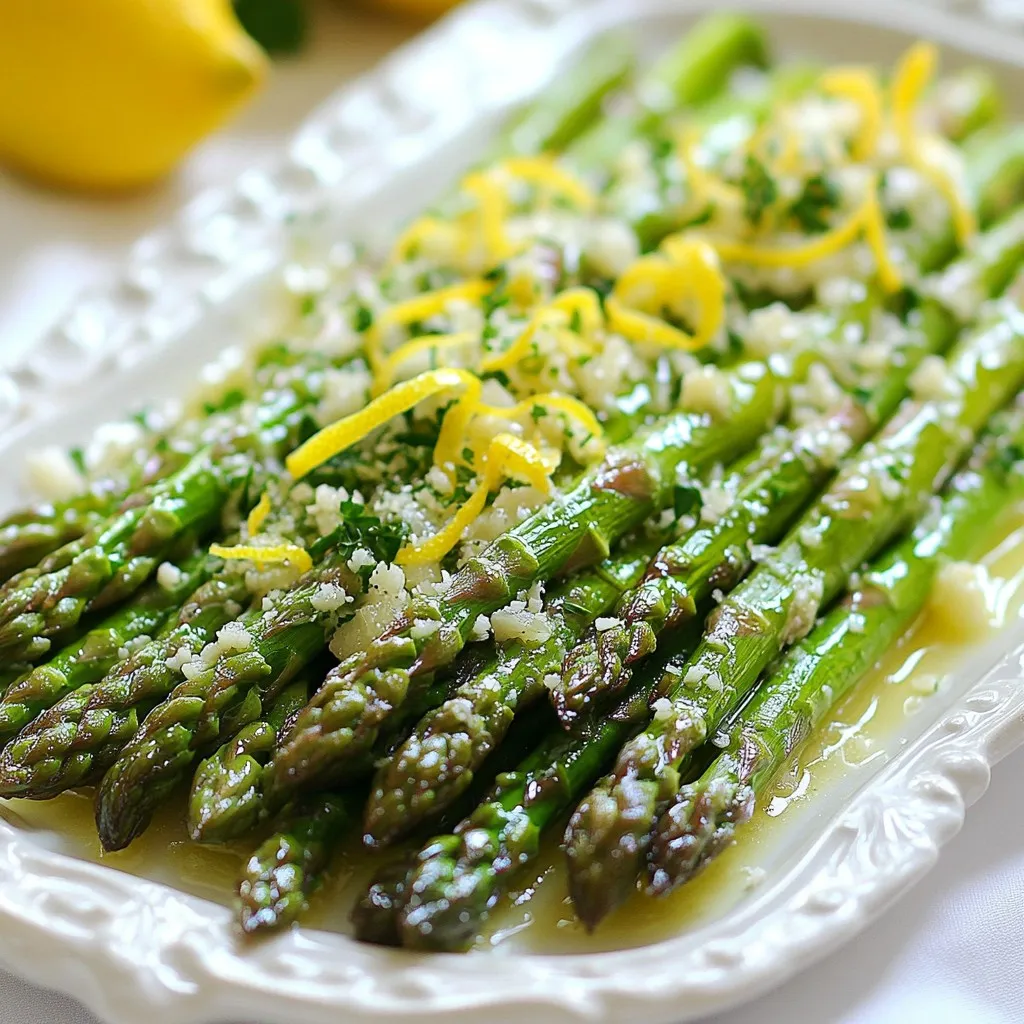

Want to impress your taste buds? Try my Garlic Butter Lemon Asparagus! This simple and tasty dish is perfect as a side or a light meal. Fresh asparagus, rich butter, zesty lemon, and garlic create a flavor that dances on your palate. Best of all, it takes just minutes to prepare. Join me as we dive into the quick steps, tips, and variations for this delicious recipe!
Why I Love This Recipe
- Freshness of Asparagus: This recipe highlights the natural flavor and crunch of fresh asparagus, making it a delightful addition to any meal.
- Garlic Butter Bliss: The combination of garlic and butter creates a rich, savory sauce that elevates the asparagus to a whole new level of deliciousness.
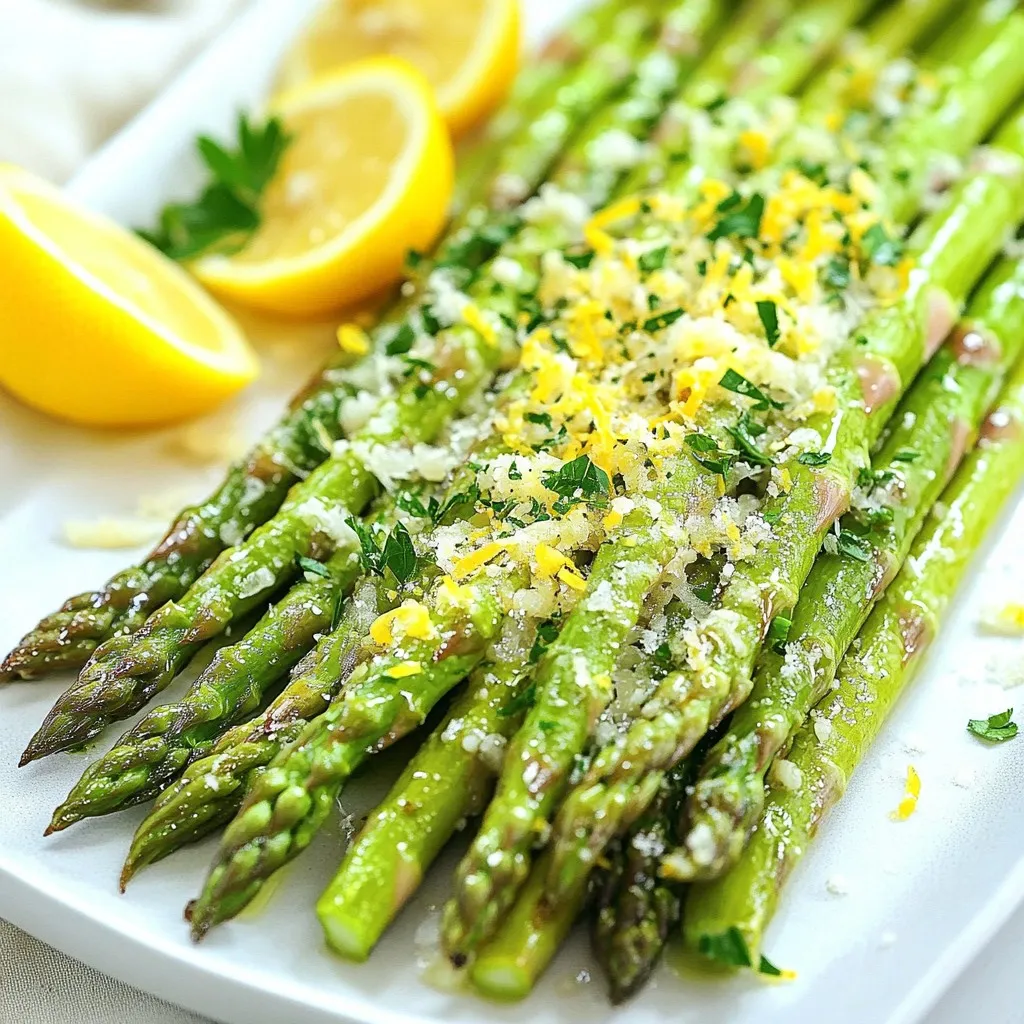
- Zesty Lemon Kick: The addition of lemon juice and zest brightens the dish, enhancing its flavors and adding a refreshing twist.
- Quick and Easy: This recipe is not only simple to prepare but also takes just 20 minutes, making it perfect for busy weeknight dinners.
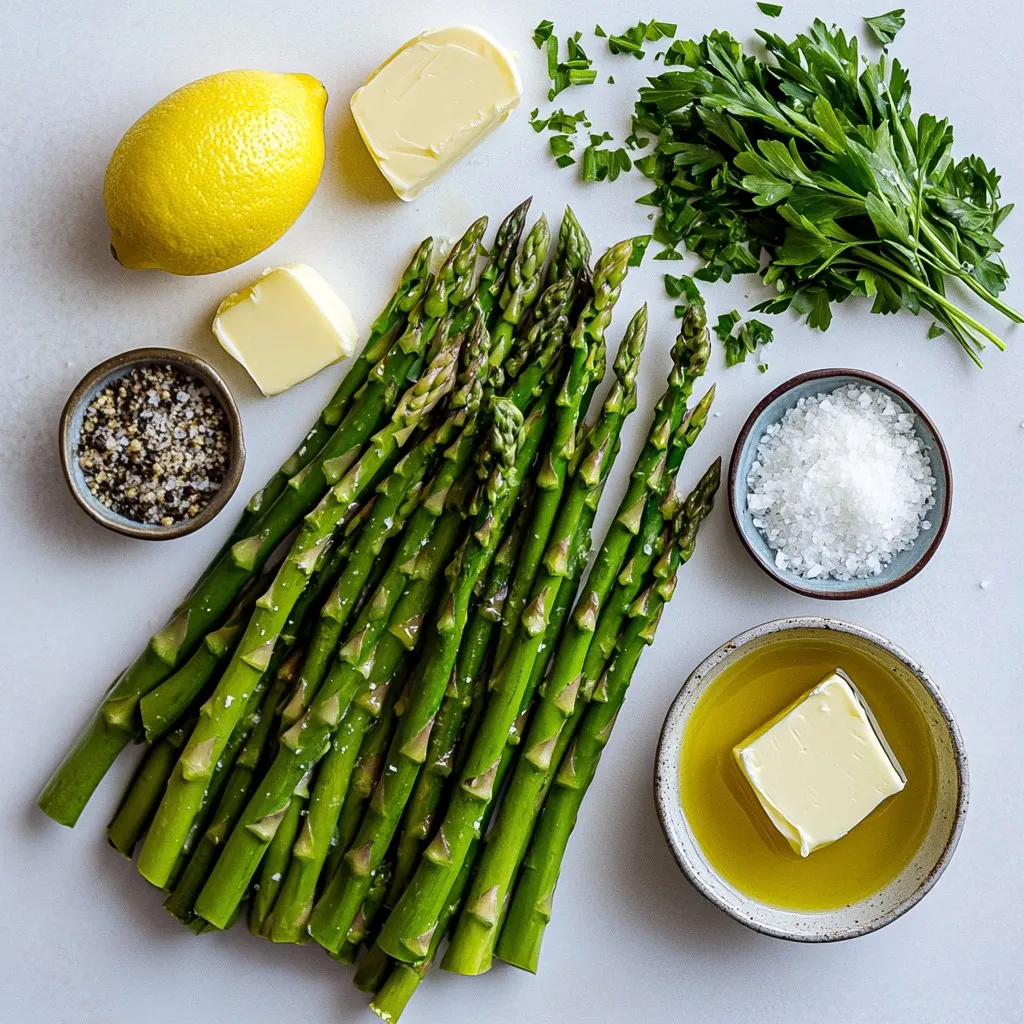
Ingredients
List of Ingredients
– 1 lb fresh asparagus, trimmed
– 3 tablespoons unsalted butter
– 4 cloves garlic, finely minced
– 1 large lemon, zested and juiced
– Salt and freshly cracked black pepper, to taste
Optional Additions
– 1 tablespoon extra virgin olive oil
– 1/4 cup freshly grated Parmesan cheese
– Fresh parsley, finely chopped for garnish
Gather these ingredients for a simple yet tasty dish. Fresh asparagus is key, ensuring a bright flavor and crisp texture. Unsalted butter adds richness, while garlic brings warmth. The juice and zest of the lemon provide a zesty kick that brightens the dish. Don’t forget the salt and black pepper to enhance the flavors.
You can add extra virgin olive oil if you want a little more depth. Parmesan cheese can give a nice, creamy finish if you choose to use it. Fresh parsley adds a pop of color and freshness, making your dish look as good as it tastes.
This combination of ingredients creates a delicious and easy dish that anyone can make!
Step-by-Step Instructions
Preparation Steps
– Begin by washing 1 pound of fresh asparagus under cold water.
– Trim the tough ends by cutting off about an inch from the base of each spear.
Cooking Process
– Heat 1 tablespoon of extra virgin olive oil in a large skillet over medium heat.
– Add the trimmed asparagus in a single layer. Sauté for 5-7 minutes. Cook until tender-crisp and bright green, stirring occasionally.
– Push the asparagus to one side of the skillet. This creates space for the next step.
– Add 3 tablespoons of unsalted butter to the empty side of the skillet. Let it melt completely.
– Stir in 4 cloves of finely minced garlic. Cook for about 1 minute. The garlic should smell fragrant and be lightly golden.
Finishing Touches
– Gently mix the asparagus with the garlic and melted butter. Ensure each piece is coated well.
– Pour in the juice from 1 large lemon and add the lemon zest. Stir to mix everything evenly.
– Season with salt and freshly cracked black pepper to taste. Mix again to combine flavors.
– If desired, sprinkle 1/4 cup of freshly grated Parmesan cheese on top.
– Remove the skillet from heat and transfer the asparagus to a serving plate.
– Garnish with finely chopped fresh parsley for a touch of color and freshness.
Tips & Tricks
Cooking Tips
To achieve tender-crisp asparagus, start with fresh spears. Trim about an inch from each end. Cook in a hot skillet for 5-7 minutes. Stir occasionally to cook evenly. You want the bright green color to shine. If you overcook, it turns mushy.
To avoid burnt garlic, add it to the pan after the asparagus cooks. Garlic burns quickly, so watch it closely. Stir it until it smells good and turns light gold. This step adds great flavor without the bitterness of burnt garlic.
Serving Suggestions
For presentation, use a clean white platter. It makes the vibrant green asparagus pop. Drizzle leftover garlic lemon butter over the top. This adds shine and flavor. Finish by sprinkling fresh parsley. It gives a nice color and fresh taste.
Pair this dish with grilled chicken or fish for a complete meal. It complements many main dishes. You can also serve it with pasta or rice for a hearty option. Enjoy the bright, zesty taste of garlic butter lemon asparagus!
Pro Tips
- Choose the Right Asparagus: Look for firm, bright green spears with tightly closed tips. Thinner asparagus tend to be more tender and flavorful.
- Perfectly Melted Butter: Keep an eye on the butter as it melts to prevent it from burning; swirling it gently can help distribute the heat evenly.
- Lemon Zest Boost: For an extra burst of flavor, consider adding a touch more lemon zest than indicated; it enhances the dish’s brightness.
- Fresh Parsley Alternatives: If fresh parsley isn’t available, try substituting with fresh basil or dill for a unique twist on the garnish.
Variations
Flavor Enhancements
To boost flavor, you can add spices or herbs. Try crushed red pepper for heat or fresh thyme for earthiness. A pinch of smoked paprika gives a nice depth. You can also experiment with herbs like dill or basil to change the dish’s vibe.
For cheese lovers, swap the Parmesan with feta or goat cheese. These cheeses add a tangy twist that pairs well with lemon. You can even use a sprinkle of nutritional yeast for a dairy-free option.
Ingredient Swaps
If you want to mix things up, consider using different vegetables. Broccoli or green beans work well. You can even try zucchini, but cut it thinner to cook evenly. These swaps keep the dish fresh and exciting.
For those watching their diet, butter substitutes are a great idea. You can use olive oil or coconut oil instead of butter. These fats enhance the dish while keeping it light. Each swap offers a new taste, so feel free to get creative!
Storage Info
Refrigeration
To store leftovers, place the asparagus in an airtight container. This helps keep the dish fresh. You can also wrap it tightly in plastic wrap. The asparagus will stay good in the fridge for about 3 to 4 days. If you want to enjoy it later, make sure to cool it first before storing.
Reheating Tips
The best methods for reheating asparagus include using the microwave or a skillet. If using a microwave, place the asparagus on a plate and cover it with a damp paper towel. Heat it for 30 seconds at a time until warm. For the skillet, add a little olive oil over medium heat, then add the asparagus. This method helps keep the flavor and texture.
To avoid sogginess, do not add too much liquid when reheating. Ensure the skillet is hot enough before adding the asparagus. This will help keep it crisp and tasty. Enjoy your garlic butter lemon asparagus just as delicious as the first time!
FAQs
Common Questions
Can I use frozen asparagus?
Yes, you can use frozen asparagus. It is easy and quick. Just cook it straight from the freezer. You may need to adjust the cooking time. Frozen asparagus may take a few extra minutes to become tender.
How can I tell when asparagus is cooked?
You can tell asparagus is cooked when it turns bright green. It should be tender yet crisp when you bite into it. You can also poke it with a fork. If it goes in easily, it’s ready!
Nutritional Information
Caloric content
Asparagus is low in calories. One serving has about 20 calories. This makes it a great side dish for many meals.
Health benefits of asparagus
Asparagus is packed with nutrients. It is high in vitamins A, C, E, and K. It also has folate, which is good for your cells. Plus, it has fiber to help with digestion. Eating asparagus may also support heart health.
In this blog post, we explored how to prepare delicious asparagus. We covered key ingredients like fresh asparagus, butter, and garlic. I shared steps for washing, cooking, and finishing your dish perfectly. Tips ensured your asparagus stays crisp and pairing ideas enhanced your meal. Remember, you can swap ingredients or try new flavors. Enjoying this dish fresh is always best. Store leftovers right for later. With these ideas, you can make great asparagus every time. Now, let’s get cookin

Garlic Butter Lemon Asparagus Delight
Ingredients
- 1 lb fresh asparagus, trimmed
- 3 tablespoons unsalted butter
- 4 cloves garlic, finely minced
- 1 large lemon, zested and juiced
- to taste Salt and freshly cracked black pepper
- 1 tablespoon extra virgin olive oil
- 1 4 cup freshly grated Parmesan cheese (optional)
- for garnish Fresh parsley, finely chopped
Instructions
- Begin by thoroughly washing the fresh asparagus under cold water. Trim the tough ends by cutting off about an inch from the base of each spear to ensure tenderness.
- In a large skillet, heat the extra virgin olive oil over medium heat until it shimmers slightly.
- Add the trimmed asparagus to the skillet in a single layer, sautéing for about 5-7 minutes. Cook until the asparagus is tender-crisp and displays a vibrant green color, stirring occasionally.
- Once cooked to your liking, push the asparagus to one side of the skillet, creating space in the pan. Add the unsalted butter to the empty side.
- Allow the butter to melt completely, then stir in the finely minced garlic. Cook for about 1 minute, or until the garlic is fragrant and lightly golden to avoid burning.
- Gently combine the asparagus with the garlic and melted butter, tossing to ensure each piece is well coated in the rich mixture.
- Pour in the lemon juice and add the zest to the skillet, stirring everything together until evenly mixed and the asparagus is thoroughly bathed in the zesty sauce.
- Season with salt and freshly cracked black pepper according to your taste preference, mixing again to incorporate the flavors.
- If using, sprinkle the freshly grated Parmesan cheese over the asparagus, allowing it to melt slightly in the warm skillet.
- Remove the skillet from heat and carefully transfer the asparagus to a serving plate or platter.
- For a vibrant finishing touch, garnish the dish with finely chopped fresh parsley, adding both color and a hint of freshness to the presentation.
![To make Cranberry Orange Energy Bites, you need the right mix of flavors and textures. Here’s what you will need: - 1 cup rolled oats - 1/2 cup almond butter - 1/4 cup honey or maple syrup - 1/2 cup dried cranberries, finely chopped - Zest of 1 medium orange - 1/4 cup freshly squeezed orange juice - 1/4 cup chia seeds - 1/2 teaspoon ground cinnamon - Pinch of sea salt - Optional: 1/4 cup chopped nuts or seeds These ingredients come together to create a tasty and healthy snack. The oats provide fiber and energy. Almond butter adds protein and a creamy texture. Honey or maple syrup gives a touch of sweetness, while dried cranberries add a chewy burst of flavor. The zest and juice of the orange brighten the bites, making them refreshing. Chia seeds add crunch and healthy omega-3s. You can also mix in nuts or seeds for extra texture. They can make your bites even more filling. You can find the full recipe for the perfect energy bites in the recipe section above. - Mixing the Base Ingredients Start by taking a large bowl. Add 1 cup of rolled oats, 1/2 cup of almond butter, and 1/4 cup of honey or maple syrup. Mix with a sturdy spoon until everything blends well. This base forms the heart of your energy bites. - Adding Flavorful Components Next, stir in 1/2 cup of finely chopped dried cranberries, the zest of 1 medium orange, and 1/4 cup of freshly squeezed orange juice. Also, add 1/4 cup of chia seeds, 1/2 teaspoon of ground cinnamon, and a pinch of sea salt. Keep mixing until you see a uniform color and texture. - Achieving the Right Texture Use your hands or a spatula to mix the ingredients thoroughly. You want a sticky but manageable consistency. If it feels too dry, add a bit more orange juice. If it’s too wet, sprinkle in extra oats until it feels just right. - Rolling Into Balls After you’ve mixed everything, cover the bowl with plastic wrap or a lid. Chill the mixture in the fridge for about 30 minutes. Once chilled, take portions and roll them into 1-inch balls. You should get about 15 to 20 bites. - Optional Coating with Nuts or Seeds For added crunch and flavor, roll some of the balls in chopped nuts or seeds. This step is optional, but it gives a nice touch to each bite. - Chilling the Mixture After rolling, arrange the energy bites on a plate. You can chill them for an extra 10 to 15 minutes to firm them up even more. This makes them easier to eat. - Presentation Tips For a pretty display, stack the energy bites or place them in a rustic jar. You can sprinkle some extra orange zest on top for color and aroma. Enjoy your tasty, nutritious snack! Check the [Full Recipe] for more details. - Best Practices for Freshness: Store energy bites in an airtight container. This keeps them moist and tasty. - Duration of Shelf Life: These bites last up to 1 week in the fridge. After that, they may dry out. - Freezing Energy Bites for Later Use: You can freeze these bites. Place them in a single layer on a tray. Once frozen, store them in a bag. They can last for up to 3 months. - Preparing in Bulk: Make a double batch! This way, you always have a quick snack ready. - Overmixing or Undermixing: Mix just enough to combine all ingredients. Too much mixing can make them tough. - Adjusting Consistency: If the mixture is too dry, add more juice. If too wet, mix in more oats. Always aim for a sticky but manageable mixture. For the full recipe, check out Cranberry Orange Energy Bites. {{image_4}} You can mix things up by adding different nuts. Walnuts, almonds, or pecans give a nice crunch. Just chop them finely and fold them into the mix. You can use about 1/4 cup of your choice. Incorporating other fruits can also change the flavor. Try using dried apricots, raisins, or figs. They add sweetness and texture. Just chop them to match the size of the cranberries. If you want a vegan option, swap honey for maple syrup. This keeps the bites sweet without using animal products. Almond butter is already vegan, so you’re set there! For gluten-free substitutions, choose certified gluten-free oats. Most oats are naturally gluten-free but can get cross-contaminated. Make sure to check the label. Using different nut butters can change the taste and texture. Peanut butter or cashew butter works great. Just use the same amount as almond butter. Adjusting crunchiness with seeds is another fun option. Add chia seeds or flaxseeds for some extra bite. You can also toss in sunflower seeds for a nut-free crunch. The cranberry orange energy bites are packed with nutrients. Each ingredient brings unique health benefits. - Rolled oats offer fiber, which helps digestion and keeps you full. - Almond butter is a great source of healthy fats and protein. - Dried cranberries add antioxidants that fight free radicals. - Chia seeds are rich in omega-3s and help with heart health. - Orange juice boosts your immune system with vitamin C. These bites provide energy and nutrients to fuel your day. They are perfect for a quick boost before a workout or during a busy afternoon. How many bites should you eat for a snack? I suggest two to three bites. This gives you enough energy without overdoing it. Each bite is satisfying. Dietary recommendations may vary. Listen to your body. If you feel hungry after two bites, enjoy another! Balance is key. Each bite contains about 70 calories. This makes it easy to track your snack intake. If you want fewer calories, consider adjusting the recipe. You can reduce the honey or use less nut butter. This way, you can fit these bites into your dietary goals without losing flavor. For more details, check the full recipe. Enjoy these tasty energy bites while staying mindful of your nutrition! Cranberry orange energy bites can last up to one week in the fridge. Store them in an airtight container to keep them fresh. If you want to keep them longer, you can freeze them. They can last up to three months in the freezer. Just thaw them in the fridge before enjoying. Yes, you can substitute almond butter with other nut butters. Peanut butter, cashew butter, or sunflower seed butter work well. Each will give a unique taste. Make sure to choose one that fits your dietary needs. You can use the mixture for various snacks. Try spreading it on toast or mixing it into yogurt. You can also make energy bars by pressing the mixture into a pan and slicing it. This way, you have more options for your snack. To make them sweeter, you can add more honey or maple syrup. You can also mix in some chocolate chips or dried fruits like dates. Adjust the sweetness based on your taste. This way, you can create a snack that you love. Yes, there are many alternatives for honey or maple syrup. You can use agave nectar, brown rice syrup, or coconut nectar. Each of these will add a different sweetness. Just make sure to adjust the amount based on how sweet you want your bites to be. For the full recipe, check out the recipe section above. These Cranberry Orange Energy Bites are simple to make and taste great. You mix healthy ingredients, shape them into bites, and enjoy a tasty snack. Remember to store them properly to keep them fresh. You can also tweak ingredients for your tastes or diet. With these tips and flavor ideas, you’ll enjoy these bites any time you need a quick boost. Get creative and make this snack your own!](https://goldendishy.com/wp-content/uploads/2025/06/5774e534-56b3-4e6d-8a48-215f930e3d22-768x768.webp)
![- 1 pound fresh okra - 2 tablespoons extra virgin olive oil - 1 teaspoon garlic powder - 1 teaspoon smoked paprika - 1/2 teaspoon ground cumin - 1/2 teaspoon salt - 1/4 teaspoon freshly ground black pepper - 1/4 teaspoon cayenne pepper (optional) - 2 tablespoons freshly grated Parmesan cheese (optional) Gathering the right ingredients is key to making crispy garlic okra chips. Fresh okra offers a unique taste and great texture. When you pick out okra, look for bright green pods that are firm and smooth. The olive oil serves as the base for your spices. It helps to crisp the okra and adds a rich flavor. Garlic powder brings a punch of taste without any hassle. Smoked paprika adds depth and a slight smokiness, which pairs well with the okra. Ground cumin gives the chips an earthy note. Salt and pepper enhance all the flavors, while cayenne pepper adds a spicy kick if you want it. Finally, Parmesan cheese can add richness, making the chips even more delicious. - Calories per serving: About 120 calories - Key vitamins and minerals: High in vitamins A and C, magnesium, and fiber - Health benefits of okra: Okra is low in calories and packed with nutrients. It supports digestion, boosts heart health, and provides antioxidants. Eating crispy garlic okra chips is not just tasty; it's also good for you. Enjoy this snack guilt-free while getting your nutrition. For the full recipe, check out the [Full Recipe] section! 1. Preheat your oven to 425°F (220°C). This step helps the okra get crispy. 2. Line a large baking sheet with parchment paper. This prevents sticking and makes cleanup easy. 3. Trim the ends of the okra pods, cutting off just the stem. 4. Cut the okra into halves or thirds. Aim for even sizes so they cook well. 1. In a large bowl, mix the extra virgin olive oil, garlic powder, smoked paprika, ground cumin, salt, black pepper, and optional cayenne pepper. Stir until you have a smooth paste. 2. Add the cut okra to the bowl. Toss gently but well. Make sure each piece gets coated with the paste. 1. Spread the okra in a single layer on the baking sheet. Don’t overcrowd the pan. This will keep them crispy. 2. Bake in the preheated oven for 20-25 minutes. Flip the chips halfway through to brown them evenly. 3. If you want to add Parmesan cheese, sprinkle it on during the last 5 minutes. This makes a tasty cheesy crust. 4. Once golden brown and crispy, take the baking sheet out of the oven. Let the okra cool slightly before serving for the best crunch. You can find the full recipe above to guide you through this process. To make crispy garlic okra chips, cut the okra evenly. This helps all pieces cook the same. Aim for pieces that are about the same size. When they are even, they will brown nicely. Also, avoid overcrowding the baking sheet. If you put too many pieces on one pan, they will steam instead of crisp. Spread them out and use two sheets if needed. Using fresh ingredients makes a big difference. Fresh okra has a better taste and texture. Also, feel free to adjust the spices. If you love garlic, add more garlic powder. For a kick, increase the cayenne pepper. Taste the mixture as you go. This way, you can make the flavor just right for you. Pair these chips with dips for extra flavor. A creamy ranch or spicy aioli works well. You can also serve them with salsa for a fresh twist. For presentation, use a bright bowl. Garnish with parsley or lime slices for a pop of color. This makes your dish look even more appetizing. Enjoy your crispy garlic okra chips as a fun snack or side dish. Check out the Full Recipe for more details! {{image_4}} You can easily change the taste of your okra chips. For spicy garlic okra chips, add cayenne pepper or chili powder. This will give them a nice kick. You might also try mixing in some smoked paprika for a deeper flavor. If you prefer fresh herbs, add chopped rosemary or thyme. These herb-infused options brighten the dish and add a lovely aroma. If you’re looking for vegan alternatives, skip the cheese. The chips will still taste great without it. You can also use nutritional yeast for a cheesy flavor. For gluten-free options, you’re in luck! This recipe is naturally gluten-free. Just ensure that any additional spices used are also gluten-free. Crispy okra chips are not just for snacking. Use them in salads for extra crunch. They can also be a fun topping on soups. Try mixing them into a grain bowl for added flavor. You can even crush them and use them as a crispy coating for chicken or fish. The possibilities are endless! Check out the Full Recipe for more details on how to make these tasty snacks. To keep your crispy garlic okra chips fresh, store them in airtight containers. This method helps keep moisture out and maintains that delightful crunch. When stored properly, they can last for about 3-5 days at room temperature. For best results, place them in a cool, dark spot in your kitchen. If you live in a warm climate or want to make them last longer, consider storing them in the refrigerator. This will help retain their flavor and texture for about a week. Just remember to let them cool completely before sealing them up. Want to enjoy okra chips later? You can freeze them! First, let the chips cool fully. Then, place them in a single layer on a baking sheet and pop them in the freezer for a few hours. Once frozen, transfer them to a freezer-safe bag. This way, you can enjoy them anytime. When you’re ready to eat your frozen okra chips, don’t thaw them. Just bake them straight from the freezer at 425°F (220°C) for about 10-15 minutes. This will help them regain their crispy texture. For the best flavor, eat your crispy garlic okra chips within the first couple of days. They taste freshest right after baking. If you notice any signs of spoilage, like an off smell or a soft texture, it’s best to toss them. Keeping an eye on your snacks ensures you always enjoy them at their best! To make Crispy Garlic Okra Chips, start with fresh okra. Preheat your oven to 425°F. Wash and dry your okra. Cut the okra into halves or thirds. In a bowl, mix olive oil, garlic powder, smoked paprika, cumin, salt, black pepper, and optional cayenne pepper. Toss the cut okra in this mix until well coated. Spread the okra on a baking sheet. Bake for 20-25 minutes, flipping halfway. Enjoy a tasty snack! For the full recipe, check the section above. Yes, you can use frozen okra, but it may change the texture. Frozen okra tends to be softer after cooking. This means your chips may not be as crisp. If you use frozen okra, thaw it first and pat it dry. This helps reduce moisture. For best results, fresh okra gives the best crunch. You can find pre-made garlic okra chips at many grocery stores. Look in the snack aisle or natural food sections. Brands like Southern Style and Veggie Chips offer tasty options. You can also check online retailers like Amazon or health-focused sites. Always read labels for the best flavor and quality. To add spice to your chips, try these tips: - Add more cayenne pepper for heat. - Mix in chili powder or red pepper flakes. - Use spicy seasoning blends like Cajun or taco seasoning. - Experiment with fresh jalapeños for a bold twist. These changes will give your chips a fiery kick! This blog covered the fun and tasty world of crispy okra. You learned about the ingredients, from fresh okra to spices, and how they bring flavor. The step-by-step guide made cooking easy and clear. Our tips will help you achieve the best crunch and taste. You can even try different flavors and modify the recipe to fit your diet. Remember to store your okra properly for the best taste. Now, it's time to enjoy your crispy okra chips, whether as a snack or a side dish!](https://goldendishy.com/wp-content/uploads/2025/07/49c08959-fe34-4929-8f55-872212e9bd7e-768x768.webp)
. 1. Heat olive oil in a large skillet over medium heat. 2. Add finely chopped red onion to the skillet. 3. Sauté the onion for 2-3 minutes until it becomes soft. 4. Now, add diced red and green bell peppers to the skillet. 5. Cook for 3-4 minutes until the peppers soften. 6. Stir in corn kernels and black beans. 7. Season with ground cumin, smoked paprika, garlic powder, salt, and pepper. 8. Mix well and cook for 5 more minutes until hot. 1. Heat another skillet over medium heat. 2. Place a tortilla in the skillet and sprinkle ¼ cup of cheese on it. 3. Layer ½ cup of the veggie mixture over the cheese. 4. Top with another ¼ cup of cheese for extra flavor. 5. Fold the tortilla in half, covering the filling. 6. Cook for 3-4 minutes until golden brown on one side. 7. Flip the quesadilla gently using a spatula. 8. Cook for another 3-4 minutes until crispy and cheese melts. - Keep the heat at medium for a crispy texture. - Use a spatula to flip the quesadilla easily. - Check for doneness by ensuring both sides are golden brown. These simple steps make it easy to create loaded veggie quesadillas at home. For the full recipe, refer to the recipe section above. Enjoy the process! Choosing the right cheese is key. I love a mix of cheddar and mozzarella. This mix melts well and adds great flavor. You want the cheese to stretch and pull when you take a bite. Balancing spices and seasonings is also important. Start with the basics like salt and pepper. Then, add spices like cumin and smoked paprika. Adjust them to fit your taste. A little heat can come from red pepper flakes if you like it spicy. Day-to-day storage tips help keep your quesadillas fresh. Place leftovers in an airtight container. Keep them in the fridge for up to three days. You can also wrap them tightly in foil or plastic wrap. Reheating suggestions for best flavor include using the oven or skillet. For the oven, preheat to 350°F. Heat the quesadillas for about 10 minutes. In a skillet, cook them over medium heat. This method keeps them crispy and delicious. Plating ideas can make your meal pop. Arrange the quesadillas in a fan shape on a colorful plate. This makes them look fun and inviting. Adding colorful garnishes like fresh cilantro adds a nice touch. You can also sprinkle some diced tomatoes or avocado on top. These small changes make your meal look gourmet. Enjoy your loaded veggie quesadillas! For the full recipe, check out the Loaded Veggie Quesadillas 🥑 section. {{image_4}} You can make loaded veggie quesadillas even more fun. Here are some easy ideas. Want some extra protein? You can add grilled chicken or tofu. Just cook them first, then slice and add to your quesadilla mix. If you like seafood, try shrimp. Cook them quickly and toss them in for a tasty twist. Spices can change the game. Try different spices like chili powder or oregano. They add depth and warmth. You can also add sauces or marinades. A dash of hot sauce or a sprinkle of lime juice can elevate your quesadillas. Need gluten-free options? Use gluten-free tortillas. They work great and taste just as good. If you're vegan, swap out the cheese for a plant-based version. There are many tasty dairy-free cheeses out there that melt well. You can find the full recipe for loaded veggie quesadillas to get started on these variations. To keep your uncooked quesadillas fresh, wrap them tightly in plastic wrap. This keeps out moisture and air. You can also place them in an airtight container. If you want to freeze them, stack the quesadillas with parchment paper in between. This prevents them from sticking together. Uncooked quesadillas can stay in the freezer for up to three months. After cooking, let the quesadillas cool completely. Then, wrap them in foil or place them in a container. Store them in the fridge for up to four days. I find they taste best within the first two days. If you notice any odd smell or mold, it’s best to toss them. To reheat, use an oven or a skillet. For the oven, preheat to 350°F (175°C). Place the quesadilla on a baking sheet and heat for about 10 minutes. If using a skillet, add a little oil and heat over medium heat for about 3-4 minutes on each side. Leftover quesadillas can also become a fun breakfast. Chop them up and add them to scrambled eggs for a tasty twist. For more ideas, check out the Full Recipe. Making loaded veggie quesadillas is quick and easy. It takes about 10 minutes to prep. Cooking them takes around 15 minutes. In total, you can make them in about 25 minutes. This makes them a great choice for busy days or quick meals. Yes, you can prep loaded veggie quesadillas in advance. To do this, cook the veggie mixture and let it cool. Then, assemble the quesadillas but do not cook them. Store them in an airtight container in the fridge for up to two days. You can also freeze them for a month. When ready to eat, just cook them straight from the fridge or freezer. This makes meal prepping super easy! You can mix and match many veggies in quesadillas. Some great options include: - Spinach or kale for a green boost - Mushrooms for a savory taste - Zucchini or squash for extra texture - Jalapeños for a spicy kick - Tomatoes for freshness Feel free to get creative! Each veggie adds its own flavor and texture. You can make quesadillas that fit your taste perfectly. For more ideas, check out the Full Recipe. These loaded veggie quesadillas are fun and easy to make. We explored essential ingredients like black beans, bell peppers, and corn. I’ve shared tips for perfect texture, storing leftovers, and creative garnishes. Remember, you can customize them with protein or spices to suit your taste. In the end, these quesadillas are more than just food; they bring flavor and joy. Enjoy making them your own!](https://goldendishy.com/wp-content/uploads/2025/06/a7c52493-2108-4a2f-8f90-ee80e7df7b2a-768x768.webp)
![To create a vibrant Summer Berry Spinach Salad, gather the following ingredients: - 5 cups fresh baby spinach - 1 cup mixed berries (strawberries, blueberries, raspberries) - ½ cup crumbled feta cheese - ¼ cup sliced almonds - ¼ red onion - 3 tablespoons olive oil - 2 tablespoons balsamic vinegar - 1 tablespoon honey - Salt and pepper to taste Each ingredient plays a key role in this dish. The fresh baby spinach adds a crisp base. Mixed berries bring natural sweetness and color. Feta cheese provides a creamy texture that balances the sweet berries. Sliced almonds add crunch, while red onion gives a nice bite. For the dressing, high-quality olive oil and balsamic vinegar create a rich flavor. Honey enhances sweetness, making it perfect for summer. Salt and pepper round out the taste. This Summer Berry Spinach Salad is not only easy to make but also a feast for the eyes. You can find the full recipe details above for a step-by-step guide. Enjoy this refreshing dish any sunny day! Start by washing the fresh baby spinach. Place it in a large bowl and rinse it under cold water. Ensure you remove any grit or dirt. After washing, pat the spinach dry with a clean kitchen towel. This helps keep the leaves crisp. Now, place the dried spinach in your salad bowl. This vibrant green will serve as the salad’s base layer. Next, focus on the mixed berries. Rinse them gently under cold running water. Make sure to dry them with a clean kitchen towel. If you have strawberries, slice them into thin rounds or quarters. This step ensures an even distribution of sweetness. Add all the berries to the bowl with the spinach. You will create a colorful mix that looks as good as it tastes. Now, it’s time to build your salad. Evenly sprinkle crumbled feta cheese over the spinach and berry mix. This adds a creamy tang that complements the sweetness of the berries. In a small skillet, heat over medium heat. Add sliced almonds and toast them for about 3-4 minutes. Stir them frequently to avoid burning. Once they are golden brown, take them off the heat and let them cool slightly. For the dressing, mix olive oil, balsamic vinegar, honey, and a pinch of salt and pepper in a small bowl. Whisk these ingredients together until they are smooth. Drizzle the dressing generously over the salad. Toss gently to coat every leaf and berry well. Just before serving, scatter the toasted almonds and thinly sliced red onions on top. This adds crunch and a nice flavor contrast. For the full recipe, refer to the earlier section. To make the best Summer Berry Spinach Salad, start by choosing ripe and juicy berries. Look for berries that are bright in color and free from any bruises. Strawberries should be deep red, blueberries should be plump, and raspberries should have a rich hue. Firm berries taste better and hold up well in your salad. Next, identify fresh spinach leaves. Choose baby spinach with vibrant green color and no signs of wilting. The leaves should feel crisp and firm to the touch. Avoid any spinach that looks yellow or slimy. Fresh spinach provides a nice base for your salad. Adjust the sweetness of your dressing with honey. You can add more or less honey based on your taste. If you prefer a sweeter salad, add an extra tablespoon. This will help balance the flavors in your dish. Vinegar is key for balancing flavors. Balsamic vinegar brings a sweet acidity that pairs well with berries. If you want a tangier taste, try adding a splash of lemon juice. Experiment with the vinegar to find the right balance for your palate. Garnishing your salad adds visual appeal. Scatter a few whole berries on top for a pop of color. You can also sprinkle a bit more feta cheese for extra flair. A light dusting of fresh herbs, like mint, can elevate the look as well. For serving suggestions, consider a large platter for gatherings. This makes it easy for everyone to help themselves. You can also serve individual bowls for a more personal touch. Either way, your salad will look beautiful and inviting. For the full recipe, check out [Full Recipe]. {{image_4}} You can switch out the feta cheese for other options. Goat cheese adds a rich creaminess. If you want a dairy-free option, try avocado. It brings a smooth texture and healthy fats. When it comes to nuts or seeds, feel free to mix it up. Walnuts or pecans can add a nice crunch. Sunflower seeds or pumpkin seeds offer a different flavor and texture. These swaps can make your salad unique. To make this salad more filling, add grilled chicken or shrimp. Both proteins pair well with the berries and spinach. Just cook them with a bit of salt and pepper for flavor. You can also include more vegetables. Chopped cucumbers or bell peppers can add freshness. Carrots or radishes bring extra crunch and color. These add-ins can change the salad’s look and taste. For vegan options, replace the feta with tofu. It soaks up flavors well and adds protein. You can use maple syrup instead of honey for sweetness. If gluten is a concern, this salad is already gluten-free. Just make sure your dressing is gluten-free too. With these simple swaps, everyone can enjoy this vibrant dish. For the full recipe, check out the Summer Berry Spinach Salad. To keep your Summer Berry Spinach Salad fresh, use an airtight container. Glass or plastic containers work well for this purpose. Always make sure the container seals tightly to prevent air from getting inside. The salad will stay fresh for about 1 to 2 days in the fridge. However, the spinach may wilt over time. The berries can last longer, but they may lose some texture. You can prepare parts of the salad ahead of time. Wash and dry the spinach, then store it in a container with a paper towel. This will keep it crisp. You can also rinse the berries and slice the strawberries ahead of time. Just remember to keep them dry and in the fridge. For the dressing, mix all the ingredients in a jar. Seal it and store it in the fridge. You can make the dressing a few days in advance. Just give it a good shake before using it. This way, you can assemble the salad quickly when you are ready to serve. For the full recipe, click here: [Full Recipe]. To make a vegan version, you can swap out the feta cheese. Use avocado for creaminess or a vegan cheese. For the dressing, replace honey with maple syrup. This keeps the sweetness while making it plant-based. Yes, you can use frozen berries. They add great flavor and nutrition. Just remember to thaw them before adding to the salad. This helps avoid extra water in your dish. Frozen berries may not be as firm as fresh, so use them carefully. Store the salad in an airtight container in the fridge. This keeps it fresh longer. If you have leftovers, keep the dressing separate. This way, the salad stays crisp and tasty. The salad lasts about 2-3 days in the fridge. However, the berries and spinach may wilt over time. To enjoy the best taste, eat it within a day or two. This blog post covered a refreshing Summer Berry Spinach Salad. We discussed the ingredients you need, step-by-step prep, and assembly. Tips for choosing fresh items improve your salad's taste. We explored fun variations and how to store leftovers. In conclusion, this salad is easy to make and versatile. You can adjust it to fit your taste. Enjoy creating your healthy and vibrant dish!](https://goldendishy.com/wp-content/uploads/2025/07/d7cbd640-e74d-48cd-91ef-5930b3ae459b-768x768.webp)