Creamy Cauliflower Alfredo Simple and Tasty Recipe

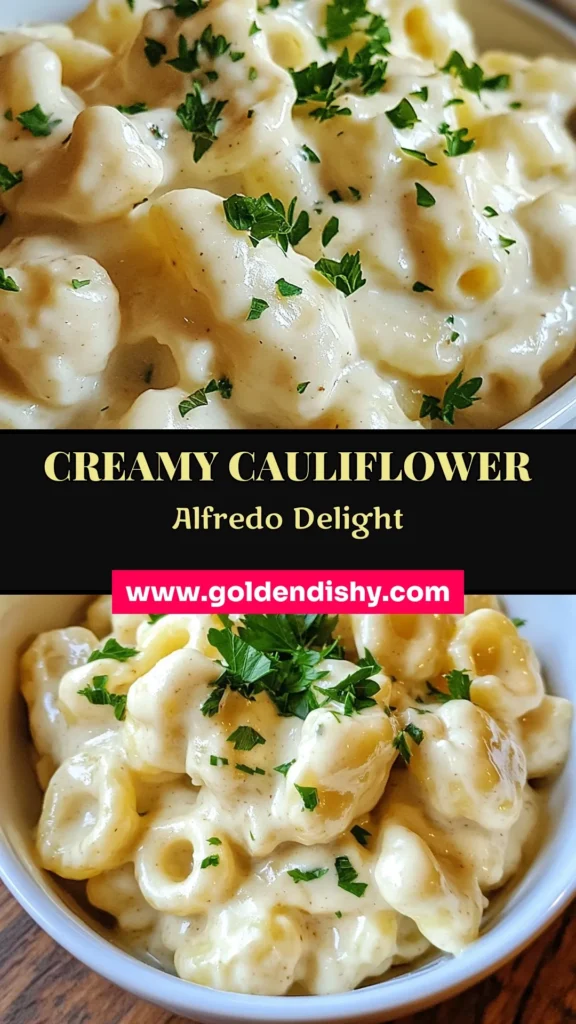
Are you craving a creamy, rich pasta dish that won’t weigh you down? My Creamy Cauliflower Alfredo recipe is not just tasty; it’s a healthier twist on a classic favorite. With wholesome ingredients, you can whip up this dish quickly. Whether you’re cooking for family or impressing friends, this recipe will satisfy your hunger and your taste buds. Let’s dive into the delightful world of cauliflower alfredo!
Why I Love This Recipe
- Healthy Alternative: This recipe offers a nutritious twist on traditional Alfredo sauce by using cauliflower, making it lower in calories and rich in vitamins.
- Dairy-Free Delight: Perfect for those avoiding dairy, this creamy sauce delivers a satisfying texture without any dairy ingredients.
- Quick and Easy: With a total prep time of just 30 minutes, this dish is ideal for busy weeknights while still being gourmet enough for special occasions.
- Customizable Flavor: You can easily adjust the seasonings and add extras like vegetables or proteins, making it versatile for your taste preferences.
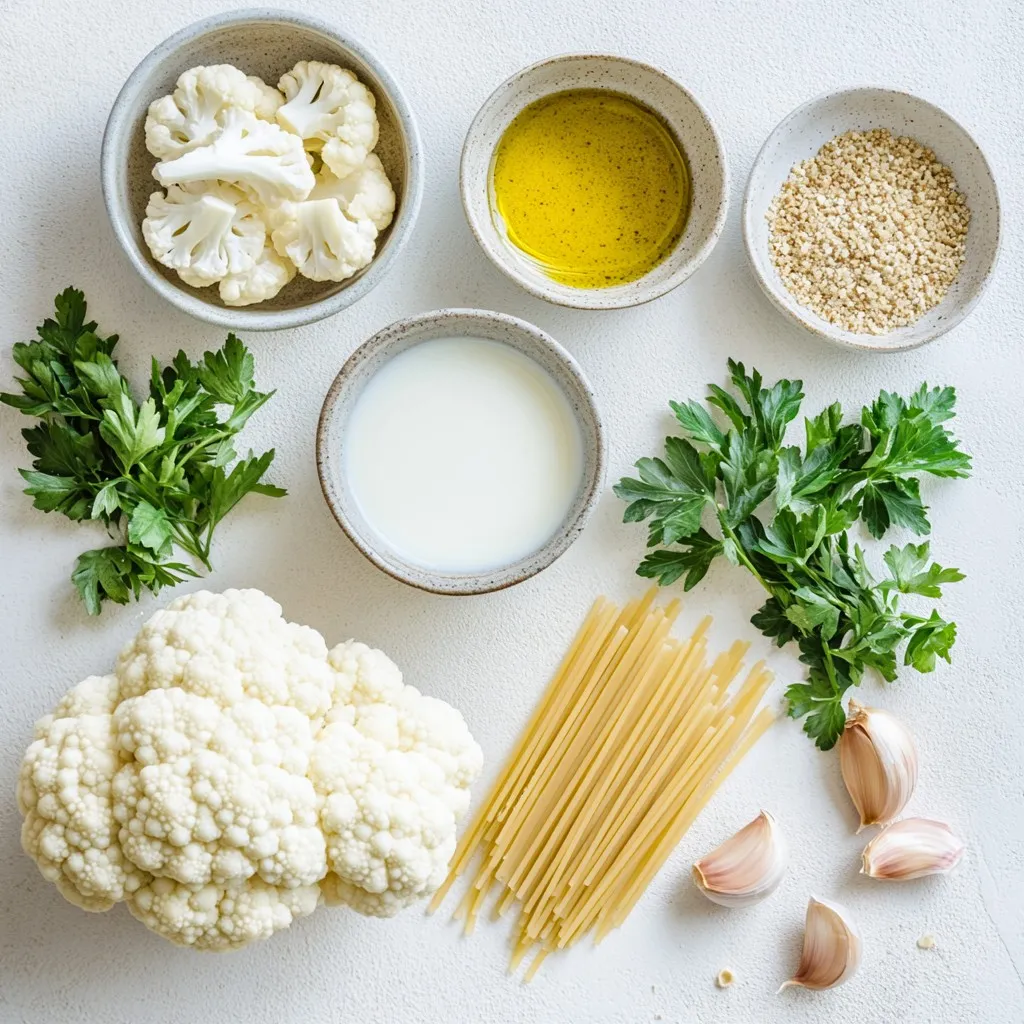
Ingredients
Main Ingredients for Creamy Cauliflower Alfredo
– 1 medium head of cauliflower, chopped into bite-sized florets
– 2 cups vegetable broth
– 1 cup unsweetened almond milk (or any preferred plant-based milk)
– 2 tablespoons nutritional yeast (adds a cheesy flavor)
– 3 cloves garlic, minced
– 1 tablespoon extra virgin olive oil
– Salt and freshly ground black pepper to taste
– 1/4 teaspoon ground nutmeg (optional, but recommended for warmth)
– 3/4 cup whole wheat pasta (or your favorite pasta type)
– Fresh parsley, finely chopped, for garnish
Optional Ingredients to Enhance Flavor
You can add more depth to your dish with these options:
– Red pepper flakes for heat
– Lemon juice for brightness
– Fresh basil for a herby touch
– Grated vegan parmesan for extra creaminess
Nutritional Information
Each serving of Creamy Cauliflower Alfredo provides:
– Calories: About 350
– Protein: 10 grams
– Carbohydrates: 50 grams
– Fat: 12 grams
– Fiber: 8 grams
This dish is low in calories and high in fiber. It’s a great choice for a healthy meal!
Step-by-Step Instructions
Preparation of Cauliflower
Start by bringing vegetable broth to a boil in a large pot. Add the chopped cauliflower florets. Cook them for about 10 minutes. They should be tender and easy to pierce with a fork. Once done, drain the cauliflower but keep some broth for later.
Cooking the Pasta
While the cauliflower cooks, fill another pot with salted water. Bring it to a boil, then add your pasta. Cook it according to the package directions until it’s al dente. When finished, drain the pasta and set it aside in a large mixing bowl.
Making the Alfredo Sauce
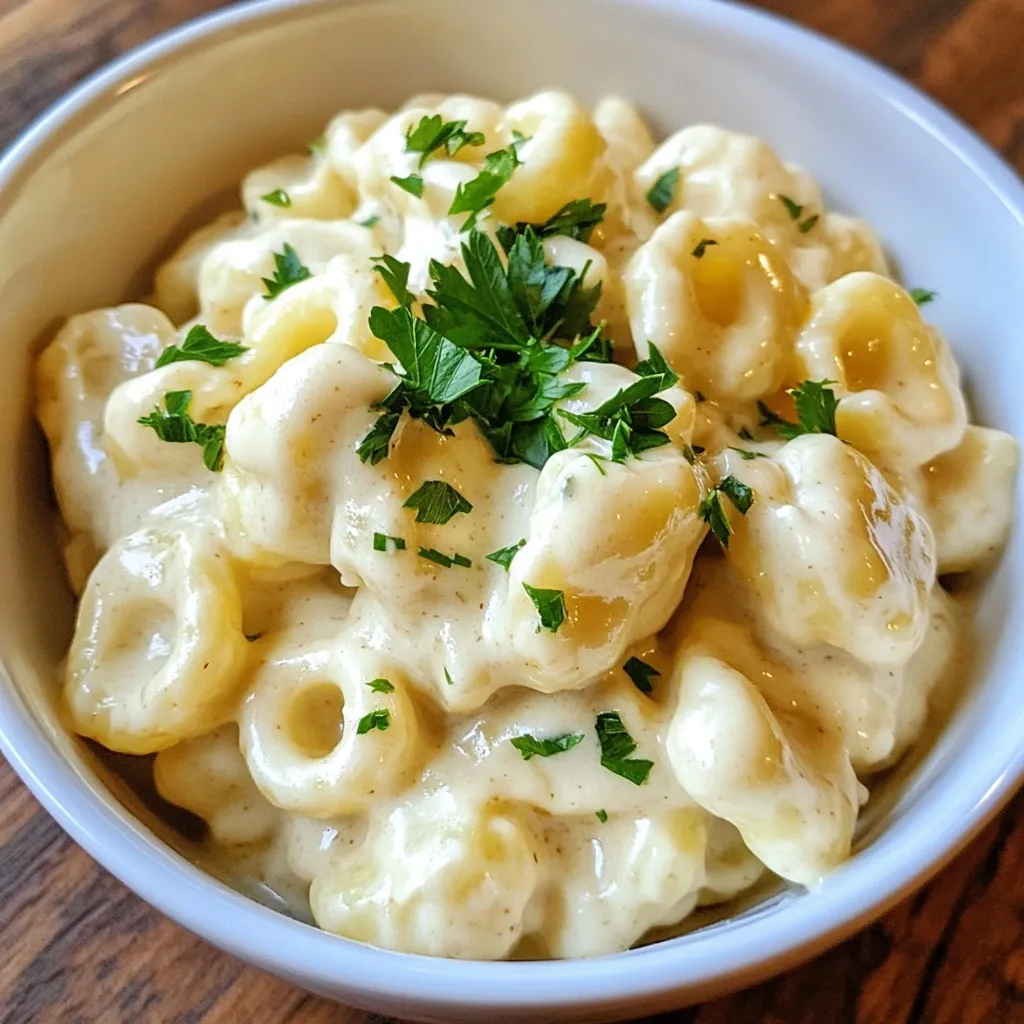
In a sauté pan, heat extra virgin olive oil over medium heat. Once hot, add minced garlic and cook for 1-2 minutes. You want it fragrant but not brown. Next, in a high-speed blender, combine the cooked cauliflower, sautéed garlic, almond milk, nutritional yeast, salt, pepper, and nutmeg. Blend until smooth and creamy. If the sauce is too thick, add a bit of the reserved broth. Pour the creamy sauce over the pasta and toss gently to coat. Serve immediately, garnished with chopped parsley for a fresh touch.
Tips & Tricks
How to Achieve the Perfect Creamy Texture
To get a smooth and creamy sauce, blend the cauliflower well. Use a high-speed blender for the best results. If the texture seems thick, add a bit of the reserved broth. This will help achieve the right consistency. The sauce should coat the pasta nicely, not be too runny.
Substitutions for Allergies or Dietary Preferences
You can easily change the recipe for different diets. If you need a nut-free option, use oat milk or soy milk instead of almond milk. For gluten-free pasta, choose a gluten-free variety. You can also substitute nutritional yeast with a dairy-free cheese alternative. Always check labels to avoid allergens.
Serving Suggestions and Pairings
This creamy cauliflower Alfredo pairs well with many sides. Serve it with a fresh green salad to add crunch. You can also add roasted vegetables for extra flavor and color. For a protein boost, sprinkle some grilled chicken or chickpeas on top. Finish with fresh parsley for a pop of color and taste.
Pro Tips
- Choose Fresh Cauliflower: For the best flavor and texture, select a cauliflower head that is firm and free of brown spots.
- Adjust Creaminess: If you prefer a thicker sauce, reduce the amount of almond milk or add more cauliflower to the blender.
- Enhance Flavor: Experiment with additional spices like garlic powder or Italian herbs to customize the flavor of your sauce.
- Perfect Pasta Cooking: Make sure to cook your pasta just al dente, as it will absorb some sauce and continue to soften after mixing.
Variations
Adding Protein to Your Dish
You can easily add protein to your creamy cauliflower Alfredo. Grilled chicken or shrimp work well. For a plant-based option, try chickpeas or lentils. Simply stir them in after mixing the sauce with pasta. This adds flavor and makes the dish more filling.
Flavor Variations
To change the flavor, try adding herbs or spices. Fresh basil or thyme adds a nice touch. You can also add a pinch of red pepper flakes for heat. If you want a smoky flavor, try adding smoked paprika. These small changes can make your dish unique and exciting.
Creamy Alfredo with Other Vegetables
You can mix in other veggies too. Spinach, broccoli, or peas blend well with the sauce. Just steam or sauté them before adding. This boosts nutrition and adds color to your plate. You can even try roasted red peppers for sweetness. These variations keep your meals fresh and fun.
Storage Info
Best Ways to Store Leftovers
To keep your Creamy Cauliflower Alfredo fresh, store it in an airtight container. Place it in the fridge. Enjoy your leftovers within three days for the best taste and quality. If you want to save time, you can portion it out. This way, you grab a serving anytime you want.
Reheating Tips for Maintaining Texture
When reheating, use a skillet over low heat. Add a splash of almond milk or water. This helps keep the sauce creamy. Stir gently to combine. Avoid using high heat, as it can dry out the sauce. You can also microwave it in short bursts. Stir in between to heat evenly.
Freezing Instructions and Duration
You can freeze Creamy Cauliflower Alfredo for up to two months. Use a freezer-safe container. Leave some space at the top, as the sauce may expand. To thaw, place it in the fridge overnight. Reheat gently as mentioned above. The texture may change slightly, but it will still taste great.
FAQs
Can I use regular milk instead of almond milk?
Yes, you can use regular milk. It will change the flavor slightly. Almond milk keeps it dairy-free. If you are okay with dairy, whole milk or cream work too.
How can I make the sauce thicker?
To thicken the sauce, add more cauliflower. Blend in extra cooked cauliflower for a creamy texture. You can also add a little cornstarch mixed with water. This will help to thicken the sauce quickly.
What’s a good pasta alternative?
Good alternatives include zucchini noodles or spaghetti squash. They add flavor and reduce carbs. Whole wheat pasta is great for more fiber. Gluten-free pasta is also an option if needed.
This blog post explored making a creamy cauliflower Alfredo. We discussed main and optional ingredients to enhance flavor. I shared step-by-step instructions for preparation, cooking, and sauce-making. Tips helped achieve the perfect creaminess, with ideas for substitutions and pairings. Variations can boost protein and flavor. I also provided storage info and answers to common FAQs.
Embrace these methods to enjoy a healthier twist on a classic dis
Creamy Cauliflower Alfredo
Ingredients
- 1 medium head cauliflower, chopped into bite-sized florets
- 2 cups vegetable broth
- 1 cup unsweetened almond milk
- 2 tablespoons nutritional yeast
- 3 cloves garlic, minced
- 1 tablespoon extra virgin olive oil
- to taste Salt and freshly ground black pepper
- 1/4 teaspoon ground nutmeg
- 3.4 cups whole wheat pasta
- for garnish Fresh parsley, finely chopped
Instructions
- In a large pot, bring the vegetable broth to a rolling boil over medium-high heat. Add the cauliflower florets and cook until they are tender and easily pierced with a fork, about 10 minutes.
- While the cauliflower is cooking, bring a separate pot of salted water to a boil. Add the whole wheat pasta and cook according to the package directions until al dente. Drain the pasta and set it aside in a large mixing bowl.
- In a sauté pan, heat the extra virgin olive oil over medium heat. Once hot, add the minced garlic and sauté for 1-2 minutes until it becomes fragrant but not browned.
- Once the cauliflower is tender, carefully drain it, reserving about 1/2 cup of the cooking broth. In a high-speed blender, combine the cooked cauliflower, sautéed garlic, almond milk, nutritional yeast, salt, pepper, and nutmeg. Blend on high until the mixture is completely smooth and creamy, adjusting the consistency with a little of the reserved broth if necessary.
- Pour the creamy cauliflower sauce over the cooked pasta in the large mixing bowl. Toss gently to ensure every strand of pasta is coated in the luscious sauce, adjusting seasoning as needed.
- Serve the creamy pasta immediately, garnished with a generous sprinkle of fresh chopped parsley for color and flavor.
![- Bell Peppers: I like using large bell peppers. You can choose any color you like: red, yellow, or green. They all taste great! Make sure they are firm and fresh. Each pepper should hold the stuffing well. - Ground Chicken and Dairy: Ground chicken adds a light flavor. It cooks quickly and blends well with other ingredients. Pair it with shredded cheddar cheese for a creamy touch. The cheese melts beautifully, making the dish extra yummy. - Enhancing Ingredients: I always add cooked rice to the mix. It gives the dish a nice texture. Black beans are great too; they add protein and fiber. Corn brings sweetness and color. Together, these ingredients create a hearty filling. - Essential Spices: Be sure to use chili powder, ground cumin, garlic powder, and onion powder. These spices pack flavor into the filling. A sprinkle of salt and pepper brings everything together. - Optional Garnishes: Fresh cilantro adds a burst of flavor. It makes the dish look more vibrant. You can also use a dollop of sour cream for creaminess. - Recommended Sides: Serve the stuffed peppers with a simple salad. A side of rice or quinoa pairs well too. You can also add some tortilla chips for crunch. - Display Ideas: For a beautiful presentation, place each stuffed pepper on a plate. Drizzle a bit of olive oil on top for shine. Add some chopped cilantro for color. This makes the meal look as good as it tastes! For the complete recipe, check out the Full Recipe. 1. Preheat your oven to 375°F (190°C). This step is key for even cooking. 2. Grab four large bell peppers. Cut off the tops and remove the seeds. Rinse the insides to clean them well. 3. Lightly coat the outside of each pepper with olive oil. Stand them upright in a 9x13 inch baking dish. 1. Heat a skillet over medium heat. Add 1 pound of ground chicken to the pan. 2. Cook the chicken for 5-7 minutes. Stir and break it apart until it turns brown. 3. Once cooked, mix in 1 cup of cooked rice, 1 cup of rinsed black beans, and 1 cup of corn. 4. Add 3/4 cup of shredded cheddar cheese, 1 teaspoon of chili powder, 1 teaspoon of cumin, 1 teaspoon of garlic powder, and 1/2 teaspoon of onion powder. Season with salt and pepper to taste. Stir for 2-3 minutes. 1. Generously fill each bell pepper with the chicken and cheese mixture. Pack it well. 2. Sprinkle the remaining 1/4 cup of cheese on top of the stuffed peppers. 3. Cover the dish with aluminum foil to trap steam. Bake in the preheated oven for 30 minutes. 4. After 30 minutes, remove the foil. Continue baking for 10-15 minutes, until the cheese is bubbly and golden. 5. Check if the peppers are tender by piercing them with a fork. 6. Allow them to cool for a few minutes after baking. Optionally, garnish with fresh cilantro for extra flavor. For the complete recipe, check out the [Full Recipe]. What are common mistakes to avoid? One mistake is overcooking the chicken. Cook it just until it's brown. If you use too much salt, it can ruin the flavor. Taste your mixture before stuffing the peppers. How can you ensure even cooking? Make sure all your peppers are the same size. This will help them cook at the same rate. Cover them with foil for part of the baking time. This keeps the heat in and helps them cook through. What are some suggestions for adding extra flavor? Try adding diced tomatoes or jalapeños for a kick. You can also mix in some spices like paprika or cayenne pepper. Fresh herbs like parsley or basil can brighten the dish. What are some ingredient swaps for dietary preferences? For a lower-carb option, replace rice with cauliflower rice. Use ground turkey or tofu for a different protein. You can also swap cheddar cheese for a dairy-free cheese for a vegan option. What cooking methods can you use? You can air fry the stuffed peppers for a crispy texture. Just set the air fryer to 375°F and cook them for about 15-20 minutes. Grilling is another fun method. Just wrap the peppers in foil and place them on the grill. How do you maintain moisture in stuffed peppers? Add a splash of chicken broth to the bottom of the baking dish. This creates steam as they cook. Avoid overstuffing the peppers; too much filling can lead to dryness. For the full recipe, check out the recipe section above. {{image_4}} You can change the ground chicken in your stuffed peppers. Use ground turkey or beef instead. These meats add different flavors and textures. If you want a vegetarian option, try using quinoa or lentils. These ingredients pack a protein punch and keep the dish hearty. For a vegan twist, use a mix of beans and mushrooms. They add a nice texture and flavor. You can also use tofu crumbles, which absorb spices well. This makes your meal rich and filling while keeping it plant-based. You can spice up your stuffed peppers with different flavors. Why not try a Mexican twist? Add taco seasoning or jalapeños for heat. A dash of lime juice brightens the dish. If you love Italian flavors, mix in some Italian herbs like oregano or basil. You could also add marinara sauce to the filling. This creates a rich and comforting taste. Want a twist? Try adding olives, capers, or feta cheese. These ingredients bring unique textures and flavors. They turn a simple meal into something exciting. For those needing gluten-free meals, this recipe is easy to adapt. Use rice instead of breadcrumbs for filling. Always check labels on canned items like beans and corn. They should be gluten-free. If you follow a low-carb diet, you can swap rice for cauliflower rice. This keeps the dish light and low in carbs. You can also skip the beans to reduce carbs even more. These variations help everyone enjoy this tasty meal. No matter your diet, you can find a way to enjoy chicken and cheese stuffed peppers. After you make your chicken and cheese stuffed peppers, let them cool down. This helps keep them fresh. Store them in an airtight container. They will stay good in the fridge for about 3 to 4 days. If you have leftovers, try to eat them within this time. To reheat, place them in the oven or microwave until warm. If you want to keep your stuffed peppers for a longer time, freezing is a great option. First, let them cool completely. Wrap each pepper tightly with plastic wrap. Then, put them in a freezer bag or container. This helps avoid freezer burn. They can last up to 3 months in the freezer. When you're ready to eat, take them out and thaw in the fridge overnight. Reheat them in the oven at 375°F until hot. This will keep the flavors and textures intact. Meal prepping can save time on busy weeknights. You can prepare the filling ahead of time. Cook the chicken and mix in the rice, beans, and spices. Store this mixture in the fridge for 2 to 3 days. When you're ready, stuff the peppers and bake them. For batch cooking, consider making a double recipe. Freeze half for later. This way, you have a tasty meal ready whenever you need it. How do you know when stuffed peppers are done? You can tell when stuffed peppers are done by checking the peppers and cheese. The peppers should be tender and the cheese melted and bubbly. If you pierce a pepper with a fork, it should feel soft but not mushy. Can you prepare them in advance? Yes, you can prepare stuffed peppers in advance. Just stuff them and store them in the fridge. Bake them when you're ready to eat. This makes for a quick and easy family meal. Can I use frozen peppers? Yes, you can use frozen peppers. Just thaw them before stuffing. They may cook faster, so keep an eye on them while baking. What to do if I don't have certain ingredients? If you lack certain ingredients, feel free to swap them out. For example, use quinoa instead of rice or a different type of cheese. Get creative based on what you have! Can stuffed peppers be made on the stovetop? Yes, you can make stuffed peppers on the stovetop. Just steam them in a skillet with a little water. Cover with a lid and cook until tender. How to adjust heating times for different ovens? Oven temperatures can vary. If your oven runs hot, check the peppers a few minutes early. If it runs cool, you may need to add a few extra minutes. Always trust your instincts! We covered the best way to make stuffed peppers. You learned about key ingredients like bell peppers, ground chicken, and spices. You also discovered tips for cooking and storing them. There are many ways to adjust the recipe for different diets and tastes. Incorporating these ideas will make your dish delicious. Get creative with flavors and toppings. With practice, you'll master this easy meal for any occasion. Enjoy your cooking journey!](https://goldendishy.com/wp-content/uploads/2025/06/69b5c483-258e-4498-8701-d043fb5fc497-768x768.webp)
![To make the spicy honey garlic shrimp, gather these items: - 1 pound large shrimp, peeled and deveined - 3 tablespoons honey - 3 tablespoons low-sodium soy sauce - 4 cloves garlic, finely minced - 1 tablespoon extra virgin olive oil - 1 teaspoon red pepper flakes (adjust according to your spice tolerance) - 1 teaspoon freshly grated ginger - 2 green onions, finely chopped (for garnish) - Toasted sesame seeds (for garnish) - Salt and freshly ground black pepper to taste You can swap some ingredients if needed: - Instead of honey, try maple syrup for a different sweetness. - Use tamari if you need a gluten-free option for soy sauce. - For garlic, garlic powder can work in a pinch. - You can replace shrimp with chicken or tofu if you prefer. A serving of spicy honey garlic shrimp has about: - Calories: 220 - Protein: 25g - Fat: 8g - Carbohydrates: 10g - Fiber: 0g - Sodium: 600mg This dish offers a good amount of protein while keeping the carbs low. The honey adds sweetness, and the shrimp provide healthy nutrients. For the full recipe, check the link provided. To start, gather your ingredients. This makes cooking easier and faster. You need: - 1 pound large shrimp, peeled and deveined - 3 tablespoons honey - 3 tablespoons low-sodium soy sauce - 4 cloves garlic, finely minced - 1 tablespoon extra virgin olive oil - 1 teaspoon red pepper flakes - 1 teaspoon freshly grated ginger - 2 green onions, finely chopped (for garnish) - Toasted sesame seeds (for garnish) - Salt and freshly ground black pepper to taste In a medium bowl, mix the honey, soy sauce, minced garlic, red pepper flakes, and ginger. Whisk it well. Set this aside to let the flavors blend. Heat the olive oil in a large skillet over medium-high heat. Wait until it shimmers. While it heats, season the shrimp with salt and black pepper. Add the shrimp in a single layer in the skillet. Cook for about 2-3 minutes without stirring. This helps them turn pink and golden on one side. Use tongs to flip the shrimp over. Pour the honey garlic sauce over them. Sauté for another 1-2 minutes. The shrimp should be fully cooked and glossy with sauce. Remove the skillet from heat. Sprinkle the green onions and sesame seeds over the shrimp. This adds flavor and crunch. If you use smaller shrimp, reduce the cooking time. Cook them for 1-2 minutes on each side. For jumbo shrimp, increase cooking time to about 3-4 minutes per side. Always check if they turn pink and are opaque. This means they are fully cooked. Enjoy this spicy honey garlic shrimp dish, and don’t forget to check the Full Recipe for more details! To get the best shrimp, look for large, firm shrimp. They should feel smooth and have a fresh smell. Avoid shrimp that smell like ammonia or are slimy. Fresh shrimp have a slight sheen and a pink color. If buying frozen shrimp, check for ice crystals. This means they may have thawed and refrozen. Cook shrimp quickly using high heat. This keeps them juicy and tender. Start with a hot pan and add oil. Add shrimp in a single layer; avoid crowding. Cook for just 2-3 minutes on one side until pink. Flip and then add your sauce. Cook for another 1-2 minutes until cooked through. To boost flavor, add fresh herbs like cilantro or parsley. You can also use lime juice for a zesty kick. For extra heat, toss in more red pepper flakes. Want more depth? Try adding a splash of rice vinegar or a bit of sesame oil. These small changes can make your shrimp pop with flavor. For the full recipe, check out the [Full Recipe]. {{image_4}} You can easily add veggies to this dish. Bell peppers, snap peas, or broccoli work great. Start by sautéing the vegetables in the skillet before adding the shrimp. This way, they cook together perfectly. Toss them in with the shrimp and sauce for a balanced meal. The veggies soak up the sweet and spicy sauce, making each bite even better. Grilling is a fantastic way to enjoy this shrimp. Marinate the shrimp in the honey garlic sauce for about 30 minutes. Preheat your grill to medium heat. Skewer the shrimp and grill for 2-3 minutes on each side. You’ll get a nice char and smoky flavor. This method is perfect for summer cookouts or outdoor gatherings. Turn this dish into tacos for a fun twist. Use corn tortillas or flour ones, whichever you prefer. Cook the shrimp as usual, then fill each taco with them. Top with cabbage, avocado, and a squeeze of lime. The crunch from the cabbage and creaminess from the avocado balance the heat. Enjoy these tacos with your friends for a tasty meal. For the full recipe, check the section above. To keep your spicy honey garlic shrimp fresh, let it cool first. Place the shrimp in an airtight container. Store it in the fridge for up to three days. This way, you can enjoy it again later. When you're ready to eat the leftovers, reheat them gently. Use a skillet over medium heat. Add a splash of water or broth to keep the shrimp moist. Stir it often so it heats evenly. This will help maintain its flavor and texture. If you want to store shrimp longer, freezing is a great option. First, cool the shrimp completely. Then, place it in a freezer-safe bag. Squeeze out any air before sealing it. You can keep it in the freezer for up to three months. When you're ready to eat, thaw it overnight in the fridge. Reheat as mentioned above for the best taste. For the full recipe, check out the details to make this tasty dish! The best way to peel shrimp is to start at the head. Hold the body and gently pull off the shell. You can also pinch the tail to detach it. To devein, make a shallow cut along the back. Use a small knife or toothpick to pull out the dark vein. Rinse the shrimp under cold water after. This step helps clean them well. Yes, you can make Spicy Honey Garlic Shrimp in advance. Cook the shrimp and sauce, then let them cool. Store them in an airtight container in the fridge. They will stay fresh for up to two days. When ready to serve, reheat them in a skillet. This helps keep their flavor bright and tasty. You can serve Spicy Honey Garlic Shrimp with several delicious sides. Steamed jasmine rice is a classic choice. It soaks up the sauce well. You can also try it with quinoa for a healthier option. Fresh veggies or a crisp salad add color and crunch. For more details on the full recipe, check out the Full Recipe section. In this blog post, we explored the complete guide to making Spicy Honey Garlic Shrimp. We covered the ingredients, including substitutions and nutritional info. You learned step-by-step instructions for prep and cooking, adjusted for shrimp sizes. The tips shared help you choose the best shrimp and achieve perfect flavor. We also discussed tasty variations and storage tips for leftovers. Remember, you can find the full recipe for Spicy Honey Garlic Shrimp linked in this post. Enjoy cooking and sharing your delicious dish!](https://goldendishy.com/wp-content/uploads/2025/06/cf05c4bf-72ca-4483-afe2-f2d6fc570350-768x768.webp)
![Zesty Spaghetti Aglio e Olio Ingredients: - 400g spaghetti - 6 cloves garlic, thinly sliced - ½ cup extra virgin olive oil - 1 teaspoon red pepper flakes (or to taste) - Zest of 1 lemon - Juice of 1 lemon - ¼ cup fresh parsley, finely chopped - Salt, to taste - Freshly grated Parmesan cheese (optional, for garnish) Spaghetti Aglio e Olio shines with simple, fresh ingredients. Each plays a vital role. - Spaghetti: This serves as the base of the dish. Choose high-quality pasta for the best texture. - Garlic: Fresh garlic gives a rich flavor. Use thin slices for even cooking. - Olive Oil: Extra virgin olive oil adds depth. It also helps infuse the garlic flavor. - Red Pepper Flakes: These provide heat. Adjust the amount to match your spice level. - Lemon: Zest and juice add brightness. They balance the richness of the oil. - Parsley: Fresh parsley adds color and freshness. It complements the garlic. Sometimes, you may need to swap ingredients. Here are some great options: - Pasta: Use any long pasta, like linguine or fettuccine. - Garlic: Garlic powder can work in a pinch, but fresh is best. - Olive Oil: Avocado oil is a good alternative. It has a similar flavor. - Red Pepper Flakes: Fresh chili or hot sauce can replace flakes for heat. - Lemon: Lime juice can work if you’re out of lemons. - Parsley: Basil or chives can add a different yet tasty note. This dish is all about the balance of flavors. Each ingredient enhances the others. Enjoy your cooking journey with Spaghetti Aglio e Olio! Start by filling a large pot with water. Add a lot of salt to the water. This step helps to flavor the spaghetti. Bring the water to a rolling boil. Add the spaghetti and cook it according to the package instructions. Usually, this takes about 8-10 minutes for 'al dente' pasta. Once it is cooked, save 1 cup of the pasta water. Drain the spaghetti in a colander. In a large skillet, heat the extra virgin olive oil over medium heat. When the oil is warm, add the thinly sliced garlic and red pepper flakes. Sauté the garlic gently, stirring often for about 2-3 minutes. Watch the garlic closely; you want it golden brown and fragrant, not burnt. Burnt garlic can turn the dish bitter, which is not what we want! Once the garlic is ready, carefully add the drained spaghetti to the skillet. Use tongs or a pasta fork to toss the spaghetti. Make sure each strand is coated in the garlic oil. If the pasta looks dry, add some reserved pasta water, one tablespoon at a time. Keep tossing until you reach the sauciness you like. Now, remove the skillet from the heat. Add the lemon zest and juice to the pasta. Toss everything well to mix. Season with salt according to your taste. Then, gently fold in the finely chopped parsley. This adds color and flavor to your dish. To get the best spaghetti, cook it until it is 'al dente.' This means it should still have a little bite. Fill a large pot with water and add a good amount of salt. Bring the water to a boil. Add the spaghetti and follow the package instructions. Usually, this takes about 8 to 10 minutes. Before draining, save a cup of the cooking water. This water helps to moisten the pasta later. Garlic is key in Spaghetti Aglio e Olio. Use fresh cloves and slice them thinly. Heat the olive oil in a skillet on medium heat. Add the sliced garlic and red pepper flakes. Stir gently for 2 to 3 minutes until the garlic turns golden. Be careful not to burn it! After mixing in lemon zest and juice, you add a bright taste. The lemon cuts through the richness and lifts the dish. Serving matters! Use warm bowls to keep your pasta hot. After plating, drizzle some of the leftover garlic oil over the spaghetti. This adds flavor and shine. Garnish with fresh parsley for color. A lemon wedge on the side adds a fun touch. When your guests squeeze it over their pasta, the dish becomes even more zesty. For a special finish, you can sprinkle on some grated Parmesan cheese. This makes the dish look gourmet, even though it’s simple to make. Enjoy your flavorful garlic pasta dish! For the complete recipe, check out the full recipe. {{image_4}} You can easily make Spaghetti Aglio e Olio heartier by adding proteins like shrimp or chicken. For shrimp, use raw, peeled shrimp. Sauté them in the garlic oil for about 3-4 minutes until they are pink and cooked through. If you prefer chicken, use diced chicken breast. Cook it in the oil until it's no longer pink. This adds great flavor and makes the dish more filling. If you want a vegetarian twist, consider adding greens. Spinach or kale works great. Add them to the skillet after the garlic has cooked. Stir until the greens wilt and mix well with the garlic oil. This not only adds color but also boosts the nutrition of your meal. You can also use peas for a pop of sweetness. For those who love heat, you can adjust the red pepper flakes to your taste. Start with the recommended amount, then add more if you want it spicier. If you want a unique twist, try adding sliced fresh chili peppers or a dash of hot sauce. This will give your dish a vibrant kick and enhance the overall flavor profile. Experimenting with these variations makes Spaghetti Aglio e Olio fun and exciting. You can enjoy it just the way you like! For the full recipe, check out the details above. To keep your leftover spaghetti aglio e olio fresh, follow these steps: - Let the pasta cool down to room temperature. - Place it in an airtight container. - Store it in the fridge for up to three days. This method helps maintain the flavors and texture of your dish. When reheating spaghetti aglio e olio, I recommend these tips: - Use a skillet over medium heat. - Add a splash of olive oil for moisture. - Stir frequently to prevent sticking. You can also microwave it. Just cover it and add a little water. Heat in short bursts, stirring in between. If you want to freeze spaghetti aglio e olio, do this: - Place cooled pasta in a freezer-safe bag. - Remove excess air and seal tightly. - Store in the freezer for up to two months. When ready to eat, thaw in the fridge overnight. Reheat on the stove for the best taste. Enjoy your flavorful garlic pasta dish again! For the full recipe, check out the [Full Recipe]. Spaghetti Aglio e Olio is a simple pasta dish from Italy. It features spaghetti tossed with garlic and olive oil. The dish gets a kick from red pepper flakes. It’s quick to make and uses few ingredients. This makes it perfect for a weeknight meal. You can find the full recipe [here](#). Yes, you can easily make this dish vegan. Just skip the Parmesan cheese that some people use. The rest of the recipe is naturally vegan. The garlic oil and pasta create a rich flavor on their own. You won’t miss the cheese at all! To make Spaghetti Aglio e Olio less spicy, reduce the red pepper flakes. Start with half a teaspoon instead of a full teaspoon. You can also omit them if you prefer no heat. The garlic and olive oil will still give great flavor. Adjusting the spice level allows everyone to enjoy this dish. You’ve learned how to make Spaghetti Aglio e Olio. We covered essential ingredients and tasty substitutes. The step-by-step guide helped simplify cooking and mixing. Tips showed how to perfect texture and flavor. The variations let you customize your dish, making it unique. Lastly, we talked about storing and reheating leftovers. Now, you can enjoy this dish any time. With simple steps, you’ll impress family and friends. Dive into your kitchen and try it out today!](https://goldendishy.com/wp-content/uploads/2025/06/d19134da-6fc7-4b27-a706-dd24852a29ee-768x768.webp)