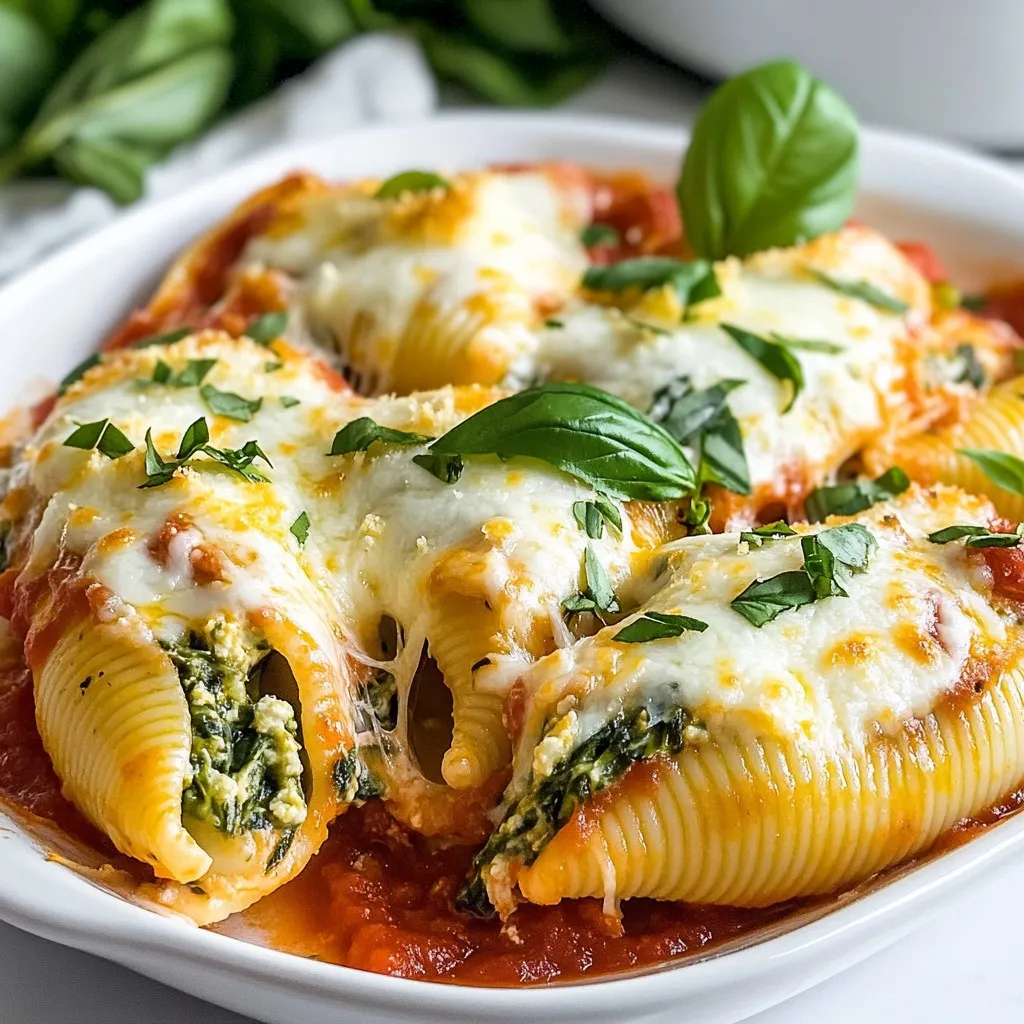
Cheesy Spinach Stuffed Shells Flavorful and Easy Dish


If you’re craving a warm, cheesy dish that’s both easy to make and delicious, you’re in the right place. Cheesy Spinach Stuffed Shells combine jumbo pasta shells, fresh spinach, and a blend of cheeses for a meal that’s sure to please anyone at your table. In this post, I’ll guide you through each step, share tips for perfecting the dish, and offer creative variations. Let’s dive in and make your next family meal unforgettable!
Why I Love This Recipe
- Deliciously Cheesy: The combination of ricotta, mozzarella, and Parmesan creates a creamy and rich filling that melts in your mouth.
- Nutritious Spinach: Packed with fresh spinach, this dish not only tastes amazing but also adds a healthy dose of greens to your meal.
- Comfort Food Classic: Stuffed pasta shells are a beloved comfort food that is perfect for family dinners or cozy nights in.
- Easy to Prepare: With simple ingredients and straightforward steps, this recipe is accessible for cooks of all skill levels.
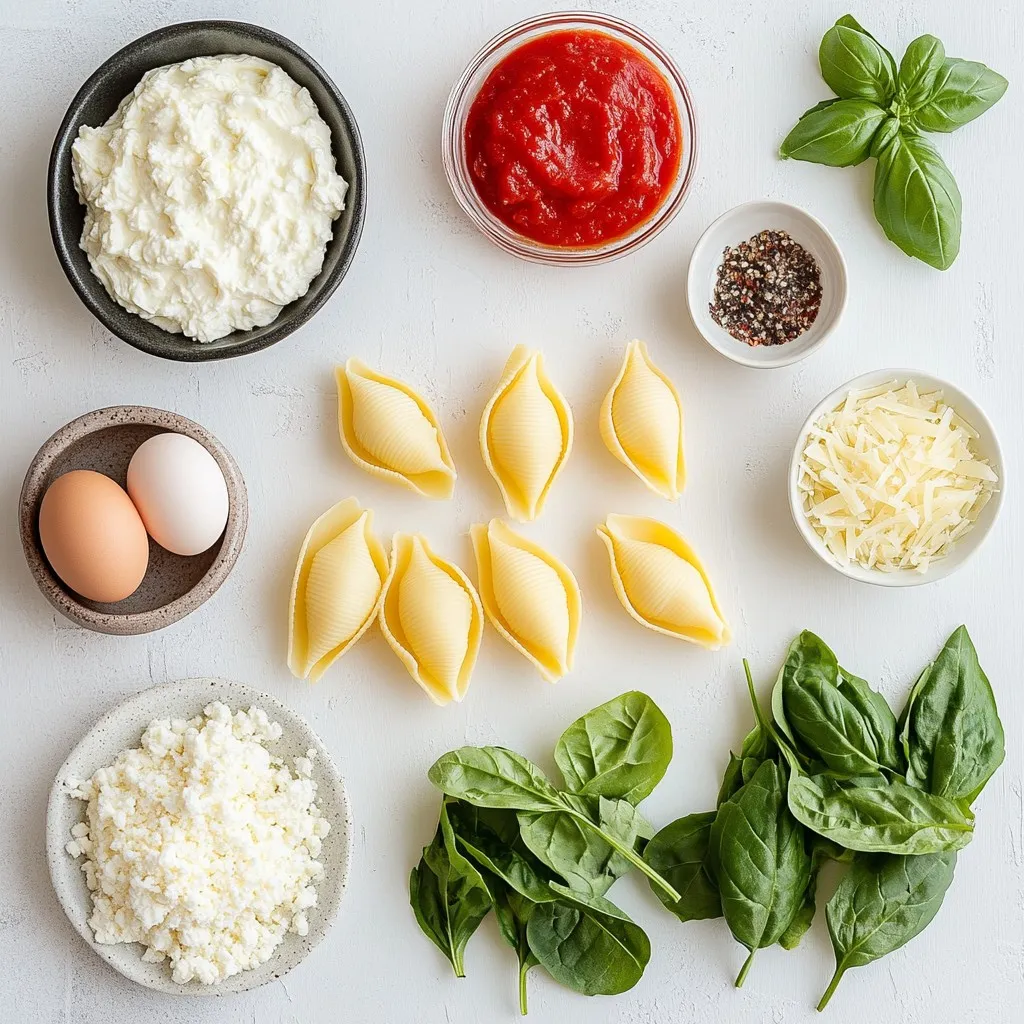
Ingredients
Main Ingredients
– 20 jumbo pasta shells
– 2 cups fresh spinach, finely chopped
– 1 cup ricotta cheese
– 1 cup shredded mozzarella cheese, divided
– 1/2 cup grated Parmesan cheese
Seasoning and Extras
– 1 teaspoon garlic powder
– 1/2 teaspoon onion powder
– Salt and black pepper, to taste
– 2 cups marinara sauce, divided
Garnishing
– Fresh basil leaves
The main ingredients create a rich and creamy filling. Jumbo pasta shells serve as a perfect vessel for this delicious mix. I love using fresh spinach for its vibrant color and flavor. Ricotta cheese adds a smooth texture, while mozzarella cheese gives it that stretchy, melty goodness. Grated Parmesan cheese provides a lovely nutty taste that brings all the flavors together.
For seasoning, garlic powder and onion powder add depth without overpowering the dish. A sprinkle of salt and black pepper helps balance the flavors. Marinara sauce not only adds moisture but also a bright acidity that complements the creamy filling.
Finally, garnishing with fresh basil leaves adds a burst of color and a hint of freshness. This combination makes for a simple yet tasty dish that you can enjoy any night of the week.
Step-by-Step Instructions
Prepping the Pasta
First, preheat your oven to 375°F (190°C). Next, bring a large pot of salted water to a boil. Cook the jumbo pasta shells according to the package directions until they are al dente. This should take about 10-12 minutes. Once cooked, drain the shells well. Set them aside to cool for a few minutes.
Making the Filling
In a large mixing bowl, combine the finely chopped spinach, ricotta cheese, 1/2 cup of shredded mozzarella cheese, grated Parmesan cheese, and a beaten egg. Add garlic powder, onion powder, and a sprinkle of salt and pepper. Mix all the ingredients thoroughly until you have a creamy filling. This step is key for great flavor.
Assembling the Dish
Now comes the fun part: stuffing the pasta shells! Take each cooled shell and gently stuff it with the spinach and cheese mixture. Be careful not to tear the shell. In a glass or ceramic baking dish, pour 1 cup of marinara sauce evenly across the bottom. This helps prevent sticking. Arrange the stuffed shells in the dish with the openings facing up. Cover the shells with the remaining marinara sauce, making sure each shell is well coated.
Sprinkle the remaining 1/2 cup of shredded mozzarella cheese evenly over the top. Cover the dish tightly with aluminum foil and place it in the preheated oven. Bake for 25 minutes. After that, carefully remove the foil and bake for an additional 10-15 minutes. This helps the cheese become bubbly and golden brown. Once done, take the dish out of the oven and let it cool for about 5 minutes. Garnish with fresh basil leaves just before serving. Enjoy!
Tips & Tricks
Perfecting the Filling
To make the filling just right, use fresh spinach. It adds great flavor. Chop it finely for an even blend. Mix it with ricotta and mozzarella for creaminess. The egg binds it all together.
Seasoning is key. Start with garlic powder and onion powder. Add salt and pepper to your taste. If you like it spicy, try adding a pinch of red pepper flakes. Taste the filling as you mix. Adjust until it’s just right.
Baking Techniques
Cover the dish with foil when baking. This keeps the shells moist and tender. After 25 minutes, remove the foil. This helps the cheese brown nicely. Watch the cheese closely; you want it bubbly and golden.
If you want extra crispiness, broil for a minute or two at the end. Just keep an eye on it. You don’t want burnt cheese!
Serving Suggestions
For a beautiful presentation, serve on warm plates. Drizzle marinara sauce around the shells. Scatter fresh basil leaves on top for color. This makes the dish look fresh and inviting.
Pair these stuffed shells with a simple green salad. A light vinaigrette works well. Garlic bread is also a great choice. Enjoy your meal with a side that complements the rich flavors!
Pro Tips
- Perfect Pasta Texture: Make sure to cook the jumbo shells al dente, as they will continue to cook in the oven. This prevents them from becoming mushy.
- Customize Your Cheese: Feel free to experiment with different types of cheese in the filling. Adding feta or goat cheese can give a unique flavor twist.
- Extra Flavor Boost: For more depth of flavor, sauté the spinach in a little olive oil and minced garlic before mixing it into the cheese filling.
- Make Ahead: These stuffed shells can be assembled ahead of time and stored in the fridge. Just bake them when you’re ready to serve for a quick meal.
Variations
Ingredient Substitutions
If you want to change the cheese, try cottage cheese instead of ricotta. It gives a nice texture too. You can also use goat cheese for a tangy flavor. If you want more veggies, add chopped mushrooms or bell peppers. These add great taste and color to your dish.
Dietary Adaptations
For a gluten-free version, choose gluten-free jumbo shells. They work just as well. If you want a vegan dish, skip the egg and use tofu instead of cheese. Blend the tofu with spices to mimic the creamy filling. You can also use nutritional yeast for a cheesy taste.
Flavor Enhancements
To add more flavor, mix in some Italian herbs like oregano or basil. A pinch of red pepper flakes gives a nice kick. For toppings, try adding breadcrumbs for crunch or more cheese for extra gooeyness. You can also drizzle olive oil before serving for a rich finish.
Storage Info
Storing Leftovers
To keep your cheesy spinach stuffed shells fresh, store them in an airtight container. You can refrigerate them for up to three days. If you want to save them for longer, freezing is a great option. Place the cooled shells in a freezer-safe container or wrap them tightly in plastic wrap. They can last up to three months in the freezer.
Reheating Instructions
When you’re ready to enjoy your leftovers, reheating is simple. You can use the oven or microwave. For the oven, preheat it to 350°F (175°C). Place the shells in a baking dish, cover with foil, and heat for about 20 minutes. This method keeps the flavors rich and the cheese melty. If you use a microwave, place a few shells on a plate and cover them with a damp paper towel. Heat in 30-second intervals until warm. This helps keep the shells moist.
Shelf Life
Cheesy spinach stuffed shells can stay safe to eat for up to three days in the fridge. If frozen, they are good for about three months. After that, the taste and texture may change. Always check for any signs of spoilage before eating.
FAQs
Can I make cheesy spinach stuffed shells ahead of time?
Yes, you can prep cheesy spinach stuffed shells ahead of time. Make the filling and stuff the shells. Place them in a baking dish with marinara sauce. Cover the dish with foil and store it in the fridge. They will stay fresh for up to two days. When you’re ready to bake, add a few extra minutes to the cook time. You can also freeze the stuffed shells. Just wrap them tightly in plastic wrap and then foil. They can last for up to three months in the freezer. Thaw them in the fridge before baking.
What can I serve with cheesy spinach stuffed shells?
Cheesy spinach stuffed shells pair well with many side dishes. I suggest a simple green salad with a light vinaigrette. Garlic bread is another great choice, adding a crunchy texture. You could also serve steamed vegetables like broccoli or green beans. For a heartier option, a side of roasted potatoes would work well too.
How do I know when the shells are fully cooked?
You can tell when the shells are fully cooked by checking the cheese. It should be bubbly and golden brown on top. The sauce should be hot and slightly bubbling around the edges. If you insert a knife into the filling, it should feel warm throughout. Make sure not to overbake them, as they can dry out.
Can I use frozen spinach instead of fresh?
Yes, you can use frozen spinach in this recipe. Frozen spinach is convenient and saves prep time. Just be sure to thaw it and drain off excess water before using. However, fresh spinach has a brighter flavor and better texture. Frozen spinach may also become mushy in the filling. So, if you want the best taste, fresh spinach is the way to go.
Cheesy spinach stuffed shells are easy and fun to make. We covered the key ingredients, like jumbo shells, spinach, and different cheeses. I shared steps to prepare, stuff, and bake your dish perfectly. Use my tips to enhance flavors or make it gluten-free or vegan. Store leftovers the right way to keep them fresh. Enjoy these shells with a side salad or a tasty sauce. I hope you feel ready to create a delicious mea

Cheesy Spinach Stuffed Shells
Ingredients
- 20 pieces jumbo pasta shells
- 2 cups fresh spinach, finely chopped
- 1 cup ricotta cheese
- 1 cup shredded mozzarella cheese, divided
- 1/2 cup grated Parmesan cheese
- 1 large egg, beaten
- 1 teaspoon garlic powder
- 1/2 teaspoon onion powder
- to taste salt and freshly ground black pepper
- 2 cups marinara sauce, divided
- for garnish fresh basil leaves
Instructions
- Preheat your oven to 375°F (190°C).
- Bring a large pot of salted water to a boil and cook the jumbo pasta shells according to the package directions until they are al dente. Once cooked, drain them well and set aside to cool for a few minutes.
- In a large mixing bowl, combine the chopped spinach, ricotta cheese, 1/2 cup of the shredded mozzarella cheese, grated Parmesan cheese, beaten egg, garlic powder, onion powder, and a sprinkle of salt and pepper. Stir well until all ingredients are thoroughly combined into a creamy filling.
- Take each cooled pasta shell and gently stuff it with the spinach and cheese mixture, being careful not to tear the shell.
- In a glass or ceramic baking dish, pour 1 cup of marinara sauce evenly across the bottom to prevent sticking.
- Arrange the stuffed shells in the dish with the openings facing up. Cover the shells with the remaining marinara sauce, ensuring each shell is generously coated for optimal flavor and moisture.
- Sprinkle the remaining 1/2 cup of shredded mozzarella cheese evenly over the top of the stuffed shells.
- Cover the dish tightly with aluminum foil and place it in the preheated oven. Bake for 25 minutes.
- After 25 minutes, carefully remove the foil and bake for an additional 10-15 minutes, or until the cheese becomes bubbly and turns a lovely golden brown.
- Once done, take the dish out of the oven and let it cool for about 5 minutes. Garnish with fresh basil leaves just before serving for an aromatic touch.
![- 2 medium sweet potatoes, peeled and cut into ½-inch cubes - 1 can (15 oz) black beans, drained and thoroughly rinsed - 1 can (14 oz) diced tomatoes, including their juices - 1 medium onion, finely chopped - 2 cloves garlic, minced - 1 red bell pepper, diced - 2 tablespoons olive oil - 2 tablespoons chili powder - 1 teaspoon ground cumin - ½ teaspoon smoked paprika - 1 cup vegetable broth - Salt and pepper, to taste To make my sweet potato and black bean chili pop with flavor, I focus on fresh ingredients. The sweet potatoes provide a creamy texture and a hint of sweetness. I use black beans for protein and fiber, which makes this dish filling. The diced tomatoes add acidity and moisture, balancing the flavors. Aromatics like onion, garlic, and red bell pepper create a fragrant base. Olive oil helps to sauté these ingredients, unlocking their full taste. I season the chili with chili powder, cumin, and smoked paprika. These spices bring warmth and depth to the dish. Vegetable broth adds richness, making the chili hearty and satisfying. Don’t forget to season with salt and pepper to taste; this step enhances every bite. - Fresh cilantro - Avocado slices For extra flavor, I love to add fresh cilantro on top. It gives the chili a fresh kick. Avocado slices add a creamy touch, making each bowl even more delicious. The chili is packed with nutrients. One serving has about 300 calories. It offers a good mix of proteins, carbs, and healthy fats. Each ingredient brings its own health benefits: - Sweet Potatoes: High in vitamins A and C, they support your immune system. - Black Beans: Rich in fiber, they aid digestion and keep you full. - Diced Tomatoes: Loaded with antioxidants, they help fight inflammation. - Aromatics: Onions and garlic have heart health benefits. - Olive Oil: Contains healthy fats that support brain health. Enjoying this chili not only warms your belly but also fuels your body with great nutrition. For the full recipe, you can check out my Sweet Potato and Black Bean Chili. How to Prepare and Cut Sweet Potatoes To start, grab two medium sweet potatoes. Use a peeler to remove the skin. Cut them into ½-inch cubes. This size helps them cook evenly. Place the cubes in a bowl of water to prevent browning. Tips for Cooking Aromatics For the aromatics, chop one medium onion finely. Mince two cloves of garlic. Dice one red bell pepper. These add flavor and depth. Heat two tablespoons of olive oil in a large pot over medium heat. Once hot, add the onion. Sauté for about 3-4 minutes until soft. Detailed Instructions for Sautéing and Simmering Next, stir in the minced garlic and diced bell pepper. Cook for an additional two minutes until fragrant. Now, add the sweet potato cubes. Stir well and cook for about five minutes. This helps to soften them before the chili cooks. Sprinkle in two tablespoons of chili powder, one teaspoon of ground cumin, and ½ teaspoon of smoked paprika. Season with salt and pepper. Stir until the sweet potatoes are coated with the spices. Then, pour in a can of diced tomatoes and one cup of vegetable broth. Timing for Each Step Bring the mixture to a gentle boil. Then, lower the heat and cover the pot. Let it simmer for 25-30 minutes, or until the sweet potatoes are fork-tender. After this, add one can of drained and rinsed black beans. Simmer for another 5-10 minutes to warm them through. Adjusting Seasoning Before Serving Taste the chili and adjust seasoning as needed. Add more salt or pepper if you like. This helps enhance the flavors. Presentation Recommendations Ladle the hot chili into deep bowls. Drizzle a little olive oil over the top for richness. Garnish with freshly chopped cilantro. If you love creaminess, add slices of avocado on top. For the full recipe, check out the details above. To make the best sweet potato chili, start with the sweet potatoes. Cut them into small, even cubes. This helps them cook faster and evenly. I always peel them for a smoother taste. Cook them until they are soft but not mushy. This gives your chili the right texture. When cooking aromatics like onion and garlic, avoid burning them. Use medium heat and stir often. If they start to brown too fast, lower the heat. This way, you keep their sweet flavor. A little patience goes a long way. To make your chili even better, try adding more spices. A pinch of cayenne or a splash of hot sauce can add a kick. You can also add smoked paprika for a deeper flavor. Each spice brings something unique to the table. Experiment and find what you like best! If you want heat, add jalapeños or other fresh peppers. Dice them small to mix in well. Start with a small amount, then taste and adjust. You can always add more, but it’s hard to take it out! For a complete meal, serve your chili with bread or rice. I love cornbread with mine for a classic touch. It adds a nice crunch and sweetness. You can also serve it over rice for a filling option. Want to add a fresh touch? Serve with lime wedges and sour cream. They brighten the dish and cool the heat. If you want a healthy twist, add avocado slices on top. They give a creamy finish and pair well with the chili. For the full recipe, visit the link provided. Enjoy your cooking adventure! {{image_4}} You can easily switch up the beans in this chili. Try using pinto beans or kidney beans for a new twist. They offer a different taste but still pair well with sweet potatoes. If you prefer a meat option, ground turkey or beef can be added. Just brown the meat before adding other ingredients. For vegan or vegetarian choices, this recipe is perfect as is. It uses no animal products. You can add tofu or tempeh for extra protein if desired. Both options blend well with the flavors of the chili. You can make this chili in a slow cooker. Just add all your ingredients into the cooker. Set it on low and let it cook for 6-8 hours. If you want a quicker option, use an Instant Pot. Cook on high pressure for 10 minutes, then let it release naturally. Both methods create a rich flavor. Feel free to add seasonal vegetables to your chili. Zucchini, corn, or bell peppers can enhance the dish. They bring freshness and crunch to each bite. When the weather changes, you can adapt the chili. In colder months, add warming spices like cinnamon or nutmeg. On hot days, serve it chilled or over a salad for a refreshing twist. For the full recipe, click here: [Full Recipe]. To keep your chili fresh, store it in an airtight container. Place it in the fridge as soon as it cools down. This helps keep flavors strong. Sweet potato and black bean chili lasts about 3 to 5 days in the fridge. If you want to save some for later, freezing is a great option. Portion out your chili into smaller containers. Make sure to leave some space at the top, as it will expand when frozen. Sweet potato and black bean chili can last up to 3 months in the freezer. When you're ready to eat it, thaw it in the fridge overnight. For reheating, you can use the stove or microwave. If using the stove, heat on low until warm. Stir occasionally to prevent sticking. In the microwave, heat in short bursts, stirring in between. Always check the temperature. It should be hot all the way through. Chili is perfect for meal prep. You can make a big batch for the week. Serve it with rice or quinoa for a complete meal. You can also use the chili in other dishes. Try it in burritos, tacos, or even over a baked potato. This adds variety to your meal plan without much extra work. Check out the Full Recipe for more details on making this delicious dish! What can I serve with Sweet Potato and Black Bean Chili? You can enjoy this chili with warm cornbread, rice, or tortilla chips. A fresh salad also pairs well. For a complete meal, add avocado slices on top for creaminess. How spicy is this chili? This chili has a mild spice level. The chili powder adds flavor without too much heat. If you like it spicy, add some chopped jalapeños or hot sauce. Can I use fresh tomatoes instead of canned? Yes, you can use fresh tomatoes. Dice about four medium tomatoes. Just remember to adjust the liquid since fresh tomatoes have less juice than canned ones. How can I make this chili gluten-free? The ingredients in this chili are naturally gluten-free. Just check your chili powder and broth labels to ensure they are gluten-free. Is Sweet Potato and Black Bean Chili healthy? Yes, this chili is very healthy! Sweet potatoes are full of vitamins and fiber. Black beans offer protein and iron. Together, they make a nutritious meal. Can I eat it on a plant-based diet? Absolutely! This chili is plant-based and vegan-friendly. It’s a great choice for anyone looking to eat more plant-based meals. Enjoy it with confidence! This blog covered making a delicious Sweet Potato and Black Bean Chili. We discussed essential ingredients, health benefits, and cooking steps. You learned about tips for perfecting your chili and suggested variations to keep it fresh. Proper storage and meal prep ideas ensure you enjoy it later. Remember, this chili is flexible and healthy. Experiment with flavors and ingredients for your taste. Enjoy your cooking journey!](https://goldendishy.com/wp-content/uploads/2025/06/98b7eb11-b0dd-4c6d-9f71-53ea28c64add-768x768.webp)
![- Bell peppers and their colors: You can use four large bell peppers. Choose any color you like: red, yellow, green, or orange. Each adds its own taste and look to the dish. - Protein options: For the filling, you can select either ground turkey or beef. Both options will give you a hearty and satisfying meal. - Base ingredients: You will need one cup of cooked rice. You can use either white or brown rice. Additionally, add one cup of black beans, rinsed and drained, and one cup of corn. You can choose fresh, frozen, or canned corn. - Flavor enhancers: To boost the flavor, use one cup of salsa. You can pick your favorite brand or make it homemade. Also, add one tablespoon of taco seasoning. You can use store-bought or make your own. - Toppings: For the top of the peppers, use one cup of shredded cheddar cheese. This cheese gives a nice gooey texture. You can add extra cheese for a more decadent touch. Fresh cilantro is a great garnish, adding color and a bit of fresh flavor. You can find the full recipe in the earlier sections of this article. Happy cooking! Preheat the oven to 375°F (190°C). This helps cook the peppers evenly. While it heats, grab a baking dish. Set it aside for the stuffed peppers. Prepare the bell peppers by slicing the tops off. Remove the seeds and membranes, which can taste bitter. Brush each pepper with olive oil. This adds flavor and helps them roast nicely. Place the peppers upright in the baking dish. Cook the meat in a large skillet over medium heat. Add 1 pound of ground turkey or beef. Break it apart with a spatula as it cooks. Make sure it browns well. Once cooked, drain any excess fat. This keeps the filling lean and tasty. Next, add rice, black beans, corn, salsa, and seasoning to the skillet. Use 1 cup of cooked rice, 1 cup of rinsed black beans, and 1 cup of corn. Pour in 1 cup of salsa and 1 tablespoon of taco seasoning. Sprinkle some salt and pepper too. Mix everything well. Simmer the mixture for about 5 minutes. This lets the flavors meld together, making the filling more delicious. Stir it occasionally to avoid sticking. Now, mix in half of the shredded cheddar cheese. This makes the filling creamy and rich. Remove the skillet from heat. Stuff the peppers by spooning the mixture into each one. Press down gently to pack it in well. This ensures every bite is full of flavor. Top with more cheese by sprinkling the remaining cheddar over each filled pepper. It will melt and brown nicely while baking. Bake the peppers by covering the baking dish with aluminum foil. Place it in the oven for 25-30 minutes. In the last 10 minutes, remove the foil. This helps the cheese bubble and turn golden. Once done, cool the peppers for a few minutes before serving. The filling will be very hot. If you like, garnish with fresh cilantro for extra flavor. Enjoy your taco stuffed bell peppers! Remember, you can find the full recipe above for all the details. How to choose fresh bell peppers: Pick bell peppers that are firm and shiny. Look for smooth skin with no blemishes. A good pepper feels heavy for its size. Colors like red, yellow, and orange are sweeter. Green peppers are a bit more bitter. All colors work well in this dish. Ensuring optimal cooking temperature and timing: Set your oven to 375°F (190°C) before you start cooking. This temperature helps the peppers cook evenly. Bake them for 25-30 minutes. In the last 10 minutes, uncover the dish to let the cheese brown. Suggestions for additional spices or ingredients: Add cumin or chili powder for an extra kick. You can also mix in diced tomatoes or jalapeños for more flavor. If you love heat, try adding some hot sauce to the filling. Offering a vegetarian option: For a vegetarian version, swap the meat for lentils or extra beans. You can use quinoa instead of rice for a healthy twist. This way, everyone can enjoy taco stuffed bell peppers! Plating ideas for presentation: Serve the peppers on a colorful platter. You can place them upright for a fun look. Add a dollop of sour cream on the side. Fresh cilantro on top adds a pop of green. Recommended side dishes for a complete meal: Pair your stuffed peppers with a fresh salad or tortilla chips. A side of guacamole or salsa also works great. These sides make the meal more fun and filling. For the full details, check out the Full Recipe! {{image_4}} You can mix up the protein in taco stuffed bell peppers. If you want a meatless option, try using black beans or lentils. They add great flavor and protein. For a twist, you can also use ground chicken or pork. When it comes to cheese, feel free to get creative. While cheddar is classic, you might try Monterey Jack or pepper jack for extra spice. You can also use cream cheese for a creamier filling. For salsa, any kind works! Chunky salsa adds texture, while smooth salsa blends in. You can even make your own with fresh tomatoes, onions, and peppers. Grilling adds a smoky flavor. Wrap the stuffed peppers in foil and place them on the grill. Cook for about 15 to 20 minutes until tender. You can also use a slow cooker. Place the stuffed peppers in the slow cooker with a bit of sauce. Cook on low for 4 to 6 hours for a hands-off approach. If you need a quick meal, the microwave is your friend. Just place the stuffed peppers in a microwave-safe dish. Cover with a lid or plastic wrap. Heat for about 5 to 7 minutes, checking for doneness. Using seasonal veggies makes your dish brighter. In summer, add fresh zucchini or corn. In fall, consider adding diced sweet potatoes or pumpkin. These add flavor and nutrition. For holidays, you can theme your peppers. For Halloween, use orange peppers and stuff them with spicy fillings. For Christmas, use red and green peppers and add festive spices. It’s a fun way to celebrate! For the full recipe, check out [Full Recipe]. To store leftovers, place the stuffed peppers in an airtight container. This keeps them fresh and tasty. You can keep them in the fridge for up to three days. Make sure they cool down first to avoid steam build-up. If you want to save some for later, freezing is a great option. Wrap each stuffed pepper tightly in plastic wrap. Then, place them in a freezer-safe bag. They can last for up to three months in the freezer. When you’re ready to eat, thaw them overnight in the fridge. To reheat, bake at 350°F (175°C) for about 25 minutes, or until heated through. For easy meal prep, you can cook a big batch in advance. Make the filling and stuff the peppers ahead of time. Store them in the fridge for two days before baking. This way, you can have a quick meal ready on busy nights. You can also use different colors of bell peppers for fun and variety. What can I substitute for rice in the recipe? You can use quinoa or cauliflower rice instead of regular rice. Quinoa adds protein and fiber. Cauliflower rice keeps it low-carb. Both options work well and keep the dish tasty. How do I know when the peppers are fully cooked? The peppers should be tender but not mushy. You can poke them with a fork. If they give easily but hold their shape, they are ready. The cheese should be melted and bubbly on top too! Caloric content and portion sizes Each stuffed pepper is about 300 calories. This includes the filling and toppings. If you use ground turkey, it may be lower in calories. Adjust the portion size based on your hunger. Health benefits of ingredients used Bell peppers are rich in vitamins A and C. They help boost your immune system. Black beans provide protein and fiber, promoting good digestion. Corn adds vitamins and a sweet crunch. What drinks pair well with taco stuffed bell peppers? A refreshing drink like lemonade or iced tea works great. For adults, a light beer or margarita adds fun. Choose drinks that balance the spice of the peppers. Can taco stuffed bell peppers be made in advance for gatherings? Yes! You can prepare the stuffed peppers ahead of time. Just store them in the fridge. Bake them when your guests arrive. They will taste fresh and hot from the oven! For the full recipe, check the earlier section. Taco stuffed bell peppers are fun and easy to make. We covered the key ingredients, steps, and helpful tips for a great dish. You learned how to mix flavors and pack ingredients for maximum yum. With ideas for storage and meal prep, you’re ready to enjoy these peppers anytime. Get creative with variations to keep things fresh. Whether for a family dinner or a gathering, these peppers can impress. Happy cooking!](https://goldendishy.com/wp-content/uploads/2025/06/e36cd186-0c48-4bd5-9184-2d07a9c06671-768x768.webp)