Jalapeño Cheddar Turkey Burgers Flavorful and Easy Recipe


Craving a juicy burger with a kick? My Jalapeño Cheddar Turkey Burgers are just what you need! This easy recipe combines lean turkey with melty cheddar and zesty jalapeños. You’ll love how simple it is to make these flavorful patties at home. Ready to fire up the grill? Let’s dive into creating a delicious meal that’s sure to impress your friends and family!
Why I Love This Recipe
- Bold Flavor Profile: The combination of jalapeños and sharp cheddar cheese creates a spicy and savory delight that tantalizes the taste buds.
- Healthier Option: Using ground turkey and whole wheat buns makes these burgers a leaner alternative without sacrificing flavor.
- Customizable Toppings: With options like avocado and fresh cilantro, you can personalize each burger to suit your taste.
- Quick and Easy Preparation: This recipe comes together in about 30 minutes, making it perfect for busy weeknights or weekend barbecues.
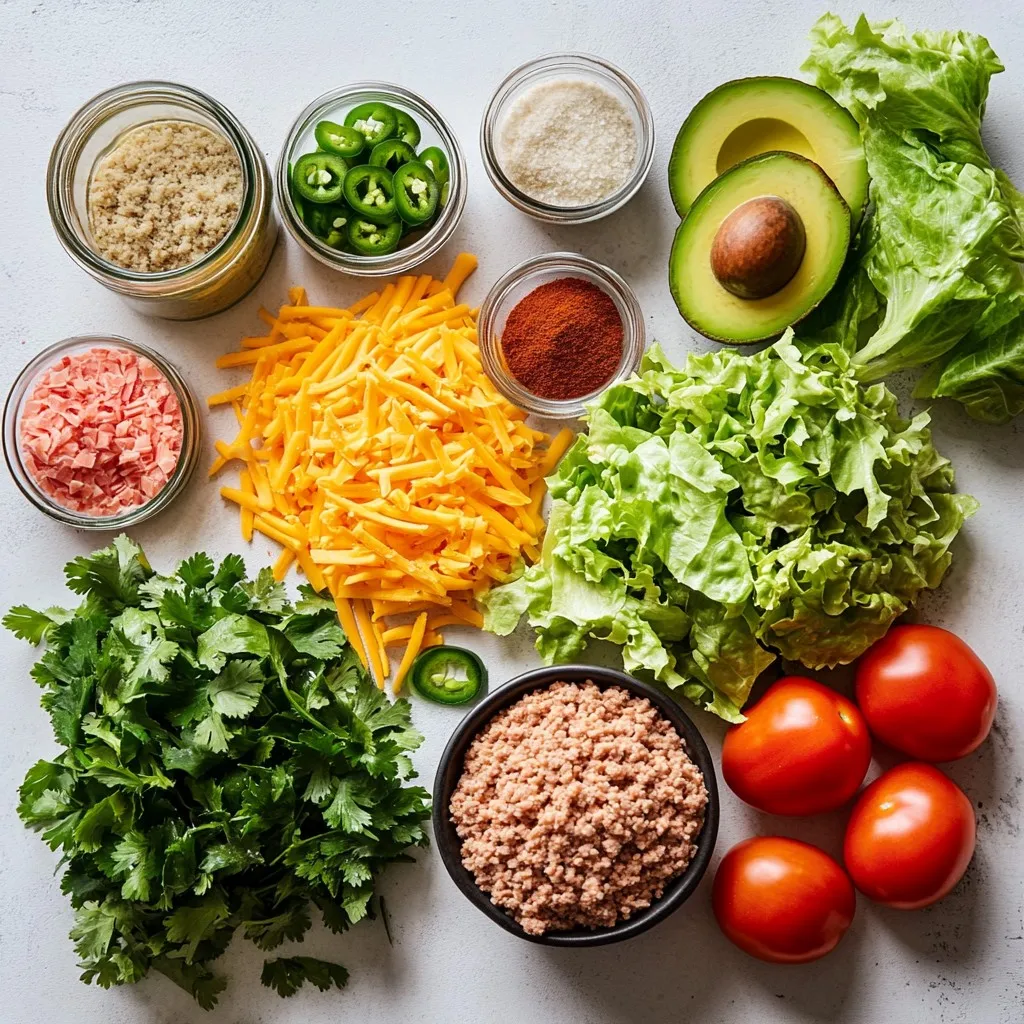
Ingredients
Main Components
– 1 lb ground turkey
– 1 cup sharp cheddar cheese, shredded
– 2 fresh jalapeños, finely chopped (seeds removed for milder flavor)
Binder and Seasoning
– 1/2 cup breadcrumbs
– 1/4 cup fresh cilantro, finely chopped
– 1 teaspoon garlic powder
– 1 teaspoon onion powder
– 1/2 teaspoon ground cumin
Additional Items
– Salt and pepper to taste
– 4 whole wheat burger buns
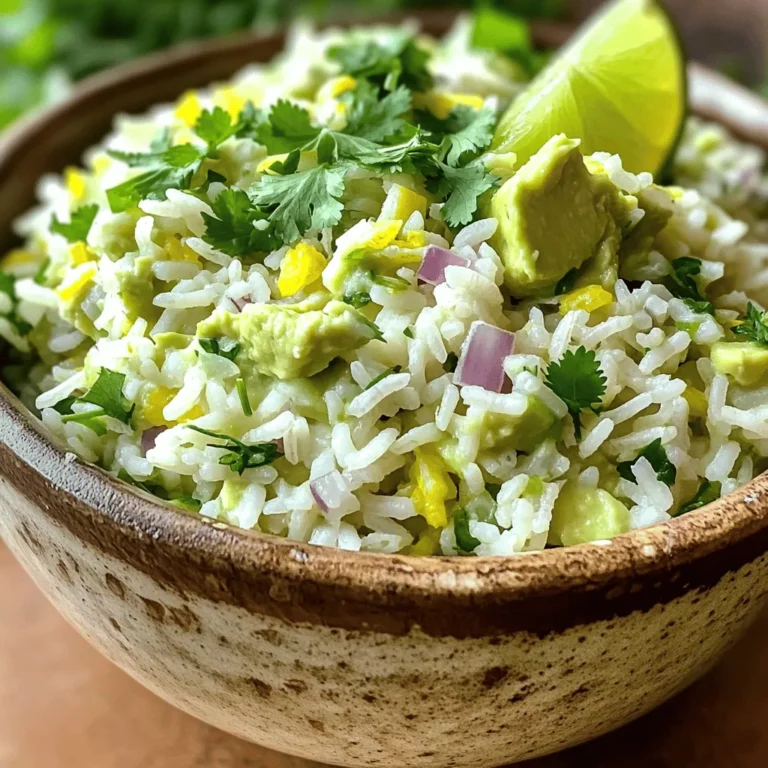
– Optional toppings: Lettuce, tomato, avocado
Gathering these ingredients is key. Each one plays a role in making these burgers tasty. Ground turkey serves as a lean protein base. Sharp cheddar cheese adds a rich, creamy flavor. Jalapeños bring a nice kick. You can adjust the heat by removing the seeds, which I often do for a milder taste.
The breadcrumbs help bind the mixture together. Fresh cilantro gives a burst of freshness. Garlic and onion powders add depth. Ground cumin adds warmth and earthiness. You can taste each layer of flavor in every bite.
Don’t forget salt and pepper! They enhance all the other flavors. Choose whole wheat burger buns for a healthier option, and feel free to add your favorite toppings. Fresh lettuce, juicy tomato slices, or creamy avocado all make great additions. Each ingredient brings something special, so have fun with it!
Step-by-Step Instructions
Prepare the Mixture
To start, grab a large mixing bowl. Add 1 pound of ground turkey. Next, toss in 1 cup of sharp cheddar cheese, shredded. Then, add 2 finely chopped jalapeños. Remove the seeds for less heat if you prefer. Now, sprinkle in 1/2 cup of breadcrumbs and 1/4 cup of fresh cilantro, finely chopped.
For flavor, include 1 teaspoon of garlic powder, 1 teaspoon of onion powder, and 1/2 teaspoon of ground cumin. Season with salt and pepper to taste. Mix everything thoroughly with your hands or a spatula. Make sure all the ingredients blend well.
Once mixed, divide the mixture into 4 equal portions. Shape each portion into a patty. To avoid puffing, press down slightly in the center with your thumb. This keeps them flat while cooking.
Cooking Method
Now, it’s time to cook! Preheat your grill or grill pan over medium heat. Lightly brush each patty with olive oil. This helps to prevent sticking.
Place the turkey patties on the grill. Cook them for about 5 to 6 minutes on each side. Check for an internal temperature of 165°F (74°C) to ensure they are cooked through. The patties should no longer be pink inside.
During the last minute of cooking, place the whole wheat burger buns on the grill. Toast them until golden brown and slightly crispy. This adds a nice crunch!
Assembling the Burgers
To assemble, start with a lettuce leaf on the bottom half of each bun. Then, add a cooked turkey patty on top. Next, layer on slices of fresh tomato and avocado.
Feel free to get creative! You can add pickled jalapeños or a drizzle of spicy mayo if you want extra flavor. Serve your burgers hot and enjoy the delicious flavors!
Tips & Tricks
Burger Patty Perfection
To make your patties perfect, keep these tips in mind.
– Preventing puffing during cooking: Make a small indent in the center of each patty. This helps them cook evenly. Without this, the edges can puff up and create a ball shape.
– Ensuring even cooking: Cook on medium heat for 5-6 minutes per side. Use a meat thermometer to check the temperature. Aim for 165°F (74°C) to ensure they are safe to eat.
Flavor Enhancements
You can boost the taste of these burgers easily.
– Adding spices or herbs: Try adding smoked paprika or chili powder for a kick. Fresh herbs like parsley or basil can also add a nice touch.
– Suggesting additional toppings: Think about layers of flavor! Try pickled jalapeños for extra heat, or a creamy avocado spread. A drizzle of spicy mayo can elevate your burger further.
Grilling vs. Pan-Sealing
Both cooking methods have their perks.
– Advantages of each method: Grilling gives a smoky flavor and those lovely grill marks. Pan-sealing keeps the burgers juicy and allows for easy cooking indoors.
– How to achieve the perfect grill marks: Make sure your grill is hot before placing the patties down. Don’t move them for the first few minutes. This helps create those beautiful marks and a nice sear.
Pro Tips
- Use Lean Turkey: Opt for lean ground turkey to keep your burgers juicy without excess fat. This will help maintain a healthier profile while still delivering great flavor.
- Customize Spice Level: Adjust the amount of jalapeños according to your preferred spice level. For a milder burger, remove all the seeds and use fewer jalapeños.
- Rest the Patties: Let the patties rest for a few minutes after cooking. This allows the juices to redistribute, resulting in a more moist and flavorful burger.
- Experiment with Toppings: Don’t hesitate to get creative with toppings! Consider adding crispy bacon, sautéed onions, or a slice of pepper jack cheese for an extra kick.

Variations
Healthier Options
You can make these burgers healthier in a few simple ways.
– Using lean turkey or chicken: Choose ground turkey or chicken that has less fat. This helps reduce calories and keeps the burgers light.
– Alternative bread choices: Opt for whole grain or lettuce wraps instead of regular buns. These options add fiber and cut carbs.
Spice Level Adjustments
Adjust the spice to fit your taste.
– Mild vs. hot jalapeños: Use mild jalapeños if you want less heat. If you love spice, choose hotter ones.
– Other pepper options: Try poblano or serrano peppers for a different flavor. Both can add a unique twist to your burger.
Regional Twists
Make your burgers special by adding local flavors.
– Incorporating local cheeses: Use a regional cheese to enhance the taste. For example, feta or pepper jack can add a fun twist.
– Different seasoning blends: Change the spices to match your area. Adding smoked paprika or Cajun seasoning can give your burgers a new kick.
Storage Info
Leftover Storage
To store your leftover burgers, let them cool first. I recommend placing them in an airtight container. This helps keep them fresh. Use a shallow container for quick cooling. Avoid stacking them; this can cause sogginess. Each burger should have its own space if possible.
Reheating Tips
When it’s time to reheat, use a skillet or an oven. Skillets can keep the patties juicy. Heat them on medium for about 5 minutes on each side. If using the oven, set it to 350°F (175°C). Bake until warm, about 10 to 15 minutes. This way, your burgers stay tasty and do not dry out.
Freezing Burgers
To freeze the patties, shape them and place them on a baking sheet. Make sure they do not touch each other. Freeze for about an hour, then transfer them to a freezer bag. This helps keep their shape. When you’re ready to cook, thaw them in the fridge overnight. This keeps them juicy and flavorful when cooked.
FAQs
Can I use chicken instead of turkey?
Yes, you can use chicken instead of turkey. Ground chicken works well in this recipe. It has a similar texture and flavor. Just ensure you cook it until it reaches 165°F (74°C). This keeps your meal safe to eat. You can also season the chicken like the turkey. This will help keep the flavors strong and tasty.
How can I make these burgers spicier?
To make the burgers spicier, add more jalapeños. Use two or three more jalapeños, chopped finely. You can also keep the seeds in some jalapeños for extra heat. Another option is to mix in spicy sauces. Hot sauce or sriracha can add more kick. Try adding chili powder or cayenne pepper to the meat mixture, too. These small changes will really enhance the spice level.
What sides pair well with Jalapeño Cheddar Turkey Burgers?
For sides, I suggest baked sweet potato fries. They are sweet and crunchy, balancing the burger’s heat. A fresh salad with greens and tomatoes is another good choice. You can also serve the burgers with corn on the cob. This adds a nice touch to your meal. Lastly, a creamy coleslaw can cool down the spice and add crunch. These sides will make your meal colorful and fun!
These jalapeño cheddar turkey burgers combine fresh ingredients and bold flavors. You learned how to mix ground turkey, cheese, and spices to form tasty patties. I shared tips for grilling and topping your burgers just right. You can also try healthier options or get creative with local ingredients. Remember to store leftovers properly and reheat them well. Enjoy cooking these burgers and make them your own! With practice, you’ll be serving delicious meals everyone will lov

Jalapeño Cheddar Turkey Burgers
Ingredients
- 1 lb ground turkey
- 1 cup sharp cheddar cheese, shredded
- 2 whole fresh jalapeños, finely chopped
- 1/2 cup breadcrumbs
- 1/4 cup fresh cilantro, finely chopped
- 1 teaspoon garlic powder
- 1 teaspoon onion powder
- 1/2 teaspoon ground cumin
- to taste salt and pepper
- 4 whole whole wheat burger buns
- as needed lettuce leaves, tomato slices, and avocado slices for toppings
- as needed olive oil for grilling
Instructions
- In a large mixing bowl, combine the ground turkey, finely chopped jalapeños, shredded cheddar cheese, breadcrumbs, chopped cilantro, garlic powder, onion powder, ground cumin, salt, and pepper. Mix thoroughly using your hands or a spatula, ensuring all ingredients are evenly distributed.
- Divide the mixture into 4 equal portions and shape each portion into a patty. To prevent the patties from puffing up during cooking, create a slight indentation in the center of each patty using your thumb.
- Preheat your grill or a grill pan over medium heat. Lightly brush the surface of each patty with olive oil to minimize sticking.
- Place the turkey patties on the grill and cook for approximately 5-6 minutes on each side, or until they reach an internal temperature of 165°F (74°C) and are no longer pink inside.
- During the last minute of cooking, toast the whole wheat burger buns on the grill until they are golden brown and slightly crispy.
- To assemble the burgers, start with a lettuce leaf on the bottom half of each bun. Place a cooked turkey patty on top, followed by slices of fresh tomato and avocado. Feel free to add additional toppings like pickled jalapeños or a drizzle of spicy mayo if desired.
- Serve your deliciously crafted turkey burgers while they're hot and enjoy the flavors!
![To make this Creamy Tuscan White Bean Soup, gather these simple ingredients: - 2 cans (15 oz each) white beans (such as cannellini or navy beans), rinsed and drained - 1 tablespoon olive oil - 1 medium onion, finely diced - 2 cloves garlic, minced - 3 cups vegetable broth - 1 cup fresh spinach, roughly chopped - 1 cup full-fat coconut milk (for richer creaminess) - 1 teaspoon Italian seasoning blend - 1/2 teaspoon red pepper flakes (adjust based on your spice preference) - Salt and freshly ground black pepper, to taste - Fresh basil leaves, for garnish You can easily adapt this soup for different diets. Here are some options: - Use gluten-free vegetable broth if you need a gluten-free version. - Swap the coconut milk for almond milk for a lighter base. - If you are avoiding beans, try using lentils instead. - For added protein, consider adding cooked chicken or turkey. While fresh ingredients often taste best, canned ingredients save time. Here’s a breakdown: - Canned White Beans: Convenient and ready to use. Rinse them to remove excess sodium. - Fresh Spinach: Fresh spinach adds a vibrant color and flavor. - Fresh Garlic and Onion: These provide a strong base for your soup. Fresh is always best here. - Vegetable Broth: You can use homemade broth for more flavor or store-bought for quick prep. Using a mix of fresh and canned ingredients helps create a creamy and satisfying soup with less effort. For the full recipe, check it out above! 1. Sauté Aromatics: Start by heating olive oil in a large pot over medium heat. Once the oil is hot, add the diced onion. Sauté for about 5 to 7 minutes until the onion is soft and clear. 2. Add Garlic: Next, stir in minced garlic. Cook it for 1 minute. This will make the kitchen smell amazing. 3. Combine Main Ingredients: Now, add the rinsed white beans, vegetable broth, Italian seasoning, and red pepper flakes. Stir everything well and bring it to a gentle simmer. 4. Simmer for Flavor: Once the soup simmers, reduce the heat to low. Let it cook for about 15 minutes. This helps all the flavors blend nicely. 5. Blend for Creaminess: After 15 minutes, use an immersion blender to blend the soup until it's smooth. If you don’t have one, pour half into a regular blender, blend it, and return it to the pot. 6. Incorporate Coconut Milk: Pour in the full-fat coconut milk and stir to mix well. Then, add chopped spinach. Let it simmer for another 5 minutes until the spinach is tender. 7. Season to Taste: Taste the soup and add salt and black pepper as you like. 8. Serve and Garnish: Scoop the hot soup into bowls. Top with fresh basil leaves for extra flavor. - Prep Time: 10 minutes - Total Cooking Time: 30 minutes - Servings: 4-6 - Large pot - Immersion blender or regular blender - Wooden spoon for stirring - Measuring cups and spoons - Knife and cutting board for chopping With these steps, you can create a tasty and creamy Tuscan white bean soup. For the full recipe, check out the ingredients and instructions above. Enjoy making this warm comfort bowl! To make your soup creamy, use full-fat coconut milk. This adds a rich texture. Blend the soup well for smoothness. An immersion blender works best for this task. If you prefer, transfer half the soup to a regular blender. This method gives a nice blend of creaminess and beans. Add fresh herbs like basil at the end for bright flavor. A squeeze of lemon juice can also enhance taste. If you like it spicy, add more red pepper flakes. A good sprinkle of salt helps all the flavors pop. Consider using homemade vegetable broth for deeper taste. Don't rush the sautéing of the onions. This step builds the base flavor. Avoid blending the soup too early; let it simmer first. This helps flavors meld together. Always taste the soup before serving and adjust seasoning. Too little salt can make it bland. Lastly, don’t skip the fresh basil garnish. It adds color and flavor to each bowl. For the complete process, check out the Full Recipe. {{image_4}} You can easily switch ingredients in this soup to change its taste. Instead of white beans, try chickpeas or lentils. Both give a nice texture. For a richer flavor, add smoked paprika or sun-dried tomatoes. You can also swap coconut milk with heavy cream or cashew cream for a different creaminess. This soup is already vegan and gluten-free. Just ensure all ingredients are certified gluten-free. If you want to add protein, toss in some cooked quinoa or diced tofu. Both keep the soup hearty while sticking to your dietary needs. Get creative with your soup! Add roasted vegetables like carrots or zucchini for extra flavor. Top each bowl with crunchy croutons or toasted nuts for a nice contrast. You can even drizzle some balsamic glaze on top for a sweet touch. For a fresh kick, sprinkle some lemon zest before serving. Explore these ideas to make your creamy Tuscan white bean soup a personal favorite! For the full recipe, check out the [Full Recipe]. After making your Creamy Tuscan White Bean Soup, let it cool down. Once cooled, store it in an airtight container. Glass containers work great for this. Keep it in the fridge for up to 4 days. Make sure to label it with the date. This helps you keep track of freshness. When you’re ready to enjoy the soup again, pour it into a pot. Heat it on medium until it’s warm. Stir it often to prevent sticking. You can also use a microwave. Place the soup in a safe bowl and heat for 1-2 minutes. Stir and check the heat. This ensures even warming. Want to save some for later? You can freeze the soup! Use freezer-safe bags or containers. Leave some space at the top for expansion. The soup can last up to 3 months in the freezer. When you want to eat it, thaw it in the fridge overnight. Then, reheat it as described above. Enjoy your tasty meal whenever you want! For the full details of making this soup, check the Full Recipe. The best way to blend the soup is with an immersion blender. It makes blending easy and quick. Just blend until it’s smooth. If you don’t have one, use a regular blender. Pour half the soup into the blender, blend it, and return it to the pot. Yes, you can use dried beans. You will need to soak them first. Soak the dried beans overnight in water. Then, cook them until they are soft. This will take more time than using canned beans. Once cooked, follow the same steps in the recipe. To make the soup spicier, add more red pepper flakes. Start with an extra 1/4 teaspoon. You can also add hot sauce or diced jalapeños. Stir them in while the soup simmers. Taste as you go to find your perfect heat level. Enjoy experimenting with the spice! In this blog post, we looked at how to make Creamy Tuscan White Bean Soup. We covered ingredients, including options for diets like vegan and gluten-free. I explained step-by-step cooking, along with tips for the best creaminess and flavor. We also discussed storage and answered common questions. Making soup can be fun and easy. Try the variations and enjoy each bowl. You can impress yourself and others with this recipe. It’s a warm dish full of flavor and comfort.](https://goldendishy.com/wp-content/uploads/2025/07/ec110289-7482-4578-8259-8912d7aded83-768x768.webp)
![- 2 boneless, skinless chicken breasts - 8 oz fettuccine pasta - 2 cups fresh spinach, roughly chopped - 1 cup heavy cream - 1 cup finely grated Parmesan cheese - 2 tablespoons olive oil - 2 cloves garlic, minced - Salt and freshly ground black pepper, to taste - Fresh basil leaves, for garnish (optional) - Red pepper flakes, for a spicy kick (optional) When I cook Chicken and Spinach Alfredo, I gather these key ingredients first. The chicken breasts are a must because they add protein and flavor. I prefer fettuccine pasta for its wide shape, which holds the creamy sauce well. Fresh spinach adds a pop of green and nutrients, making the dish feel lighter. Next, I grab heavy cream. It’s the star of the sauce, bringing that rich, smooth texture. Of course, Parmesan cheese can't be skipped. It gives depth and a savory taste that blends perfectly with the cream. In the additional ingredients, olive oil is essential for cooking. It adds a nice flavor base. Minced garlic brings a wonderful aroma and a bit of zing. I always keep salt and pepper handy to season the dish just right. Lastly, I suggest garnishing with fresh basil for that extra flair. A sprinkle of red pepper flakes can bring heat if you like a spicy bite. For the full list of ingredients, check out the Full Recipe. First, I boil a large pot of salted water. Once it bubbles, I add the fettuccine. I cook it until it's al dente, which takes about 8-10 minutes. After cooking, I drain the pasta but keep a small cup of the pasta water for later. While the pasta cooks, I heat olive oil in a skillet over medium heat. I take the chicken breasts and season them with salt and pepper on both sides. I place the chicken in the hot skillet and cook for about 6-7 minutes on each side. When they turn golden brown and are fully cooked, I remove them from the skillet. I let them rest for a few minutes before slicing them into thin strips. In the same skillet, I lower the heat and add minced garlic. I sauté it for about 30 seconds until it smells amazing. Then, I slowly pour in heavy cream while stirring. I let it simmer gently, making sure it doesn’t boil. Next, I whisk in grated Parmesan cheese until the sauce is smooth and creamy. I add the chopped spinach and let it cook for 1-2 minutes until it wilts. Now, I carefully fold the cooked fettuccine into the creamy sauce. I mix it well so each strand is coated. If the sauce is too thick, I add a bit of the reserved pasta water to get the right consistency. Finally, I arrange the sliced chicken on top of the pasta. If I want a spicy touch, I sprinkle some red pepper flakes over everything. For the full recipe, check out the earlier section. - Adjusting seasoning: Start by tasting your sauce as you cook. Add more salt or pepper if needed. A pinch of nutmeg can also enhance the flavor. This small touch makes a big difference. - Whisking technique for smooth sauce: When you add the cream and cheese, whisk constantly. This helps to blend everything smoothly. It prevents lumps and ensures a creamy texture. - Presentation tips: Serve the Chicken and Spinach Alfredo in shallow bowls. Drizzle extra sauce on top for a rich look. Finish with freshly grated Parmesan and a basil sprig. This adds color and makes the dish pop. - Best accompaniments: Garlic bread or a fresh salad pairs perfectly. The crunch of the salad balances the creaminess of the dish. A glass of white wine complements the flavors well too. - Multitasking during prep: While the pasta cooks, focus on the chicken. Season it and cook it in the same skillet. This saves time and adds flavor to the sauce. Always keep an eye on the pasta so it doesn’t overcook. By using these tips, you can make your Chicken and Spinach Alfredo even better. Each step adds to the dish's overall experience, making it truly enjoyable. Enjoy the process and get creative! {{image_4}} You can switch out the chicken for other proteins. Shrimp works great in this dish. It adds a nice flavor and cooks quickly. Tofu is a good option for a vegetarian meal. Just make sure to season it well before cooking. For pasta, fettuccine is classic, but you can try penne or whole wheat. Penne holds the sauce well due to its shape. Whole wheat adds a nutty flavor and more fiber. Want to boost nutrition? Add seasonal vegetables. Broccoli brings crunch and color. You can steam it lightly before adding. Bell peppers add sweetness and vibrancy. Slice them thinly to mix in easily. Feel free to experiment! Seasonal vegetables can change the dish each time. Enhancing flavor is simple. You can add herbs like Italian seasoning for a savory kick. A sprinkle of lemon zest brightens the dish and adds freshness. For a bit of heat, red pepper flakes are great. Just a pinch goes a long way. These variations keep your Chicken and Spinach Alfredo fun and fresh. Check out the Full Recipe to get started! After you enjoy your Chicken and Spinach Alfredo, store any leftovers in the fridge. Use an airtight container to keep it fresh. You can keep it for about 3 to 4 days. To reheat, put the pasta in a pan over low heat. Add a splash of water or cream to help it warm evenly. Stir often to keep it creamy and avoid burning. If you want to keep it longer, you can freeze Chicken and Spinach Alfredo. Place it in a freezer-safe container or bag. Make sure to remove as much air as possible. It can last in the freezer for up to 2 months. When you are ready to eat it, take it out and thaw it in the fridge overnight. To reheat, warm it in a pan over low heat, adding a bit of water or cream to restore its creaminess. For the complete recipe, check the [Full Recipe]. Chicken and Spinach Alfredo lasts about 3 to 4 days in the fridge. Store it in an airtight container to keep it fresh. Make sure to cool it down before placing it in the fridge. This helps prevent condensation, which can make the dish soggy. Yes, you can make this recipe ahead of time. Cook the pasta and chicken in advance. Store them separately from the sauce. When you’re ready to eat, just heat everything together. This keeps the pasta from getting mushy. For the best taste, try to eat it within a few days. You can use half-and-half for a lighter option. If you want a dairy-free choice, try coconut cream or cashew cream. Both options give a nice creamy texture. You may need to adjust the seasonings to match your taste. Yes, you can make this dish gluten-free. Use gluten-free pasta such as rice or corn pasta. For the sauce, just check the labels on your cream and cheese. Most are gluten-free, but it’s good to be sure. This way, everyone can enjoy your Chicken and Spinach Alfredo. For the full recipe, check the details above! This blog post covered the key ingredients and steps for making Chicken and Spinach Alfredo. We discussed how to prepare the pasta, cook the chicken, and create a creamy sauce. Plus, I shared tips for enhancing flavors and serving. Remember, you can mix it up with different proteins and veggies. Also, I provided storage advice to keep your meal fresh. Embrace your creativity in the kitchen. Enjoy a tasty meal and share it with friends or family!](https://goldendishy.com/wp-content/uploads/2025/06/ee4d0533-23fd-4fc4-b715-1820a1e3e494-768x768.webp)