Creamy Roasted Cauliflower Soup Rich and Flavorful Dish

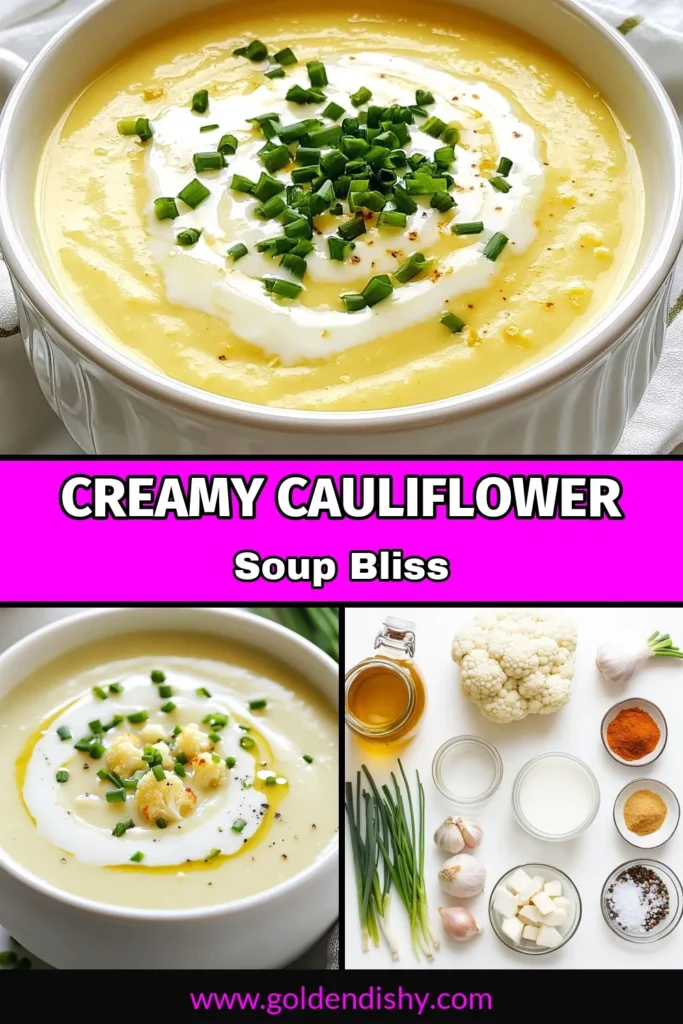
Warm up your kitchen with my creamy roasted cauliflower soup—a rich, flavorful dish that’s perfect for any season! In this post, I’ll guide you through easy steps to blend roasted cauliflower into a velvety, comforting soup. You’ll discover tips for ingredient quality, tasty variations, and ways to make it fit your diet. Ready to impress your taste buds? Let’s dive into this delicious adventure together!
Why I Love This Recipe
- Comforting Flavor: This creamy soup offers a rich and comforting flavor profile that warms you from the inside out, making it perfect for chilly days.
- Nutrient-Packed: Cauliflower is not only delicious but also packed with vitamins and minerals, making this soup a healthy choice for any meal.
- Versatile Base: The soup can easily be customized with various spices or toppings, allowing you to make it your own every time you prepare it.
- Easy to Prepare: With straightforward steps and minimal prep time, this recipe is perfect for both novice and experienced cooks looking for a quick meal.
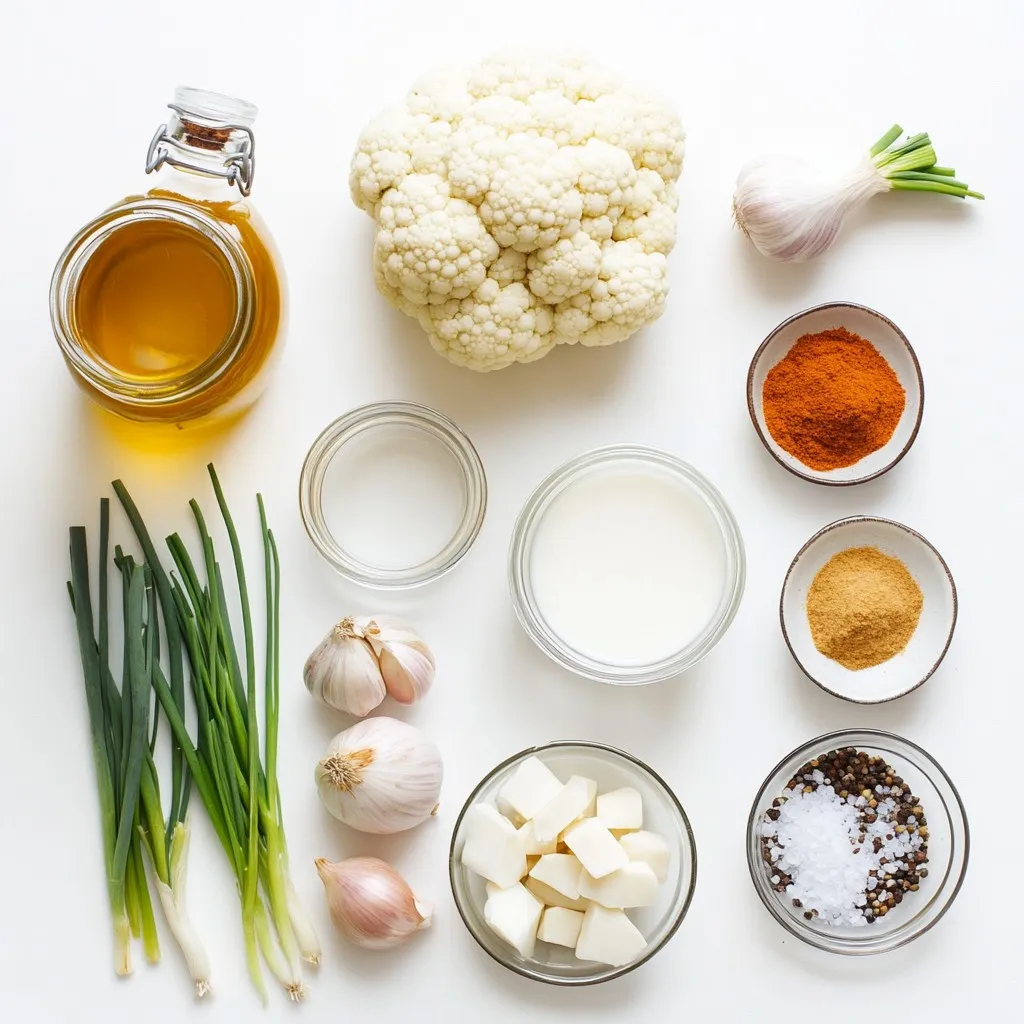
Ingredients
List of Ingredients
– 1 medium head of cauliflower, cut into bite-sized florets
– 2 tablespoons extra virgin olive oil
– Kosher salt and freshly ground black pepper, to taste
– 1 medium onion, finely diced
– 3 cloves garlic, minced
– 3 cups vegetable broth (low-sodium recommended)
– 1 cup coconut milk (or heavy cream for a richer texture)
– 1 teaspoon ground cumin
– 1/2 teaspoon smoked paprika
– Fresh chives or parsley, finely chopped, for garnish
Notes on Ingredient Quality
When cooking, always choose fresh ingredients. Fresh cauliflower has a firm texture and bright color. Look for heads without brown spots or soft areas. For the best flavor, use high-quality olive oil. Extra virgin olive oil adds richness. Fresh herbs like chives or parsley bring a burst of flavor and color to your dish.
Possible Substitutions for Dietary Needs
If you need a vegan option, use coconut milk. It gives a creamy texture without dairy. For those who can’t use nuts, heavy cream works well instead of coconut milk. If you have a garlic allergy, omit the garlic or use garlic oil for flavor. For a low-sodium diet, choose low-sodium vegetable broth.
Step-by-Step Instructions
Preheat the Oven
First, set your oven to 425°F (220°C). This heat will help the cauliflower roast well. A hot oven makes the florets brown nicely. This adds a rich flavor to the soup.
Seasoning and Roasting the Cauliflower
Next, take one medium head of cauliflower and cut it into bite-sized florets. In a large bowl, mix the florets with 2 tablespoons of extra virgin olive oil. Make sure each piece gets coated. Then, sprinkle kosher salt and freshly ground black pepper over the cauliflower. Toss it all together.
Now, spread the seasoned florets on a large baking sheet in a single layer. Roast them in your preheated oven for 25-30 minutes. Stir the florets halfway through to ensure they cook evenly. Look for a nice golden brown color and tender texture.
Sautéing Aromatics and Combining Ingredients
While the cauliflower roasts, grab a large pot. Heat a drizzle of olive oil over medium heat. Add one finely diced onion and sauté it for about 5 minutes. Wait until the onion becomes translucent. Then, add 3 minced garlic cloves and sauté for another 1-2 minutes. The garlic should smell great!
After that, add the roasted cauliflower to the pot. Pour in 3 cups of vegetable broth. Sprinkle in 1 teaspoon of ground cumin and 1/2 teaspoon of smoked paprika. Stir well to mix all the flavors together.
Bring the mixture to a gentle simmer. Let it cook for 10 minutes. This step helps combine the tastes beautifully.
Tips & Tricks
Achieving the Perfect Consistency
To make your soup smooth, blend it well. Use an immersion blender for easy mixing. If you want it creamier, add more coconut milk or heavy cream. Make sure to blend until there are no lumps. If it feels too thick, add more vegetable broth a little at a time.
Enhancing Flavor with Extra Seasonings
You can make this soup even tastier by adding more spices. Try a pinch of nutmeg for warmth, or a squeeze of lemon for freshness. For some heat, add red pepper flakes. Taste as you go, so you find the right balance. Herbs like thyme or rosemary can also bring new flavors.
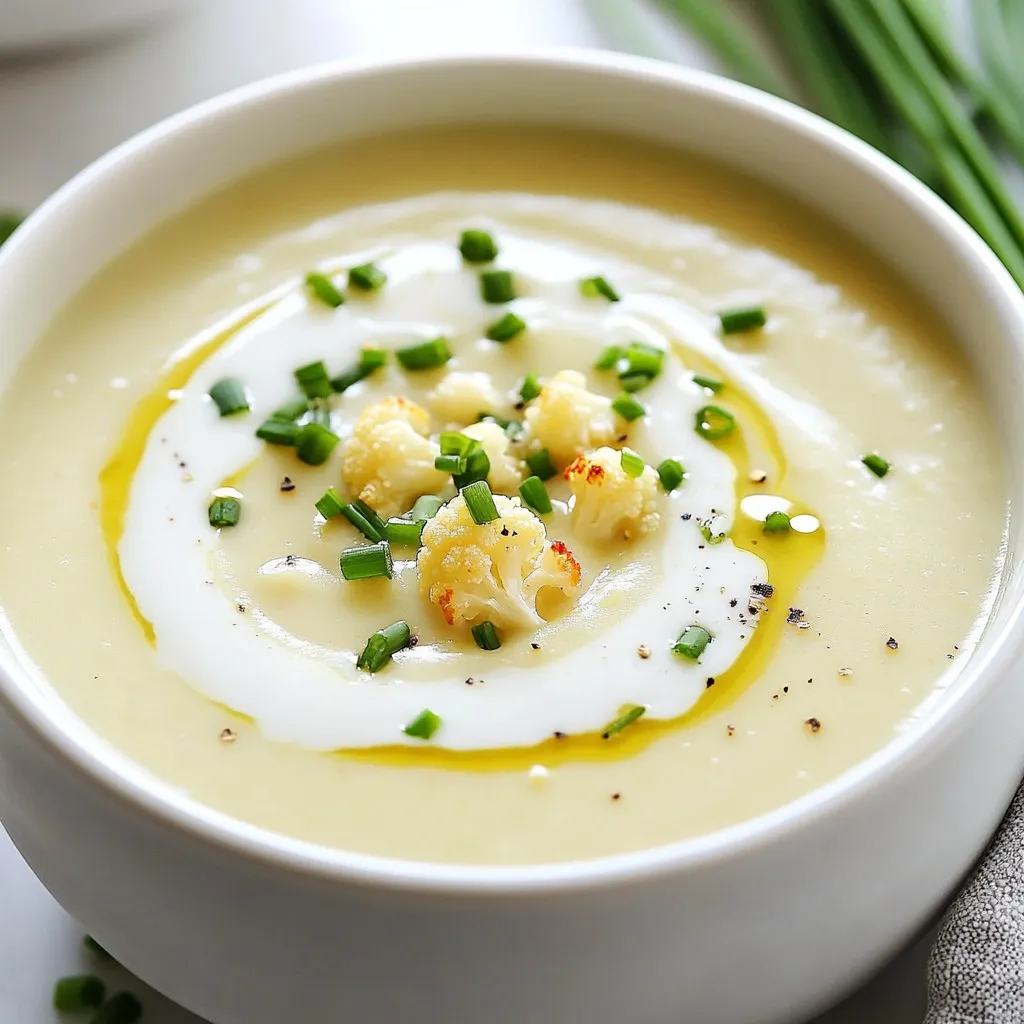
Serving Suggestions for Presentation
Presentation can make your dish pop! Pour the soup into bowls and add a swirl of coconut milk on top. This adds a nice touch. Sprinkle fresh chives or parsley for color. Serve with crusty bread on the side. This makes the meal feel complete and inviting.
Pro Tips
- Roasting for Flavor: Roast the cauliflower until it’s deeply golden brown; this enhances the soup’s flavor profile and adds a caramelized sweetness.
- Adjusting Consistency: If the soup is too thick after blending, add a bit more vegetable broth or coconut milk until you reach your desired creaminess.
- Infuse More Spice: For an extra kick, consider adding a pinch of cayenne pepper or a dash of hot sauce to elevate the flavor.
- Garnish Creatively: Experiment with different garnishes such as roasted nuts, seeds, or a drizzle of chili oil for added texture and flavor contrast.
Variations
Vegan and Dairy-Free Options
You can easily make this soup vegan and dairy-free. Instead of heavy cream, use coconut milk. It adds creaminess and flavor. For extra richness, try cashew cream or almond milk. Both make the soup smooth without dairy.
Adding Protein to the Soup
To boost protein, add cooked lentils or chickpeas. They blend well with the flavors. You can also mix in diced tofu or shredded rotisserie chicken. These add heartiness and make the soup more filling.
Spicy or Flavored Versions
Want some heat? Add red pepper flakes or diced jalapeños while cooking. For a twist, try adding curry powder or turmeric. These spices give the soup a new depth of flavor. Experiment with different herbs like thyme or rosemary for unique tastes.
Storage Info
How to Store Leftovers Properly
To keep your creamy roasted cauliflower soup fresh, store it in an airtight container. Make sure to cool the soup to room temperature before sealing. This helps prevent condensation, which can make the soup watery. You can keep it in the fridge for up to three days. Just label the container with the date for easy tracking.
Reheating Instructions
When you are ready to enjoy leftovers, reheat the soup gently. Pour the soup into a pot over low heat. Stir often to avoid burning. If the soup seems too thick, you can add a splash of vegetable broth or water. Heat until warmed through, but do not boil. This keeps the flavors intact.
Freezing for Future Use
Freezing is a great option for longer storage. To freeze, pour the cooled soup into freezer-safe bags or containers. Leave some space at the top, as liquids expand when frozen. Label with the date and freeze for up to three months. When you’re ready to eat, thaw it in the fridge overnight or use the microwave for a quicker option. Reheat as mentioned above for best results.
FAQs
How can I make the soup thicker?
To make the soup thicker, you can add more cauliflower. Simply roast an extra cup of florets and blend them in. You can also add a small potato while cooking the soup. The potato will break down and add creaminess. Another option is to use less broth. Start with two cups instead of three. Then, blend and check the thickness.
Can I use frozen cauliflower instead of fresh?
Yes, you can use frozen cauliflower. It is a great time-saver. Just remember to thaw it first. Drain any excess water to avoid a watery soup. Roasting frozen cauliflower may not give the same caramelized flavor. However, it can still taste great when blended.
What are some good toppings for creamy roasted cauliflower soup?
Toppings can make your soup even better. Here are some tasty ideas:
– Croutons for crunch
– A drizzle of olive oil
– Fresh chives or parsley for color
– Toasted nuts for added texture
– A sprinkle of cheese, like feta or parmesan
Feel free to mix and match your favorite toppings! Each adds a new twist to the dish.
We explored how to make creamy roasted cauliflower soup. You learned about key ingredients, their quality, and substitutions. I gave you step-by-step cooking instructions to ensure success. Tips for perfecting your soup’s flavor and texture were shared. Don’t forget the variations and storage info for easy meals later.
Overall, enjoy experimenting in the kitchen! This soup is simple, flexible, and deliciou

Creamy Roasted Cauliflower Soup
Ingredients
- 1 medium head cauliflower, cut into bite-sized florets
- 2 tablespoons extra virgin olive oil
- to taste Kosher salt and freshly ground black pepper
- 1 medium onion, finely diced
- 3 cloves garlic, minced
- 3 cups vegetable broth (low-sodium recommended)
- 1 cup coconut milk (or heavy cream for a richer texture)
- 1 teaspoon ground cumin
- 1/2 teaspoon smoked paprika
- for garnish Fresh chives or parsley, finely chopped
Instructions
- Preheat your oven to 425°F (220°C) to prepare for roasting the cauliflower.
- In a large mixing bowl, combine the cauliflower florets with the extra virgin olive oil, ensuring they are evenly coated. Sprinkle with kosher salt and freshly ground black pepper, to taste.
- Arrange the seasoned cauliflower florets in a single layer on a large baking sheet. Roast in the preheated oven for 25-30 minutes, until the florets are beautifully golden brown and tender, stirring halfway through to promote even cooking.
- While the cauliflower roasts, heat a drizzle of olive oil in a large pot over medium heat. Add the diced onion, sautéing until it becomes translucent, about 5 minutes. Toss in the minced garlic and continue to sauté for an additional 1-2 minutes until the garlic is fragrant.
- Add the roasted cauliflower to the pot and pour in the vegetable broth. Sprinkle in the ground cumin and smoked paprika, stirring well to combine all the flavors.
- Bring the mixture to a gentle simmer. Allow it to cook for an additional 10 minutes, which helps to meld the flavors perfectly.
- Using an immersion blender, puree the soup until it reaches a smooth and creamy consistency. If using a regular blender, let the soup cool slightly before blending in batches to ensure safety.
- Return the blended soup to the pot. Stir in the coconut milk, heating gently until the soup is warming through. Taste and adjust the seasoning with additional salt and pepper as desired.

. First, preheat your oven to 400°F (200°C). This step is key for even roasting. Gather your ingredients. You should have baby carrots, honey, olive oil, garlic, thyme, and lemon juice ready. In a large bowl, combine the honey, olive oil, minced garlic, and thyme. Add a good pinch of salt and pepper. Next, squeeze in the lemon juice. Whisk the mixture well until it is smooth. This glaze will give your carrots a sweet and savory flavor. Now, it's time to coat the carrots. Add them to your bowl with the glaze. Toss them gently until they are well coated. Line a baking sheet with parchment paper for easy cleanup. Spread the carrots out in a single layer, avoiding crowding. Place the baking sheet in the preheated oven. Roast the carrots for 25-30 minutes. Halfway through, toss the carrots again for even cooking. They should become tender and caramelized. Once done, let them cool for a few minutes. If you like, drizzle some extra glaze over the top for added flavor. Finally, garnish with fresh parsley before serving. This adds a pop of color and freshness. If you want the full recipe, check it out [Full Recipe]. To ensure your carrots roast perfectly, choose fresh carrots. Baby carrots work well, but regular ones are great too. If using regular carrots, slice them into sticks for even cooking. Spread the carrots out in a single layer on the baking sheet. This step keeps them from steaming and helps them caramelize nicely. Toss them halfway through cooking for even browning. For a great glaze, mix the honey, olive oil, garlic, and thyme well. The oil helps the honey coat the carrots. If your glaze feels too thick, add a splash of water or lemon juice. This can help thin it out and ensure it coats the carrots evenly. Remember, a smooth glaze means more flavor in every bite! To make your dish pop, use a nice platter. Once the carrots are roasted, transfer them carefully. Drizzle with extra honey for shine. Sprinkle fresh parsley or thyme over the top for color. This simple touch makes your dish look gourmet. Enjoy serving them at your next meal! For the full recipe, check out the details above. {{image_4}} You can easily change this dish by adding other vegetables. Try sweet potatoes or parsnips. They roast well and add new flavors. Just cut them to a similar size as the carrots. This helps them cook evenly. If you want to switch up the sweet taste, use maple syrup or agave. Both give a nice flavor and work well with the garlic. You can use the same amount as honey. Just mix it well with the other ingredients. Adding spices can boost the taste of your honey garlic roasted carrots. You might try a pinch of cumin or chili powder for warmth. Fresh herbs like rosemary or dill can also add a bright note. Experiment with what you love! Each change can make this dish new and exciting. You can find the full recipe to guide you through these variations. To store leftover honey garlic roasted carrots, first let them cool down. Use an airtight container to keep them fresh. If you have a lot, divide them into smaller portions. Place the container in the fridge. They will stay good for about 3 to 5 days. Keeping them sealed helps avoid drying out. When you're ready to enjoy the leftovers, preheat your oven to 350°F (175°C). Spread the carrots on a baking sheet. You can drizzle a little olive oil for extra moisture. Heat them for about 10 to 15 minutes, or until they feel warm. You can also use a microwave if you're in a hurry. Just cover them with a damp paper towel and heat in 30-second bursts. If you want to keep the carrots longer, freezing is a great option. First, let the carrots cool completely. Spread them in a single layer on a baking sheet. Freeze them for about 1 hour. This step prevents them from sticking together. After that, transfer the carrots to freezer bags. Remove as much air as possible before sealing. They can last for up to 3 months in the freezer. To eat, thaw them in the fridge overnight before reheating. For more details, check the Full Recipe. Yes, you can use frozen carrots. However, fresh carrots will taste better. Frozen carrots may lose some crunch. If you use them, roast them longer to ensure they cook fully. Just remember to thaw them before roasting for the best results. Honey garlic roasted carrots pair well with many dishes. You can serve them with grilled chicken, beef, or fish. They also taste great with rice or quinoa. Try them with a fresh salad for a balanced meal. Their sweet and savory flavor adds depth to any plate. You can make this dish ahead of time. Prepare the honey garlic glaze and coat the carrots. Store them in the fridge for up to 24 hours. When ready to serve, just roast them in the oven. This saves time and still gives you that amazing flavor. For the full recipe, check out the complete instructions above. We explored the key ingredients and steps to make honey garlic roasted carrots. You learned how to mix the glaze, roast the carrots, and personalize the dish. We also discussed useful tips for perfect roasting and presentation. Lastly, we covered variations and storage tips to keep your dish fresh. Use this guide to make a tasty meal. Enjoy these carrots with your loved ones for a delightful experience.](https://goldendishy.com/wp-content/uploads/2025/06/04a56f10-aefe-4807-b100-2b1e29675843-768x768.webp)
. - Heat your skillet over medium heat. - Add the unsalted butter and let it melt. - Once melted, watch for it to bubble gently. - Next, add the minced garlic. - Sauté the garlic for about one minute. - Stir often until it smells great and turns lightly golden. - Now, add the peeled and deveined shrimp to the skillet. - Season the shrimp with salt and pepper. - If you like spice, sprinkle in some red pepper flakes. - Cook the shrimp for 2-3 minutes on one side. - Flip the shrimp to cook the other side evenly. - Add the lemon zest and juice as they cook. - Keep cooking until the shrimp are opaque. - Remove the skillet from the heat. - Stir in the chopped parsley for a fresh taste. - Serve the shrimp over warm pasta or fluffy rice. - Drizzle the leftover lemon-garlic butter sauce on top for extra flavor. - For a lovely presentation, you can garnish with lemon wedges. For more details, check the Full Recipe. - Achieving the perfect shrimp texture: To get tender shrimp, avoid overcooking. Cook them just until they turn pink. This usually takes about 2-3 minutes per side. - Best practices for sautéing garlic: Start with a hot skillet and melted butter. Add minced garlic and stir for about 1 minute. Keep an eye on it so it doesn’t burn; burnt garlic tastes bitter. - Presentation ideas for a beautiful dish: Serve the shrimp in shallow bowls to make it look elegant. Add a sprinkle of parsley on top for color. Include lemon wedges on the side for a fresh touch. - Pairing options with side dishes: Lemon garlic butter shrimp goes well with cooked pasta or fluffy rice. You can also serve it with a side salad for a light meal. - Additional herbs or spices to try: Consider adding fresh basil or thyme for extra flavor. These herbs pair well with lemon and shrimp. - Adjusting spice levels with red pepper flakes: If you like heat, add more red pepper flakes. Start with a teaspoon and adjust to your taste. This will make your dish more exciting! For more details, check the Full Recipe. {{image_4}} You can change the seafood in this recipe. Try scallops or even crab. These swaps add new tastes while keeping the dish simple. If you want a healthier fat, swap butter for olive oil. Olive oil works well and gives a light, fresh flavor. To mix things up, add other citrus flavors. Lime or orange juice can brighten the dish. You can also infuse the recipe with herbs. Try basil or thyme for a different twist. These herbs can make the dish feel more seasonal. If you need a gluten-free option, serve the shrimp over quinoa or zucchini noodles. Both are great gluten-free choices. For a low-calorie meal, cut back on the butter. You can use less or replace it with vegetable broth. This keeps the dish tasty but lighter. After enjoying your lemon garlic butter shrimp, store any leftovers in the fridge. Use an airtight container to keep them fresh. These shrimp will stay good for about 2-3 days. Always check for freshness before eating. To freeze lemon garlic butter shrimp, let them cool completely first. Place them in a freezer-safe bag, removing as much air as possible. They can last for about 2 months in the freezer. When you're ready to eat, thaw the shrimp in the fridge overnight. Reheat them gently in a skillet over low heat. This keeps them tender and tasty. Always ensure your shrimp is safe to eat after storage. Check for any off smells or changes in color. If the shrimp look slimy or smell bad, it’s best to discard them. Trust your senses to keep your meals safe and enjoyable. Cook shrimp for 4-6 minutes. They cook quickly. In a hot skillet, shrimp turn pink when done. Avoid overcooking; it makes them tough. Yes, you can use frozen shrimp. Thaw them first for best results. Place them in cold water for about 15 minutes. This way, they cook evenly and taste fresh. I love serving lemon garlic butter shrimp with: - Cooked pasta - Fluffy rice - Fresh salad - Garlic bread These sides balance the rich flavors well. Check for color and texture. Cooked shrimp turn pink and opaque. They should feel firm but not hard. When in doubt, cut one open. It should be white inside, not translucent. You’ve learned how to make lemon garlic butter shrimp. We covered essential ingredients, easy steps, tips for cooking, and variations to try. Remember to adjust flavors to your taste and pair with your favorite sides. Store leftovers safely for later enjoyment. Cooking shrimp can be simple and satisfying. Enjoy every bite, and don't hesitate to experiment. Whether for a cozy night in or impressing guests, this dish shines every time. Let your kitchen be a place of fun and flavor!](https://goldendishy.com/wp-content/uploads/2025/06/8ad1771e-7d26-4dd4-879b-9e464bbb0647-768x768.webp)