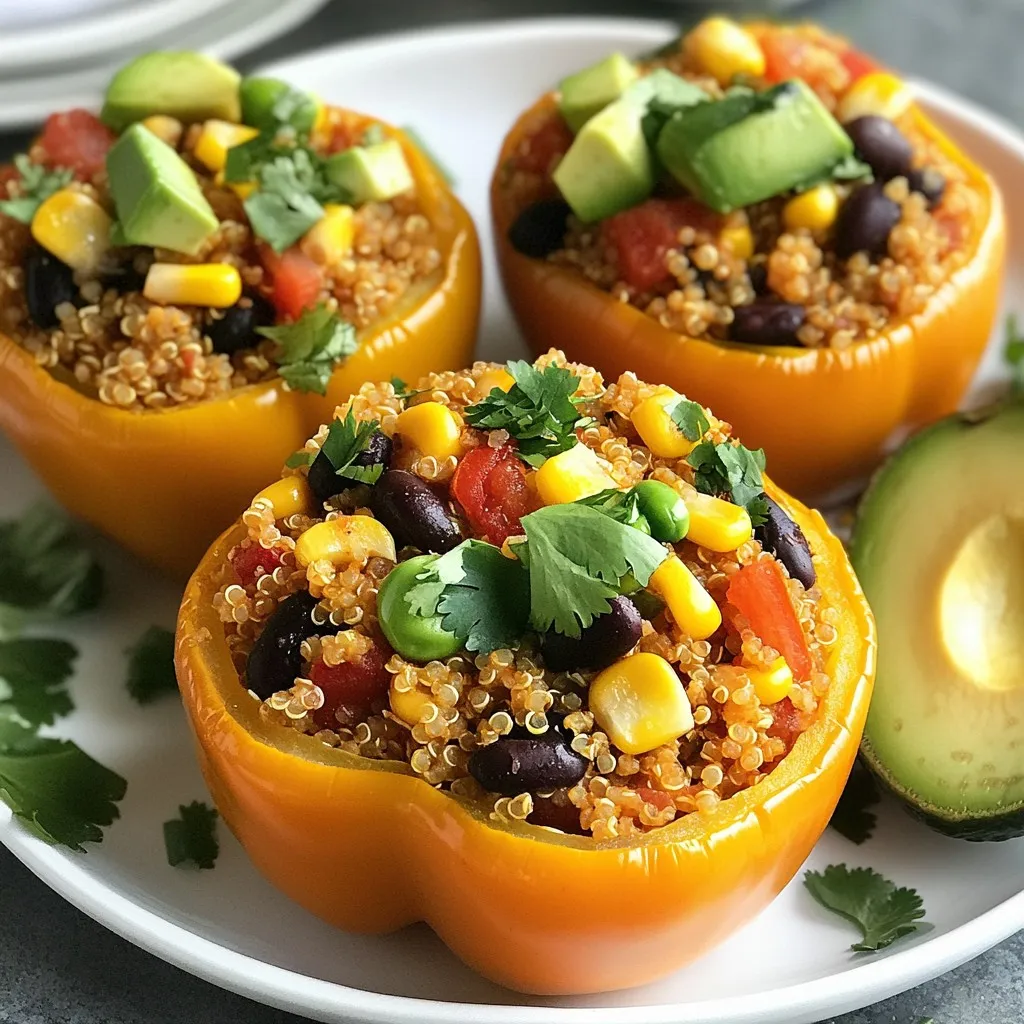
Vegan Stuffed Bell Peppers Nutritious and Tasty Dish
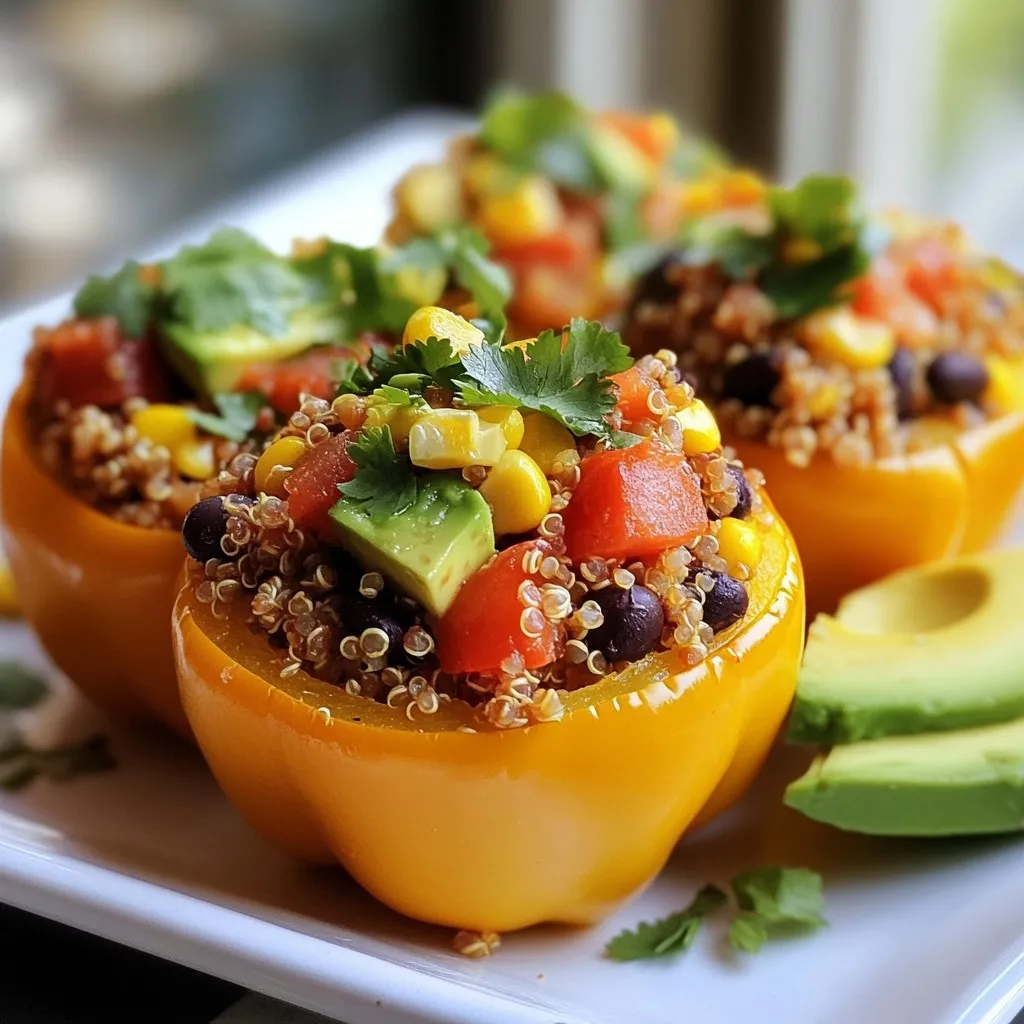
Looking for a delicious and healthy meal? Vegan stuffed bell peppers pack a punch with flavor and nutrition. These colorful peppers are easy to make and fun to customize. You’ll fill them with wholesome ingredients like quinoa, black beans, and fresh veggies. Whether you crave spicy or mild, this dish suits every palate. Join me as we dive into this tasty recipe that will satisfy your hunger and keep your diet on track!
Why I Love This Recipe
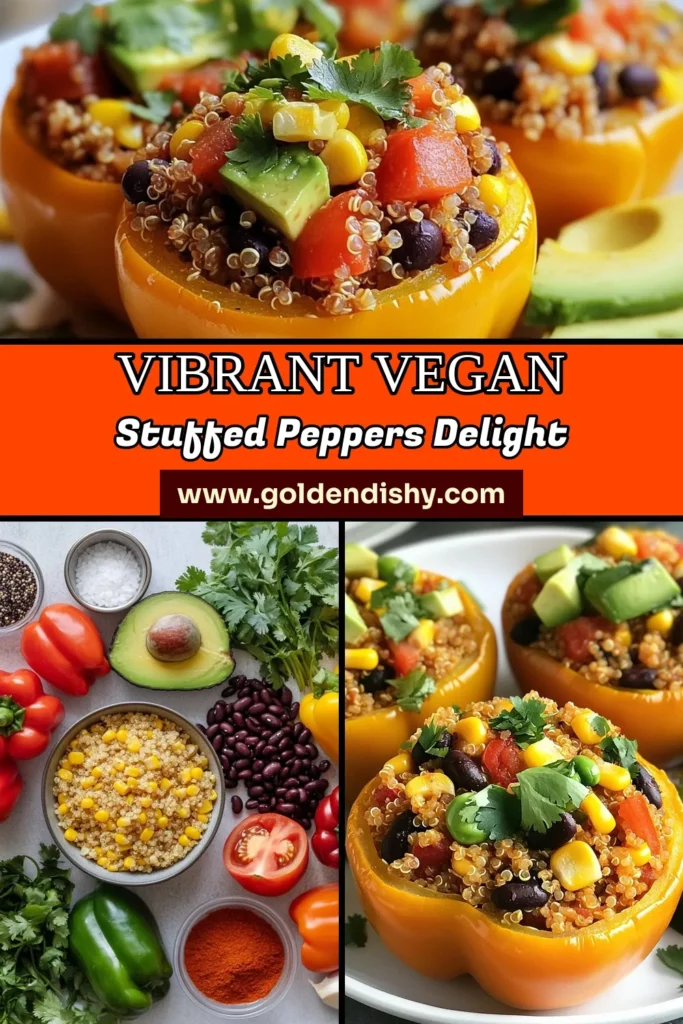
- Colorful Presentation: These stuffed bell peppers are visually stunning, showcasing a rainbow of colors that make them irresistible on any table.
- Nutrient-Packed Filling: With quinoa, black beans, and a variety of vegetables, this recipe is not only delicious but also loaded with essential nutrients.
- Easy to Customize: You can easily swap in your favorite vegetables or grains, making this a versatile dish that suits your taste preferences.
- Perfect for Meal Prep: These stuffed peppers store well in the fridge, making them an ideal option for quick and healthy meals throughout the week.
Ingredients
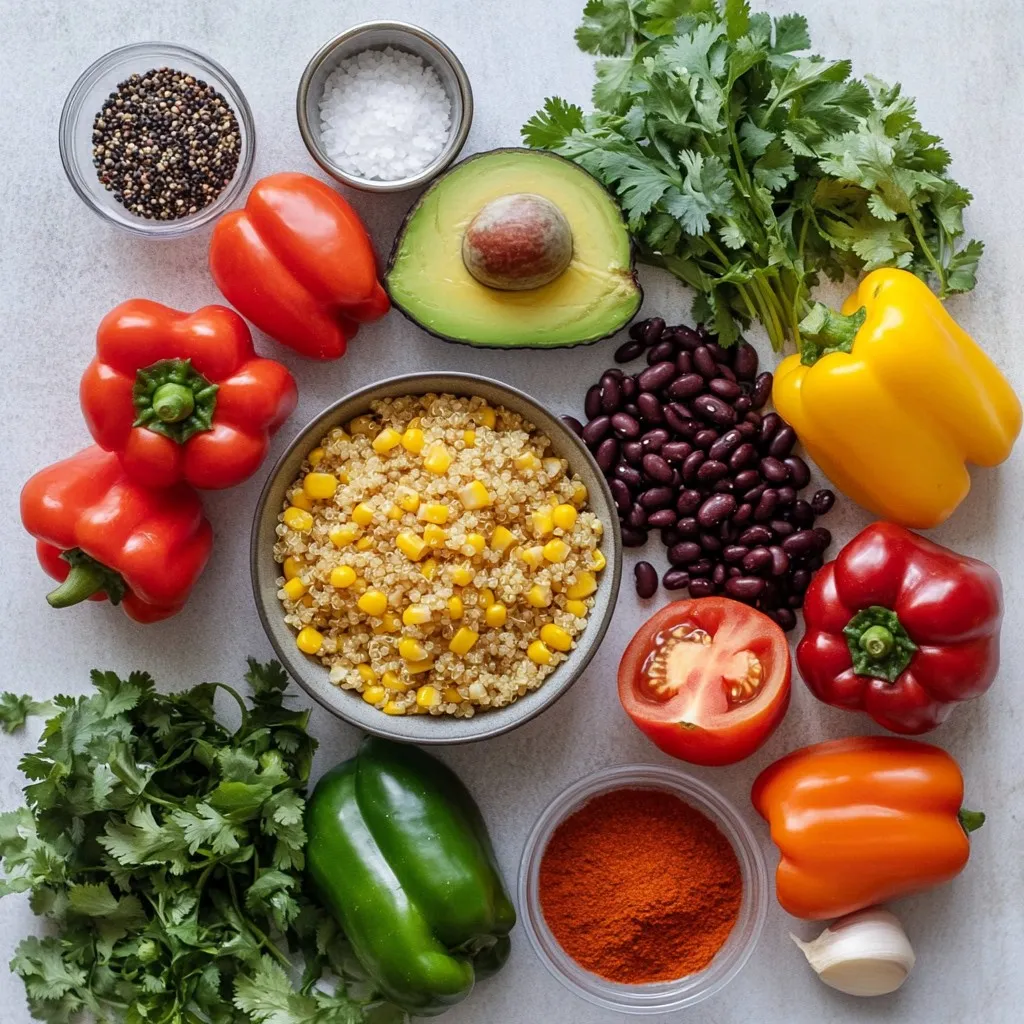
List of Ingredients
– 4 large bell peppers
– 1 cup quinoa
– 2 cups vegetable broth
– 1 can black beans
– 1 cup corn
– 1 cup diced tomatoes
– 1 small onion
– 2 cloves garlic
– Spices: cumin, smoked paprika, chili powder
– Garnishes: cilantro, avocado
– Seasoning: salt and black pepper
For this dish, I love using vibrant bell peppers. They add color and flavor. You can pick any color you like, such as red, yellow, or green. Quinoa is the star of the filling. It is packed with protein and very filling. The vegetable broth gives it a nice taste.
Black beans add a creamy texture. They are also a great source of fiber. Corn adds sweetness and crunch. Diced tomatoes bring juiciness. They make the filling moist and delicious.
For aromatics, I use a small onion and garlic. They enhance flavor and aroma. The spices—cumin, smoked paprika, and chili powder—bring warmth and depth. Adjust the spice levels to fit your taste.
Finally, fresh cilantro and avocado elevate the dish. Cilantro adds a burst of freshness. Avocado brings creaminess and richness. This combination makes each bite special.
Step-by-Step Instructions
Preheating the Oven
Start by preheating your oven to 375°F (190°C). This step is key. Preheating helps cook the peppers evenly. It also ensures a nice roasted finish on top.
Cooking the Quinoa
To cook quinoa, bring 2 cups of vegetable broth to a boil in a medium saucepan. Rinse 1 cup of quinoa under cold water. Add the quinoa to the boiling broth. Lower the heat and cover the pot. Let it simmer for about 15 minutes. The quinoa is done when all the liquid is absorbed and it looks fluffy. If you want, you can also cook quinoa in a rice cooker. Just follow the same water-to-quinoa ratio.
Preparing the Bell Peppers
While the quinoa cooks, prepare your bell peppers. Take 4 large bell peppers and carefully slice the tops off. Remove the seeds and membranes inside. This makes room for the filling. Arrange the hollowed peppers upright in a baking dish. This helps them stay standing during baking.
Sautéing Aromatics
In a large skillet, add a splash of olive oil over medium heat. Add 1 finely chopped onion and 2 minced garlic cloves. Sauté them together for about 3 to 4 minutes. You want the onion to be soft and translucent. This step adds a lot of flavor to your dish.
Mixing the Filling
Once the onion and garlic are ready, it’s time to mix the filling. Add the cooked quinoa, 1 can of rinsed black beans, 1 cup of corn, and 1 cup of diced tomatoes to the skillet. Also, add 1 teaspoon of ground cumin, 1 teaspoon of smoked paprika, ½ teaspoon of chili powder, salt, and black pepper. Stir everything well to combine. Cook for another 5 minutes to heat through. This ensures every bite is full of flavor.
Stuffing and Baking the Peppers
Now for the fun part! Generously spoon the filling into each bell pepper. Press down slightly to pack it in well. If you have leftover filling, spread it around the peppers in the baking dish. Cover the dish with aluminum foil. This keeps moisture in while baking. Bake in your preheated oven for 25 to 30 minutes. The peppers should be tender when done. After that, remove the foil and bake for another 10 minutes. This gives the tops a lovely roasted look.
Tips & Tricks
Achieving Perfectly Cooked Quinoa
To cook quinoa just right, avoid common mistakes. Rinse the quinoa well before cooking. This removes the bitter outer coating. Use a ratio of one cup of quinoa to two cups of liquid. I prefer vegetable broth for added flavor. Bring the broth to a boil, then reduce to a simmer. Cover and let it cook for about 15 minutes. The quinoa will be fluffy when done. If you see liquid left, cook for a few more minutes.
Flavoring quinoa can elevate your dish. Add herbs, spices, or even a splash of lemon juice. This simple step can make a big difference.
Adjusting Spice Levels
You can easily customize the heat of your stuffed peppers. Start with less chili powder and add more to taste. If you enjoy bold flavors, consider adding jalapeños or cayenne pepper. For a different twist, try paprika or curry powder for warmth.
Alternative spices can change the flavor profile. Cumin adds earthiness, while smoked paprika gives a nice smoky touch. Don’t be afraid to experiment and find your perfect mix.
Healthy Ingredient Substitutions
If you need gluten-free options, replace quinoa with rice or millet. For a soy-free choice, use lentils or chickpeas instead of beans. These options keep the filling hearty and nutritious.
You can also switch up legumes or grains. Try farro, barley, or even bulgur for a different texture. Each option brings its unique flavor and adds variety to your meal.
Pro Tips
- Choose Colorful Peppers: Using a mix of bell pepper colors not only enhances the visual appeal but also adds a variety of nutrients to your dish.
- Quinoa Cooking Tip: Rinse quinoa well before cooking to remove any bitterness from the saponins on its surface, resulting in a cleaner flavor.
- Season to Taste: Always taste the filling before stuffing the peppers; adjust the seasonings if necessary to ensure maximum flavor.
- Make Ahead: Prepare the filling in advance and store it in the fridge. Stuff the peppers just before baking for an easy weeknight dinner.
Variations
Different Filling Options
You can change the filling to suit your taste. Consider adding more veggies like spinach or zucchini. You might also try nuts such as walnuts or almonds for extra crunch.
For a protein boost, you can switch up the beans. Instead of black beans, use kidney beans or chickpeas. You can also add grains like brown rice or farro for a heartier meal.
Flavor Profile Changes
If you want a Southwestern twist, add jalapeños for heat and lime for freshness. The spice will kick up the flavor nicely. You can also sprinkle some cilantro on top for added zest.
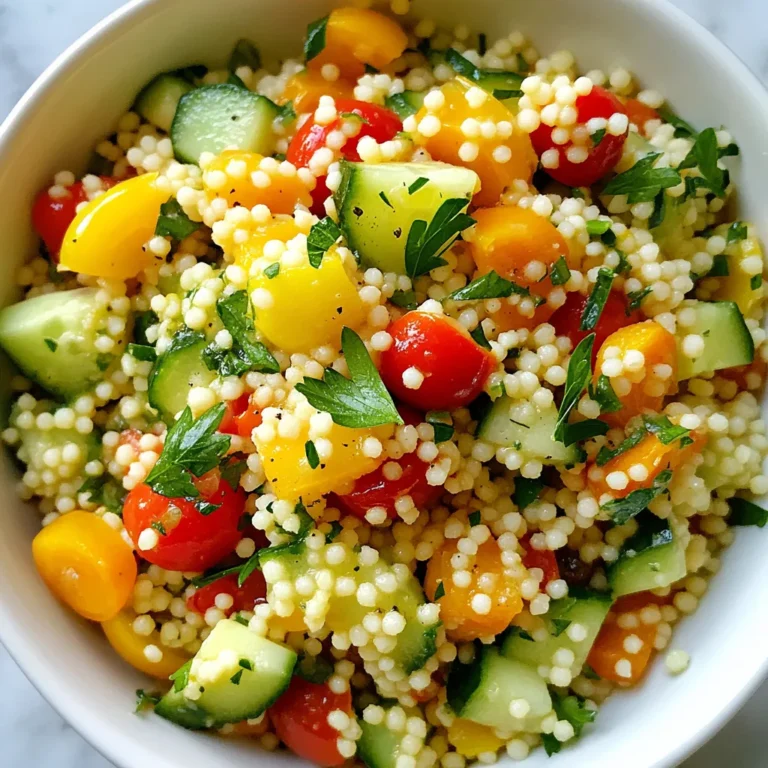
For a Mediterranean flair, use couscous instead of quinoa. Mix in herbs like parsley or oregano to elevate the taste. This version is fresh and bright, perfect for summer meals.
Serving Suggestions
Pair your stuffed peppers with a tasty sauce or dip. A creamy avocado sauce or a zesty salsa works great. These will enhance the flavors and add a nice touch.
You can serve the peppers with a side salad or some roasted veggies. A simple green salad will balance the meal nicely. This makes for a colorful and nutritious plate.
Storage Info
How to Store Leftover Stuffed Peppers
To keep your stuffed peppers fresh, use an airtight container. Glass containers work best. Place the peppers in the container after they cool. You can store them in the fridge for up to five days. Make sure to cover them well to prevent drying out.
Freezing Instructions
To freeze stuffed peppers, wrap each one tightly in plastic wrap. Then, place them in a freezer-safe bag or container. Label the bag with the date. You can freeze them for up to three months. When you’re ready to eat, take them out and let them thaw in the fridge overnight.
Reheating Tips
Reheat stuffed peppers in the oven for the best texture. Preheat your oven to 350°F (175°C). Place the peppers in a baking dish and cover with foil. This keeps them moist. Heat for about 20-25 minutes. Avoid microwaving, as it can make them soggy. Enjoy your meal warm and tasty!
FAQs
Can I Make These Stuffed Peppers Ahead of Time?
Yes, you can make stuffed peppers ahead of time. Prepare the filling and stuff the peppers. Then, store them in the fridge for up to 24 hours. When ready to cook, just pop them in the oven. If you want, you can also freeze them. Wrap each pepper in foil and place them in a freezer-safe bag. They will last up to three months. When you want to eat them, thaw in the fridge overnight, then bake as usual.
What Can I Substitute for Quinoa?
If you need a substitute for quinoa, try rice, farro, or couscous. Cooked rice takes about 15-20 minutes. Farro usually cooks in 30-40 minutes, while couscous cooks in just 5 minutes. Each option will bring a different texture and taste to your peppers but will still be delicious!
Are Stuffed Peppers Healthier Than Other Meals?
Stuffed peppers are indeed healthy. They contain a variety of nutrients. Bell peppers are high in vitamins A and C. Quinoa is a great source of protein and fiber. Black beans add even more protein and fiber. Corn brings in vitamins and minerals too. This dish is low in fat and packed with good things.
Can I Use Different Types of Peppers?
You can use different types of peppers! Each type has its own flavor. Green peppers have a more bitter taste, while red and yellow are sweeter. You can also use smaller peppers like jalapeños for a spicy kick. Just remember that cooking times may vary. Smaller peppers may cook faster, while larger ones might need more time in the oven.
What Are the Best Toppings for Stuffed Peppers?
Toppings can make your stuffed peppers even better. Fresh cilantro adds a bright taste. Slices of avocado give a creamy texture. You can also add a drizzle of lime juice for a zesty touch. If you enjoy a bit of heat, try adding jalapeños. For a crunchy finish, sprinkle some crushed tortilla chips on top before serving.
In this article, we explored how to make delicious stuffed peppers using wholesome ingredients. We covered everything from gathering the right materials to prepping, cooking, and storing your dish. Remember, the beauty of this recipe lies in its flexibility. You can customize the filling or change the spices to fit your taste. Stuffed peppers can be a healthy and fun meal for your family. Enjoy experimenting with this straightforward recip

Colorful Vegan Stuffed Bell Peppers
Ingredients
- 4 large bell peppers
- 1 cup quinoa
- 2 cups vegetable broth
- 1 can black beans
- 1 cup corn
- 1 cup diced tomatoes
- 1 small onion
- 2 cloves garlic
- 1 teaspoon ground cumin
- 1 teaspoon smoked paprika
- ½ teaspoon chili powder
- to taste salt
- to taste black pepper
- ½ cup fresh cilantro
- 1 ripe avocado
Instructions
- Preheat your oven to 375°F (190°C).
- In a medium saucepan, bring 2 cups of vegetable broth to a rolling boil. Rinse the quinoa under cold water, then add it to the boiling broth. Lower the heat to a simmer, cover, and let it cook for about 15 minutes, or until all the liquid is absorbed and the quinoa is fluffy.
- While the quinoa cooks, carefully slice the tops off each bell pepper, removing the seeds and membranes. Arrange the hollowed peppers upright in a baking dish for stuffing.
- In a large skillet over medium heat, add a splash of olive oil and sauté the finely chopped onion and minced garlic for about 3-4 minutes, until the onion becomes soft and translucent.
- To the skillet, add the cooked quinoa, rinsed black beans, corn, diced tomatoes, ground cumin, smoked paprika, chili powder, salt, and black pepper. Stir everything together to combine and continue cooking for an additional 5 minutes to heat through.
- Generously spoon the quinoa filling into each bell pepper, pressing down slightly to pack it in. If there's any leftover filling, spread it around the peppers in the baking dish for extra flavor.
- Cover the baking dish with aluminum foil and bake in the preheated oven for 25-30 minutes, or until the bell peppers are tender to the touch.
- After 25-30 minutes, remove the foil and bake for an additional 10 minutes to give the tops a beautifully roasted finish.
- Once baked, let the peppers cool for a few minutes. Garnish with fresh chopped cilantro and serve warm with slices of creamy avocado on the side.

![For this recipe, you need key ingredients to make the salmon shine. Here’s what to gather: - 4 salmon fillets (approximately 6 oz each) - 2 tablespoons Sriracha sauce - 3 tablespoons honey - 1 tablespoon soy sauce - 2 cloves garlic, finely minced - 1 tablespoon fresh ginger, finely grated - 2 tablespoons olive oil - Salt and freshly ground black pepper, to taste These main ingredients create a sweet and spicy glaze that makes the salmon pop. Seasoning is crucial in cooking. It helps to enhance the natural flavors of the fish. Use these simple items: - Salt - Freshly ground black pepper Make sure to season both sides of the salmon. This step adds depth to every bite. Garnishes make your dish look great and add extra flavor. For this salmon recipe, you will need: - 1 tablespoon sesame seeds - 2 green onions, thinly sliced Sprinkling these on top gives the meal a beautiful finish. The sesame seeds add crunch, while green onions bring freshness. To see the full details for cooking, check the [Full Recipe]. To make the glaze, grab a medium bowl. Combine 2 tablespoons of Sriracha sauce, 3 tablespoons of honey, and 1 tablespoon of soy sauce. Add 2 minced garlic cloves and 1 tablespoon of freshly grated ginger. Whisk these together until the mixture is smooth. This sweet and spicy glaze will add the perfect flavor to your salmon. Set this aside for later use. Next, take 4 salmon fillets and dry them with a paper towel. This step helps the skin get crispy. Now, sprinkle salt and pepper on both sides of each fillet. Make sure to cover every inch. This simple seasoning enhances the natural taste of the fish. Now, heat 2 tablespoons of olive oil in a large skillet over medium-high heat. Once the oil shimmers, carefully place the salmon fillets in the skillet, skin-side down. Sear them for about 4-5 minutes until the skin turns golden and crispy. Once that happens, gently flip the fillets over. Lower the heat to medium and pour the glaze over the salmon. Cook for another 4-5 minutes, basting the salmon occasionally with the glaze. When it is cooked through and caramelized, remove the fillets from the skillet. Enjoy every bite of this flavorful salmon dish! For the full recipe, check out the details above! To get that perfect crispy skin, start with dry salmon. Use a paper towel to pat it well. This removes extra moisture, which helps the skin crisp nicely. Heat your skillet until it shimmers before adding the salmon. Place the fillets skin-side down and don’t move them for the first few minutes. This helps create a nice golden crust. Sear for about 4-5 minutes, then flip gently to finish cooking. If you like a milder glaze, reduce the Sriracha amount. Start with 1 tablespoon instead of 2. You can also add extra honey to balance the heat. For spice lovers, add more Sriracha or a pinch of cayenne pepper. Taste the glaze before pouring it on the salmon. This way, you can adjust it to your liking. Using the right tools makes cooking easier. Here’s what I recommend: - Large skillet for searing - Mixing bowl for the glaze - Whisk for blending ingredients - Paper towels for drying salmon - Spatula for flipping fillets These tools help you create a delicious Sriracha honey glazed salmon from the [Full Recipe]. {{image_4}} You can switch up the Sriracha honey glaze if you want. Try a sweet soy glaze instead. Mix soy sauce, brown sugar, and ginger for a tasty alternative. You can also use teriyaki sauce for a different flavor. It adds a rich, savory taste that pairs well with salmon. Another option is a citrus glaze. Mix orange juice and honey for a bright, zesty twist. While salmon shines in this recipe, other fish work too. Try using trout, which has a similar flavor and texture. Mahi-mahi also holds up well to grilling and glazing. Cod is another great option, as it absorbs flavors nicely. Each fish brings its own unique taste, so feel free to experiment. Toppings can elevate your dish further. Try adding sliced avocados for creaminess. Chopped cilantro or parsley adds a fresh touch. You can also sprinkle crushed peanuts or cashews for crunch. For a spicy kick, add sliced jalapeños. These toppings can make your meal even more fun and flavorful. Enjoy customizing your Sriracha honey glazed salmon with these ideas! Store your leftover salmon in an airtight container. Make sure to let it cool first. Place a piece of parchment paper between layers if stacking. This keeps the fish from sticking together. Refrigerate the salmon for up to three days. If you plan to keep it longer, freezing is a better option. To reheat, use the oven for the best taste. Preheat to 350°F (175°C). Place the salmon on a baking sheet and cover it with foil. Heat for about 10 to 15 minutes. This keeps the salmon moist and tasty. You can also use the microwave. Heat it in short bursts of 30 seconds. Check often to avoid overcooking. If you want to freeze your salmon, do it right after cooking. Wrap each piece tightly in plastic wrap. Then, place them in a freezer bag. Remove as much air as you can before sealing. You can freeze it for up to three months. When ready to eat, thaw it in the fridge overnight before reheating. For more ideas, check out the Full Recipe. You can tell if the salmon is cooked when it flakes easily with a fork. The flesh should be opaque and no longer translucent. A good rule is to cook it for about 4-5 minutes per side, depending on thickness. Use a food thermometer if you want to be precise. The internal temperature should reach 145°F (63°C). Cooking it just right keeps it moist and tasty. Yes, you can prepare the glaze ahead of time. Just store it in the fridge in an airtight container. This makes cooking easier later. However, I recommend cooking the salmon fresh. This keeps it juicy and full of flavor. If you must, you can cook the salmon and store it in the fridge for up to 2 days. For a full meal, pair the salmon with fluffy jasmine rice or quinoa. Steamed broccoli or snap peas add color and crunch. You can also serve it with a fresh salad for a light touch. If you want something more filling, try roasted potatoes or sweet potatoes. These sides balance the bold flavors of the salmon well. Check out the Full Recipe for more details! This blog post shared key details about making Sriracha Honey Glazed Salmon. You learned what ingredients to use, including seasoning and garnishes. I outlined simple steps to prepare the glaze, season the fish, and achieve that perfect sear. Plus, you found helpful tips for crispy skin and spice adjustments. I also covered variations for sauces and fish, along with storage options for leftovers. Savor this dish and share it with others. Enjoy your cooking!](https://goldendishy.com/wp-content/uploads/2025/07/1e0cb0f2-d69e-43b4-ab0e-316143d411f1-768x768.webp)
![- 1 can (15 oz) black beans, drained and rinsed - 1/2 cup cooked quinoa, cooled - 1/2 cup breadcrumbs (gluten-free option available) - 1 small red onion, finely diced - 2 cloves garlic, minced - 1 small jalapeño, minced (seeds removed for less heat) - 1 tablespoon chili powder - 1 teaspoon ground cumin - 1/2 teaspoon smoked paprika - Sea salt and black pepper, to taste - 2 tablespoons fresh cilantro, finely chopped - 1 large egg (or for a vegan option, mix 1 tablespoon ground flaxseed with 2.5 tablespoons water) - Olive oil for frying To make these spicy black bean burgers, choose fresh ingredients when you can. Fresh veggies add great flavor and crunch. However, pantry staples like canned black beans and quinoa work well too. When picking black beans, look for those with a firm texture. Check the can for any damage. Good beans should have a clean label with no added preservatives. For a gluten-free option, look for gluten-free breadcrumbs at your store. They are easy to find and useful in many dishes. You can also use oats or crushed corn chips if needed. This recipe is not just tasty but also easy to prepare. It allows you to explore new flavors while making a healthy meal. For the full recipe, check the instructions provided above. 1. Mashing black beans for ideal texture: Start with a large bowl. Use a fork or potato masher to mash the black beans. Aim for a mix of smooth and chunky. This gives your burger a great texture. 2. Mixing all ingredients thoroughly: After mashing, add the cooked quinoa, breadcrumbs, diced onion, minced garlic, chopped jalapeño, chili powder, cumin, smoked paprika, salt, pepper, and cilantro. Mix everything well. You want each bite to have a burst of flavor. 3. Tips for shaping patties consistently: To shape patties, wet your hands slightly. This helps the mixture stick less. Form about four to six patties, depending on your size preference. Make them even in thickness for even cooking. 1. Heating the skillet correctly: Pour a good drizzle of olive oil into a non-stick skillet. Heat it on medium. Wait until the oil shimmers before adding patties. This step is key for crispiness. 2. Cooking times for achieving crispy patties: Cook each patty for 5 to 6 minutes. Check for a golden brown color before flipping. This ensures a nice crust forms. 3. How to avoid breakage while flipping: Use a spatula to gently lift each patty. Flip them carefully to keep them intact. If they feel too soft, let them cook a bit longer. To get the right texture, add ingredients in the right order. Start with the black beans. Mash them well, but leave some chunks. This gives your burger a nice bite. Next, mix in the quinoa and breadcrumbs. These help bind your burger. If you want a firmer burger, add more breadcrumbs. For a softer burger, reduce them. Use olive oil for frying. It adds great flavor and helps the patties crisp up nicely. Spice up your burgers with extra spices. Consider adding cayenne for heat or oregano for earthiness. You can make a homemade spicy mayo. Mix mayo with hot sauce and lime juice. This makes a great dip too! Pair your burgers with tasty sides. Sweet potato fries or a fresh salad work well. These add color and flavor to your meal. For the full recipe, check out [Full Recipe]. {{image_4}} You can easily change this recipe to suit your taste. Here are a few ideas: - Different Beans or Grains: If you want a twist, try using kidney beans or chickpeas. You can also swap quinoa for brown rice or oats. Each option brings a unique flavor and texture. - Adding Cheese: For a creamy touch, mix in some cheese. Cheddar or pepper jack adds great flavor. If you prefer a vegan option, use vegan cheese or nutritional yeast. Both will give a cheesy taste without dairy. - Adjusting Spice Levels: Want it milder? Skip the jalapeño or use less chili powder. If you love heat, double the spices or add hot sauce. Make it just right for you. Take your spicy black bean burgers to the next level with these fun ideas: - Unique Toppings: Try avocado slices, pickled onions, or spicy slaw. Fresh herbs like cilantro or basil add a bright touch too. Experiment and find your favorite combo! - Suggested Sides: Pair your burgers with sweet potato fries, a crisp salad, or coleslaw. These sides add crunch and flavor to your meal. - Creative Presentation: Stack your burger high with colorful veggies. Serve it on a wooden board for a rustic look. Use fun plates to make your dish pop. Your guests will love it! For the full recipe, check out the [Full Recipe]. After enjoying your spicy black bean burgers, store leftovers in the fridge. Place cooked patties in an airtight container. They stay fresh for about three to four days. For uncooked patties, wrap them tightly in plastic wrap or place them in a freezer-safe bag. This way, you can freeze them for up to three months. To reheat, heat a skillet over medium heat. Add a little olive oil and cook the patties for about five minutes on each side. This will keep them crispy. You can also use an oven. Preheat it to 350°F (175°C) and bake for about 10-15 minutes. Cooked spicy black bean burgers last for up to four days in the fridge. If you freeze them, they can last for about three months. Look for signs of spoilage, like an off smell or a change in color. If the burgers feel slimy or dry, it's best to throw them away. Always trust your senses to keep your food safe! Can I make these burgers ahead of time? Yes, you can make these spicy black bean burgers ahead of time. Shape the patties and store them in the fridge for up to a day. This saves time on busy nights. You can also freeze them for up to three months. Just make sure to separate them with parchment paper. Are spicy black bean burgers gluten-free? Yes, they can be gluten-free! Use gluten-free breadcrumbs instead of regular ones. Many brands offer tasty options that work well in this recipe. Always check the label for hidden gluten. What can I use as a binder if I can’t use eggs? If you can’t use eggs, try a flax egg. Mix 1 tablespoon of ground flaxseed with 2.5 tablespoons of water. Let it sit for about five minutes until it thickens. This works great to hold the burger together. How can I make these burgers spicier? To add more heat, include extra jalapeños or use a spicier pepper like serrano. You can also add hot sauce or cayenne pepper to the mixture. Experiment to find your perfect spice level! Can I cook these on a grill instead? Absolutely! Grilling adds a nice smoky flavor. Preheat your grill and lightly oil the grates. Cook the patties for about 5-6 minutes on each side, just like in a skillet. What are the best buns to use for black bean burgers? I recommend whole wheat or brioche buns for great flavor. Lettuce wraps are an option too for a low-carb meal. Choose what fits your taste and diet best! Tips for meal prepping these burgers for the week. Make a large batch of patties and store them in the fridge or freezer. You can reheat them quickly for lunch or dinner. Pair with fresh toppings for a nice meal. Having these ready to go makes weeknight cooking easier! You learned how to make delicious black bean burgers. We covered key ingredients, step-by-step instructions, and great tips. Remember to choose fresh ingredients for the best flavor. Mix your beans well to get the right texture. Don’t forget to try different variations and toppings to suit your taste. Proper storage will help you enjoy leftovers later. With these tips, you can impress anyone at your next meal. Enjoy creating your perfect black bean burger!](https://goldendishy.com/wp-content/uploads/2025/06/68a5a06a-1097-44cf-8076-380ecc54e2d9-768x768.webp)