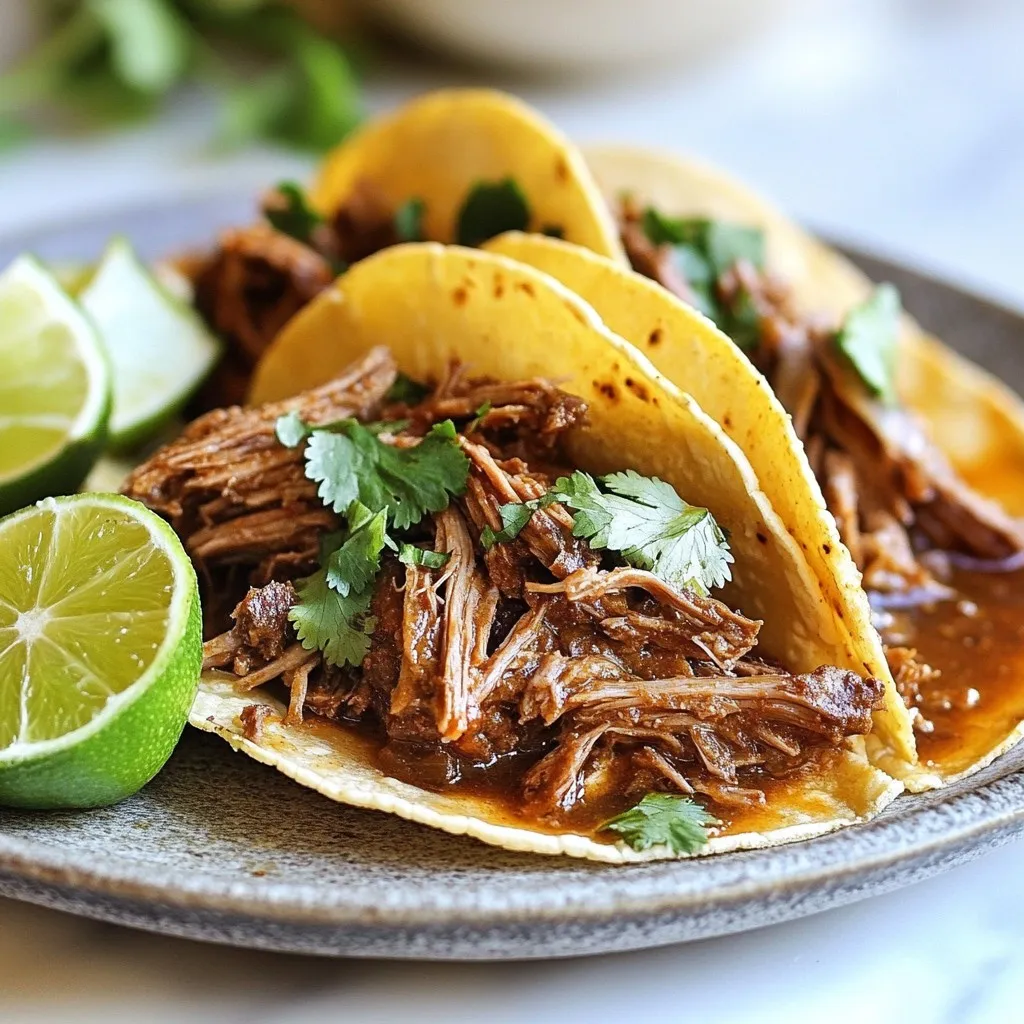
Crockpot Birria Tacos Flavorful and Easy Recipe


Are you ready to elevate your taco game? In this post, I’ll guide you through making Crockpot Birria Tacos, an easy and tasty dish that will impress your family and friends. With just a few simple ingredients and your trusty crockpot, you’ll create tender, flavorful beef tucked in warm corn tortillas. Let’s dive into this delicious journey and transform your taco nights forever!
Why I Love This Recipe
- Flavor Explosion: This recipe brings together a rich blend of spices and chiles that create an incredibly flavorful and aromatic dish.
- Slow-Cooked Perfection: Using a crockpot allows the beef to become wonderfully tender, making it easy to shred and perfect for tacos.
- Customizable: These tacos can be topped with your favorite garnishes, allowing everyone to personalize their own plate.
- Great for Gatherings: This recipe yields a generous amount, making it ideal for serving at parties or family dinners.
Ingredients
Main Ingredients
– 2 lbs beef chuck roast, cut into 2-inch chunks
– 2 dried guajillo chiles, seeds removed
– 2 dried ancho chiles, seeds removed
– Corn tortillas (about 12)
Seasoning and Sauce Ingredients
– 1 large onion, quartered
– 4 cloves garlic, minced
– 1 tablespoon ground cumin
– 1 tablespoon dried oregano
– 1 teaspoon smoked paprika
– 1 teaspoon ground cinnamon
– 4 cups beef broth
– 2 tablespoons apple cider vinegar
– Salt and freshly ground black pepper, to taste
Garnishes and Serving Suggestions
– Fresh cilantro, chopped (for garnish)
– Lime wedges (for serving)
– Optional toppings (e.g., radishes)
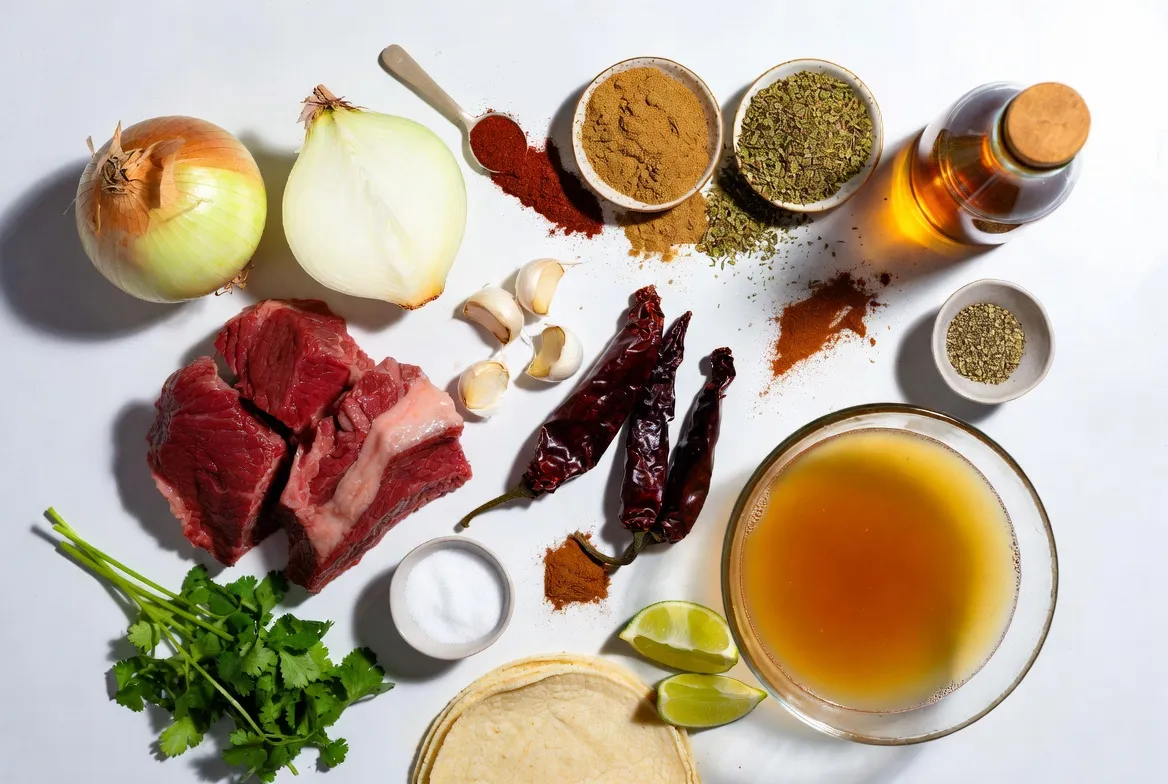
When making crockpot birria tacos, using fresh and high-quality ingredients is key. The beef chuck roast is the star of the dish. It’s rich and tender, perfect for shredding. The dried guajillo and ancho chiles add depth and a nice warmth to the sauce.
Onion and garlic are essential to build flavor. Ground spices like cumin, oregano, smoked paprika, and cinnamon round out the taste. The beef broth adds moisture and richness, while apple cider vinegar brings a touch of acidity.
Don’t forget the corn tortillas! They hold all the delicious filling. For garnishes, fresh cilantro and lime wedges brighten the dish. Optional toppings like radishes add crunch and color.
Choosing the right ingredients makes a world of difference in flavor. Enjoy crafting these tacos!
Step-by-Step Instructions
Preparing the Ingredients
Toasting the dried chiles
First, heat a dry skillet over medium heat. Add the guajillo and ancho chiles. Toast them for about 1-2 minutes. Make sure to turn them often. You want them fragrant, not burnt. Once toasted, remove them from the heat and let them cool.
Blending the sauce ingredients
When the chiles are cool, place them in a blender. Add the quartered onion and minced garlic. Next, add ground cumin, oregano, smoked paprika, and cinnamon. Pour in 1 cup of beef broth and 2 tablespoons of apple cider vinegar. Blend until smooth.
Cooking in the Crockpot
Seasoning the beef
Take 2 lbs of beef chuck roast and cut it into 2-inch chunks. In a large bowl, sprinkle salt and freshly ground black pepper over the beef. Mix well to coat every piece. This seasoning is key for flavor.
Combining ingredients in the crockpot
Now, place the seasoned beef chunks into your crockpot. Pour the blended sauce over the beef. Make sure all the meat is covered. Next, add the remaining 3 cups of beef broth to the crockpot. This step helps to keep the meat moist while cooking.
Final Steps
Shredding the meat
After cooking on low for 8 hours or high for 4-5 hours, check the beef. It should be fork-tender. Carefully take the beef out using tongs. Place it on a cutting board and shred it with two forks.
Warming the tortillas
In a skillet over medium heat, warm the corn tortillas. Heat them for about 30 seconds on each side. You want them soft and slightly toasted.
Assembling the tacos
Take a warm tortilla and add a generous amount of the shredded beef in the center. Top with freshly chopped cilantro. Serve with lime wedges on the side. If you like, drizzle some of the rich broth over the tacos for extra flavor.
Tips & Tricks
Enhancing Flavor
To make your birria tacos shine, seasoning the meat is key. I like to use salt and freshly ground black pepper. This simple step ensures the beef is full of flavor. You can also customize the sauce. Add more spices if you like heat, or keep it mild. Blend in fresh herbs for a unique twist.
Optimal Cooking Times
Choosing the right setting on your crockpot is crucial. Cooking on low for about 8 hours gives you the best results. The beef becomes tender and tasty. If you’re short on time, use the high setting for 4 to 5 hours. Always check for tenderness. The meat should shred easily with a fork.
Presentation Tips
When serving, style matters. I love to place the tacos on a large platter. Add lime wedges and a bowl of broth for dipping. You can even add thinly sliced radishes. They add color and a nice crunch. This way, your meal looks as good as it tastes!
Pro Tips
- Choosing the Right Cut: For the best flavor and tenderness, opt for well-marbled cuts like beef chuck roast. The fat will render down during cooking, adding richness to your tacos.
- Toast Your Spices: Toasting the spices and chiles before blending enhances their flavors. Just be careful not to over-toast, as this can lead to bitterness.
- Resting the Meat: After shredding your beef, let it rest for a few minutes. This allows the juices to redistribute, making the meat even more flavorful and juicy.
- Make Ahead: Birria can be made a day in advance. The flavors deepen as it sits, making it even more delicious when reheated. Just store in an airtight container in the fridge.
Variations
Different Proteins
You can switch the beef for other meats. Pork and chicken work great. For pork, use a shoulder roast. It will be tender and juicy. Chicken thighs are also a tasty option. Just remember to adjust the cooking time. Chicken cooks faster than beef, so check it after three hours on high.
Vegetarian Options
Want a meat-free taco? Try jackfruit or mushrooms. Jackfruit has a great texture. It absorbs flavors well. Use young green jackfruit for the best results. Cook it like you would the beef. For mushrooms, try portobello or shiitake. Sauté them first for a deeper flavor.
Flavor Variations
You can add spices or herbs for a twist. Try adding more cumin or chili powder for heat. Fresh herbs like cilantro or parsley can brighten the dish. Consider adding lime zest for a citrus kick. Mixing in fresh ingredients can change the whole vibe of your tacos. Have fun experimenting!
Storage Info
Refrigeration Guidelines
To store your leftover Birria, place it in an airtight container. Make sure it’s cool before sealing. This helps keep the flavor fresh. The shelf life in the fridge is about 3 to 4 days. Always check for any signs of spoilage before eating.
Freezing Instructions
You can freeze Birria for longer storage. Use a freezer-safe container or bag. Make sure to seal it tightly to avoid freezer burn. For the tortillas, stack them with parchment paper in between. This keeps them from sticking. When you want to eat, thaw the Birria overnight in the fridge. Reheat it on the stove or in the microwave.
Reusing Leftovers
Leftover Birria is great for new meals. You can make a hearty soup by adding broth and veggies. Another fun idea is using it for quesadillas. Just fill a tortilla with cheese and Birria, then grill it. You can also use it as a topping for nachos. The flavor stays bold, and it’s a perfect way to enjoy your leftovers!
FAQs
What is Birria?
Birria is a tasty Mexican dish that started in Jalisco. It began as a stew made with goat meat, but now beef is also popular. The dish combines spices and chiles to create a rich, savory flavor. Birria tacos are soft tortillas filled with this juicy meat. You dip the tacos in the broth, which adds even more flavor. People love birria for its warmth and comfort.
Can I make this recipe ahead of time?
Yes, you can prepare this recipe in advance. Start by cooking the meat and sauce. Once cooked, let it cool and store in the fridge. You can keep it for up to three days. When you’re ready to eat, just reheat the meat and broth. This makes meal prep easy. You can also freeze the cooked birria for up to three months. Just thaw it overnight in the fridge before reheating.
How do I keep my tacos from getting soggy?
To keep your tacos crisp, use warm tortillas. Lightly toast them in a skillet for 30 seconds. This helps create a barrier against moisture. Also, avoid adding too much broth directly to the tacos. Instead, serve the broth on the side for dipping. Lastly, assemble the tacos just before serving to keep them fresh and crunchy.
This blog covers making amazing Birria tacos. We discussed key ingredients like beef chuck roast and dried chiles. You learned how to prepare, cook, and serve these tasty tacos. Tips for enhancing flavor and storage options were provided too.
With the right steps, you can create delicious tacos for any occasion. Enjoy experimenting with different flavors and proteins! Your cooking journey with Birria will be rewarding and fu

Crockpot Birria Tacos
Ingredients
- 2 lbs beef chuck roast, cut into 2-inch chunks
- 1 large onion, quartered
- 4 cloves garlic, minced
- 2 dried guajillo chiles, seeds removed
- 2 dried ancho chiles, seeds removed
- 1 tablespoon ground cumin
- 1 tablespoon dried oregano
- 1 teaspoon smoked paprika
- 1 teaspoon ground cinnamon
- 4 cups beef broth
- 2 tablespoons apple cider vinegar
- to taste salt and freshly ground black pepper
- 12 corn tortillas
- for garnish fresh cilantro, chopped
- for serving lime wedges
Instructions
- In a dry skillet over medium heat, carefully toast the guajillo and ancho chiles for 1-2 minutes, turning occasionally, until they become fragrant but do not burn. Once toasted, remove from heat and allow them to cool slightly. Transfer the cooled chiles to a blender.
- In the blender with the chiles, add the quartered onion, minced garlic, ground cumin, oregano, smoked paprika, cinnamon, apple cider vinegar, and 1 cup of beef broth. Blend the mixture until it reaches a smooth consistency.
- In a large mixing bowl, generously season the beef chunks with salt and freshly ground black pepper to ensure even flavor throughout the meat.
- In a crockpot, place the seasoned beef chunks. Pour the blended sauce over the meat, ensuring it is evenly coated. Add the remaining 3 cups of beef broth, making sure the meat is submerged for maximum flavor absorption.
- Cover the crockpot and cook on low for 8 hours, or on high for 4-5 hours, until the beef is fork-tender and easily shreds apart.
- Once the cooking time has elapsed, carefully remove the beef from the crockpot using tongs and place it on a cutting board. Use two forks to shred the meat into bite-sized pieces.
- In a skillet over medium heat, lightly warm the corn tortillas for about 30 seconds on each side, or until they are pliable and slightly toasted.
- Take a warm tortilla and place a generous amount of the shredded beef in the center.
- Top each taco with freshly chopped cilantro. Serve with lime wedges on the side, and for an extra kick of flavor, drizzle some of the rich broth from the crockpot over the tacos before enjoying.

![To make Easy Chicken Tortilla Soup, gather these key ingredients: - 2 tablespoons olive oil - 1 medium onion, finely diced - 2 cloves garlic, minced - 1 bell pepper (any color), finely diced - 2 medium tomatoes, diced - 4 cups low-sodium chicken broth - 1 teaspoon ground cumin - 1 teaspoon chili powder - 1 teaspoon smoked paprika - 1 pound cooked chicken breast, shredded - 1 can (15 oz) black beans, thoroughly rinsed and drained - 1 cup corn (fresh or frozen) - Salt and freshly ground black pepper, to taste These ingredients create a rich flavor base for your soup. The spices, like cumin and chili powder, add warmth. Using low-sodium broth helps control salt levels. For a delightful finish, consider adding these garnishes: - Tortilla chips, for garnish and added crunch - Fresh cilantro, roughly chopped, for garnish - 1 ripe avocado, diced, for garnish - Lime wedges, for serving These garnishes enhance the soup's look and taste. The crunch of tortilla chips contrasts nicely with the tender soup. A squeeze of lime adds a zesty touch. To prepare this soup, have these tools on hand: - A large pot - A sharp knife - A cutting board - A measuring spoon - A ladle for serving Having the right tools makes cooking easier. A large pot holds all the ingredients while they cook together. A sharp knife and cutting board help you chop veggies quickly. For the full recipe, check out the [Full Recipe]. Gather your ingredients before you start. This makes cooking easier and faster. You will need: - 2 tablespoons olive oil - 1 medium onion, finely diced - 2 cloves garlic, minced - 1 bell pepper (any color), finely diced - 2 medium tomatoes, diced - 4 cups low-sodium chicken broth - 1 teaspoon ground cumin - 1 teaspoon chili powder - 1 teaspoon smoked paprika - 1 pound cooked chicken breast, shredded - 1 can (15 oz) black beans, thoroughly rinsed and drained - 1 cup corn (fresh or frozen) - Salt and freshly ground black pepper, to taste - Tortilla chips, for garnish and added crunch - Fresh cilantro, roughly chopped, for garnish - 1 ripe avocado, diced, for garnish - Lime wedges, for serving 1. Heat the olive oil in a large pot over medium heat. 2. Add the diced onion and sauté for about 3-4 minutes until it turns soft. 3. Stir in the minced garlic and diced bell pepper. Cook these for 2 more minutes. 4. Now, add diced tomatoes, chicken broth, cumin, chili powder, smoked paprika, and shredded chicken. Mix well. 5. Raise the heat until it boils, then reduce it and let it simmer for 15 minutes. 6. After simmering, stir in the black beans and corn. Heat for another 5-7 minutes. 7. Taste and season with salt and pepper as needed. Adjust spices if you want more heat. Ladle the hot soup into bowls. Top with crumbled tortilla chips for crunch. Add diced avocado and fresh cilantro for color and flavor. Serve with lime wedges on the side. Squeeze lime juice over the soup before eating for a zesty kick! For the full recipe, check the section above. Enjoy your tasty chicken tortilla soup! To make your chicken tortilla soup taste amazing, focus on fresh ingredients. Use ripe tomatoes and fresh herbs. They add a burst of flavor. Toast your spices in the olive oil to release their aromas. This small step can boost the taste of your soup. Consider adding a splash of lime juice for brightness. It really makes a difference! If you like heat, add more chili powder or a diced jalapeño. For milder soup, use less spice. Remember to taste as you cook. You can add more spice later if needed. Also, consider serving hot sauce on the side. This way, everyone can adjust the heat to their liking. To speed up cooking, use pre-cooked chicken. Shredded rotisserie chicken works well. It saves time and adds flavor. Chop your veggies small for quicker cooking. Use a sharp knife for safety and ease. Lastly, keep your broth warm before adding it to the pot. This helps your soup come together faster. For the full recipe, check out the earlier section. {{image_4}} You can easily make a vegetarian version of chicken tortilla soup. Swap out the chicken for hearty vegetables. Use black beans for protein and fiber. Sweet corn adds a nice crunch. You can also add diced zucchini or bell peppers for more flavor. Use vegetable broth instead of chicken broth. This keeps the soup light yet filling. Top it with tortilla chips, avocado, and cilantro for the best taste. This version is perfect for a healthy meal. If you love heat, then spicy chicken tortilla soup is for you. Start with the original recipe and add more spices. Include diced jalapeños or serrano peppers for a kick. You can also add some cayenne pepper or hot sauce to the pot. Adjust the spice level to your liking. Serve it with sour cream to cool down the heat. This soup is sure to warm you up on a chilly night. For a creamy twist, turn your chicken tortilla soup into a creamy delight. After cooking the soup, stir in some heavy cream or sour cream. This gives the soup a rich and smooth texture. You can also blend a portion of the soup for extra creaminess. Just blend it in a blender and stir it back in. This version is comforting and perfect for those who enjoy a velvety finish. Don't forget to garnish with tortilla chips and avocado for a crunchy contrast. For the full recipe, check out the details above! After making Easy Chicken Tortilla Soup, allow it to cool. Use an airtight container. Store the soup in the fridge for up to three days. Make sure to keep it covered to preserve flavor. When you're ready to enjoy leftovers, pour the soup into a pot. Heat it over medium heat until warm. Stir it often to prevent sticking. You can also use the microwave. Place the soup in a bowl and cover it loosely. Heat for about 2-3 minutes, stirring halfway. Always check the temperature before eating. If you want to save some soup for later, freezing is perfect. Let the soup cool completely. Pour it into freezer-safe bags or containers. Leave some space for the soup to expand. Seal tightly and label with the date. You can freeze it for up to three months. When you want to eat it, thaw it overnight in the fridge before reheating. This method helps keep all the flavors intact. Enjoy the full recipe and indulge in this delightful dish! I recommend using cooked chicken breast for this soup. It stays tender and juicy. You can use leftover rotisserie chicken or poach chicken breasts to save time. Shredded chicken blends well with the soup flavors. Yes, you can make this soup in a slow cooker. Start by sautéing the onion and garlic in a pan. Then add all the ingredients to the slow cooker. Set it on low for 6-8 hours or high for 3-4 hours. This method lets the flavors meld nicely. Chicken Tortilla Soup stays fresh for about 3-4 days in the refrigerator. Store it in an airtight container. Make sure it cools before you put it in the fridge. If you want it to last longer, consider freezing it. You can find the Full Recipe for more details on storage. This blog post covered everything you need for easy chicken tortilla soup. We explored essential ingredients, tools, and garnishes. You learned the clear steps for prep and cooking, plus tips for flavor and spice. Variations let you customize the soup to your taste. Lastly, we discussed how to store and reheat leftovers. Now, you can enjoy this tasty meal any time. Get creative with flavors and make it your own!](https://goldendishy.com/wp-content/uploads/2025/06/e0a7fe5b-d8f8-4d99-83cb-06f3f9771105-768x768.webp)
![For this recipe, you need key ingredients to make the salmon shine. Here’s what to gather: - 4 salmon fillets (approximately 6 oz each) - 2 tablespoons Sriracha sauce - 3 tablespoons honey - 1 tablespoon soy sauce - 2 cloves garlic, finely minced - 1 tablespoon fresh ginger, finely grated - 2 tablespoons olive oil - Salt and freshly ground black pepper, to taste These main ingredients create a sweet and spicy glaze that makes the salmon pop. Seasoning is crucial in cooking. It helps to enhance the natural flavors of the fish. Use these simple items: - Salt - Freshly ground black pepper Make sure to season both sides of the salmon. This step adds depth to every bite. Garnishes make your dish look great and add extra flavor. For this salmon recipe, you will need: - 1 tablespoon sesame seeds - 2 green onions, thinly sliced Sprinkling these on top gives the meal a beautiful finish. The sesame seeds add crunch, while green onions bring freshness. To see the full details for cooking, check the [Full Recipe]. To make the glaze, grab a medium bowl. Combine 2 tablespoons of Sriracha sauce, 3 tablespoons of honey, and 1 tablespoon of soy sauce. Add 2 minced garlic cloves and 1 tablespoon of freshly grated ginger. Whisk these together until the mixture is smooth. This sweet and spicy glaze will add the perfect flavor to your salmon. Set this aside for later use. Next, take 4 salmon fillets and dry them with a paper towel. This step helps the skin get crispy. Now, sprinkle salt and pepper on both sides of each fillet. Make sure to cover every inch. This simple seasoning enhances the natural taste of the fish. Now, heat 2 tablespoons of olive oil in a large skillet over medium-high heat. Once the oil shimmers, carefully place the salmon fillets in the skillet, skin-side down. Sear them for about 4-5 minutes until the skin turns golden and crispy. Once that happens, gently flip the fillets over. Lower the heat to medium and pour the glaze over the salmon. Cook for another 4-5 minutes, basting the salmon occasionally with the glaze. When it is cooked through and caramelized, remove the fillets from the skillet. Enjoy every bite of this flavorful salmon dish! For the full recipe, check out the details above! To get that perfect crispy skin, start with dry salmon. Use a paper towel to pat it well. This removes extra moisture, which helps the skin crisp nicely. Heat your skillet until it shimmers before adding the salmon. Place the fillets skin-side down and don’t move them for the first few minutes. This helps create a nice golden crust. Sear for about 4-5 minutes, then flip gently to finish cooking. If you like a milder glaze, reduce the Sriracha amount. Start with 1 tablespoon instead of 2. You can also add extra honey to balance the heat. For spice lovers, add more Sriracha or a pinch of cayenne pepper. Taste the glaze before pouring it on the salmon. This way, you can adjust it to your liking. Using the right tools makes cooking easier. Here’s what I recommend: - Large skillet for searing - Mixing bowl for the glaze - Whisk for blending ingredients - Paper towels for drying salmon - Spatula for flipping fillets These tools help you create a delicious Sriracha honey glazed salmon from the [Full Recipe]. {{image_4}} You can switch up the Sriracha honey glaze if you want. Try a sweet soy glaze instead. Mix soy sauce, brown sugar, and ginger for a tasty alternative. You can also use teriyaki sauce for a different flavor. It adds a rich, savory taste that pairs well with salmon. Another option is a citrus glaze. Mix orange juice and honey for a bright, zesty twist. While salmon shines in this recipe, other fish work too. Try using trout, which has a similar flavor and texture. Mahi-mahi also holds up well to grilling and glazing. Cod is another great option, as it absorbs flavors nicely. Each fish brings its own unique taste, so feel free to experiment. Toppings can elevate your dish further. Try adding sliced avocados for creaminess. Chopped cilantro or parsley adds a fresh touch. You can also sprinkle crushed peanuts or cashews for crunch. For a spicy kick, add sliced jalapeños. These toppings can make your meal even more fun and flavorful. Enjoy customizing your Sriracha honey glazed salmon with these ideas! Store your leftover salmon in an airtight container. Make sure to let it cool first. Place a piece of parchment paper between layers if stacking. This keeps the fish from sticking together. Refrigerate the salmon for up to three days. If you plan to keep it longer, freezing is a better option. To reheat, use the oven for the best taste. Preheat to 350°F (175°C). Place the salmon on a baking sheet and cover it with foil. Heat for about 10 to 15 minutes. This keeps the salmon moist and tasty. You can also use the microwave. Heat it in short bursts of 30 seconds. Check often to avoid overcooking. If you want to freeze your salmon, do it right after cooking. Wrap each piece tightly in plastic wrap. Then, place them in a freezer bag. Remove as much air as you can before sealing. You can freeze it for up to three months. When ready to eat, thaw it in the fridge overnight before reheating. For more ideas, check out the Full Recipe. You can tell if the salmon is cooked when it flakes easily with a fork. The flesh should be opaque and no longer translucent. A good rule is to cook it for about 4-5 minutes per side, depending on thickness. Use a food thermometer if you want to be precise. The internal temperature should reach 145°F (63°C). Cooking it just right keeps it moist and tasty. Yes, you can prepare the glaze ahead of time. Just store it in the fridge in an airtight container. This makes cooking easier later. However, I recommend cooking the salmon fresh. This keeps it juicy and full of flavor. If you must, you can cook the salmon and store it in the fridge for up to 2 days. For a full meal, pair the salmon with fluffy jasmine rice or quinoa. Steamed broccoli or snap peas add color and crunch. You can also serve it with a fresh salad for a light touch. If you want something more filling, try roasted potatoes or sweet potatoes. These sides balance the bold flavors of the salmon well. Check out the Full Recipe for more details! This blog post shared key details about making Sriracha Honey Glazed Salmon. You learned what ingredients to use, including seasoning and garnishes. I outlined simple steps to prepare the glaze, season the fish, and achieve that perfect sear. Plus, you found helpful tips for crispy skin and spice adjustments. I also covered variations for sauces and fish, along with storage options for leftovers. Savor this dish and share it with others. Enjoy your cooking!](https://goldendishy.com/wp-content/uploads/2025/07/1e0cb0f2-d69e-43b4-ab0e-316143d411f1-768x768.webp)