
Spinach Feta Egg Muffins Quick and Easy Recipe


Are you looking for a quick and tasty breakfast idea? These Spinach Feta Egg Muffins pack protein and flavor in every bite. With just a few simple ingredients, you can whip up a healthy meal in minutes. Whether you enjoy them fresh or on the go, this easy recipe fits your busy lifestyle. Let’s dive into the ingredients and get started on making your new favorite breakfast!
Why I Love This Recipe
- Healthy and Nutritious: These egg muffins are packed with fresh spinach and feta, making them a great source of vitamins and minerals while being low in calories.
- Quick and Easy: The recipe takes just 10 minutes to prep, and they bake in 20-25 minutes, perfect for a busy morning or meal prep.
- Versatile Ingredients: You can easily customize these muffins by adding your favorite vegetables or proteins, making them suitable for various dietary preferences.
- Great for Meal Prep: These muffins can be stored in the fridge for a quick breakfast or snack throughout the week, ensuring you always have a healthy option on hand.
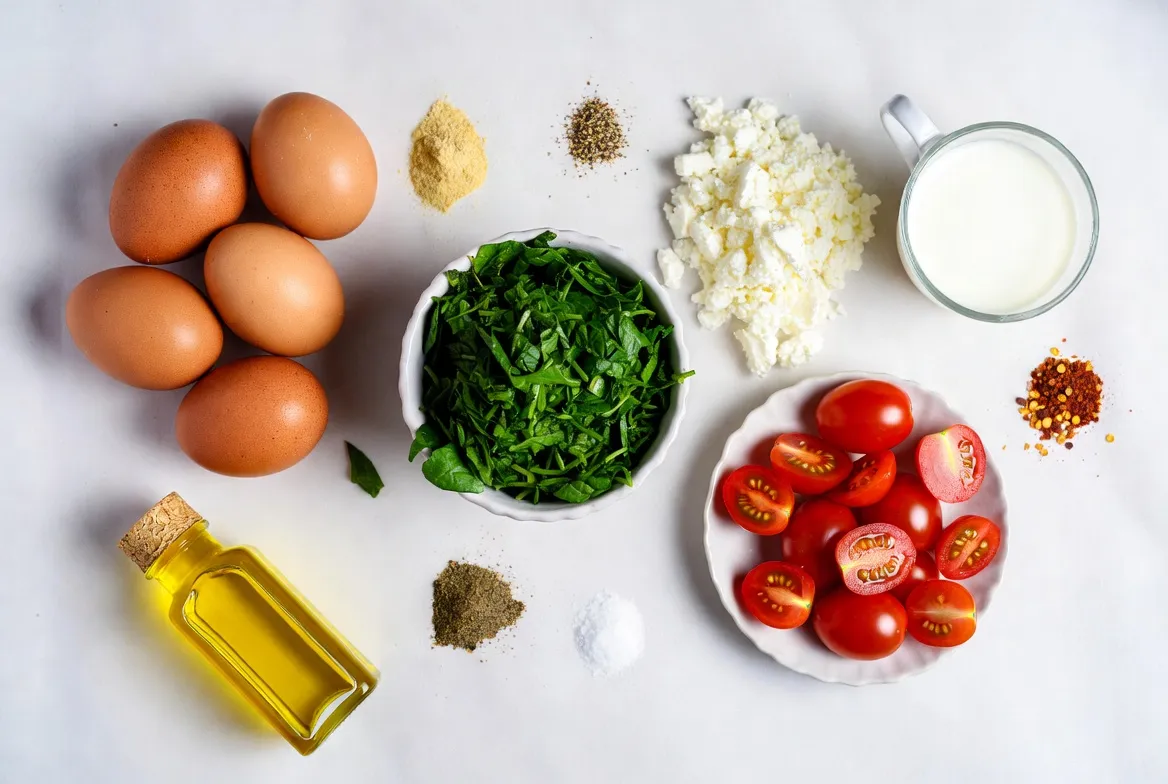
Ingredients
List of Ingredients with Measurements
– 6 large eggs
– 1 cup fresh spinach, roughly chopped
– 1/2 cup feta cheese, crumbled
– 1/4 cup milk (or any non-dairy alternative)
– 1/4 cup cherry tomatoes, halved
– 1/4 teaspoon garlic powder
– 1/4 teaspoon black pepper
– 1/2 teaspoon salt
– 1/4 teaspoon red pepper flakes (optional, for a spicy kick)
– 1 tablespoon olive oil (for greasing the muffin pan)
Nutritional Information per Serving
Each muffin is packed with nutrients. Here’s what you get per serving:
– Calories: 150
– Protein: 9g
– Fat: 10g
– Carbohydrates: 3g
– Fiber: 1g
– Sugar: 1g
This recipe makes six muffins, so it’s great for sharing!
Tips for Ingredient Substitutions
You can switch some ingredients for taste or dietary needs:
– Eggs: Try egg whites for fewer calories.
– Feta Cheese: Use goat cheese or cottage cheese if you prefer.
– Spinach: Kale or Swiss chard can be good swaps.
– Milk: Almond milk or oat milk works well for dairy-free options.
– Cherry Tomatoes: Bell peppers or zucchini also add a nice touch.
Feel free to mix and match based on what you have. Enjoy your cooking!
Step-by-Step Instructions
Preheat the Oven
Start by preheating your oven to 350°F (175°C). This step gets your oven hot and ready for baking. A hot oven helps the muffins rise well.
Prepare the Muffin Tin
Next, take your muffin tin and grease it with olive oil. You can also use silicone muffin cups. These options help keep the muffins from sticking and make them easy to remove later.
Mix the Egg Batter
In a large bowl, whisk together six large eggs and a quarter cup of milk. Whisk until the mixture is smooth and a bit frothy. This step mixes air into the eggs, making your muffins fluffier.
Now, add in the fun stuff: a cup of chopped spinach, half a cup of crumbled feta cheese, and a quarter cup of halved cherry tomatoes. Sprinkle in a quarter teaspoon each of garlic powder, black pepper, and half a teaspoon of salt. If you like a bit of heat, add a quarter teaspoon of red pepper flakes. Mix gently until all the ingredients blend well.
Fill Muffin Cups and Bake
Carefully pour the egg mixture into the greased muffin cups. Fill each cup about three-quarters full. This allows the muffins to rise without spilling over. Place the muffin tin into the preheated oven. Bake for about 20-25 minutes. The muffins should look golden and set in the center.
Cool and Remove Muffins
After baking, take the muffin tin out of the oven. Let the muffins cool for about five minutes. Use a fork or spatula to lift each muffin out gently. Be careful not to break them. Enjoy your tasty Spinach Feta Egg Muffins!
Tips & Tricks
How to Achieve Perfectly Fluffy Muffins
To get those muffins fluffy, whisk the eggs and milk well. This creates air in the mixture. Air helps the muffins rise nicely while baking. Make sure not to overmix once you add spinach, feta, and other ingredients. Gentle folding keeps the air bubbles intact.
Recommended Cooking Tools
Here are some tools you should have:
– Muffin tin (standard size)
– Whisk for mixing
– Measuring cups and spoons
– Mixing bowl
– Fork or spatula for lifting muffins
– Oven mitts for safety
These tools make the process smooth and easy.
Serving Suggestions for Breakfast
Serve these muffins warm for the best taste. You can top them with extra feta cheese and cherry tomato halves. For a complete meal, pair them with fruit or yogurt. These muffins are also great for meal prep. Store them in your fridge for easy, quick breakfasts during the week. Enjoy your delicious creation!
Pro Tips
- Use Fresh Ingredients: Fresh spinach and high-quality feta cheese will enhance the flavor and texture of your egg muffins. Look for vibrant greens and creamy feta for the best results.
- Customize Your Veggies: Feel free to swap in your favorite vegetables. Bell peppers, onions, or zucchini can add more flavor and nutrition to your muffins.
- Perfect Storage: To maintain freshness, store the muffins in an airtight container in the refrigerator. They can last up to a week and are perfect for a quick breakfast.
- Freezing for Later: These egg muffins freeze well! Place them in a single layer on a baking sheet, freeze until solid, then transfer to a freezer bag for up to 3 months.

Variations
Spinach Feta Egg Muffins with Different Vegetables
You can change up the veggies in your muffins. Try adding bell peppers, mushrooms, or zucchini. Each adds a new flavor and texture. For example, bell peppers bring a sweet crunch. Zucchini adds moisture, keeping muffins tender. Just chop your choice and mix them in with the spinach.
Adding Protein: Ham or Turkey Variations
Want more protein? Add diced ham or turkey. This makes your muffins heartier and more filling. Use about 1/2 cup of diced meat. Cooked turkey or ham works best. Just toss it in with the other ingredients. This simple step boosts flavor and nutrition.
Dairy-Free and Vegan Alternatives
If you want to go dairy-free or vegan, swap the eggs and milk. Use flaxseed meal and water as an egg substitute. Mix 1 tablespoon of flaxseed meal with 2.5 tablespoons of water for each egg. For milk, almond or oat milk can work well. Substitute the feta with vegan cheese or nutritional yeast for a cheesy flavor. This way, everyone can enjoy these muffins!
Storage Info
How to Properly Store Muffins
To keep your spinach feta egg muffins fresh, place them in an airtight container. Store them in the fridge. They will stay good for about four days. Make sure to let them cool completely before sealing. This prevents moisture from making them soggy.
Reheating Instructions
When you want to enjoy your muffins again, reheating is easy. You can use the microwave or the oven. For the microwave, heat for about 30 seconds. Check if they are warm. If not, heat for another 10 seconds. For the oven, preheat it to 350°F (175°C). Place the muffins on a baking sheet and heat for about 10 minutes. This keeps them fluffy and warm.
Freezing Spinach Feta Egg Muffins
You can freeze these muffins for longer storage. First, let them cool completely. Wrap each muffin in plastic wrap. Then, place them in a freezer bag or container. They can last up to three months in the freezer. When you’re ready to eat, thaw them overnight in the fridge. Reheat as mentioned before, and enjoy!
FAQs
How long do Spinach Feta Egg Muffins last?
Spinach Feta Egg Muffins last for about five days in the fridge. Store them in an airtight container. This keeps them fresh and tasty.
Can I make these muffins ahead of time?
Yes, you can make these muffins ahead of time. Prepare them and store in the fridge. They are perfect for quick breakfasts or snacks!
What to serve with Spinach Feta Egg Muffins?
You can serve these muffins with fresh fruit or a light salad. A side of yogurt also pairs well. This adds more flavor and balance to your meal.
Can I substitute feta cheese with another type?
Yes, you can use other cheeses like goat cheese or cheddar. Keep in mind that flavors will change a bit. Experiment with what you like best!
You learned how to make delicious Spinach Feta Egg Muffins. We covered ingredients, cooking steps, and variations for every taste. Tips for fluffiness and storage made it easier to enjoy them longer. You can experiment with protein and dairy-free options too. These muffins are a tasty and simple breakfast choice. Now go ahead—try these recipes and make your mornings bette

Spinach Feta Egg Muffins
Ingredients
- 6 large eggs
- 1 cup fresh spinach, roughly chopped
- 1/2 cup feta cheese, crumbled
- 1/4 cup milk (or any non-dairy alternative)
- 1/4 cup cherry tomatoes, halved
- 1/4 teaspoon garlic powder
- 1/4 teaspoon black pepper
- 1/2 teaspoon salt
- 1/4 teaspoon red pepper flakes (optional)
- 1 tablespoon olive oil (for greasing the muffin pan)
Instructions
- Begin by preheating your oven to 350°F (175°C) to ensure it is ready for baking.
- Prepare your muffin tin: grease it thoroughly with olive oil or opt for silicone muffin cups for easy removal after baking.
- In a large mixing bowl, whisk together the eggs and milk vigorously until the mixture is uniform and frothy.
- Add the chopped spinach, crumbled feta cheese, halved cherry tomatoes, garlic powder, black pepper, salt, and optional red pepper flakes to the egg mixture. Stir gently until all ingredients are well incorporated.
- Carefully pour the egg mixture into the prepared muffin tin, filling each cup about three-quarters full.
- Place the muffin tin in the preheated oven and bake for approximately 20-25 minutes until set in the center and lightly golden on top.
- Once baked, remove the tin from the oven and allow the muffins to cool for about 5 minutes before gently lifting each muffin out.


![- 1 medium head of cauliflower, cut into bite-sized florets - 4 cloves fresh garlic, finely minced - 3 tablespoons extra virgin olive oil - 1 teaspoon smoked paprika - 1 teaspoon fine sea salt - ½ teaspoon freshly ground black pepper The main ingredients create a base of flavor. Cauliflower gives a nice texture and absorbs the garlic well. Garlic adds a strong taste that enhances the dish. Olive oil helps with roasting and adds richness. Smoked paprika brings depth, while salt and pepper balance the flavors. - 2 tablespoons grated Parmesan cheese - Fresh parsley, finely chopped You can add Parmesan cheese for a cheesy twist. It melts nicely and adds a savory note. Fresh parsley adds color and freshness on top. These add-ins make the bites even more delightful. - Baking sheet - Mixing bowl - Parchment paper A baking sheet is essential for roasting. Use a mixing bowl to combine all the ingredients. Parchment paper helps with easy cleanup and prevents sticking. These tools make the cooking process smooth and simple. You can find the Full Recipe above for more details. 1. Preheat the Oven: Start by preheating your oven to 425°F (220°C). This heat helps make the bites crispy and golden. 2. Prepare the Cauliflower: Cut one medium head of cauliflower into bite-sized florets. Make sure they are all similar in size. This helps them cook evenly. 1. Combine Cauliflower and Seasonings: In a large mixing bowl, add the cauliflower florets. Then, add 4 minced garlic cloves, 3 tablespoons of olive oil, 1 teaspoon of smoked paprika, 1 teaspoon of sea salt, and ½ teaspoon of black pepper. 2. Ensure Even Coating: Toss everything together well. You want the florets to be fully coated with the olive oil and seasonings. This gives them great flavor. 1. Arrange on Baking Sheet: Line a baking sheet with parchment paper for easy cleanup. Spread the cauliflower in a single layer. Make sure the florets have space. This helps them roast well. 2. Roast Duration and Tips: Place the sheet in the oven. Roast for 25-30 minutes. Keep an eye on them. Toss the florets halfway through. This helps them cook evenly. If you like cheese, sprinkle 2 tablespoons of grated Parmesan cheese on top in the last 5 minutes. This adds a nice touch. Enjoy the full recipe for all the details and tips for these delicious bites! Ensuring Tender Florets To get tender florets, cut them into uniform pieces. This helps them cook at the same rate. Toss them well with oil and seasonings. The olive oil locks in moisture and adds a nice flavor. Roasting at 425°F (220°C) gives the perfect balance of crispiness and tenderness. Avoiding Soggy Cauliflower Space the florets on the baking sheet. If they are too close, steam will build up and make them soggy. Use parchment paper to keep them from sticking. This also helps with cleanup. Remember to toss them halfway through roasting for even cooking. Adding Spices Spices can elevate the taste of your cauliflower bites. I love using smoked paprika for depth. You can also try garlic powder, cayenne, or cumin for a twist. Start with small amounts and adjust to your taste. Using Different Oils While olive oil is great, try other oils for different flavors. Avocado oil works well for high heat. You can also use sesame oil for a nutty taste. Just ensure the oil has a high smoke point to avoid burning. Serving Suggestions Serve the roasted garlic cauliflower bites on a rustic wooden platter. This adds warmth to your meal. You can also arrange them in a circle with a bowl of dipping sauce in the center. This invites guests to dig in. Garnishing Techniques Garnish with fresh parsley for a pop of color. You can also sprinkle some lemon zest on top for a refreshing zing. If you used Parmesan, let some shavings fall over the bites to enhance the look and flavor. For the complete recipe, check the [Full Recipe]. {{image_4}} Vegan Alternatives You can easily make these bites vegan. Just skip the Parmesan cheese. The garlic and spices keep the taste rich and satisfying. You can also add nutritional yeast for a cheesy flavor without dairy. Gluten-Free Options This recipe is naturally gluten-free! You can enjoy it without any worry. Always check labels on packaged spices or sauces to ensure they are gluten-free. Spice Variations Want a kick? Add cayenne pepper or chili powder. For a milder flavor, use paprika or turmeric. You can also try curry powder for an exotic twist. Herb Infusions Fresh herbs make a big difference. Add rosemary or thyme for earthy notes. Basil or cilantro can brighten the dish. Mix and match to find your favorite combination. Air Fryer Instructions Using an air fryer makes these bites super crispy. Set your air fryer to 400°F (200°C). Cook them for about 15-20 minutes, shaking the basket halfway through. Grilling Method Grilling adds a smoky flavor. Toss the cauliflower in a grill basket. Grill over medium heat for about 10-15 minutes. Turn occasionally for even cooking. Enjoy the charred bits! Store any leftovers in an airtight container. This helps keep them fresh. You can place them in the fridge. They stay good for about 3 to 5 days. If you see any signs of spoilage, throw them away. You have two options for reheating: oven or microwave. The oven keeps the bites crispy. Preheat it to 350°F (175°C) and heat for about 10 minutes. The microwave is faster, but it can make them soggy. If using a microwave, heat in 30-second intervals. You can freeze roasted cauliflower bites if you want to save some. Let them cool completely first. Place them in a freezer-safe bag. They can last up to 3 months in the freezer. When ready to eat, thaw them in the fridge overnight. Reheat in the oven for the best texture. To make your roasted garlic cauliflower bites crispy, follow these tips: - Cut the cauliflower into small, even pieces. - Make sure to coat every floret with olive oil. - Spread the florets out on the baking sheet, leaving space between them. - Roast at a high temperature, around 425°F (220°C). - Toss the cauliflower halfway through cooking to ensure even roasting. - If you want extra crunch, broil for the last few minutes. Yes, you can use frozen cauliflower. However, it’s best to thaw it first. Pat it dry with a towel. This helps remove excess moisture, which can make your bites soggy. The cooking time may be shorter, so check for doneness a few minutes early. A great dipping sauce pairs well with roasted garlic cauliflower bites. Here are some tasty options: - Ranch dressing for a classic taste. - Garlic aioli for a creamy twist. - Spicy sriracha for a kick of heat. - Hummus for a healthy choice. Feel free to try different sauces to find your favorite! To adjust the recipe for more servings, simply multiply the ingredients. For example: - Use two heads of cauliflower for eight servings. - Keep the same ratio for olive oil and seasonings. - Roast in batches if your baking sheet is too small. This way, you’ll still get delicious, crispy bites! For the complete instructions, check the Full Recipe. Roasted garlic cauliflower is easy to make and very tasty. We covered the main ingredients, like cauliflower and garlic, and shared tips for perfect texture and flavors. You learned about storage and reheating methods to keep your dish fresh. Try different variations to suit your tastes or dietary needs. Enjoy this dish as a side or snack. It’s healthy, fun, and simple. You'll love making it again and again!](https://goldendishy.com/wp-content/uploads/2025/06/58dc371e-82c7-47cc-93f2-9c36524126f6-768x768.webp)