
Mexican Street Corn Salad Flavorful Summer Delight


Are you ready to bring the vibrant flavors of Mexico to your summer table? My Mexican Street Corn Salad combines sweet, juicy corn with fresh veggies and zesty dressing. This salad is not just a dish; it’s a celebration of summer! You’ll learn how to grill corn perfectly and mix everything together for a delightful meal. Let’s dive into the ingredients and create something delicious that your friends and family will love.
Why I Love This Recipe
- Fresh Ingredients: This salad features fresh, vibrant ingredients that burst with flavor, making each bite a delightful experience.
- Versatile Dish: Perfect as a side for barbecues or as a light meal, this salad is versatile and fits various occasions.
- Easy to Prepare: With minimal prep time and straightforward steps, this recipe is quick and easy, great for busy days.
- Flavorful and Zesty: The combination of zesty lime, creamy dressing, and spices creates a deliciously bold flavor profile.
Ingredients
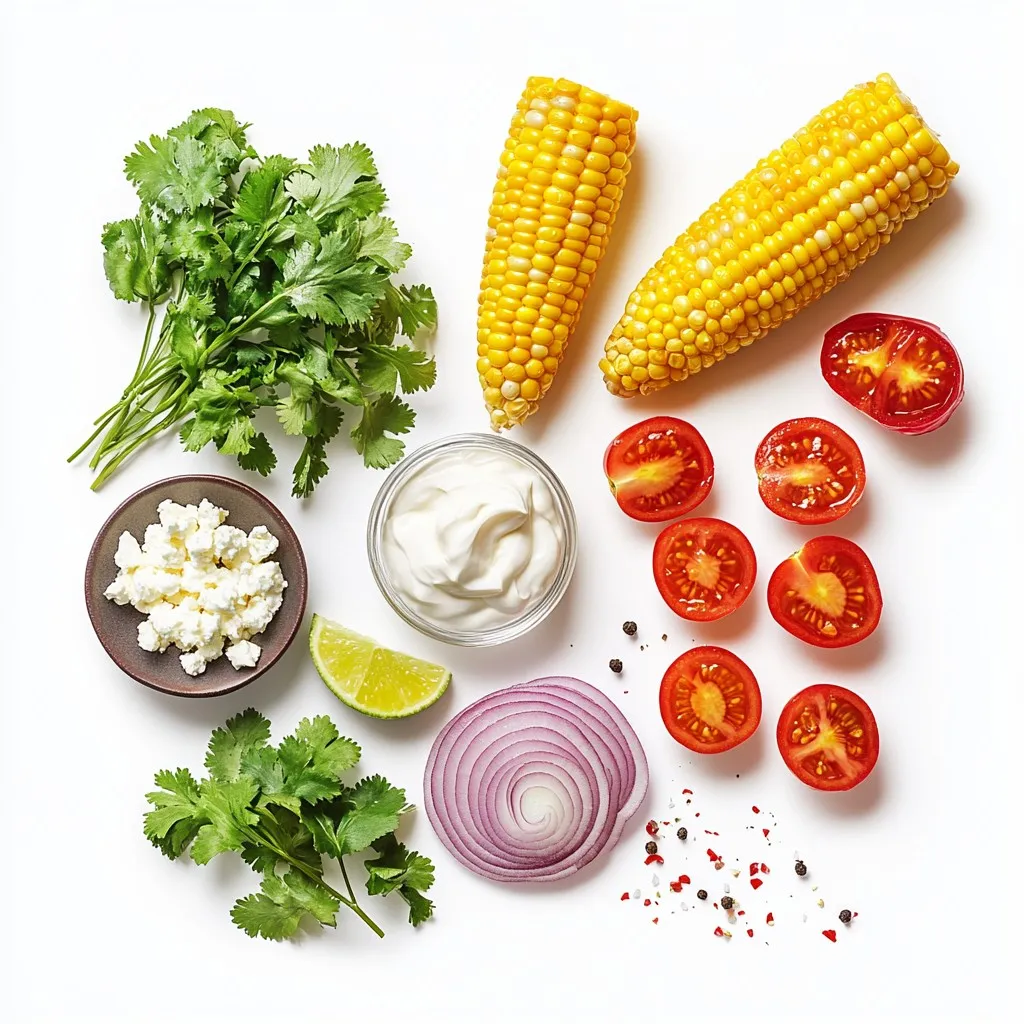
To make a delicious Mexican Street Corn Salad, you will need the following fresh ingredients:
– Sweet corn
– Cherry tomatoes
– Red onion
– Feta cheese
– Fresh cilantro
– Mayonnaise
– Sour cream
– Lime juice
– Chili powder
– Salt and black pepper
Each ingredient plays a key role in creating that vibrant flavor. The sweet corn gives the salad its base and main flavor. Cherry tomatoes add a juicy burst. Red onion brings a sharp crunch. Feta cheese adds creaminess and a salty note. Fresh cilantro offers a bright herbal touch. The mixture of mayonnaise and sour cream creates the perfect creamy dressing with lime juice for tang. Chili powder gives that signature kick, while salt and black pepper balance the flavors.
Gathering these fresh, quality ingredients will set you up for a fantastic dish. If you use seasonal produce, you’ll enjoy even richer flavors.
Step-by-Step Instructions
Preparing the Corn
1. Preheating the grill
Start by preheating your grill to medium-high heat. This step is key for a great char.
2. Grilling the corn
Once the grill is hot, place the husked corn on the grates. Grill each ear for about 10-12 minutes. Turn the corn every few minutes. You want it nicely charred and caramelized.
3. Cooling and cutting kernels
After grilling, remove the corn from the grill and let it cool. Once it’s cool enough to handle, cut the kernels off the cobs with a sharp knife. Transfer those kernels to a large mixing bowl.
Mixing the Ingredients
1. Combining corn and vegetables
Into the bowl with the corn, add the halved cherry tomatoes, diced red onion, crumbled feta cheese, and chopped cilantro. Use a spatula to gently stir all ingredients together.
2. Preparing the dressing
In a separate bowl, whisk together the mayonnaise, sour cream, lime juice, chili powder, salt, and pepper. Mix until you have a smooth and creamy dressing.
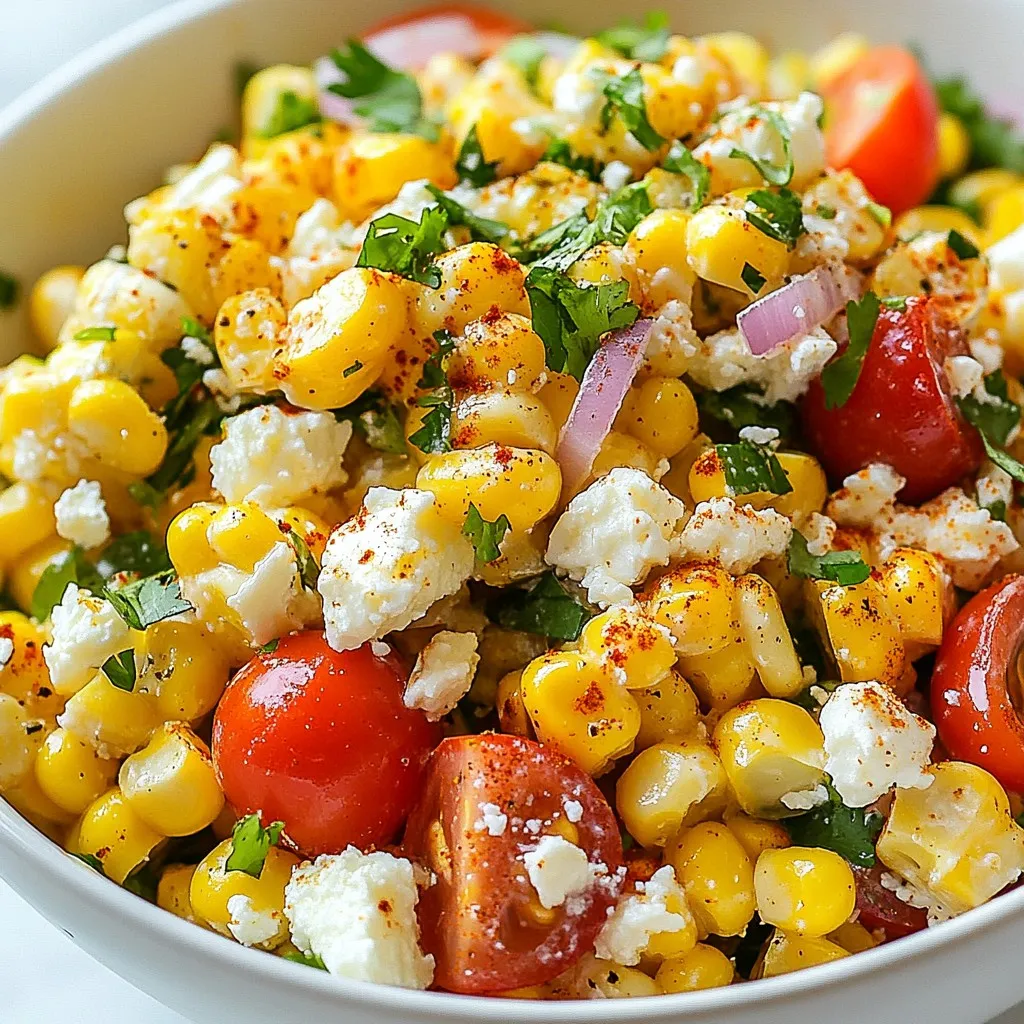
Final Assembly
1. Tossing the salad
Drizzle the dressing over the corn mixture. Use a spatula or wooden spoon to toss everything gently. Make sure all ingredients are well coated.
2. Adjusting the seasoning
Take a moment to taste the salad. Adjust the seasoning if needed. You can add more lime juice, salt, or chili powder to suit your taste.
3. Serving suggestions
You can serve the salad right away for a fresh experience. If you want richer flavors, chill it in the fridge for about 30 minutes. This allows the flavors to blend beautifully. For a nice touch, serve it in a decorative bowl or individual cups. Garnish with cilantro and lime wedges for extra flair.
Tips & Tricks
Perfecting the Grill
Choosing the right corn
Start with sweet corn. Look for fresh, firm ears. The kernels should be plump and juicy. Avoid corn with dry or brown spots. Organic corn adds extra flavor too.
Tips for optimal charring
Preheat your grill to medium-high heat. This step is key for good char. Grill the corn for 10-12 minutes. Turn it every few minutes. Look for a nice golden-brown color. This adds a smoky taste to your salad.
Dressing Adjustments
Customizing flavors to taste
Feel free to adjust the dressing. Add more lime juice for tanginess. If you like heat, increase the chili powder. Taste as you mix and make it yours.
Substituting ingredients for dietary needs
You can use Greek yogurt instead of mayo or sour cream. For a dairy-free option, try avocado cream. This keeps the salad creamy while meeting dietary needs.
Serving Recommendations
Presentation ideas
Serve the salad in a big bowl for sharing. For parties, use individual cups. Add lime wedges and extra cilantro on top. This makes it look fresh and inviting.
Pairing suggestions
This salad pairs well with grilled meats. Try it with chicken or shrimp tacos. It also goes great with spicy dishes. The cool salad balances heat perfectly.
Pro Tips
- Choose Fresh Corn: Fresh, in-season corn will provide the best sweetness and flavor for your salad. Look for ears with bright green husks and plump kernels.
- Customize the Heat: If you like it spicy, add diced jalapeños or a pinch of cayenne pepper to the dressing for an extra kick.
- Mix in Avocado: For a creamier texture, consider adding diced avocado to the salad just before serving. It complements the other flavors beautifully.
- Serve Chilled: Allowing the salad to chill in the refrigerator for about 30 minutes before serving enhances the flavors and provides a refreshing experience.
Variations
Ingredient Swaps
You can change some ingredients in this salad to fit your taste.
– Using different cheeses: Feta cheese adds a nice salty flavor. If you want, try queso fresco for a milder taste. Cotija cheese is another great option. It’s crumbly and adds a nice bite.
– Adding beans or other veggies: You can add black beans for protein. They give a creamy texture and taste. Corn and diced bell peppers also work well. They add crunch and color.
Flavor Enhancements
Small changes can make a big difference in taste.
– Extra spices or herbs: If you want more heat, add cayenne pepper. You could also try adding fresh herbs like basil or mint. They bring a fresh twist to the salad.
– Sweet additions like avocado or fruits: Avocado adds creaminess. You can also add mango or pineapple for a sweet touch. These fruits balance the spice and add a tropical vibe.
Storage Info
Refrigeration Guidelines
To store leftovers, place your Mexican street corn salad in an airtight container. Make sure it cools down before sealing. This helps keep the flavors fresh.
The best containers for storage are glass or BPA-free plastic. These materials do not hold onto smells. They also help prevent spills in your fridge.
Shelf Life
For maintaining freshness, the salad lasts about 3 to 5 days in the fridge. After this time, the taste and texture may suffer.
Signs of spoilage include a sour smell or a change in color. If you see any mold, throw it away. Always trust your senses when it comes to food safety.
FAQs
Common Questions about Mexican Street Corn Salad
Can I use frozen corn?
Yes, you can use frozen corn. Just thaw it before mixing. Frozen corn is sweet and will work well.
What can I substitute for feta cheese?
You can use cotija cheese or goat cheese. Both give a nice flavor and texture.
How can I make this salad vegan?
To make it vegan, replace feta with a plant-based cheese. Use vegan mayo and sour cream too.
Troubleshooting Tips
Why is my salad watery?
Your salad may be watery if you didn’t drain the tomatoes well. Also, don’t add too much dressing at once.
How can I add more flavor?
Add more lime juice or chili powder for a kick. Fresh herbs like cilantro also boost flavor.
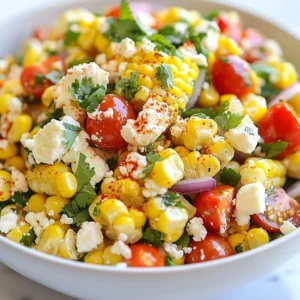
This blog post shows you how to create a fresh Mexican Street Corn Salad. We went through key ingredients, easy steps, and useful tips. The salad is bright and packed with flavor. Feel free to swap ingredients or adjust the dressing to suit your taste. Store leftovers properly and enjoy them later. Remember, cooking is about having fun and experimenting. I hope you try this salad and make it your own. It’s perfect for any meal or gathering. Happy cookin
Zesty Mexican Street Corn Salad
Ingredients
- 4 ears sweet corn, husked
- 1 cup cherry tomatoes, halved
- 0.5 cup red onion, finely diced
- 0.5 cup feta cheese, crumbled
- 0.25 cup fresh cilantro, roughly chopped
- 2 tablespoons mayonnaise
- 2 tablespoons sour cream
- 1 tablespoon freshly squeezed lime juice
- 1 teaspoon chili powder
- 1 to taste salt
- 1 to taste black pepper
Instructions
- Begin by preheating your grill to medium-high heat. This will create the perfect environment for charring the corn.
- Once the grill is ready, place the husked corn on the grill grates. Grill the corn for about 10-12 minutes, turning it every few minutes until the exterior is nicely charred and caramelized. Once grilled, remove the corn from the grill and set it aside to cool slightly.
- After the corn has cooled enough to handle, carefully cut the kernels off the cobs using a sharp knife. Transfer the kernels to a large mixing bowl.
- Into the bowl with the corn, add the halved cherry tomatoes, diced red onion, crumbled feta cheese, and chopped cilantro. Stir the ingredients gently to combine them.
- In a separate small bowl, whisk together the mayonnaise, sour cream, freshly squeezed lime juice, chili powder, salt, and pepper until you achieve a smooth and creamy dressing.
- Drizzle the dressing over the corn mixture. Using a spatula or wooden spoon, gently toss everything together to ensure all ingredients are evenly coated with the dressing.
- Take a moment to taste the salad and adjust the seasoning as necessary. Feel free to add more lime juice, salt, or chili powder to suit your taste preferences.
- You can serve the salad immediately for a fresh experience, or for an even richer flavor, chill it in the refrigerator for about 30 minutes to allow the flavors to meld beautifully.


![- Bell pepper (red, yellow, or green) - Zucchini and yellow squash - Red onion and cherry tomatoes - Mushrooms When I make grilled veggie skewers, I choose a mix of colorful vegetables. They not only look great but also taste fantastic. Bell peppers are a must. You can pick red, yellow, or green. Each type adds a sweet taste. Zucchini and yellow squash are next. Their soft texture and mild flavor work well on the grill. I like to cut them into thick rounds. This helps them hold their shape while cooking. Red onions add a nice bite. I cut them into wedges so they cook evenly. Cherry tomatoes are fun and juicy. I use them whole, so they burst with flavor when grilled. Finally, I love mushrooms. They soak up the marinade and get smoky when grilled. - Olive oil, garlic powder, smoked paprika - Salt and black pepper To bring out the flavors, I use a simple marinade. I drizzle extra virgin olive oil over the veggies. It helps the spices stick and adds richness. I sprinkle garlic powder for a savory kick and smoked paprika for a hint of smoke. Don’t forget to add salt and black pepper. They enhance all the natural flavors. I mix everything well, so each piece is coated. This step is crucial for a tasty outcome. - Fresh basil leaves After grilling, I like to add fresh basil leaves. They give a burst of color and flavor. Just tear them up and sprinkle on top of the skewers. This final touch makes the dish even more inviting. For the full recipe, check out the [Full Recipe]. First, we need to get our grill ready. Preheating is key to good grilling. It helps to cook the veggies evenly and gives them nice grill marks. Set your grill to medium-high heat. This temperature is perfect for cooking our colorful skewers. Let’s prep our vegetables. Start by cutting them into pieces. Cut the bell pepper into 1-inch chunks. Slice the zucchini and yellow squash into thick rounds. Cut the red onion into wedges. Keep the cherry tomatoes whole and use whole mushrooms or half them if they are large. Next, we’ll mix the veggies. Place all the cut veggies in a big bowl. Drizzle them with olive oil and sprinkle in garlic powder, smoked paprika, salt, and black pepper. Now, toss everything gently with your hands or a spatula. Make sure each piece is well-coated with the seasoning. This step adds a lot of flavor! Now comes the fun part: assembling the skewers. Take a skewer and start threading the veggies. Alternate the types of veggies to create a colorful mix. This not only looks great but also adds different flavors in every bite. Be careful when handling the skewers. The ends can be sharp, so keep your hands clear when you thread the veggies. Once you finish, your skewers are ready for the grill. For the full recipe, check out the details above. Grilling veggie skewers is simple and fun. Aim for a medium-high heat. This ensures your veggies cook well. Grill them for about 10-12 minutes. Turn them often to get nice grill marks. You want them tender but not mushy. To boost flavor, try adding spices like cumin or dill. A splash of lemon juice also brightens the taste. For a smoky flavor, use smoked paprika or a dash of liquid smoke. Marinades can add depth, too. A blend of olive oil, vinegar, and herbs works great. For a beautiful presentation, stand skewers upright in a holder. You can also lay them on a platter. Drizzle with olive oil and sprinkle fresh herbs. Pair the skewers with dips like hummus or tzatziki. These add flavor and make serving easier. Check out the Full Recipe for more ideas! {{image_4}} You can mix and match veggies for your skewers. Seasonal vegetables make great choices. In summer, try zucchini and corn. In fall, use butternut squash and Brussels sprouts. You can also add eggplant for a nice smoky taste. Asparagus gives a nice crunch and fresh flavor. If you can’t grill, you can bake or roast your skewers. For oven-baking, preheat your oven to 400°F (200°C). Place the skewers on a baking sheet. Bake for about 20 minutes. Keep an eye on them to ensure they don’t burn. Roasting gives a rich taste and helps the flavors blend well. This recipe is easy to adapt for different diets. For a vegan version, stick to the veggies and oil. If you need gluten-free options, all ingredients in this recipe work well. Just make sure to check labels on sauces or seasonings. You can enjoy tasty skewers that fit your needs by making small swaps. For the full recipe, check the details above. To keep your grilled veggie skewers fresh, use airtight containers. Store them in the fridge right after they cool down. Make sure to eat them within three days for the best taste and quality. If you notice any moisture, add a paper towel inside the container to soak it up. You can reheat skewers in the microwave or on the grill. For the microwave, place them on a plate and cover them with a damp paper towel. Heat in short bursts to avoid overcooking. To reheat on the grill, warm it up and place the skewers back on for a few minutes. This keeps the texture nice and doesn't make them soggy. To freeze skewers, wrap them tightly in plastic wrap and place them in a freezer bag. Make sure to remove as much air as possible. They can last for up to three months in the freezer. When you’re ready to eat them, thaw them in the fridge overnight. Reheat on the grill or in the oven to restore their flavor and texture. For the full recipe, check out the details above. I prefer metal skewers for grilling. They heat up quickly and help cook the veggies evenly. They are also reusable, making them eco-friendly. Wooden skewers are lighter but can burn easily. If you use wooden skewers, you need to soak them in water first. This helps prevent them from catching fire. Both types work well, so choose what you like best. Yes, you can use frozen vegetables. They are convenient and save time. However, frozen veggies may not have the same texture as fresh ones. They can become mushy when cooked. If you choose to use them, thaw them first. Pat them dry to remove extra moisture before grilling. This helps keep them from steaming and allows for better grilling. To prevent sticking, coat your vegetables with olive oil. This adds flavor and creates a barrier. Preheat your grill well before adding the skewers. A hot grill helps to sear the veggies quickly. Turn them gently with tongs. Avoid using a fork, as this can pierce the vegetables and let juices escape. Keep an eye on them, so they don't burn. Soaking wooden skewers is a good idea. It prevents them from burning on the grill. Soak them for at least 30 minutes before using. This helps them stay intact while grilling. If you skip soaking, watch them closely as they cook. You might need to turn down the heat to avoid burning. Soaking is a simple step that makes grilling easier. This blog post guides you on making vibrant vegetable skewers. We covered key ingredients, including bell peppers, zucchini, and cherry tomatoes. I shared tips for preparing the grill and veggies, along with assembling skewers safely. Remember optimal grilling time and temperature for the best results. You can try different vegetables or cooking methods for variety. Don’t forget about storing leftovers properly for later enjoyment. With the right techniques, you’ll create tasty skewers that impress. Your grilling skills can elevate any meal!](https://goldendishy.com/wp-content/uploads/2025/06/899b9bee-2fb2-475c-b5a5-3b543ce01d01-768x768.webp)