Sun-Dried Tomato Pesto Chicken Flavorful Dinner Idea

If you’re craving a quick yet delicious dinner, try Sun-Dried Tomato Pesto Chicken! This dish combines juicy chicken with the rich flavors of pesto and sun-dried tomatoes. You’ll love how simple it is to make. Plus, it works well with many sides. In this post, I will break down the ingredients, provide step-by-step instructions, and share tips to make your meal shine. Let’s get cooking!
Why I Love This Recipe
- Bold Flavors: The combination of sun-dried tomatoes, fresh basil, and Parmesan creates a rich and vibrant pesto that elevates the chicken to a whole new level.
- Easy Preparation: With just a few simple steps, you can have a gourmet meal ready in under an hour, making it perfect for busy weeknights.
- Versatile Pairings: This dish pairs beautifully with a variety of sides, from pasta to salads, allowing you to customize it to your taste.
- Health Benefits: Packed with lean protein and nutrient-rich ingredients like basil and olive oil, this recipe is not only delicious but also nutritious.
Ingredients
Main ingredients needed for Sun-Dried Tomato Pesto Chicken
– 4 boneless, skinless chicken breasts
– 1 cup sun-dried tomatoes (packed in oil), roughly chopped
– 1/2 cup fresh basil leaves, tightly packed
– 1/2 cup grated Parmesan cheese
– 1/3 cup pine nuts, toasted to a golden brown
– 2 garlic cloves, minced
– 1/4 cup extra-virgin olive oil
– Salt and freshly cracked black pepper, to taste
– Juice of 1 fresh lemon
The main ingredients create a rich and flavorful dish. The sun-dried tomatoes add a sweet and tangy taste. Fresh basil gives it a nice green touch. Grated Parmesan cheese brings in a salty, nutty flavor. Pine nuts add crunch, while garlic makes everything smell amazing.
Optional ingredients for enhanced flavors
– Fresh parsley for garnish
– Crushed red pepper flakes for heat
– Lemon slices for serving
Adding fresh parsley brightens the dish. Red pepper flakes can give a spicy kick. Lemon slices on the side add a zesty burst when squeezed on top.
Nutritional information per serving
– Calories: 380
– Protein: 40g
– Carbohydrates: 12g
– Fat: 20g
– Fiber: 2g
This meal packs a punch of protein, making it great for dinner. The balance of healthy fats and carbs keeps it satisfying. You can enjoy a tasty dinner while staying mindful of nutrition.

Step-by-Step Instructions
How to prepare the sun-dried tomato pesto
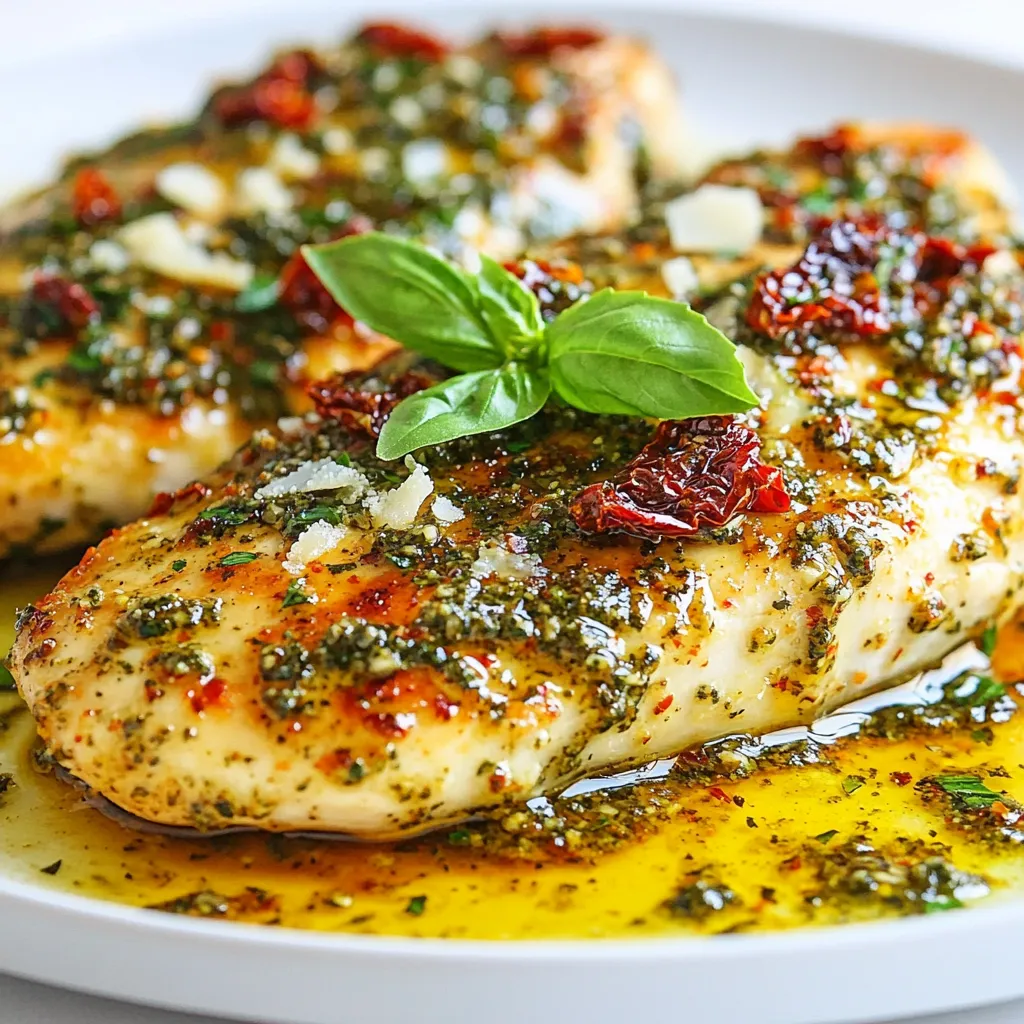
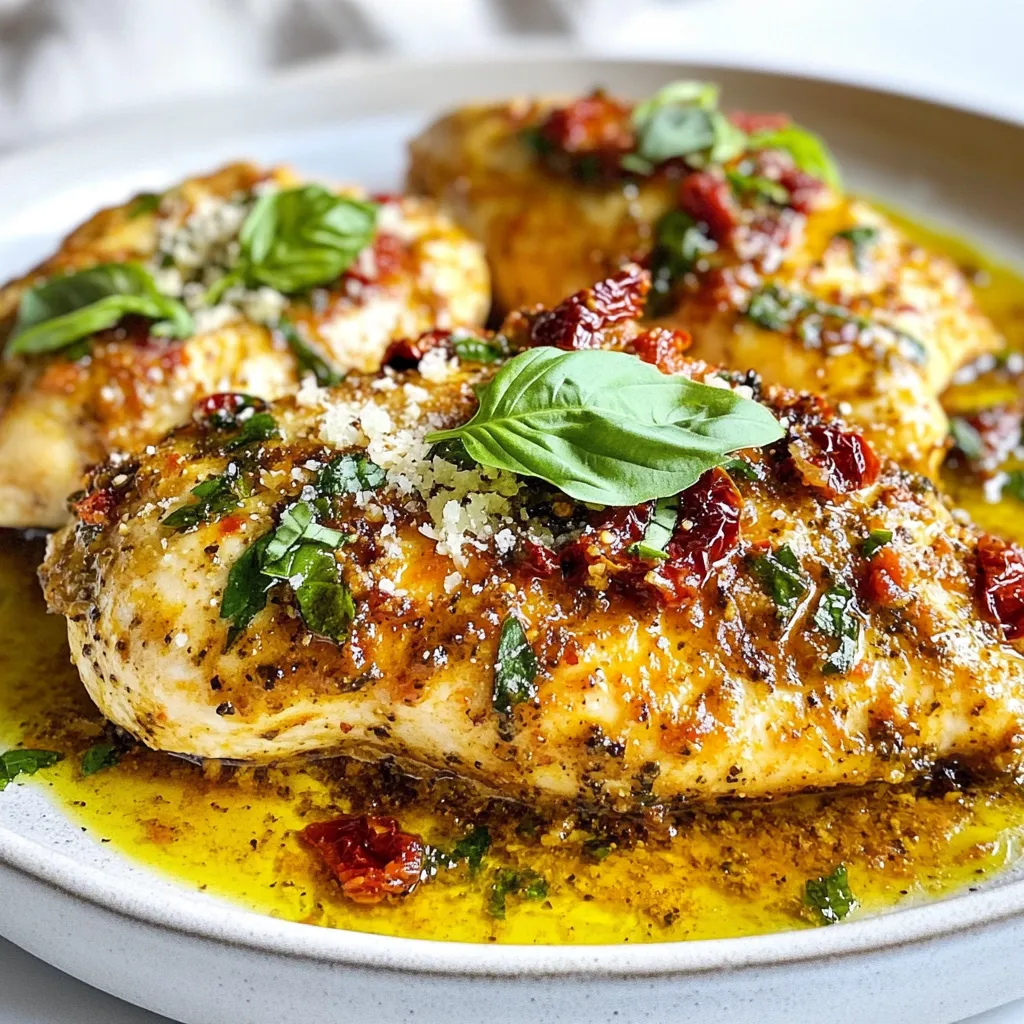
To make the sun-dried tomato pesto, gather your ingredients first. You will need sun-dried tomatoes, fresh basil, Parmesan cheese, pine nuts, garlic, olive oil, lemon juice, salt, and pepper. Place the sun-dried tomatoes, basil, Parmesan, pine nuts, and garlic in a food processor. Pulse until they are finely chopped, but not pureed. While pulsing, slowly drizzle in the olive oil. This helps it become smooth and creamy. Finally, add salt and pepper to taste.
Preparing the chicken for cooking
Next, preheat your oven to 375°F (190°C). Take your chicken breasts and pat them dry with paper towels. This removes extra moisture and helps them cook better. Season both sides of the chicken with salt and pepper. This step boosts flavor and makes your dish tasty.
Searing the chicken to perfection
Now it’s time to sear the chicken. Heat a splash of olive oil in a large oven-safe skillet over medium-high heat. Carefully add the chicken breasts to the skillet. Sear them for about 3 to 4 minutes on each side. You want a nice golden brown crust. This step locks in flavor and gives a great texture.
Adding pesto and baking the chicken
Once your chicken is seared, take the skillet off the heat. Spoon the sun-dried tomato pesto over each chicken breast. Make sure they are well-coated. Then, carefully transfer the skillet to the preheated oven. Bake for 20 to 25 minutes. The chicken should reach an internal temperature of 165°F (74°C) to ensure it’s fully cooked.
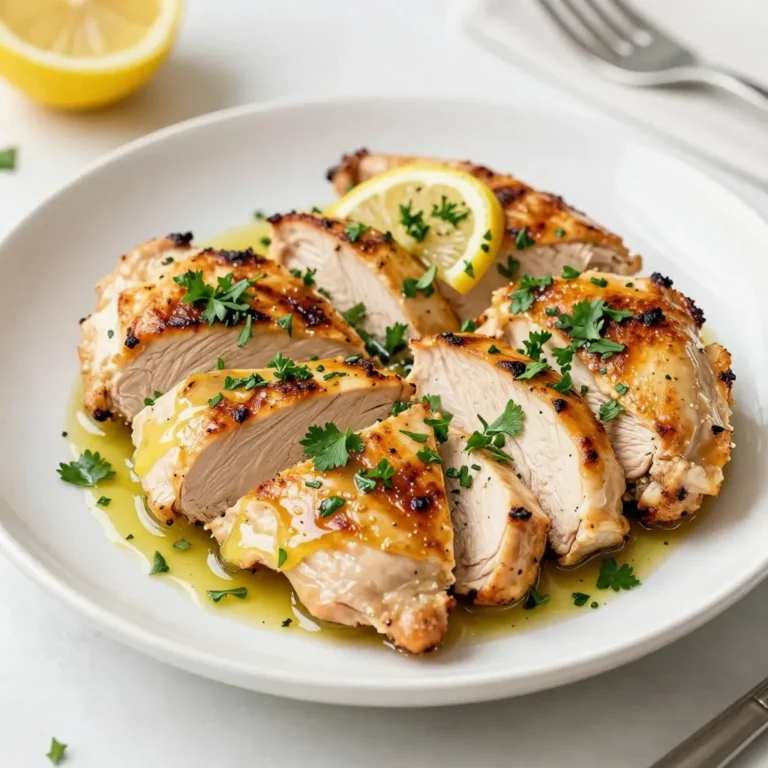
Serving suggestions and presentation tips
After baking, let the chicken rest for a few minutes. This helps keep it juicy. Serve it with sides like pasta, rice, or a salad. For a beautiful plate, garnish each chicken breast with fresh basil and a sprinkle of Parmesan cheese. Roasted vegetables also make a great side. Enjoy your flavorful dinner!
Tips & Tricks
Achieving the perfect chicken texture
To get juicy chicken, start with fresh, high-quality breasts. Pat them dry with paper towels. This helps them sear better. Season both sides with salt and pepper. When you heat olive oil in your skillet, make sure it’s hot. Sear each side for about 3-4 minutes until golden brown. This creates a nice crust that locks in moisture. Always check the internal temperature; it should reach 165°F (74°C) when done.
Making pesto ahead of time
You can make the sun-dried tomato pesto a day or two in advance. Just blend all the ingredients as stated in the recipe. Store it in an airtight container in the fridge. The flavors will deepen and mix together over time. When you are ready to cook, just spoon it over the chicken before baking. This saves time and still gives you fresh taste.
Flavor enhancements and seasoning tips
For a little extra zing, add a pinch of red pepper flakes to the pesto. This gives a nice kick without being too spicy. Fresh lemon juice brightens the flavor, so don’t skip it. For a creamier texture, mix in a splash of heavy cream to the pesto. If you want to experiment, try adding different herbs like thyme or oregano to the mix.
Pro Tips
- Use Fresh Ingredients: Always opt for fresh basil and high-quality sun-dried tomatoes for the best flavor in your pesto.
- Perfectly Cooked Chicken: Use a meat thermometer to ensure the chicken reaches an internal temperature of 165°F (74°C) for optimal juiciness.
- Customize Your Pesto: Feel free to add other nuts like walnuts or cashews, or even a hint of spice with red pepper flakes in the pesto for a unique twist.
- Let It Rest: Allow the chicken to rest for a few minutes after baking to help retain its moisture before serving.
Variations
Alternative proteins to use
If you want to change things up, try using different proteins. Here are some great options:
– Turkey breasts: They are lean and cook similarly to chicken.
– Pork chops: They add a nice flavor that pairs well with pesto.
– Firm tofu: Great for a meatless option.
These proteins can soak up the sun-dried tomato pesto nicely.
Vegetarian options and substitutes
For a vegetarian twist, consider these substitutes:
– Cauliflower steaks: Slice cauliflower thick, season, and roast. It’s a hearty option.
– Eggplant: Grilled or roasted, eggplant takes on great flavors.
– Chickpeas: Toss them with pesto and roast for a crunchy texture.
These options keep the dish delicious while meeting vegetarian needs.
Customizing pesto ingredients
You can easily customize the pesto to fit your taste. Here are some ideas:
– Different nuts: Swap pine nuts for walnuts or almonds for a new flavor.
– Cheese choices: Use feta or goat cheese for a tangy twist.
– Herbs: Mix in parsley or arugula for a fresh taste.
Feel free to experiment with your pesto. Each change brings a new experience!
Storage Info
Storing leftover Sun-Dried Tomato Pesto Chicken
After your meal, you may have some tasty chicken left. To store it, let it cool to room temperature. Then, place it in an airtight container. This helps keep the chicken fresh and safe. Store it in the fridge for up to three days. If you want to keep it longer, consider freezing it.
Reheating instructions
When you’re ready to eat the leftovers, reheating is easy. You can use the oven or microwave. For the oven, preheat it to 350°F (175°C). Place the chicken in a baking dish and cover it with foil. Heat for about 15-20 minutes until it’s warm. If using a microwave, put the chicken on a plate and cover it. Heat for 2-3 minutes on high, checking often. Make sure it’s heated all the way through.
Freezing tips for meal prep
If you want to freeze the chicken, it’s best to do so soon after cooking. Place the cooled chicken in a freezer-safe bag or container. Remove as much air as possible to prevent freezer burn. Label the bag with the date. It can stay good for up to three months. To thaw, move it to the fridge overnight before reheating.
FAQs
What can I serve with Sun-Dried Tomato Pesto Chicken?
You can serve Sun-Dried Tomato Pesto Chicken with several tasty sides. Here are some ideas:
– Pasta: Toss al dente pasta with olive oil and herbs.
– Rice: Fluffy rice pairs well and soaks up flavors.
– Salad: A mixed green salad adds freshness.
– Roasted Vegetables: Colorful veggies bring vibrancy to your plate.
These sides balance the rich flavors of the chicken.
Can I make this dish in advance?
Yes, you can make this dish ahead of time. Prepare the chicken and pesto separately. Store the chicken in the fridge after cooking. You can also freeze it for later. When ready to eat, reheat the chicken and add fresh pesto on top. This keeps the flavors fresh.
How do I know when the chicken is cooked through?
Check the internal temperature with a meat thermometer. The chicken should reach 165°F (74°C). If you don’t have a thermometer, cut into the thickest part. The meat should be white, not pink. Juices should run clear.
Can I use store-bought pesto instead of homemade?
Yes, store-bought pesto works well for this dish. It saves time and still tastes great. Look for a high-quality brand for the best flavor. Just adjust seasoning as needed, since some store-bought options can be saltier.
What adjustments can I make for a gluten-free version?
This recipe is already gluten-free! The ingredients do not contain gluten. Serve it with gluten-free sides like rice or gluten-free pasta. Always check labels to ensure no hidden gluten in your ingredients.
You’ve learned how to make delicious Sun-Dried Tomato Pesto Chicken. We covered key ingredients and step-by-step instructions. I shared tips to ensure perfect texture and flavor. You can explore variations using different proteins and customize the pesto. Remember to store leftovers properly for later enjoyment. This dish is versatile and allows for creativity in the kitchen. Enjoy cooking and sharing this tasty meal with other

Sun-Dried Tomato Pesto Chicken
Ingredients
- 4 pieces boneless, skinless chicken breasts
- 1 cup sun-dried tomatoes (packed in oil), roughly chopped
- 1 2 cup fresh basil leaves, tightly packed
- 1 2 cup grated Parmesan cheese
- 1 3 cup pine nuts, toasted to a golden brown
- 2 cloves garlic, minced
- 1 4 cup extra-virgin olive oil
- 1 to taste Salt and freshly cracked black pepper
- 1 pieces Juice of 1 fresh lemon
Instructions
- Prepare the pesto: In a food processor, place the chopped sun-dried tomatoes, fresh basil leaves, grated Parmesan cheese, toasted pine nuts, minced garlic, and lemon juice. Pulse these ingredients together until finely chopped but not completely puréed. As you continue to pulse, gradually drizzle in the olive oil until the mixture reaches a smooth and creamy consistency. Season the pesto with salt and freshly cracked black pepper according to your taste preference.
- Prepare the chicken: Preheat your oven to 375°F (190°C). Using paper towels, pat the chicken breasts dry to remove excess moisture. Generously season both sides of the chicken with salt and pepper to enhance flavor.
- Sear the chicken: In a large oven-safe skillet, heat a drizzle of olive oil over medium-high heat. Carefully add the chicken breasts to the skillet and sear them for about 3-4 minutes on each side, or until they develop a beautiful golden brown crust.
- Add the pesto: Once the chicken is seared, remove the skillet from heat. Spoon the sun-dried tomato pesto generously over the top of each chicken breast, ensuring they are well-coated.
- Bake: Carefully transfer the skillet to the preheated oven and bake for 20-25 minutes. The chicken should be cooked through, with an internal temperature reaching 165°F (74°C).
- Serve: After baking, remove the skillet from the oven and allow the chicken to rest for a few minutes to retain its juiciness. Serve the chicken with your choice of delicious sides such as al dente pasta, fluffy rice, or a vibrant mixed salad.
. First, preheat your oven to 400°F (200°C). This step is key for even roasting. Gather your ingredients. You should have baby carrots, honey, olive oil, garlic, thyme, and lemon juice ready. In a large bowl, combine the honey, olive oil, minced garlic, and thyme. Add a good pinch of salt and pepper. Next, squeeze in the lemon juice. Whisk the mixture well until it is smooth. This glaze will give your carrots a sweet and savory flavor. Now, it's time to coat the carrots. Add them to your bowl with the glaze. Toss them gently until they are well coated. Line a baking sheet with parchment paper for easy cleanup. Spread the carrots out in a single layer, avoiding crowding. Place the baking sheet in the preheated oven. Roast the carrots for 25-30 minutes. Halfway through, toss the carrots again for even cooking. They should become tender and caramelized. Once done, let them cool for a few minutes. If you like, drizzle some extra glaze over the top for added flavor. Finally, garnish with fresh parsley before serving. This adds a pop of color and freshness. If you want the full recipe, check it out [Full Recipe]. To ensure your carrots roast perfectly, choose fresh carrots. Baby carrots work well, but regular ones are great too. If using regular carrots, slice them into sticks for even cooking. Spread the carrots out in a single layer on the baking sheet. This step keeps them from steaming and helps them caramelize nicely. Toss them halfway through cooking for even browning. For a great glaze, mix the honey, olive oil, garlic, and thyme well. The oil helps the honey coat the carrots. If your glaze feels too thick, add a splash of water or lemon juice. This can help thin it out and ensure it coats the carrots evenly. Remember, a smooth glaze means more flavor in every bite! To make your dish pop, use a nice platter. Once the carrots are roasted, transfer them carefully. Drizzle with extra honey for shine. Sprinkle fresh parsley or thyme over the top for color. This simple touch makes your dish look gourmet. Enjoy serving them at your next meal! For the full recipe, check out the details above. {{image_4}} You can easily change this dish by adding other vegetables. Try sweet potatoes or parsnips. They roast well and add new flavors. Just cut them to a similar size as the carrots. This helps them cook evenly. If you want to switch up the sweet taste, use maple syrup or agave. Both give a nice flavor and work well with the garlic. You can use the same amount as honey. Just mix it well with the other ingredients. Adding spices can boost the taste of your honey garlic roasted carrots. You might try a pinch of cumin or chili powder for warmth. Fresh herbs like rosemary or dill can also add a bright note. Experiment with what you love! Each change can make this dish new and exciting. You can find the full recipe to guide you through these variations. To store leftover honey garlic roasted carrots, first let them cool down. Use an airtight container to keep them fresh. If you have a lot, divide them into smaller portions. Place the container in the fridge. They will stay good for about 3 to 5 days. Keeping them sealed helps avoid drying out. When you're ready to enjoy the leftovers, preheat your oven to 350°F (175°C). Spread the carrots on a baking sheet. You can drizzle a little olive oil for extra moisture. Heat them for about 10 to 15 minutes, or until they feel warm. You can also use a microwave if you're in a hurry. Just cover them with a damp paper towel and heat in 30-second bursts. If you want to keep the carrots longer, freezing is a great option. First, let the carrots cool completely. Spread them in a single layer on a baking sheet. Freeze them for about 1 hour. This step prevents them from sticking together. After that, transfer the carrots to freezer bags. Remove as much air as possible before sealing. They can last for up to 3 months in the freezer. To eat, thaw them in the fridge overnight before reheating. For more details, check the Full Recipe. Yes, you can use frozen carrots. However, fresh carrots will taste better. Frozen carrots may lose some crunch. If you use them, roast them longer to ensure they cook fully. Just remember to thaw them before roasting for the best results. Honey garlic roasted carrots pair well with many dishes. You can serve them with grilled chicken, beef, or fish. They also taste great with rice or quinoa. Try them with a fresh salad for a balanced meal. Their sweet and savory flavor adds depth to any plate. You can make this dish ahead of time. Prepare the honey garlic glaze and coat the carrots. Store them in the fridge for up to 24 hours. When ready to serve, just roast them in the oven. This saves time and still gives you that amazing flavor. For the full recipe, check out the complete instructions above. We explored the key ingredients and steps to make honey garlic roasted carrots. You learned how to mix the glaze, roast the carrots, and personalize the dish. We also discussed useful tips for perfect roasting and presentation. Lastly, we covered variations and storage tips to keep your dish fresh. Use this guide to make a tasty meal. Enjoy these carrots with your loved ones for a delightful experience.](https://goldendishy.com/wp-content/uploads/2025/06/04a56f10-aefe-4807-b100-2b1e29675843-768x768.webp)