Air Fryer Coconut Shrimp Crispy and Flavorful Delight

Are you ready to enjoy a crispy and flavorful treat? Air Fryer Coconut Shrimp combines the perfect crunch with tasty coconut goodness. In this post, I’ll share all the key ingredients and easy steps to make this dish right at home. Plus, I’ll give you tips for maximum crispiness and serving ideas that wow! Let’s dive in and cook up this delight that will impress your family and friends!
Why I Love This Recipe
- Quick and Easy: This recipe takes just 25 minutes from start to finish, making it a perfect option for a busy weeknight dinner or a last-minute appetizer.
- Crispy Texture: The combination of coconut and panko breadcrumbs creates a wonderfully crispy exterior that complements the tender shrimp perfectly.
- Customizable Flavor: You can easily adjust the spices to your liking, whether you prefer a bit more heat or sweetness in your coconut shrimp.
- Healthy Option: Air frying uses significantly less oil than deep frying, allowing you to enjoy this delicious dish with less guilt.
Ingredients
List of Ingredients
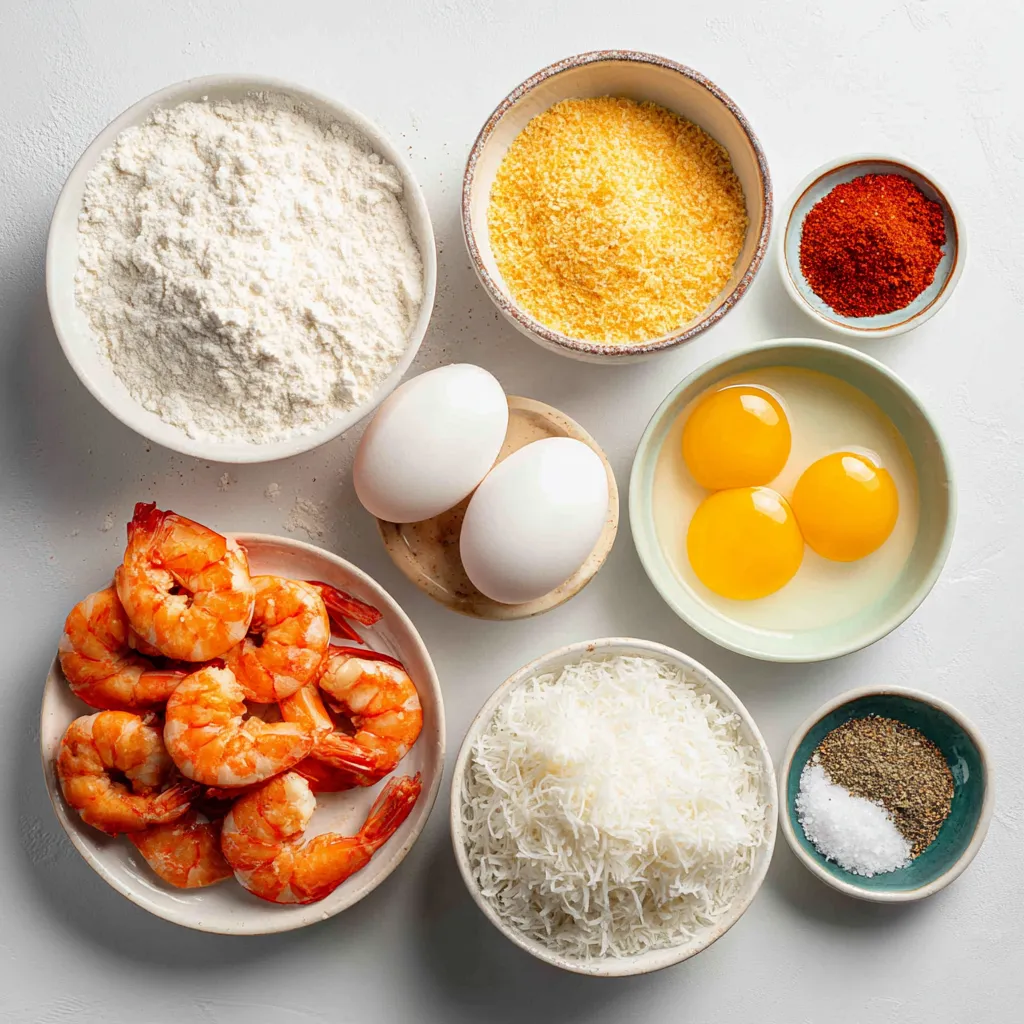
– 1 pound large shrimp, peeled and deveined
– 1/2 cup all-purpose flour
– 2 large eggs, beaten
– 1 cup shredded coconut (sweetened or unsweetened)
– 1/2 cup panko breadcrumbs
– 1 teaspoon garlic powder
– 1 teaspoon smoked paprika
– Salt and freshly ground black pepper, to taste
– Cooking spray
Ingredient Substitutions
You can swap out some ingredients if needed. Here are some ideas:
– Use almond flour or coconut flour instead of all-purpose flour for a gluten-free option.
– If you don’t have panko, regular breadcrumbs will work too, but they may not be as crispy.
– For a dairy-free version, ensure the eggs are replaced with a suitable alternative, like flaxseed meal mixed with water.
Importance of Fresh Ingredients
Using fresh ingredients makes a big difference in taste. Fresh shrimp will taste sweet and juicy. Old shrimp can taste fishy and bland. Fresh coconut adds a great texture and flavor. When possible, buy fresh shrimp from a trusted source. It ensures the best taste and quality in your dish. Fresh ingredients lead to a more enjoyable meal and impress your guests.
Step-by-Step Instructions
Prepping the Air Fryer
First, I preheat my air fryer to 400°F (200°C). This step is important as it helps the shrimp cook evenly and become crispy. While it heats, I gather three shallow bowls for the breading process. This setup makes it easy to coat the shrimp perfectly.
Breading the Shrimp
In the first bowl, I mix together 1/2 cup of all-purpose flour with a pinch of salt, black pepper, 1 teaspoon of garlic powder, and 1 teaspoon of smoked paprika. This blend adds great flavor to the shrimp.
In the second bowl, I pour in 2 large beaten eggs. I whisk them lightly to ensure they are smooth.
In the third bowl, I combine 1 cup of shredded coconut with 1/2 cup of panko breadcrumbs. I mix them well to get an even coating.
Now, I take my shrimp, which are peeled and deveined. I dip each shrimp first into the flour mixture, making sure it is fully coated. I gently shake off any extra flour before moving on.
Next, I dip the floured shrimp into the egg, allowing any excess egg to drip back into the bowl. Finally, I press the shrimp into the coconut and panko mix, ensuring it sticks well. A good coating is key for that crunch!
Cooking the Shrimp in the Air Fryer
Now it’s time for cooking! I arrange the coated shrimp in a single layer in the air fryer basket. To boost crispiness, I lightly spray the shrimp with cooking spray.
I air fry the shrimp for 8-10 minutes. Halfway through, I flip them to ensure they cook evenly. When they turn golden brown and are cooked through, they are ready to come out.
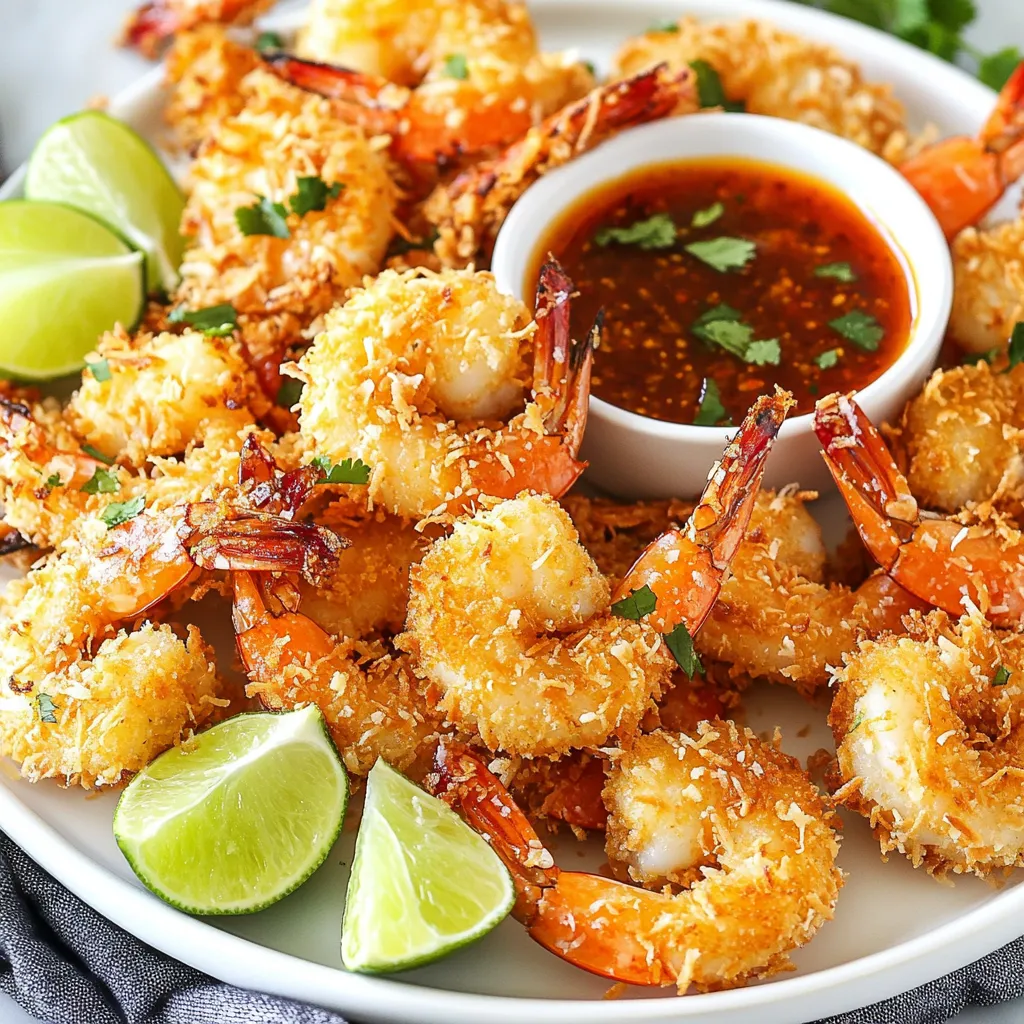
Once done, I carefully remove the shrimp and let them rest for about a minute. This helps keep them crispy. Now, they are ready to be served!
Tips & Tricks
Achieving Maximum Crispiness
To get the best crunch, use panko breadcrumbs. Panko is light and airy, which adds great texture. Make sure to coat your shrimp well in each layer. Start with the flour, then eggs, and finally the coconut and panko mix. A light spray of cooking oil helps too. It creates that golden, crispy finish everyone loves. Flip the shrimp halfway through cooking for even crispiness.
Serving Suggestions
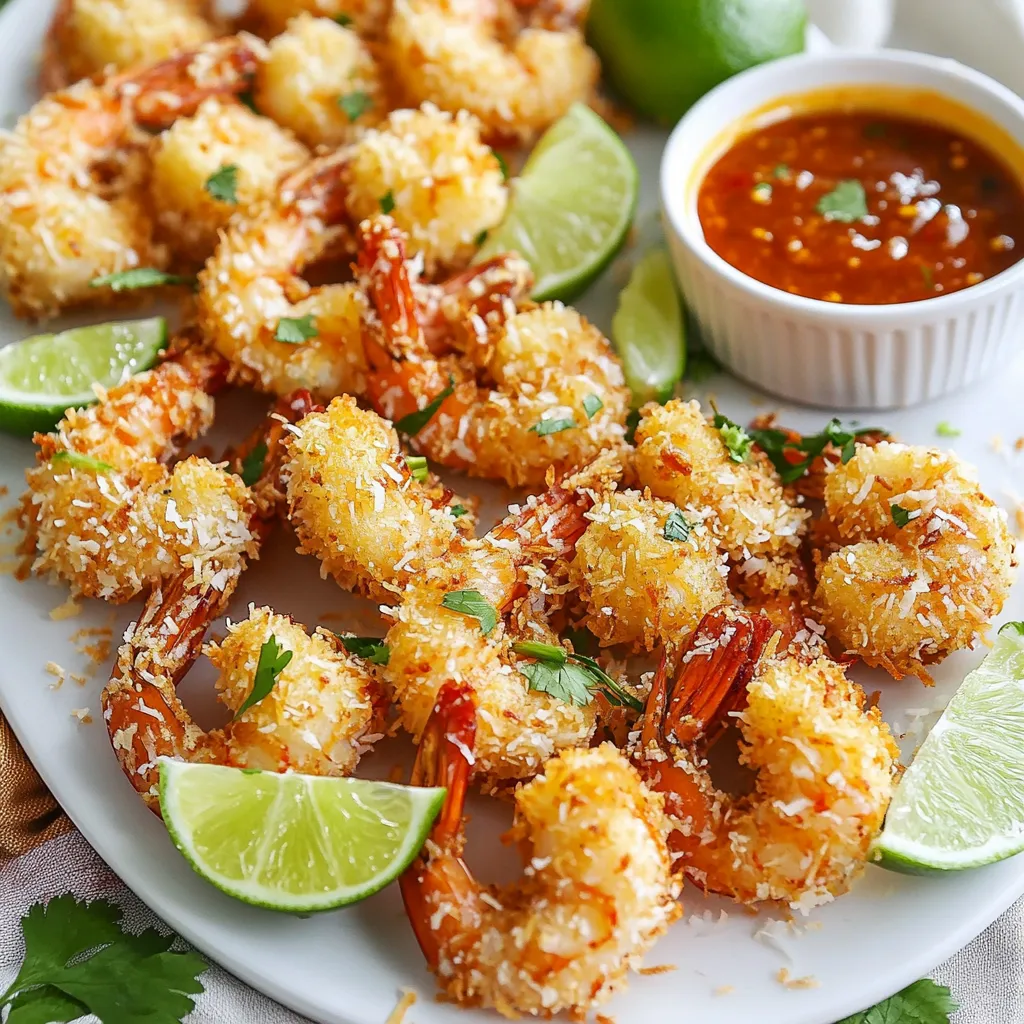
Serve your coconut shrimp on a bright platter. Add fresh lime wedges for a burst of flavor. A side of sweet chili sauce makes a perfect dip. You can also sprinkle fresh cilantro over the dish for a pop of color and taste. Pair it with a salad or rice to make a full meal. This dish works great as an appetizer for parties or a fun family dinner.
Common Mistakes to Avoid
One common mistake is overcrowding the air fryer. Give your shrimp space to cook evenly. Another mistake is skipping the cooking spray. Without it, your shrimp may not get as crispy. Be sure to check your shrimp halfway through. If they are not golden yet, let them cook a bit longer. Lastly, don’t rush the breading process. Each layer is key to a tasty, crunchy shrimp!
Pro Tips
- Use Fresh Shrimp: For the best flavor and texture, opt for fresh or thawed shrimp instead of frozen. Fresh shrimp will give you that perfect bite.
- Adjust Coconut Sweetness: Depending on your preference, choose sweetened or unsweetened coconut. Sweetened coconut will add a hint of sweetness, while unsweetened will keep it savory.
- Don’t Overcrowd the Basket: For maximum crispiness, ensure that the shrimp are arranged in a single layer and not overcrowded in the air fryer. This allows for proper air circulation.
- Experiment with Spices: Feel free to add your favorite spices to the flour or coconut mixture to customize the flavor profile. A touch of cayenne pepper can add a nice kick!
Variations
Flavor Enhancements (Spices and Seasonings)
You can make your coconut shrimp even tastier with simple spices. Try adding cayenne pepper for heat. A pinch of curry powder gives a nice twist. You can also use lemon zest for a fresh kick. Each spice adds a unique flavor to your dish. Mix and match to find your favorite!
Different Coating Options
While the classic coconut coating is great, you can switch it up. Use crushed cornflakes instead of panko for extra crunch. You can also try using ground almonds for a nutty flavor. If you want a gluten-free option, use almond flour or coconut flour. Each choice gives the shrimp a new and fun texture!
Serving with Various Dipping Sauces
Dipping sauces can take your coconut shrimp to the next level. Sweet chili sauce pairs well for a nice balance. For a zesty option, try a lime aioli. You can also make a spicy mango salsa for a fruity kick. Experiment with different dips to find your perfect match!
Storage Info
How to Store Leftovers
To store leftover coconut shrimp, let them cool first. Place them in an airtight container. Keep them in the fridge for up to three days. Make sure to separate layers with parchment paper. This prevents sticking and keeps them crisp.
Freezing Coconut Shrimp
You can freeze coconut shrimp for later use. After frying, let them cool completely. Arrange them in a single layer on a baking sheet. Freeze for about one hour until solid. Then, transfer them to a freezer-safe bag. They will last up to three months in the freezer.
Reheating Instructions
To reheat, preheat your air fryer to 350°F (175°C). Place the shrimp in the basket in a single layer. Heat for about 5-7 minutes, until warm and crispy. Avoid the microwave, as it can make the shrimp soggy. Enjoy your tasty shrimp just like when they were fresh!
FAQs
How do I know when the shrimp is cooked?
You can tell when shrimp is cooked by its color and texture. Cooked shrimp turns pink and opaque. It should also curl slightly. For the best results, aim for an internal temperature of 120°F (49°C). If you are unsure, cut one shrimp in half to check. The flesh should be white and not translucent.
Can I use frozen shrimp?
Yes, you can use frozen shrimp for this recipe. Just remember to thaw them first. Place the frozen shrimp in the fridge overnight or run them under cold water for a quick thaw. Once thawed, pat them dry with paper towels. This step helps the coating stick better.
What is the best way to reheat air fryer coconut shrimp?
To reheat coconut shrimp, use the air fryer for the best results. Preheat it to 350°F (175°C). Place the shrimp in a single layer and cook for 3-5 minutes. This method keeps them crispy. You can also use a conventional oven at the same temperature and time. Avoid using the microwave, as it can make them soggy.
In this post, I’ve shared how to make air fryer coconut shrimp, focusing on key ingredients, cooking steps, and tips. I emphasized using fresh ingredients for the best flavor. Remember to prep your air fryer well and avoid common mistakes to ensure crispiness. Try different spices or sauces for added taste, and follow my storage tips to keep leftovers fresh. Cooking can be fun and rewarding. Enjoy your delicious shrimp and experiment with new flavor

Crispy Air Fryer Coconut Shrimp
Ingredients
- 1 pound large shrimp, peeled and deveined
- 1/2 cup all-purpose flour
- 2 large eggs, beaten
- 1 cup shredded coconut
- 1/2 cup panko breadcrumbs
- 1 teaspoon garlic powder
- 1 teaspoon smoked paprika
- to taste salt and freshly ground black pepper
- as needed cooking spray
Instructions
- Begin by preheating your air fryer to 400°F (200°C) to ensure it’s hot and ready for cooking.
- Prepare three shallow bowls for breading: In the first bowl, mix the all-purpose flour with a pinch of salt, freshly ground black pepper, garlic powder, and smoked paprika for added flavor. In the second bowl, pour in the beaten eggs, whisking them lightly to combine. In the third bowl, combine the shredded coconut and panko breadcrumbs, mixing them thoroughly for an even coating.
- Take each shrimp and first dip it into the flour mixture. Make sure the shrimp is completely coated before gently shaking off any excess flour.
- Next, dip the floured shrimp into the beaten eggs, ensuring it’s well-coated. Allow any excess egg to drip off.
- Finally, transfer the shrimp into the coconut and panko mixture. Press down gently to ensure the coating adheres well to the shrimp.
- Arrange the coated shrimp in a single layer in the air fryer basket. To enhance crispiness, lightly spray the shrimp with cooking spray.
- Air fry the shrimp for 8-10 minutes, flipping them halfway through the cooking time. They should be golden brown and cooked through when done.
- Once cooked, carefully remove the shrimp from the air fryer and allow them to rest for about a minute before serving.
![- 2 medium zucchinis, grated - 2 medium carrots, grated - 1/2 cup all-purpose flour - 1/4 cup grated Parmesan cheese - 1 large egg - 2 green onions, finely chopped - 2 cloves garlic, minced - 1 teaspoon dried oregano - 1/2 teaspoon salt - 1/4 teaspoon black pepper - Olive oil for frying These ingredients form the base of your zucchini carrot fritters. The grated zucchini and carrots give them a fresh taste and bright color. The flour and cheese help bind everything together, while the egg adds richness. Don’t forget the seasonings! They bring out all the flavors. - Fresh herbs like parsley or dill - Additional cheese variants such as feta or cheddar These optional ingredients can elevate your fritters. Fresh herbs add a burst of flavor and color. You can also mix in different cheeses for a unique twist. - Gluten-free options: Use almond flour or gluten-free flour - Dairy-free alternatives: Replace cheese with nutritional yeast If you need to make dietary changes, these substitutions work well. Gluten-free flour keeps the fritters light and fluffy. Nutritional yeast adds a cheesy flavor without dairy. You can still enjoy delicious fritters that fit your needs. Check the [Full Recipe] for more details! - Grating Vegetables Start by grating the zucchinis and carrots. I use a box grater for this. It makes the job easy and quick. - Removing Excess Moisture After grating, place the vegetables in a clean kitchen towel. Twist and squeeze to remove as much liquid as possible. This step is key. It helps the fritters stay firm and not soggy. - Combining Dry and Wet Ingredients In a large bowl, mix the drained zucchini and carrot with flour, Parmesan cheese, egg, green onions, garlic, oregano, salt, and pepper. Stir well to combine. You want a smooth and even mixture. - Ensuring a Cohesive Mixture Check that all ingredients are mixed thoroughly. The batter should hold together well. This cohesive mixture is vital for great fritters. - Heating the Skillet Heat a non-stick skillet over medium heat. Add a couple of tablespoons of olive oil. Wait until the oil is hot and shimmering but not smoking. - Frying Tips for Crispiness Scoop about 2 tablespoons of the fritter mix into the skillet. Flatten each scoop gently with a spatula. This helps them cook evenly. Fry each fritter for about 3-4 minutes on each side. Look for a golden brown color and a crispy texture. If needed, fry in batches, adding more oil as you go. Serve them warm, and enjoy the tasty crunch! For the full recipe, check out the [Full Recipe]. To make great zucchini carrot fritters, moisture removal is key. Grated vegetables hold a lot of water. If you don’t squeeze them dry, your fritters turn out soggy. After grating, use a clean kitchen towel. Place the veggies in the towel and twist it tightly. This method gets rid of extra liquid, ensuring crispy fritters. Cooking temperature control is also important. Use medium heat for frying. If the temperature is too low, the fritters will absorb too much oil. If it's too high, they will burn on the outside and stay raw inside. A good test is to add a small bit of batter to the pan. If it sizzles right away, you're ready to go! For dipping sauces, yogurt pairs perfectly. You can also try a spicy mayo or tzatziki. These sauces enhance the flavors and add creaminess. For sides, serve your fritters with a crisp salad or roasted veggies. Both options balance the meal nicely. Adding spices can elevate your fritters. Try a pinch of cayenne for heat or smoked paprika for depth. Herbs like dill or parsley can also add freshness. You can mix in other vegetables too. Finely chopped bell peppers or spinach work well. They add color and nutrition, making your fritters even better. For the full recipe, check out the complete guide above! {{image_4}} You can switch up the flavors in your zucchini carrot fritters to keep things interesting. - Spicy Zucchini Carrot Fritters: Add some heat! Mix in chopped jalapeños or red pepper flakes. This will give your fritters a nice kick. You can also serve them with a spicy dipping sauce. - Mediterranean-Inspired Fritters: Want a fresh twist? Use feta cheese, fresh dill, and olives in your batter. These flavors will transport you to the sunny Mediterranean coast. You can easily modify this recipe to fit your dietary needs. - Vegan Version: Replace the egg with a flaxseed or chia seed mix. Combine 1 tablespoon of seeds with 2.5 tablespoons of water. Let it sit until it becomes gel-like. This will bind your fritters well. - Low-Carb Options: For a low-carb twist, swap all-purpose flour for almond flour. This keeps your fritters tasty and lower in carbs. The shape and size of your fritters can change how you serve them. - Mini Bites for Appetizers: Form smaller fritters for easy snacking. They are perfect for parties and gatherings. Just adjust the cooking time to avoid burning. - Larger Fritters for Main Dishes: Make bigger fritters for a hearty meal. Serve them with a salad for a complete dish. They also hold up nicely on a bun for a veggie burger. You can find the full recipe for zucchini carrot fritters above. Enjoy experimenting with these variations to suit your taste! How do you store leftover fritters? Place them in an airtight container. Use parchment paper between layers to keep them crisp. This helps prevent sogginess. What are the best practices for freshness? Store fritters in the fridge for up to three days. Keep the container sealed tight. This keeps them tasty and prevents drying out. Should you freeze fritters before or after cooking? You can freeze them both ways. For the best texture, freeze them uncooked. It helps keep them crisp when cooked later. What are the thawing and reheating tips? Thaw the fritters in the fridge overnight. Reheat them in a skillet over medium heat. Add a little oil for that crispy edge. How long do refrigerated fritters last? They stay good for about three days in the fridge. After that, the texture and flavor may change. What is the freezer storage timeframe? Frozen fritters can last up to two months. Make sure they are in a sealed bag or container. This protects against freezer burn. For more details, check the [Full Recipe]. Yes, you can use frozen zucchini or carrots. However, they will change the texture and flavor. Frozen veggies often hold more water. This extra moisture can make fritters soggy. If you use frozen, let them thaw and squeeze out the water. After that, they can work well in your fritters. To make fritters crispy, focus on a few key tips. First, remove as much moisture as possible from the grated vegetables. Use a clean towel to squeeze out water. Next, heat your oil until it's hot but not smoking. Fry fritters in small batches and leave space between them. This way, they cook evenly. You have many tasty options for dips. Here are some favorites: - Greek yogurt with lemon juice - Spicy sriracha mayo - Creamy ranch dressing - Simple tzatziki sauce These dips add flavor and complement the fritters well. They enhance the meal, making it even more enjoyable. For a full recipe, check the details above! Zucchini and carrot fritters are simple to make and delicious. We covered essential ingredients, like grated veggies, flour, and cheese. You learned how to prepare, mix, and fry the batter for perfect bites. I shared tips to ensure crispness and flavor, plus variations for diets. Don’t forget to store any extras properly! Now you can enjoy these fritters at any meal, with great dips, or as snacks. Have fun cooking and experimenting with these ideas!](https://goldendishy.com/wp-content/uploads/2025/06/18ed450f-8e43-4a66-9091-0bc3385fc8fe-768x768.webp)