
Teriyaki Chicken Lettuce Wraps Flavorful Healthy Dish


Want a tasty dish that’s also healthy? Teriyaki Chicken Lettuce Wraps are packed with flavor and nutrition! They’re easy to make and fun to eat. In this post, I’ll guide you through the best ingredients, give you step-by-step instructions, and share tips for perfecting your wraps. Whether you stick to the classic recipe or try variations, you’ll love these delicious bites. Let’s dive in and make your meal exciting!
Why I Love This Recipe
- Fresh and Flavorful: This recipe combines the freshness of vegetables with the rich taste of teriyaki chicken, creating a delightful explosion of flavors in every bite.
- Healthier Option: Using lettuce wraps instead of tortillas or bread reduces carbs and adds a refreshing crunch, making it a nutritious choice for any meal.
- Quick to Prepare: With a total prep and cook time of just 30 minutes, this recipe is perfect for busy weeknights when you want a homemade meal without the hassle.
- Customizable: You can easily modify the ingredients based on your preferences or what you have on hand, making it a versatile dish for everyone.
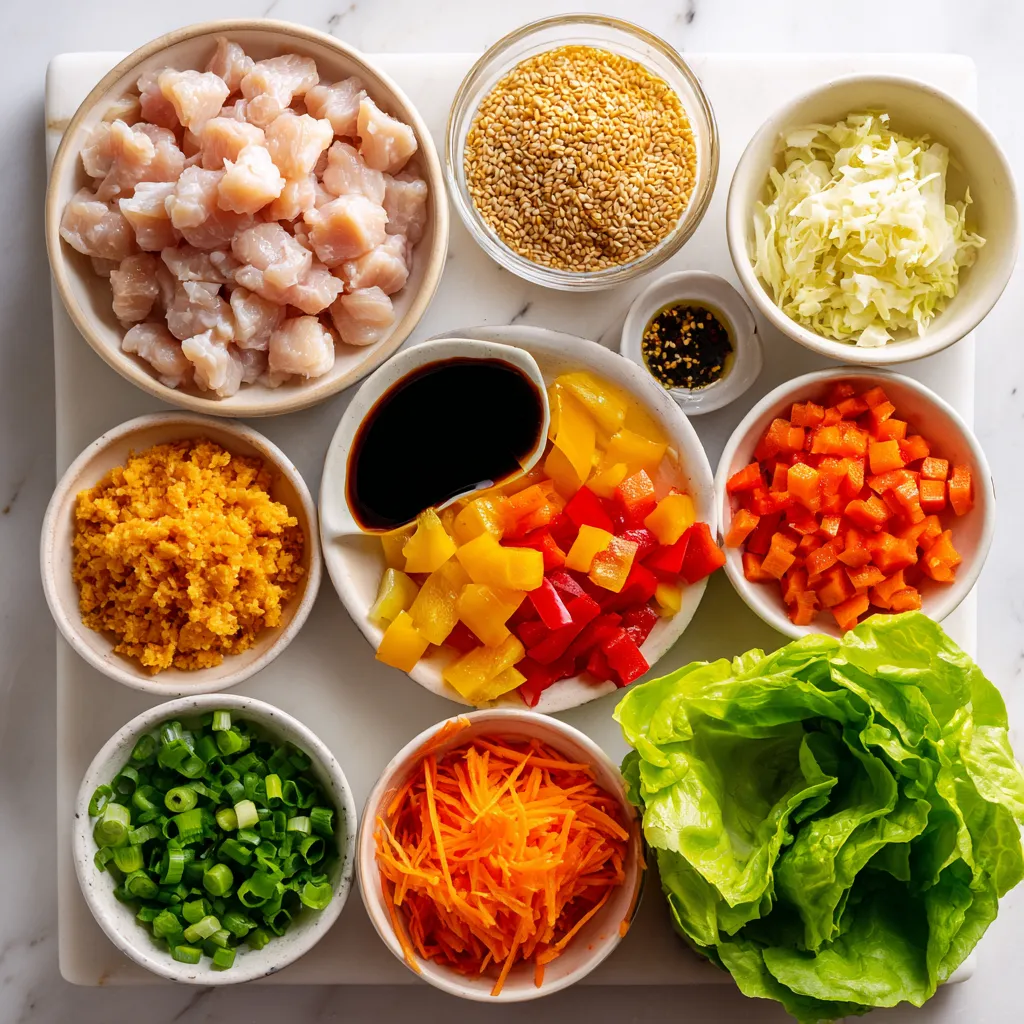
Ingredients
Main Ingredients for Teriyaki Chicken Lettuce Wraps
To create these tasty wraps, you need:
– 1 lb chicken breast, diced into bite-sized pieces
– 1/4 cup soy sauce (or low-sodium soy sauce for a healthier option)
– 2 tablespoons honey, for sweetness
– 1 tablespoon rice vinegar, to balance the flavors
– 1 tablespoon sesame oil, for a nutty aroma
– 1 tablespoon fresh ginger, minced finely
– 2 cloves garlic, minced
– 1/2 cup bell pepper, diced (mix of colors for visual appeal)
– 1/2 cup carrots, grated
– 1/4 cup green onions, sliced thinly
– 1 head of butter or romaine lettuce, carefully separated into individual leaves
– Sesame seeds for garnish
These ingredients come together to create a bright and flavorful dish. The chicken absorbs the sweet soy sauce and honey. The ginger and garlic add depth. The crunchy vegetables give great texture.
Suggested Variants and Substitutions
You can switch things up with these options:
– Chicken: Use turkey or tofu for a different protein.
– Sauce: Try coconut aminos instead of soy sauce for a different taste.
– Veggies: Add cucumber or radishes for extra crunch.
– Sweetener: Instead of honey, use maple syrup for a vegan choice.
These changes let you customize the wraps to your taste. You can adapt the recipe based on what you have on hand.
Healthier Alternatives
To make this dish lighter:
– Use low-sodium soy sauce to cut down on salt.
– Swap out honey for agave syrup or stevia to reduce sugar.
– Add more vegetables like spinach or zucchini to increase nutrients.
– Use leafy greens like kale instead of lettuce for more fiber.
These healthier swaps keep the dish delicious while improving its nutrition. You can enjoy these wraps guilt-free!
Step-by-Step Instructions
Preparing the Teriyaki Marinade
To start, gather your ingredients. In a medium bowl, mix together:
– 1/4 cup soy sauce
– 2 tablespoons honey
– 1 tablespoon rice vinegar
– 1 tablespoon sesame oil
– 1 tablespoon minced ginger
– 2 cloves minced garlic
Whisk these well until they blend smoothly. This marinade gives your chicken great flavor.
Marinating the Chicken
Next, take 1 pound of diced chicken breast. Add it to the marinade in the bowl. Make sure each piece is coated well. Cover the bowl and let it sit in the fridge for at least 15 minutes. This helps the flavors soak in deep.
Cooking the Chicken and Vegetables
After marinating, heat a large pan over medium-high heat. Add the marinated chicken and all the marinade. Cook for about 7 to 10 minutes. Stir occasionally until the chicken is cooked through. Use a thermometer to check that it reaches 165°F (75°C). Then, add in:
– 1/2 cup diced bell pepper
– 1/2 cup grated carrots
Sauté this mix for another 2 to 3 minutes. The veggies should be soft but still crunchy.
Assembling the Lettuce Wraps
Once your chicken and veggies are ready, take a sturdy lettuce leaf. Spoon in a good amount of the chicken mixture. Don’t overfill it. To finish, sprinkle some sesame seeds on top for extra flavor. Now, fold the lettuce leaf around the filling. Enjoy your wraps as a tasty and healthy treat!
Tips & Tricks
Best Practices for Perfect Chicken
To get the best flavor from your chicken, marinate it well. Mix the soy sauce, honey, rice vinegar, sesame oil, ginger, and garlic in a bowl. Make sure to coat all the chicken pieces. This helps the chicken soak up all the taste. Let the chicken sit in the fridge for at least 15 minutes. If you have time, longer marinating adds even more flavor. Cook the chicken until it reaches 165°F (75°C). This keeps it safe and juicy.
Serving Suggestions for Teriyaki Chicken Lettuce Wraps
When serving, use crisp lettuce leaves. Butter or romaine lettuce works best. Arrange the wraps on a platter for a nice look. Add extra sesame seeds and sliced green onions for garnish. Serve a small bowl of extra sauce on the side. This lets everyone add more flavor to their wraps. You can also serve these wraps with a side of rice or a fresh salad.
Enhancing Flavor with Additional Toppings
You can make your wraps even better by adding toppings. Consider adding chopped nuts for crunch, like peanuts or cashews. You could also use sliced cucumbers for a fresh bite. A drizzle of spicy mayo can add a nice kick. For a fruity twist, try adding mango or pineapple chunks. These options let you customize your wraps to fit your taste. Enjoy experimenting with different toppings!
Pro Tips
- Marinate Longer for Flavor Boost: For an even deeper flavor, let the chicken marinate for 30 minutes to 1 hour in the refrigerator. This allows the marinade to penetrate the meat more thoroughly.
- Use Fresh Ingredients: Whenever possible, opt for fresh ginger and garlic instead of powdered versions. The vibrant flavors will enhance the overall taste of your teriyaki chicken.
- Customize Your Veggies: Feel free to add or substitute other vegetables such as diced zucchini, mushrooms, or snap peas. This not only adds color but also boosts the nutritional value of your wraps.
- Make It a Meal Prep Option: These lettuce wraps can be prepped in advance. Store the chicken mixture and lettuce leaves separately in airtight containers for a quick and healthy meal throughout the week.

Variations
Different Proteins to Use
You can swap chicken for other proteins. Try diced turkey for a leaner option. Shrimp also works well with teriyaki sauce. Just cook shrimp until pink. Beef is another choice; use flank steak, thinly sliced. Cook it quickly over high heat for best results.
Vegetarian Alternatives
If you prefer a vegetarian dish, use tofu or tempeh. Press tofu to remove excess water, then dice it. Marinate it like you would chicken. Cook until golden brown for added texture. You can add mushrooms for a meaty flavor. They absorb the teriyaki sauce beautifully.
Gluten-Free Adaptations
To make this dish gluten-free, use tamari instead of soy sauce. It has a similar taste and works well in marinades. Always check labels on other sauces and ingredients. Many brands offer gluten-free options. Enjoy the same great flavors without worry.
Storage Info
How to Store Leftovers
To keep your teriyaki chicken lettuce wraps fresh, follow these steps:
– Place any leftover chicken mixture in an airtight container.
– Store the lettuce leaves separately to keep them crisp.
– Refrigerate both for up to three days.
Reheating Guidelines
When you are ready to enjoy the leftovers, here’s how to reheat:
– Heat the chicken mixture in a pan over medium heat.
– Stir occasionally until it warms through, about 5 minutes.
– Avoid reheating the lettuce; use fresh leaves for wraps.
Freezing Tips
If you want to save some wraps for later, freezing works well. Here’s how:
– Cool the chicken mixture completely before freezing.
– Use a freezer-safe container or bag to store it.
– Label and date the container. It can last up to three months.
– Thaw in the fridge overnight before reheating.
These storage tips will help you enjoy your teriyaki chicken lettuce wraps even longer!
FAQs
Can I make Teriyaki Chicken Lettuce Wraps ahead of time?
Yes, you can prepare many parts ahead. You can marinate the chicken in advance. Let it sit in the fridge for up to 24 hours. You can also chop the veggies and store them in the fridge. Just wait to assemble the wraps until you are ready to eat. This keeps the lettuce fresh and crisp.
What are the best types of lettuce for wraps?
I recommend using butter or romaine lettuce. Both have sturdy leaves that hold the filling well. Butter lettuce is soft and sweet. Romaine gives a nice crunch. You can also use iceberg lettuce, but it is not as flavorful. Choose leaves that are large enough to hold the filling without tearing.
How long do leftovers last in the fridge?
Leftovers can last in the fridge for about three days. Store the chicken and veggies in an airtight container. Keep the lettuce separate to prevent it from wilting. When ready to eat, simply reheat the chicken and veggies. Fresh lettuce makes the wraps taste better.
Can I use store-bought teriyaki sauce?
Yes, using store-bought teriyaki sauce is a great option. It saves time and still tastes good. Look for low-sodium options to keep it healthier. Just be aware that some sauces can be sweeter. Adjust the honey in your recipe if needed.
Teriyaki chicken lettuce wraps are fun and easy to make. We went over main ingredients and tasty substitutes. I shared steps to marinate, cook, and assemble your wraps. You learned tips for perfect chicken and serving ideas. Variations offer choices for meat lovers and vegetarians alike. Lastly, I covered how to store your leftovers.
Try making your own wraps at home for quick meals. Easy recipes like this can lead to many tasty dinners. Enjoy cookin

Savory Teriyaki Chicken Lettuce Wraps
Ingredients
- 1 lb chicken breast, diced into bite-sized pieces
- 1 cup soy sauce
- 2 tablespoons honey
- 1 tablespoon rice vinegar
- 1 tablespoon sesame oil
- 1 tablespoon fresh ginger, minced finely
- 2 cloves garlic, minced
- 1 cup bell pepper, diced
- 1 cup carrots, grated
- 1 cup green onions, sliced thinly
- 1 head butter or romaine lettuce, separated into leaves
- to taste sesame seeds for garnish
Instructions
- In a medium mixing bowl, prepare the teriyaki marinade by combining the soy sauce, honey, rice vinegar, sesame oil, minced ginger, and minced garlic. Use a whisk to thoroughly blend the ingredients until smooth and uniform.
- Take the diced chicken and add it to the marinade, ensuring that each piece of chicken is fully coated. Cover the bowl and let it marinate in the refrigerator for a minimum of 15 minutes.
- Heat a large pan or skillet over medium-high heat. Once hot, add the marinated chicken along with all the marinade. Cook the chicken for approximately 7-10 minutes, stirring occasionally until it is fully cooked through and exhibits a slight caramelization on the edges.
- After the chicken is cooked, incorporate the diced bell pepper and grated carrots into the skillet. Sauté the mixture for an additional 2-3 minutes.
- Once the vegetables are ready, remove the skillet from the heat and gently fold in the sliced green onions.
- To assemble the lettuce wraps, select a sturdy lettuce leaf. Spoon a generous portion of the savory teriyaki chicken mixture into the center of the leaf.
- For added flavor and crunch, sprinkle sesame seeds over the filling before wrapping.
- Fold the lettuce leaf around the filling, creating a secure, yet loosely wrapped bundle.
![- 1 medium head of cauliflower, cut into bite-sized florets - 4 cloves fresh garlic, finely minced - 3 tablespoons extra virgin olive oil - 1 teaspoon smoked paprika - 1 teaspoon fine sea salt - ½ teaspoon freshly ground black pepper The main ingredients create a base of flavor. Cauliflower gives a nice texture and absorbs the garlic well. Garlic adds a strong taste that enhances the dish. Olive oil helps with roasting and adds richness. Smoked paprika brings depth, while salt and pepper balance the flavors. - 2 tablespoons grated Parmesan cheese - Fresh parsley, finely chopped You can add Parmesan cheese for a cheesy twist. It melts nicely and adds a savory note. Fresh parsley adds color and freshness on top. These add-ins make the bites even more delightful. - Baking sheet - Mixing bowl - Parchment paper A baking sheet is essential for roasting. Use a mixing bowl to combine all the ingredients. Parchment paper helps with easy cleanup and prevents sticking. These tools make the cooking process smooth and simple. You can find the Full Recipe above for more details. 1. Preheat the Oven: Start by preheating your oven to 425°F (220°C). This heat helps make the bites crispy and golden. 2. Prepare the Cauliflower: Cut one medium head of cauliflower into bite-sized florets. Make sure they are all similar in size. This helps them cook evenly. 1. Combine Cauliflower and Seasonings: In a large mixing bowl, add the cauliflower florets. Then, add 4 minced garlic cloves, 3 tablespoons of olive oil, 1 teaspoon of smoked paprika, 1 teaspoon of sea salt, and ½ teaspoon of black pepper. 2. Ensure Even Coating: Toss everything together well. You want the florets to be fully coated with the olive oil and seasonings. This gives them great flavor. 1. Arrange on Baking Sheet: Line a baking sheet with parchment paper for easy cleanup. Spread the cauliflower in a single layer. Make sure the florets have space. This helps them roast well. 2. Roast Duration and Tips: Place the sheet in the oven. Roast for 25-30 minutes. Keep an eye on them. Toss the florets halfway through. This helps them cook evenly. If you like cheese, sprinkle 2 tablespoons of grated Parmesan cheese on top in the last 5 minutes. This adds a nice touch. Enjoy the full recipe for all the details and tips for these delicious bites! Ensuring Tender Florets To get tender florets, cut them into uniform pieces. This helps them cook at the same rate. Toss them well with oil and seasonings. The olive oil locks in moisture and adds a nice flavor. Roasting at 425°F (220°C) gives the perfect balance of crispiness and tenderness. Avoiding Soggy Cauliflower Space the florets on the baking sheet. If they are too close, steam will build up and make them soggy. Use parchment paper to keep them from sticking. This also helps with cleanup. Remember to toss them halfway through roasting for even cooking. Adding Spices Spices can elevate the taste of your cauliflower bites. I love using smoked paprika for depth. You can also try garlic powder, cayenne, or cumin for a twist. Start with small amounts and adjust to your taste. Using Different Oils While olive oil is great, try other oils for different flavors. Avocado oil works well for high heat. You can also use sesame oil for a nutty taste. Just ensure the oil has a high smoke point to avoid burning. Serving Suggestions Serve the roasted garlic cauliflower bites on a rustic wooden platter. This adds warmth to your meal. You can also arrange them in a circle with a bowl of dipping sauce in the center. This invites guests to dig in. Garnishing Techniques Garnish with fresh parsley for a pop of color. You can also sprinkle some lemon zest on top for a refreshing zing. If you used Parmesan, let some shavings fall over the bites to enhance the look and flavor. For the complete recipe, check the [Full Recipe]. {{image_4}} Vegan Alternatives You can easily make these bites vegan. Just skip the Parmesan cheese. The garlic and spices keep the taste rich and satisfying. You can also add nutritional yeast for a cheesy flavor without dairy. Gluten-Free Options This recipe is naturally gluten-free! You can enjoy it without any worry. Always check labels on packaged spices or sauces to ensure they are gluten-free. Spice Variations Want a kick? Add cayenne pepper or chili powder. For a milder flavor, use paprika or turmeric. You can also try curry powder for an exotic twist. Herb Infusions Fresh herbs make a big difference. Add rosemary or thyme for earthy notes. Basil or cilantro can brighten the dish. Mix and match to find your favorite combination. Air Fryer Instructions Using an air fryer makes these bites super crispy. Set your air fryer to 400°F (200°C). Cook them for about 15-20 minutes, shaking the basket halfway through. Grilling Method Grilling adds a smoky flavor. Toss the cauliflower in a grill basket. Grill over medium heat for about 10-15 minutes. Turn occasionally for even cooking. Enjoy the charred bits! Store any leftovers in an airtight container. This helps keep them fresh. You can place them in the fridge. They stay good for about 3 to 5 days. If you see any signs of spoilage, throw them away. You have two options for reheating: oven or microwave. The oven keeps the bites crispy. Preheat it to 350°F (175°C) and heat for about 10 minutes. The microwave is faster, but it can make them soggy. If using a microwave, heat in 30-second intervals. You can freeze roasted cauliflower bites if you want to save some. Let them cool completely first. Place them in a freezer-safe bag. They can last up to 3 months in the freezer. When ready to eat, thaw them in the fridge overnight. Reheat in the oven for the best texture. To make your roasted garlic cauliflower bites crispy, follow these tips: - Cut the cauliflower into small, even pieces. - Make sure to coat every floret with olive oil. - Spread the florets out on the baking sheet, leaving space between them. - Roast at a high temperature, around 425°F (220°C). - Toss the cauliflower halfway through cooking to ensure even roasting. - If you want extra crunch, broil for the last few minutes. Yes, you can use frozen cauliflower. However, it’s best to thaw it first. Pat it dry with a towel. This helps remove excess moisture, which can make your bites soggy. The cooking time may be shorter, so check for doneness a few minutes early. A great dipping sauce pairs well with roasted garlic cauliflower bites. Here are some tasty options: - Ranch dressing for a classic taste. - Garlic aioli for a creamy twist. - Spicy sriracha for a kick of heat. - Hummus for a healthy choice. Feel free to try different sauces to find your favorite! To adjust the recipe for more servings, simply multiply the ingredients. For example: - Use two heads of cauliflower for eight servings. - Keep the same ratio for olive oil and seasonings. - Roast in batches if your baking sheet is too small. This way, you’ll still get delicious, crispy bites! For the complete instructions, check the Full Recipe. Roasted garlic cauliflower is easy to make and very tasty. We covered the main ingredients, like cauliflower and garlic, and shared tips for perfect texture and flavors. You learned about storage and reheating methods to keep your dish fresh. Try different variations to suit your tastes or dietary needs. Enjoy this dish as a side or snack. It’s healthy, fun, and simple. You'll love making it again and again!](https://goldendishy.com/wp-content/uploads/2025/06/58dc371e-82c7-47cc-93f2-9c36524126f6-768x768.webp)
. Prep Time: 15 minutes Total Time: 1 hour 30 minutes Servings: 6 This potato salad is great for summer meals. You can serve it at picnics, barbecues, or potlucks. I love to garnish it with extra dill and chives for a colorful touch. Enjoy! In this post, I shared how to make a classic potato salad. We covered the ingredients, tips for cooking the potatoes, and mixing the dressing. I showed you how to add flavors and enhance your dish. Remember, you can store leftovers correctly or even try tasty variations. Potato salad is easy to make and perfect for any meal. Enjoy your cooking adventure!](https://goldendishy.com/wp-content/uploads/2025/07/3d114334-7953-4aa3-9cf8-99466b57d4b6-768x768.webp)


![- 1 lb boneless, skinless chicken thighs, cut into 1-inch pieces - 1/4 cup honey - 2 tablespoons Sriracha sauce - 2 tablespoons soy sauce - 1 tablespoon sesame oil - 2 cloves garlic, minced - 1 teaspoon fresh ginger, grated - Salt and pepper, to taste - 1 red bell pepper, cut into 1-inch pieces - 1 yellow bell pepper, cut into 1-inch pieces - 1 medium red onion, cut into chunks - Wooden or metal skewers The chicken thighs make this dish juicy and flavorful. The honey gives a sweet touch, while the Sriracha brings the heat. Soy sauce adds depth, and sesame oil lends a nutty flavor. Garlic and ginger enhance the marinade, making it aromatic and fresh. The colorful bell peppers and onion not only taste great but also add visual appeal. - Sesame seeds for garnish - Chopped scallions for serving You can use sesame seeds or scallions to spruce up your dish. They add extra crunch and freshness. If you want to change things up, try adding pineapple or zucchini to your skewers. You can also swap chicken for shrimp or firm tofu for a different taste. If you want to adjust the heat, add more or less Sriracha. You can mix in some fruit juice for a fruity twist. Make sure to check your pantry for alternatives, like honey substitutes or low-sodium soy sauce. To start, you need to make the marinade. In a medium bowl, mix together the honey, Sriracha sauce, soy sauce, and sesame oil. Then, add the minced garlic, grated ginger, salt, and pepper. Whisk all the ingredients until they blend well. Next, add the chicken pieces and stir gently. Make sure every piece gets coated. Cover the bowl with plastic wrap and place it in the fridge. Let the chicken marinate for at least 30 minutes. For more flavor, you can leave it marinating for up to 2 hours. If you use wooden skewers, soak them in water for at least 30 minutes. This step stops them from burning on the grill. While they soak, preheat your grill or grill pan to medium-high heat. When you are ready, take the marinated chicken out of the fridge. Start threading the chicken pieces onto the skewers. Alternate with chunks of red and yellow bell peppers and red onion. This adds color and flavor to your skewers. Now it’s time to grill! Place the skewers carefully on your preheated grill. Grill them for about 10 to 12 minutes. Be sure to turn them every few minutes. This helps them cook evenly. You want the chicken to reach an internal temperature of 165°F (75°C). Look for nice grill marks on the chicken. During the last few minutes, brush the skewers with any leftover marinade. This adds a tasty glaze. Once done, take the skewers off the grill. Let them rest for a couple of minutes before serving. For the full recipe, check out the details above. To make the best Honey Sriracha Chicken Skewers, you need balance. Sweetness from honey meets the heat of Sriracha. You can change the spice level by adding more or less Sriracha. I like to use fresh ingredients whenever possible. Fresh garlic and ginger make a big difference. For marinating, let the chicken sit in the sauce for at least 30 minutes. If you have time, go for 2 hours. This helps the flavors soak in well. Use a reliable grill for even cooking. I prefer a gas grill because it heats up fast. If you use wooden skewers, soak them in water for 30 minutes. This stops them from burning. Avoid common mistakes like overcrowding the grill. Give each skewer space to cook properly. It helps to turn them every few minutes to get nice grill marks. To enhance your meal, pair these skewers with rice or a fresh salad. A cool dip like yogurt sauce works well too. As for drinks, iced tea or a light beer are great choices. For gatherings, serve the skewers on a nice platter. A sprinkle of sesame seeds and chopped scallions adds flair. Follow the Full Recipe for complete details on making these amazing skewers! {{image_4}} You can change the proteins in this recipe. For a different taste, try pork or beef. Both meats work well with the honey Sriracha sauce. If you prefer vegetarian options, use firm tofu or tempeh. These options soak up flavors nicely. For seafood lovers, shrimp or salmon can be great choices. They cook quickly and pair well with the sauce. You can adjust the spice level to suit your taste. If you want less heat, use less Sriracha. For more heat, add extra Sriracha or some chili flakes. You can also add fruity components like pineapple or mango. This adds a sweet twist to the dish. Don't be afraid to experiment with different sauces too. Try teriyaki or peanut sauce for a fresh take. Mix up the skewers by adding different vegetables. Zucchini, mushrooms, or cherry tomatoes can add flavor and color. You might also serve the skewers in wraps or sandwiches. Use lettuce or pita bread for a fun meal. Another idea is to use the skewers as a salad topping. Just slice them and place them on your favorite greens. For the full recipe, check out the Honey Sriracha Chicken Skewers section. To keep your Honey Sriracha Chicken Skewers fresh, store them in the fridge. Place leftovers in an airtight container. They stay good for up to three days. If you want to store them longer, freezing is a great option. Wrap the skewers in plastic wrap and then in foil. They can last for up to three months in the freezer. When you are ready to eat, thaw the skewers in the fridge overnight. To reheat, place them in the oven at 350°F (175°C) for about 15 minutes. You can also use a microwave. Just make sure to cover them to prevent drying out. Meal prepping helps save time during busy weeks. You can marinate the chicken in advance. This makes cooking quick and easy. Portion out the skewers into individual servings. This way, you have ready-to-go meals. You can also use leftovers in stir-fries or salads. Shred the chicken and add it to a wrap for a tasty lunch. Fresh ingredients have a shorter shelf life than dried ones. Always check expiration dates on your sauces and oils. Honey and Sriracha last a long time, but garlic and ginger spoil faster. Look for signs of spoilage like mold or bad smells. If you buy bell peppers, use them within a week for the best flavor. Proper storage helps keep your ingredients fresh longer. You should marinate the chicken for at least 30 minutes. This allows the chicken to soak up the flavors. If you have time, marinate it for up to 2 hours. This longer time gives a stronger taste and makes the chicken juicier. Just remember to keep it in the fridge while it marinates. Yes, you can use either wooden or metal skewers. Wooden skewers are usually cheaper and easy to find. Just soak them in water for 30 minutes before grilling. This helps stop them from burning. Metal skewers are more durable and reusable. They also heat up quickly, helping to cook the food evenly. You can serve these skewers with a variety of side dishes. Rice is a great option; it soaks up the sauce well. Grilled vegetables add color and flavor. A fresh salad can balance the heat too. For drinks, try iced tea or a light beer. They complement the sweet and spicy flavors nicely. Yes, you can cook the skewers in the oven. Preheat your oven to 400°F (200°C). Place the skewers on a baking sheet lined with foil. Bake them for about 15-20 minutes. Turn them halfway through to cook evenly. Check the chicken's temperature; it should reach 165°F (75°C) for safety. If you don’t have Sriracha, you can use other hot sauces. Look for sauces with a similar flavor profile. Hot chili sauce or a mix of chili powder and honey can work too. You can also try making your own by mixing red pepper flakes with a little vinegar and honey for a sweet heat. For the complete recipe, check out the [Full Recipe]. In this blog post, we explored how to make delicious chicken skewers. We covered key ingredients, including chicken thighs and marinade components. I shared step-by-step instructions on marinating, preparing, and grilling your skewers for perfect flavor. We also discussed tips to enhance your dish and variations for different tastes. Now, with this knowledge, you can create your own tasty skewers. Experiment with flavors and ingredients. Enjoy sharing your creations with family and friends!](https://goldendishy.com/wp-content/uploads/2025/06/16598c59-d7e9-4d3b-953e-ae03d4ffffdf-768x768.webp)