Chili Lime Steak Salad Fresh and Flavorful Meal


Looking for a fresh and flavorful meal? The Chili Lime Steak Salad fits the bill! This dish combines juicy grilled flank steak with vibrant greens and tasty toppings. You’ll whisk together a zesty marinade that makes the steak shine. In just a few steps, you can create a colorful, tasty meal that’s perfect for any day. Let’s dive in and get cooking!
Why I Love This Recipe
- Bold Flavors: The combination of chili and lime creates a vibrant flavor profile that elevates the simple steak salad into a gourmet dish.
- Quick and Easy: With minimal prep time and a short marinating period, this recipe is perfect for a weeknight dinner without sacrificing taste.
- Healthy Ingredients: Packed with fresh greens, avocados, and tomatoes, this salad is not only delicious but also nutritious and satisfying.
- Versatile Meal: This dish can be served as a main course or a side, making it a versatile option for any meal occasion.
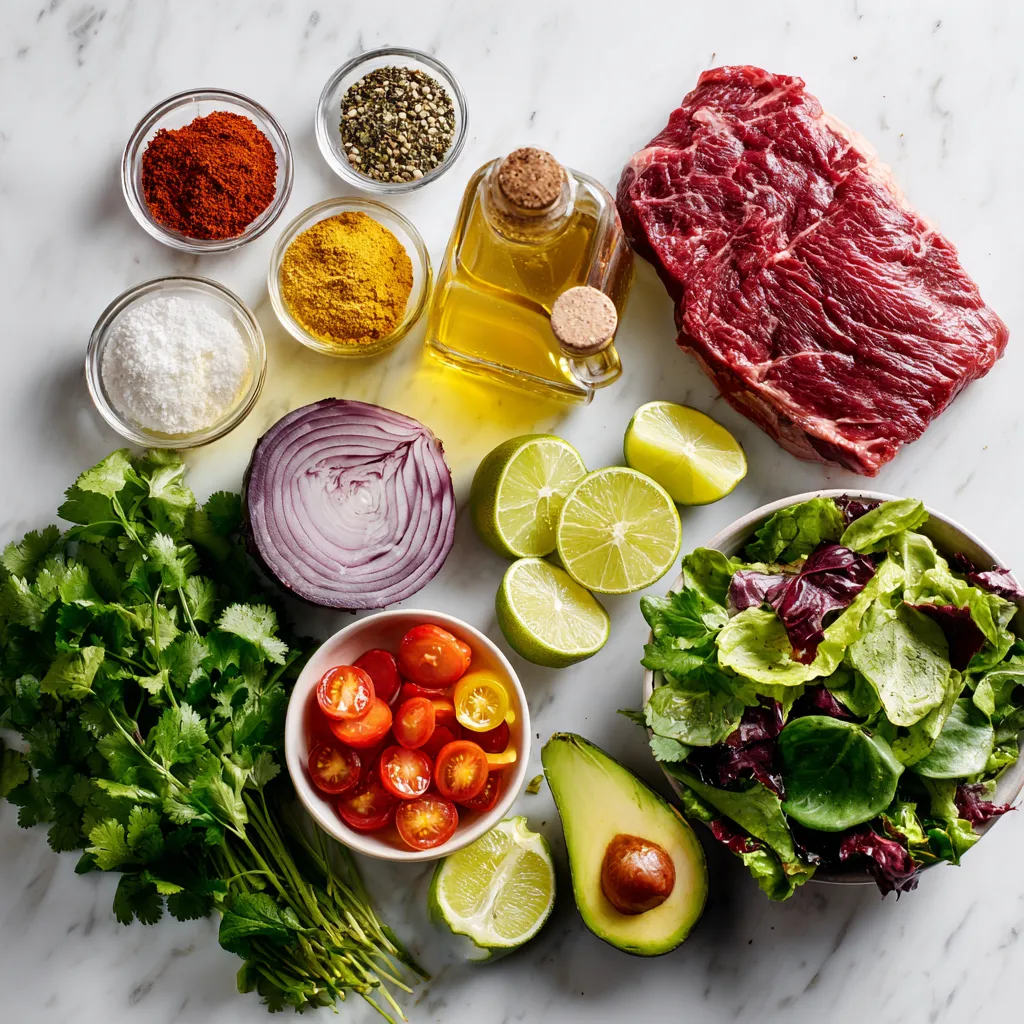
Ingredients
Main Ingredients
– 1 lb flank steak
– Mixed salad greens (arugula, baby spinach, romaine)
Marinade Ingredients
– 1 tablespoon chili powder
– 1 teaspoon ground cumin
– 1 teaspoon garlic powder
– 1 teaspoon onion powder
– Juice of 2 fresh limes
– 2 tablespoons extra virgin olive oil
– Salt and freshly cracked black pepper to taste
Toppings
– 1 cup cherry tomatoes, halved
– 1 ripe avocado, sliced
– 1/2 cup red onion, thinly sliced
– Fresh cilantro leaves for garnish
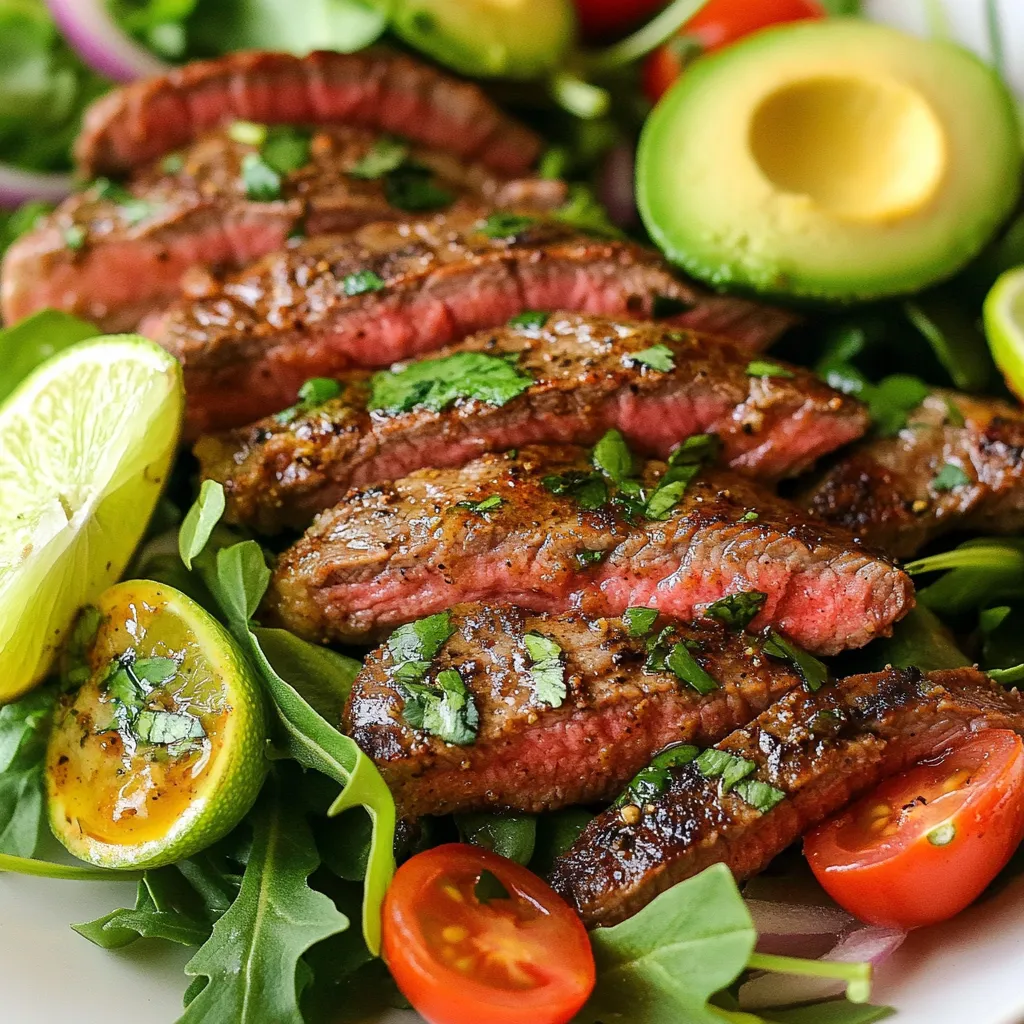
In this salad, the main star is the flank steak. It brings rich flavor and a great texture. The mixed salad greens add freshness and crunch. I love using a mix of arugula, baby spinach, and romaine. This blend gives the salad a nice depth.
For the marinade, we use simple spices that pack a punch. Chili powder gives heat, while cumin adds a warm, earthy taste. Garlic and onion powder enhance the overall flavor. Fresh lime juice adds brightness, making everything come alive. Olive oil helps blend it all together and adds a smooth finish.
The toppings are where the salad shines. Cherry tomatoes bring sweetness and color. Avocado adds creaminess, while red onion gives a bit of sharpness. Finally, fresh cilantro adds a burst of flavor. This combination makes every bite a delight.
You can see how each ingredient plays a role in this dish. It’s not just a salad; it’s a celebration of flavors!
Step-by-Step Instructions
Preparing the Marinade
Whisk together the following ingredients in a bowl:
– 1 tablespoon chili powder
– 1 teaspoon ground cumin
– 1 teaspoon garlic powder
– 1 teaspoon onion powder
– Juice of 2 fresh limes
– 2 tablespoons extra virgin olive oil
– Salt and freshly cracked black pepper to taste
Mix until you see a smooth blend. This marinade adds a zesty kick to the steak.
Marinating the Steak
Take 1 lb flank steak and coat it evenly in the marinade. Ensure every part has flavor. Place the steak in a shallow dish or a resealable plastic bag. Seal the dish or bag, and refrigerate. Let it marinate for at least 30 minutes. For the best taste, let it sit for up to 2 hours.
Cooking the Steak
Preheat your grill or grill pan over medium-high heat. Make sure it is hot before cooking. Remove the steak from the marinade, letting the extra drip off. Place it on the grill. Cook for about 4-5 minutes on each side for a medium-rare steak. Adjust the cooking time based on how you like it cooked. After cooking, set the steak aside to rest for about 5 minutes. This helps the juices stay inside.
Assembling the Salad
In a large bowl, mix together the salad greens. Use about 4 cups of mixed greens like arugula, baby spinach, and chopped romaine. Add in:
– 1 cup cherry tomatoes, halved
– 1 ripe avocado, sliced
– 1/2 cup red onion, thinly sliced
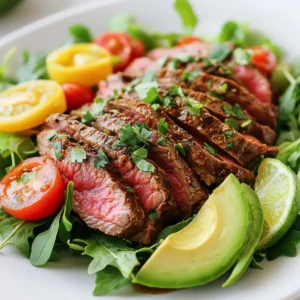
Toss everything gently to mix. Now, slice the rested steak thinly against the grain. Arrange the steak on top of the salad mixture. Drizzle any leftover marinade over the steak if you like. Finally, garnish with fresh cilantro leaves for a colorful touch. This salad is now ready to impress!
Tips & Tricks
Achieving the Perfect Steak
For great steak, cook it to your desired doneness. Here are some cooking times:
– Medium-Rare: 4-5 minutes per side
– Medium: 5-6 minutes per side
– Medium-Well: 6-7 minutes per side
Always let the steak rest after cooking. This step is key for juicy meat. Let it rest for about 5 minutes. This allows the juices to move back into the meat.
Enhancing Flavor
To boost flavor, consider adding spices. Try smoked paprika, oregano, or cayenne for extra kick. Fresh herbs like basil or thyme work well too.
If you have leftover marinade, use it wisely. You can drizzle it over the salad. Just make sure to heat it first to kill any bacteria.
Presentation Ideas
Plating is important for a great look. Use a large, shallow bowl. Neatly arrange the steak slices on top of the salad. This creates a beautiful layer.
Add garnishes for extra appeal. Fresh cilantro leaves add a nice touch. Lime wedges also brighten the dish. These simple steps make your meal look restaurant-worthy!
Pro Tips
- Marinate Longer for More Flavor: For the best flavor, let the steak marinate for at least 2 hours. If time allows, marinating overnight will enhance the taste even more.
- Let the Steak Rest: After grilling, always let the steak rest for about 5 minutes. This helps the juices redistribute, resulting in a more tender and juicy steak.
- Slice Against the Grain: When slicing the steak, be sure to cut against the grain. This will ensure each slice is tender and easy to chew.
- Fresh Ingredients Make a Difference: Using fresh, high-quality ingredients for your salad will elevate the dish. Opt for ripe avocados and vibrant greens for the best results.
Variations
Alternative Proteins
You can switch flank steak with other proteins. Chicken is a great option. It cooks fast and absorbs flavor well. Just marinate it like the steak. Shrimp also works nicely. It cooks quickly on the grill, too. For a vegetarian choice, try grilled tofu. Tofu takes on flavors from the marinade, making it tasty and filling.
Different Dressings
Dressings can change the salad’s taste. A citrus vinaigrette adds a zesty kick. It pairs well with the steak’s spices. Creamy avocado dressing is another choice. It adds a rich, smooth flavor that complements the salad. You can also try a yogurt-based dressing for a fresh twist.
Seasonal Ingredients
Using seasonal ingredients can enhance your salad. In spring, add fresh peas or asparagus. In summer, ripe peaches or berries can brighten the dish. Fall brings in roasted squash, and winter calls for hearty greens. Adjust your salad based on what is fresh and available. This not only tastes better but also supports local farms.
Storage Info
Storing Leftovers
To keep your salad fresh, store it in an airtight container. Make sure you separate the greens from the steak. This way, the greens stay crisp. You can keep the salad in the fridge for up to three days. After that, the greens may wilt.
Freezing Options
You can freeze the cooked steak but not the salad greens. Wrap the steak tightly in plastic wrap, then place it in a freezer bag. It will stay good for up to three months. When you’re ready to eat, thaw it in the fridge overnight.
To reheat, place the steak in a hot skillet for a few minutes on each side. This warms it up without drying it out. Avoid reheating the greens. Instead, serve them fresh for the best taste.
Serving Suggestions
When you’re ready to enjoy leftovers, reassemble the salad. Place fresh greens in a bowl, add the steak, and top with tomatoes and avocado. You can drizzle lime juice for extra flavor.
Pair this salad with simple sides like crusty bread or corn on the cob. These sides balance the meal while keeping it light. Enjoy your fresh and vibrant meal!
FAQs
How do I make the marinade more flavorful?
You can boost the marinade with herbs and spices. Try adding:
– Cumin
– Paprika
– Fresh garlic
– Fresh cilantro
– Oregano
These additions add depth and warmth. You can also use lime zest for a bright kick. Adjust to your taste and enjoy the extra flavor.
Can I prepare the salad in advance?
Yes, you can make the salad in advance. Here are some tips:
– Prepare the salad greens and toppings separately.
– Store them in airtight containers.
– Assemble the salad just before serving.
This keeps the greens crisp. The flavors will mix well when combined later.
What can I serve with Chili Lime Steak Salad?
There are many great sides to pair with this salad. Here are a few ideas:
– Grilled corn on the cob
– Black bean quesadillas
– Rice or quinoa
– Fresh fruit salad
– Light beers or citrus drinks
These sides complement the salad’s flavors well.
How do I choose the right cut of steak?
Choosing the right steak cut is key for this salad. Here are some good options:
– Flank steak: Juicy and flavorful, perfect for grilling.
– Skirt steak: Tender and great for marinating.
– Sirloin: Leaner but still tasty when cooked well.
Each cut has its unique taste. Pick one that you enjoy!
This recipe for Chili Lime Steak Salad highlights key ingredients, easy steps, and helpful tips. From marinating the flank steak to choosing the best toppings, you can create a delicious meal. Remember to store and reheat properly for maximum flavor. Experiment with alternative proteins and dressings to make the dish your own. With simple adjustments, you can enjoy a fresh and tasty salad every time. Embrace these ideas, and you’ll impress your family and friend
Chili Lime Steak Salad
Ingredients
- 1 lb flank steak
- 1 tablespoon chili powder
- 1 teaspoon ground cumin
- 1 teaspoon garlic powder
- 1 teaspoon onion powder
- 2 fresh limes Juice
- 2 tablespoons extra virgin olive oil
- to taste Salt and freshly cracked black pepper
- 4 cups mixed salad greens (such as arugula, baby spinach, and chopped romaine lettuce)
- 1 cup cherry tomatoes, halved
- 1 ripe avocado sliced
- 1/2 cup red onion, thinly sliced
- to garnish Fresh cilantro leaves
Instructions
- In a mixing bowl, combine the chili powder, ground cumin, garlic powder, onion powder, lime juice, olive oil, salt, and pepper. Whisk together until the marinade is well blended.
- Place the flank steak in a shallow dish or resealable plastic bag. Pour the marinade over the steak, making sure to coat it evenly on all sides. Cover the dish or seal the bag, and refrigerate. Allow the steak to marinate for a minimum of 30 minutes, but for maximum flavor, marinate for up to 2 hours.
- Preheat your grill or a stovetop grill pan over medium-high heat until it reaches the desired temperature. Once hot, carefully remove the steak from the marinade, letting excess marinade drip off, and place it on the grill. Cook the steak for approximately 4-5 minutes on each side for medium-rare, or adjust the cooking time based on your preferred level of doneness.
- Once cooked, take the steak off the grill and let it rest on a cutting board for about 5 minutes. This allows the juices to redistribute. After resting, slice the steak thinly against the grain for maximum tenderness.
- In a large serving bowl, gently combine the mixed salad greens, halved cherry tomatoes, sliced avocado, and thinly sliced red onion. Toss the ingredients together with care to ensure everything is evenly mixed.
- Neatly arrange the sliced steak on top of the salad mixture. If desired, drizzle any remaining marinade over the steak for added flavor.
- Finish with a garnish of fresh cilantro leaves for a pop of color and flavor just before serving.
![For perfect Greek lemon potatoes, gather these simple ingredients: - 2 pounds baby potatoes, halved - 1 cup chicken or vegetable broth - 2 tablespoons extra virgin olive oil - 3 tablespoons freshly squeezed lemon juice - 2 teaspoons fresh lemon zest - 4 cloves garlic, minced - 1 tablespoon dried oregano - Sea salt and freshly cracked pepper to taste - Fresh parsley, chopped (for garnish) You can swap baby potatoes for Yukon Gold or red potatoes. Both work well and add great taste. If you want a vegan option, use vegetable broth instead of chicken broth. Fresh lemon juice is best, but bottled works in a pinch. You can add fresh herbs like thyme or rosemary to change the flavor. For a spicy kick, consider a pinch of red pepper flakes. Using high-quality ingredients makes a big difference. Fresh potatoes give the best texture and flavor. Extra virgin olive oil adds richness. Fresh lemon juice and zest brighten the dish. Quality broth enhances the taste. When you use good ingredients, you create an authentic Greek experience. They help your dish shine and make every bite delicious. Check out the Full Recipe for more tips and tricks on how to make these zesty potatoes. To make Greek lemon potatoes, start by gathering your ingredients. You need baby potatoes, broth, olive oil, fresh lemon juice, lemon zest, garlic, oregano, salt, and pepper. 1. Preheat the oven to 425°F (220°C). This heat helps the potatoes become crispy. 2. Halve the baby potatoes. This allows them to soak up all the flavors. 3. In a large bowl, mix the broth, olive oil, lemon juice, lemon zest, garlic, oregano, salt, and pepper. Stir well to combine. 4. Add the halved potatoes to the bowl. Toss them until they are fully coated with the mixture. Once your potatoes are ready, it’s time to roast them. 1. Pour the potato mix into a roasting pan. Spread the potatoes out in a single layer. This step ensures they cook evenly. 2. Roast in the oven for about 30-35 minutes. Check for a golden brown color and fork-tender texture. 3. Stir the potatoes halfway through roasting. This helps them absorb more flavors and become crispy all around. Sometimes things don’t go as planned. Here are some tips to help. - If your potatoes are not browning, increase the oven temperature by 25°F. This can help them crisp up. - If they seem too dry, add a splash more broth. This will keep them moist and flavorful. - If they are not tender after 35 minutes, roast them a bit longer. Just keep an eye on them to prevent burning. For a full recipe, refer to the [Full Recipe]. Enjoy the deliciousness of Greek lemon potatoes! To boost the taste of Greek lemon potatoes, use fresh ingredients. Fresh garlic and herbs add a lot of flavor. When using oregano, choose dried or fresh based on what you have. For a zingy kick, try adding a pinch of red pepper flakes. This little touch makes a big difference. You can also let the potatoes marinate in the broth mixture for an hour before cooking. This extra time helps the flavors soak in deeply. To get potatoes that are both soft and crispy, cut them evenly. Halving the baby potatoes helps ensure they cook at the same rate. Use a hot oven, around 425°F (220°C). The high heat helps the outside crisp up while keeping the inside tender. Halfway through cooking, give the potatoes a good stir. This helps them brown evenly. If you want extra crispiness, broil them for the last 2-3 minutes. Just keep an eye on them to avoid burning. Prep the ingredients ahead of time to save effort later. You can wash and cut the potatoes a day before. Store them in water in the fridge to keep them fresh. You can also mix the broth and seasonings ahead. Just combine everything in a bowl and cover it. When you are ready to cook, simply combine the potatoes with the mixture. This makes dinner quick and easy. For even faster meals, consider roasting a larger batch. Leftovers taste great and can be enjoyed in many ways. For the full recipe, check out the complete cooking guide for Greek lemon potatoes. {{image_4}} You can easily make Greek lemon potatoes vegan. Just swap chicken broth for vegetable broth. This change keeps the rich flavor intact. Make sure your broth is gluten-free if needed. You can use any vegetable broth you like. This way, everyone can enjoy this dish! Feel free to mix up the flavors! Add fresh herbs like thyme or rosemary. These herbs give a nice twist. You can also try spices like paprika or cumin for heat. For a creamier taste, sprinkle some feta cheese on top before serving. You can even toss in some olives for a salty kick. Each of these options makes the dish unique! Greek lemon potatoes shine as a side dish. Pair them with grilled chicken or fish for a full meal. They also go well with a fresh salad or tzatziki sauce. If you want to make it special, serve with warm pita bread. These potatoes are great for any gathering. They will impress your guests, and they are easy to share. For the full recipe, check out the Full Recipe link above. To keep your Greek Lemon Potatoes fresh, let them cool first. Then, place them in an airtight container. You can also cover them tightly with plastic wrap. Store them in the fridge for up to three days. This method helps keep their flavor and texture. When reheating, use the oven for the best taste. Preheat your oven to 350°F (175°C). Spread the potatoes on a baking sheet. Heat them for about 15 to 20 minutes. This way, they will regain their crispiness. If you’re in a hurry, you can use the microwave. Just heat them in 30-second bursts, but they may not be as crispy. Greek Lemon Potatoes stay good in the fridge for three days. If you want to keep them longer, you can freeze them. Place the cooled potatoes in a freezer-safe bag. They can last up to three months in the freezer. When ready to eat, thaw them in the fridge overnight. Then, reheat them as mentioned above. Greek Lemon Potatoes are a delicious side dish. They are made with baby potatoes, lemon juice, and herbs. The dish is known for its bright, zesty flavor. The potatoes become tender and crisp when roasted. You can enjoy them with grilled meats or fish. They add a refreshing touch to any meal. You can prepare Greek Lemon Potatoes ahead of time. First, follow the recipe up to the roasting step. After mixing the ingredients, cover the dish and store it in the fridge. This way, the flavors will blend. When you're ready to cook, just preheat your oven and roast them. You may need to add a few extra minutes to the cooking time. Yes, you can use other potatoes like Yukon Gold or red potatoes. These types work well due to their creamy texture. Just remember to cut them into similar sizes. This helps them cook evenly. Each potato type will offer a slightly different taste and texture. Feel free to experiment with your favorites! Greek Lemon Potatoes are a delightful dish that you can easily make. You learned the key ingredients that make them special, and tips for the best flavor. Following the step-by-step guide ensures perfect roasting every time. You also discovered tasty variations for different diets and ways to store leftovers. In closing, use fresh ingredients and don't rush the cooking process. Enjoy this dish with friends and family. Each bite will showcase Greek flavors. Happy cooking!](https://goldendishy.com/wp-content/uploads/2025/07/055e8462-33de-483e-a53c-599291ba0dde-768x768.webp)


. - Heat your skillet over medium heat. - Add the unsalted butter and let it melt. - Once melted, watch for it to bubble gently. - Next, add the minced garlic. - Sauté the garlic for about one minute. - Stir often until it smells great and turns lightly golden. - Now, add the peeled and deveined shrimp to the skillet. - Season the shrimp with salt and pepper. - If you like spice, sprinkle in some red pepper flakes. - Cook the shrimp for 2-3 minutes on one side. - Flip the shrimp to cook the other side evenly. - Add the lemon zest and juice as they cook. - Keep cooking until the shrimp are opaque. - Remove the skillet from the heat. - Stir in the chopped parsley for a fresh taste. - Serve the shrimp over warm pasta or fluffy rice. - Drizzle the leftover lemon-garlic butter sauce on top for extra flavor. - For a lovely presentation, you can garnish with lemon wedges. For more details, check the Full Recipe. - Achieving the perfect shrimp texture: To get tender shrimp, avoid overcooking. Cook them just until they turn pink. This usually takes about 2-3 minutes per side. - Best practices for sautéing garlic: Start with a hot skillet and melted butter. Add minced garlic and stir for about 1 minute. Keep an eye on it so it doesn’t burn; burnt garlic tastes bitter. - Presentation ideas for a beautiful dish: Serve the shrimp in shallow bowls to make it look elegant. Add a sprinkle of parsley on top for color. Include lemon wedges on the side for a fresh touch. - Pairing options with side dishes: Lemon garlic butter shrimp goes well with cooked pasta or fluffy rice. You can also serve it with a side salad for a light meal. - Additional herbs or spices to try: Consider adding fresh basil or thyme for extra flavor. These herbs pair well with lemon and shrimp. - Adjusting spice levels with red pepper flakes: If you like heat, add more red pepper flakes. Start with a teaspoon and adjust to your taste. This will make your dish more exciting! For more details, check the Full Recipe. {{image_4}} You can change the seafood in this recipe. Try scallops or even crab. These swaps add new tastes while keeping the dish simple. If you want a healthier fat, swap butter for olive oil. Olive oil works well and gives a light, fresh flavor. To mix things up, add other citrus flavors. Lime or orange juice can brighten the dish. You can also infuse the recipe with herbs. Try basil or thyme for a different twist. These herbs can make the dish feel more seasonal. If you need a gluten-free option, serve the shrimp over quinoa or zucchini noodles. Both are great gluten-free choices. For a low-calorie meal, cut back on the butter. You can use less or replace it with vegetable broth. This keeps the dish tasty but lighter. After enjoying your lemon garlic butter shrimp, store any leftovers in the fridge. Use an airtight container to keep them fresh. These shrimp will stay good for about 2-3 days. Always check for freshness before eating. To freeze lemon garlic butter shrimp, let them cool completely first. Place them in a freezer-safe bag, removing as much air as possible. They can last for about 2 months in the freezer. When you're ready to eat, thaw the shrimp in the fridge overnight. Reheat them gently in a skillet over low heat. This keeps them tender and tasty. Always ensure your shrimp is safe to eat after storage. Check for any off smells or changes in color. If the shrimp look slimy or smell bad, it’s best to discard them. Trust your senses to keep your meals safe and enjoyable. Cook shrimp for 4-6 minutes. They cook quickly. In a hot skillet, shrimp turn pink when done. Avoid overcooking; it makes them tough. Yes, you can use frozen shrimp. Thaw them first for best results. Place them in cold water for about 15 minutes. This way, they cook evenly and taste fresh. I love serving lemon garlic butter shrimp with: - Cooked pasta - Fluffy rice - Fresh salad - Garlic bread These sides balance the rich flavors well. Check for color and texture. Cooked shrimp turn pink and opaque. They should feel firm but not hard. When in doubt, cut one open. It should be white inside, not translucent. You’ve learned how to make lemon garlic butter shrimp. We covered essential ingredients, easy steps, tips for cooking, and variations to try. Remember to adjust flavors to your taste and pair with your favorite sides. Store leftovers safely for later enjoyment. Cooking shrimp can be simple and satisfying. Enjoy every bite, and don't hesitate to experiment. Whether for a cozy night in or impressing guests, this dish shines every time. Let your kitchen be a place of fun and flavor!](https://goldendishy.com/wp-content/uploads/2025/06/8ad1771e-7d26-4dd4-879b-9e464bbb0647-768x768.webp)
![- 1 can (15 oz) black beans, drained and rinsed - 1/2 cup cooked quinoa, cooled - 1/2 cup breadcrumbs (gluten-free option available) - 1 small red onion, finely diced - 2 cloves garlic, minced - 1 small jalapeño, minced (seeds removed for less heat) - 1 tablespoon chili powder - 1 teaspoon ground cumin - 1/2 teaspoon smoked paprika - Sea salt and black pepper, to taste - 2 tablespoons fresh cilantro, finely chopped - 1 large egg (or for a vegan option, mix 1 tablespoon ground flaxseed with 2.5 tablespoons water) - Olive oil for frying To make these spicy black bean burgers, choose fresh ingredients when you can. Fresh veggies add great flavor and crunch. However, pantry staples like canned black beans and quinoa work well too. When picking black beans, look for those with a firm texture. Check the can for any damage. Good beans should have a clean label with no added preservatives. For a gluten-free option, look for gluten-free breadcrumbs at your store. They are easy to find and useful in many dishes. You can also use oats or crushed corn chips if needed. This recipe is not just tasty but also easy to prepare. It allows you to explore new flavors while making a healthy meal. For the full recipe, check the instructions provided above. 1. Mashing black beans for ideal texture: Start with a large bowl. Use a fork or potato masher to mash the black beans. Aim for a mix of smooth and chunky. This gives your burger a great texture. 2. Mixing all ingredients thoroughly: After mashing, add the cooked quinoa, breadcrumbs, diced onion, minced garlic, chopped jalapeño, chili powder, cumin, smoked paprika, salt, pepper, and cilantro. Mix everything well. You want each bite to have a burst of flavor. 3. Tips for shaping patties consistently: To shape patties, wet your hands slightly. This helps the mixture stick less. Form about four to six patties, depending on your size preference. Make them even in thickness for even cooking. 1. Heating the skillet correctly: Pour a good drizzle of olive oil into a non-stick skillet. Heat it on medium. Wait until the oil shimmers before adding patties. This step is key for crispiness. 2. Cooking times for achieving crispy patties: Cook each patty for 5 to 6 minutes. Check for a golden brown color before flipping. This ensures a nice crust forms. 3. How to avoid breakage while flipping: Use a spatula to gently lift each patty. Flip them carefully to keep them intact. If they feel too soft, let them cook a bit longer. To get the right texture, add ingredients in the right order. Start with the black beans. Mash them well, but leave some chunks. This gives your burger a nice bite. Next, mix in the quinoa and breadcrumbs. These help bind your burger. If you want a firmer burger, add more breadcrumbs. For a softer burger, reduce them. Use olive oil for frying. It adds great flavor and helps the patties crisp up nicely. Spice up your burgers with extra spices. Consider adding cayenne for heat or oregano for earthiness. You can make a homemade spicy mayo. Mix mayo with hot sauce and lime juice. This makes a great dip too! Pair your burgers with tasty sides. Sweet potato fries or a fresh salad work well. These add color and flavor to your meal. For the full recipe, check out [Full Recipe]. {{image_4}} You can easily change this recipe to suit your taste. Here are a few ideas: - Different Beans or Grains: If you want a twist, try using kidney beans or chickpeas. You can also swap quinoa for brown rice or oats. Each option brings a unique flavor and texture. - Adding Cheese: For a creamy touch, mix in some cheese. Cheddar or pepper jack adds great flavor. If you prefer a vegan option, use vegan cheese or nutritional yeast. Both will give a cheesy taste without dairy. - Adjusting Spice Levels: Want it milder? Skip the jalapeño or use less chili powder. If you love heat, double the spices or add hot sauce. Make it just right for you. Take your spicy black bean burgers to the next level with these fun ideas: - Unique Toppings: Try avocado slices, pickled onions, or spicy slaw. Fresh herbs like cilantro or basil add a bright touch too. Experiment and find your favorite combo! - Suggested Sides: Pair your burgers with sweet potato fries, a crisp salad, or coleslaw. These sides add crunch and flavor to your meal. - Creative Presentation: Stack your burger high with colorful veggies. Serve it on a wooden board for a rustic look. Use fun plates to make your dish pop. Your guests will love it! For the full recipe, check out the [Full Recipe]. After enjoying your spicy black bean burgers, store leftovers in the fridge. Place cooked patties in an airtight container. They stay fresh for about three to four days. For uncooked patties, wrap them tightly in plastic wrap or place them in a freezer-safe bag. This way, you can freeze them for up to three months. To reheat, heat a skillet over medium heat. Add a little olive oil and cook the patties for about five minutes on each side. This will keep them crispy. You can also use an oven. Preheat it to 350°F (175°C) and bake for about 10-15 minutes. Cooked spicy black bean burgers last for up to four days in the fridge. If you freeze them, they can last for about three months. Look for signs of spoilage, like an off smell or a change in color. If the burgers feel slimy or dry, it's best to throw them away. Always trust your senses to keep your food safe! Can I make these burgers ahead of time? Yes, you can make these spicy black bean burgers ahead of time. Shape the patties and store them in the fridge for up to a day. This saves time on busy nights. You can also freeze them for up to three months. Just make sure to separate them with parchment paper. Are spicy black bean burgers gluten-free? Yes, they can be gluten-free! Use gluten-free breadcrumbs instead of regular ones. Many brands offer tasty options that work well in this recipe. Always check the label for hidden gluten. What can I use as a binder if I can’t use eggs? If you can’t use eggs, try a flax egg. Mix 1 tablespoon of ground flaxseed with 2.5 tablespoons of water. Let it sit for about five minutes until it thickens. This works great to hold the burger together. How can I make these burgers spicier? To add more heat, include extra jalapeños or use a spicier pepper like serrano. You can also add hot sauce or cayenne pepper to the mixture. Experiment to find your perfect spice level! Can I cook these on a grill instead? Absolutely! Grilling adds a nice smoky flavor. Preheat your grill and lightly oil the grates. Cook the patties for about 5-6 minutes on each side, just like in a skillet. What are the best buns to use for black bean burgers? I recommend whole wheat or brioche buns for great flavor. Lettuce wraps are an option too for a low-carb meal. Choose what fits your taste and diet best! Tips for meal prepping these burgers for the week. Make a large batch of patties and store them in the fridge or freezer. You can reheat them quickly for lunch or dinner. Pair with fresh toppings for a nice meal. Having these ready to go makes weeknight cooking easier! You learned how to make delicious black bean burgers. We covered key ingredients, step-by-step instructions, and great tips. Remember to choose fresh ingredients for the best flavor. Mix your beans well to get the right texture. Don’t forget to try different variations and toppings to suit your taste. Proper storage will help you enjoy leftovers later. With these tips, you can impress anyone at your next meal. Enjoy creating your perfect black bean burger!](https://goldendishy.com/wp-content/uploads/2025/06/68a5a06a-1097-44cf-8076-380ecc54e2d9-768x768.webp)