
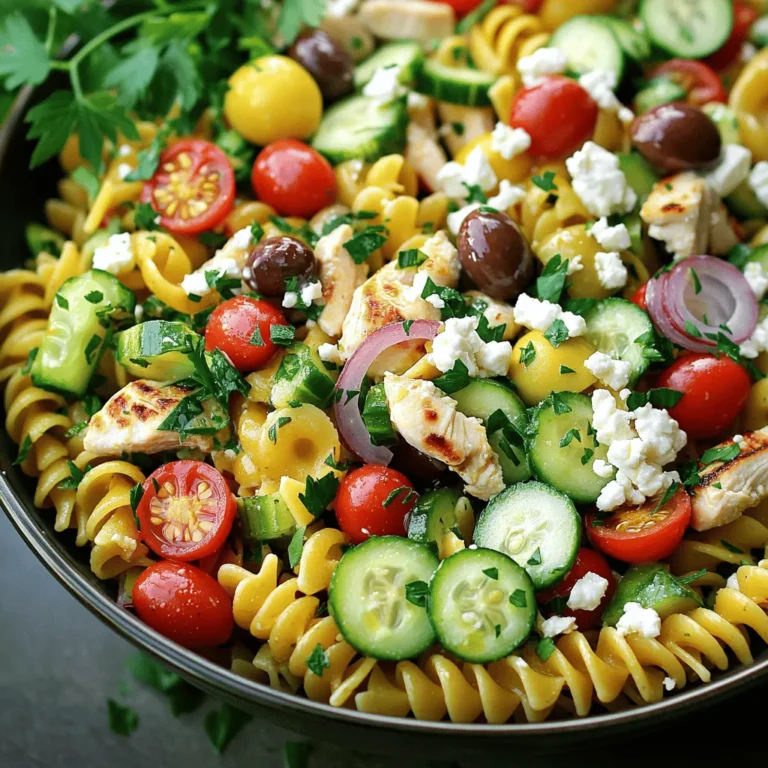
Coconut Lime Chicken Skewers Flavorful and Easy Recipe

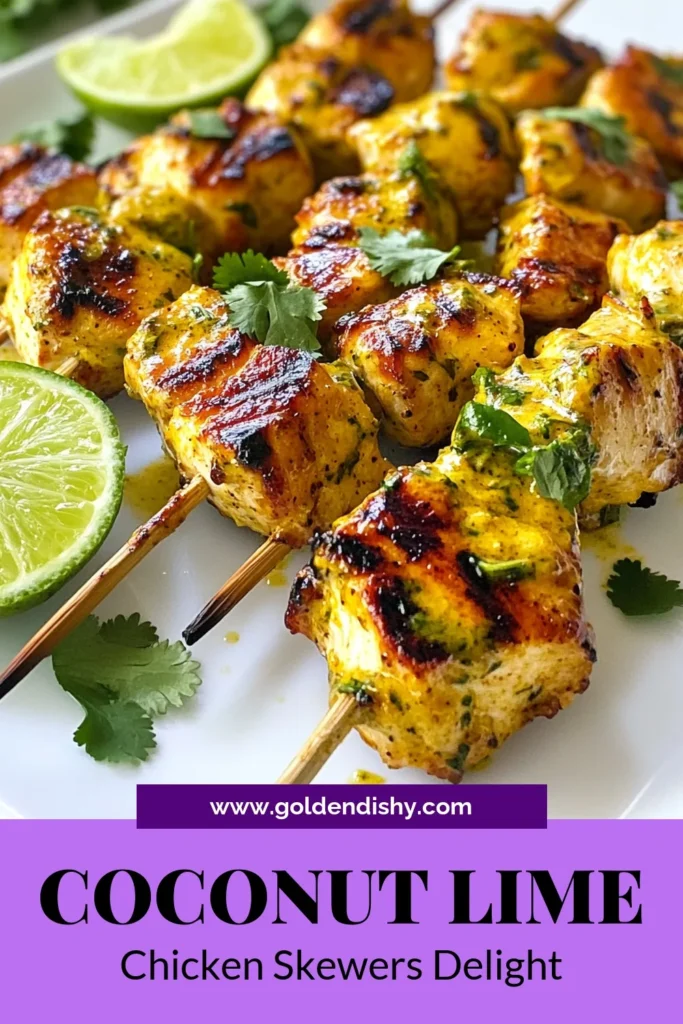
Ready for a burst of tropical flavor? These Coconut Lime Chicken Skewers are a must-try! With juicy chicken, zesty lime, and creamy coconut milk, you can have a delicious meal on the table in no time. This easy recipe will impress your family and friends without the fuss. Let’s dive into the ingredients and get you grilling the perfect skewers!
Why I Love This Recipe
- Bright and Zesty Flavor: The combination of coconut and lime creates a refreshing taste that transports you to a tropical paradise with every bite.
- Easy to Prepare: With a simple marinade and straightforward grilling instructions, this recipe is perfect for both novice and experienced cooks.
- Perfect for Any Occasion: These skewers are great for casual barbecues, dinner parties, or even meal prep, making them versatile for any dining scenario.
- Healthier Option: Using chicken breast and coconut milk provides a lean protein source along with healthy fats, making this dish a nutritious choice.
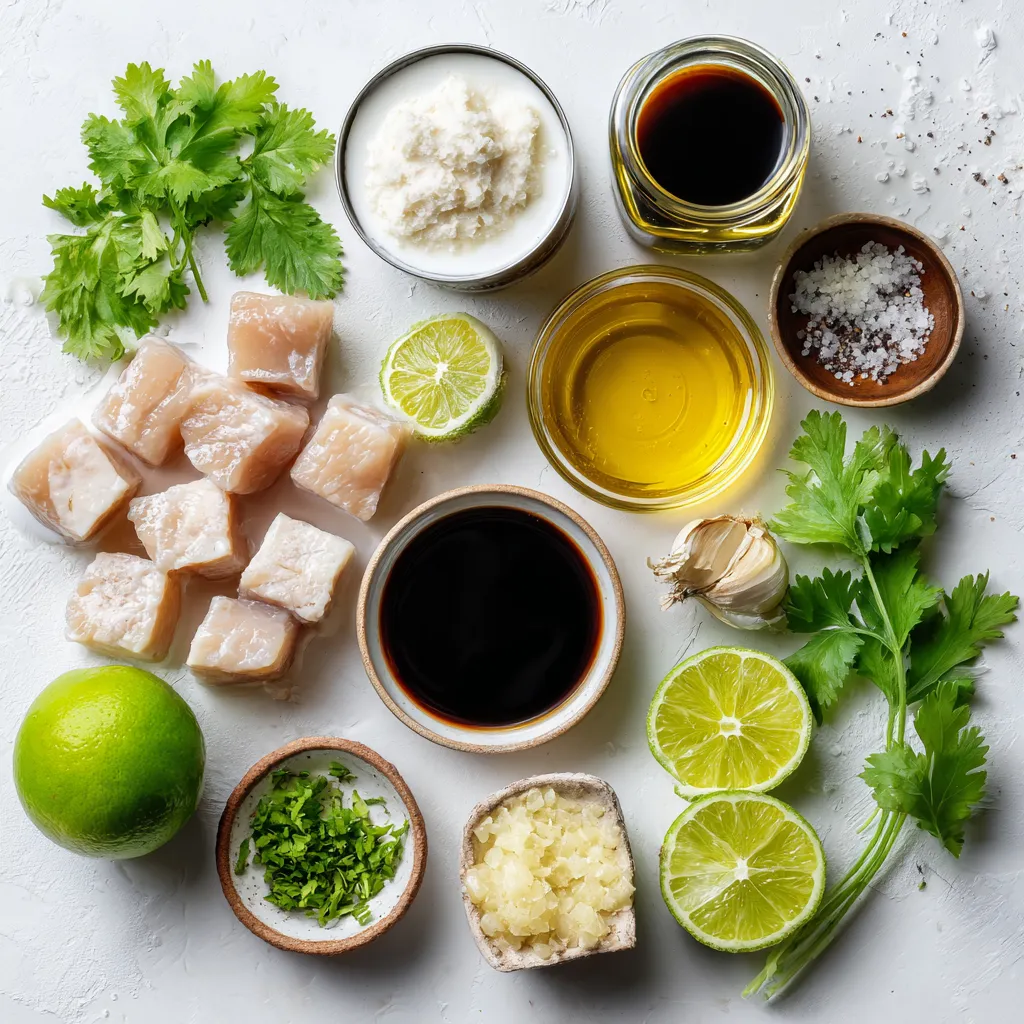
Ingredients
Main Ingredients
– 1 lb chicken breast
– 1 cup coconut milk
– Zest and juice of 2 limes
– 2 tablespoons honey
– 1 tablespoon soy sauce
– 2 cloves garlic, minced
– 1 teaspoon fresh ginger, grated
Seasoning and Garnish
– Salt and pepper
– 1/4 cup fresh cilantro, chopped
– Wooden or metal skewers
For this dish, you need chicken breast as the main protein. It cooks quickly and stays juicy. The coconut milk gives a rich, creamy flavor. Limes add brightness with their zest and juice. Honey balances the flavors with sweetness. Soy sauce adds saltiness and depth. Garlic and ginger bring warmth and aroma to the dish.
Don’t forget about the seasoning! Salt and pepper enhance all the flavors. Fresh cilantro adds a burst of color and freshness on top. Finally, you will need skewers to hold everything together. If you use wooden skewers, soak them in water to stop them from burning on the grill. This mix of ingredients makes a great meal that everyone will enjoy!
Step-by-Step Instructions
Marinating the Chicken
To make the marinade, start by mixing these ingredients in a bowl:
– 1 cup coconut milk
– Zest and juice of 2 limes
– 2 tablespoons honey
– 1 tablespoon soy sauce
– 2 cloves garlic, minced
– 1 teaspoon fresh ginger, grated
– Salt and pepper to taste
Whisk everything together until blended well. This mix is key. It flavors the chicken deeply. For the best taste, marinate the chicken for four hours. If you are short on time, one hour works too. The longer you let it sit, the better the flavor.
Preparing the Skewers
Next, soak wooden skewers in water for 30 minutes. This step stops them from burning on the grill. If you skip this, your skewers might catch fire. While soaking, preheat your grill to medium heat. A hot grill helps the chicken cook evenly and get those nice grill marks.
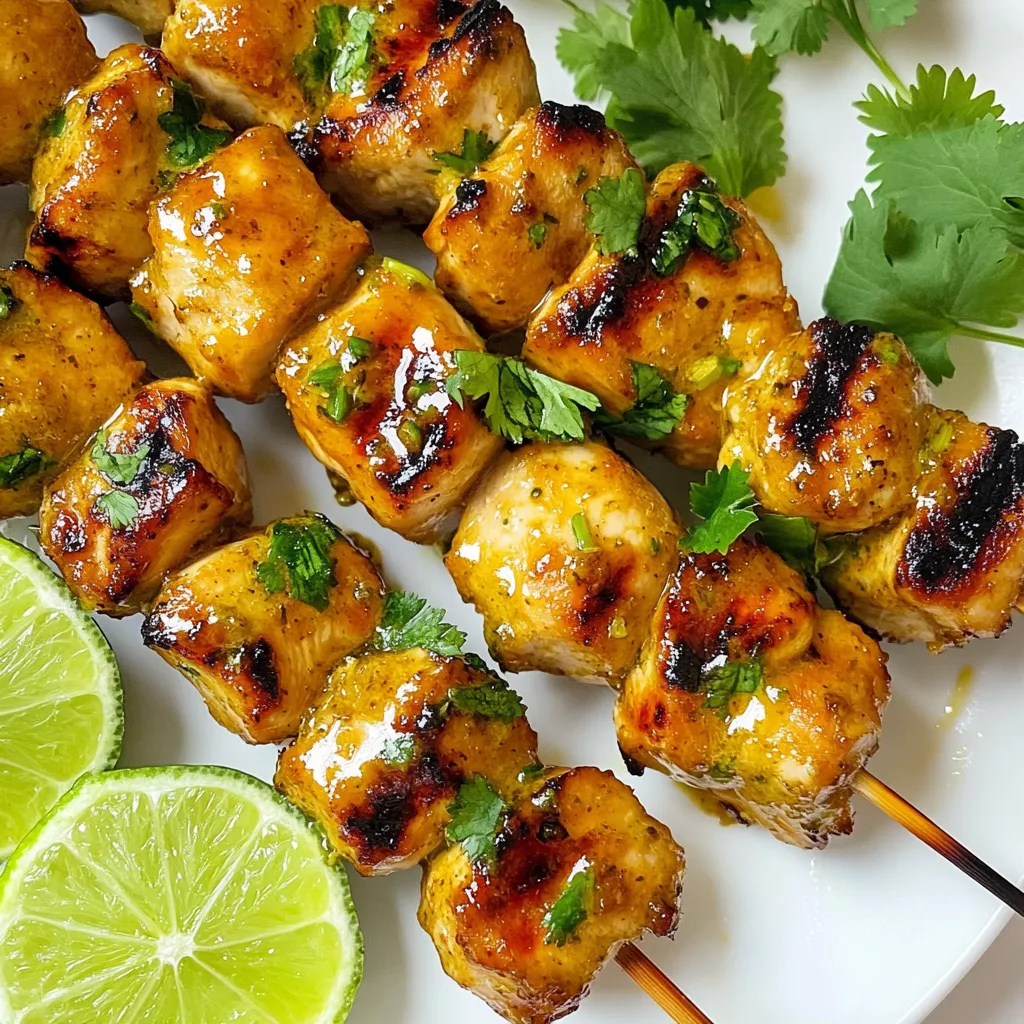
Cooking the Skewers
Once your grill is ready, it’s time to grill the skewers. Place them on the grill for 10 to 12 minutes. Turn them often to cook evenly. You want to see nice grill marks and for the chicken to be fully cooked. Use a meat thermometer to check the chicken. It needs to reach 165°F (75°C) inside. This step is crucial for food safety.
Tips & Tricks
Enhancing Flavor
For the best flavor, marinate the chicken for at least 1 hour. However, I recommend marinating for up to 4 hours. This longer time allows the flavors to soak in deeply. You can also add spices like cayenne pepper or smoked paprika. These spices give a nice kick and depth to the skewers.
Presentation Tips
To make your dish look stunning, serve the skewers on a rustic wooden platter. This adds a natural touch that complements the dish. You can also drizzle a reduction of coconut milk around the skewers. It adds a creamy look and boosts the flavor. For extra flair, garnish with fresh cilantro and lime wedges. This brings vibrant color and a fresh aroma to your meal.
Pro Tips
- Marination Magic: The longer you marinate the chicken, the more flavor it absorbs. Aim for at least 4 hours for the best results.
- Grill Preheating: Always preheat your grill to medium heat before adding the skewers. This ensures even cooking and perfect grill marks.
- Use a Meat Thermometer: To avoid undercooking or overcooking, check the internal temperature of the chicken. It should reach 165°F (75°C).
- Presentation Perfection: For an eye-catching presentation, serve the skewers on a wooden platter and drizzle some coconut milk reduction around them.
Variations
Alternative Proteins
You can switch out chicken for shrimp or tofu. Shrimp cooks fast and absorbs flavors well. Tofu is great for a plant-based option. Both are tasty!
For cooking, you can oven-bake or broil your skewers. Baking takes about 15-20 minutes at 400°F (200°C). Broiling will take less time, around 8-10 minutes, so watch them closely.
Flavor Enhancements
To spice things up, consider adding cayenne pepper or paprika to your marinade. Both will give a nice kick! If you prefer a fresh twist, try adding herbs like parsley or mint. They bring brightness to your dish.
Experiment with these variations to find your favorite combo. Enjoy the process of creating something special!
Storage Info
Storing Leftovers
To keep your coconut lime chicken skewers fresh, follow these steps:
– Refrigeration: Place leftover skewers in an airtight container. Store them in the fridge for up to 3 days. This keeps the chicken moist and flavorful.
– Freezing: If you want to save them longer, freeze the skewers. Wrap each one in plastic wrap and place them in a freezer bag. They can last up to 3 months in the freezer. When you’re ready to eat, just thaw them in the fridge overnight before reheating.
Reheating Options
When it’s time to enjoy your leftovers, reheating is key. Here’s how to do it safely:
– Microwave Method: Place the skewers on a microwave-safe plate. Heat in 30-second intervals until warm. This keeps them juicy.
– Oven Method: Preheat your oven to 350°F (175°C). Place the skewers on a baking sheet and cover with foil. Heat for about 10 minutes. This method helps to maintain their texture.
– Grill Method: For the best flavor, reheat on the grill. Just a few minutes on each side will bring back that great grilled taste.
FAQs
How long should I marinate coconut lime chicken skewers?
You should marinate the chicken for at least 1 hour. This allows the flavors to soak in. For the best taste, aim for 4 hours. Longer marinating adds more depth to the flavor, making each bite delicious.
Can I use coconut cream instead of coconut milk?
Yes, you can use coconut cream if you want a richer taste. Coconut cream will give your skewers a thicker texture. Just keep in mind that this will make the marinade sweeter and creamier.
What can I serve with coconut lime chicken skewers?
You can serve various side dishes with your skewers. Here are some great options:
– Rice: Coconut rice pairs well for a tropical touch.
– Salad: A fresh green salad with lime vinaigrette works nicely.
– Vegetables: Grilled veggies like bell peppers and zucchini add color and flavor.
– Dipping Sauces: Try a spicy mango salsa or a tangy yogurt dip.
These sides will enhance the meal and impress your guests!
You’ve learned how to make tasty coconut lime chicken skewers. We covered the key ingredients, like chicken breast and coconut milk. You saw the importance of marinating and grilling tips to ensure juicy chicken. Variations let you use shrimp or tofu for your skewers, engaging your creativity. Storage and reheating advice helps keep your leftovers fresh.
Now, you can enjoy delicious meals with ease. Have fun experimenting with flavors and presentations! Your next gathering will be a hit with these skewers on the gril

Coconut Lime Chicken Skewers
Ingredients
- 1 lb chicken breast, diced into 1-inch cubes
- 1 cup coconut milk
- 2 lime zest and juice
- 2 tablespoons honey
- 1 tablespoon soy sauce
- 2 cloves garlic, finely minced
- 1 teaspoon fresh ginger, grated
- to taste salt and freshly ground pepper
- 1 4 cup fresh cilantro, chopped (for garnish)
- Wooden or metal skewers
Instructions
- In a large mixing bowl, combine the coconut milk, lime zest, lime juice, honey, soy sauce, minced garlic, grated ginger, salt, and pepper. Whisk the mixture thoroughly until well blended.
- Carefully place the cubed chicken breast into the marinade, making sure each piece is fully coated. Cover the bowl with plastic wrap or a lid and refrigerate for at least 1 hour. For optimal flavor, marinate for 4 hours.
- If you are using wooden skewers, soak them in water for 30 minutes to prevent them from burning on the grill. Preheat your grill or grill pan to medium heat for even cooking.
- Take the marinated chicken and thread the cubes onto the skewers, leaving a little bit of space between each piece to allow for even cooking.
- Place the skewers on the preheated grill. Cook for approximately 10-12 minutes, turning the skewers occasionally. The chicken should be cooked all the way through and have beautiful grill marks. Use a meat thermometer to ensure the internal temperature reaches 165°F (75°C).
- After grilling, carefully remove the skewers from the grill. Sprinkle the fresh cilantro generously over the top. Serve your skewers with additional lime wedges on the side for a burst of freshness.
![To make these crispy fish tacos, gather these key items: - 1 lb white fish fillets (cod or tilapia work great) - 1 cup all-purpose flour - 1 cup cornmeal - 1 teaspoon paprika - 1/2 teaspoon cayenne pepper - 1/2 teaspoon garlic powder - 1/2 teaspoon salt - 1/4 teaspoon black pepper - 2 large eggs, beaten - Vegetable oil, for frying - 8 small corn tortillas The toppings add flavor and texture to your tacos. Here are my favorites: - 1/2 cup red cabbage, thinly sliced - 1 avocado, sliced - Fresh cilantro leaves, for garnish - Lime wedges, for serving To round out your meal, consider these sides: - Fresh salsa for a zesty kick - A drizzle of spicy crema for creaminess - Mexican rice for a hearty addition These ingredients make crispy fish tacos a fun and tasty weeknight meal. For the full recipe, be sure to check out the details above! Start by drying the fish fillets with paper towels. This step helps the coating stick better. Cut the fish into strips that are about 1 inch wide. This size cooks evenly and fits nicely in the tacos. In a medium bowl, mix the flour, cornmeal, paprika, cayenne pepper, garlic powder, salt, and black pepper. Stir until well combined. In another bowl, beat the eggs until smooth. This egg wash will help the coating stick. Heat about 1 inch of vegetable oil in a large skillet over medium-high heat. Check if the oil is hot by dropping in a pinch of the flour mix; if it sizzles, it's ready. Dip each fish strip into the egg wash, letting excess drip off. Then coat it in the flour mixture, pressing lightly to ensure it sticks. Place the coated fish in the hot oil, frying in batches to prevent overcrowding. Cook for 3-4 minutes on each side until golden brown. Transfer the fried fish to a plate lined with paper towels to absorb extra oil. Warm each corn tortilla in a dry skillet for about 30 seconds on each side. This makes them soft and easy to fold. For each tortilla, place 2-3 pieces of crispy fish. Top with sliced red cabbage, avocado, and fresh cilantro. Don’t forget to serve the tacos with lime wedges. A squeeze of lime adds a bright, fresh flavor. For the full recipe, you can check the complete details above. To get that perfect crunch, follow these steps: - Dry the Fish: Start by patting the fish fillets with paper towels. This removes moisture and helps them get crispy. - Use Cornmeal: Mixing cornmeal with flour gives extra texture and crunch. It makes the coating thicker and crispier. - Hot Oil: Make sure the oil is hot enough before frying. If it’s too cool, the fish will absorb oil and turn soggy. - Don’t Overcrowd: Fry the fish in batches. Too many pieces at once cools the oil and affects crispiness. Here are some common mistakes you should steer clear of: - Skipping the Egg Wash: The egg wash helps the coating stick. Don’t skip this step! - Not Heating the Oil Properly: Always test the oil. If it’s not hot, you’ll end up with greasy fish. - Using Wet Fish: Wet fish won’t fry well. Always dry them before coating. - Flipping Too Soon: Let the fish cook fully on one side before flipping. This helps it stay intact and crispy. Enhance your tacos with these tasty garnishes: - Fresh Cilantro: Adds a burst of freshness and color. - Avocado: Creamy avocado pairs well with crispy fish. - Lime Wedges: A squeeze of lime brightens up the flavors. - Salsa or Crema: A drizzle of spicy crema or your favorite salsa adds flavor and moisture. For the full recipe, check out [Full Recipe]. {{image_4}} If you want to try a different protein, shrimp works great. Just peel and devein before cooking. You can also use chicken strips. They need a bit more time to cook, so adjust frying time. Another option is tofu for a different texture. Press it to remove water and cut into strips. For a vegetarian twist, use cauliflower. Cut it into small florets, coat, and fry. It gets nice and crispy. If you want a vegan option, tempeh is fantastic. Slice it thin and marinate for flavor before frying. Just make sure to use a plant-based egg wash or a mixture of flour and water. To boost flavor, add lime zest to the coating mix. It brightens each bite. For spice, increase the cayenne pepper in the coating. You can also create a spicy sauce for drizzling on top. Mix yogurt or mayo with hot sauce for a creamy kick. Fresh herbs like cilantro or parsley can add freshness too. These variations keep the dish exciting, ensuring you can enjoy crispy fish tacos in many ways! Try out the full recipe to explore these options. To keep your crispy fish tacos fresh, store leftovers in an airtight container. Place the fish in one container and the toppings in another. This keeps the fish crispy and the toppings fresh. You can also wrap the tortillas in foil for better storage. To reheat, use the oven or an air fryer for best results. Preheat your oven to 350°F (175°C). Place the fish on a baking sheet and bake for about 10 minutes. If using an air fryer, heat it to 350°F (175°C) and fry for 5 minutes. This way, the fish stays crispy. Cooked fish lasts about 2-3 days in the fridge. Fresh toppings, like cabbage and avocado, can last 1-2 days. Store each item separately. If you have leftover tortillas, they can stay fresh in a sealed bag for up to a week. Always check for signs of spoilage before using any of the ingredients. For the full recipe, check the complete list of ingredients. I recommend using white fish like cod or tilapia. These fish have a mild flavor and cook well. They stay tender inside while getting crispy on the outside. Other good options include haddock or snapper. Yes, you can prepare the fish ahead of time. Cut the fish into strips and coat them. Keep the coated fish in the fridge for up to an hour. This helps the coating stick better when you fry them. If you can't find corn tortillas, flour tortillas are a good choice. You can also use lettuce leaves for a low-carb option. They add a nice crunch and freshness to your tacos. Crispy fish tacos can be gluten-free if you use gluten-free flour. Make sure to check the labels on your ingredients. Corn tortillas are naturally gluten-free, so they work well for this dish. For the best results, use gluten-free breadcrumbs or a gluten-free flour blend for coating the fish. Crispy fish tacos are a fun dish to make at home. We discussed key ingredients, topped it with tasty options, and paired it with sides. The steps from preparing the fish to frying it were simple and clear. Use my tips for crispy results and avoid common mistakes. You can also explore variations for flavors and dietary choices. Proper storage will keep your tacos fresh. Now, enjoy making and sharing your crispy fish tacos! They’re sure to impress.](https://goldendishy.com/wp-content/uploads/2025/06/e15c4a6f-d152-43b4-ae39-d2f9004115b6-768x768.webp)

![To make the spicy honey garlic shrimp, gather these items: - 1 pound large shrimp, peeled and deveined - 3 tablespoons honey - 3 tablespoons low-sodium soy sauce - 4 cloves garlic, finely minced - 1 tablespoon extra virgin olive oil - 1 teaspoon red pepper flakes (adjust according to your spice tolerance) - 1 teaspoon freshly grated ginger - 2 green onions, finely chopped (for garnish) - Toasted sesame seeds (for garnish) - Salt and freshly ground black pepper to taste You can swap some ingredients if needed: - Instead of honey, try maple syrup for a different sweetness. - Use tamari if you need a gluten-free option for soy sauce. - For garlic, garlic powder can work in a pinch. - You can replace shrimp with chicken or tofu if you prefer. A serving of spicy honey garlic shrimp has about: - Calories: 220 - Protein: 25g - Fat: 8g - Carbohydrates: 10g - Fiber: 0g - Sodium: 600mg This dish offers a good amount of protein while keeping the carbs low. The honey adds sweetness, and the shrimp provide healthy nutrients. For the full recipe, check the link provided. To start, gather your ingredients. This makes cooking easier and faster. You need: - 1 pound large shrimp, peeled and deveined - 3 tablespoons honey - 3 tablespoons low-sodium soy sauce - 4 cloves garlic, finely minced - 1 tablespoon extra virgin olive oil - 1 teaspoon red pepper flakes - 1 teaspoon freshly grated ginger - 2 green onions, finely chopped (for garnish) - Toasted sesame seeds (for garnish) - Salt and freshly ground black pepper to taste In a medium bowl, mix the honey, soy sauce, minced garlic, red pepper flakes, and ginger. Whisk it well. Set this aside to let the flavors blend. Heat the olive oil in a large skillet over medium-high heat. Wait until it shimmers. While it heats, season the shrimp with salt and black pepper. Add the shrimp in a single layer in the skillet. Cook for about 2-3 minutes without stirring. This helps them turn pink and golden on one side. Use tongs to flip the shrimp over. Pour the honey garlic sauce over them. Sauté for another 1-2 minutes. The shrimp should be fully cooked and glossy with sauce. Remove the skillet from heat. Sprinkle the green onions and sesame seeds over the shrimp. This adds flavor and crunch. If you use smaller shrimp, reduce the cooking time. Cook them for 1-2 minutes on each side. For jumbo shrimp, increase cooking time to about 3-4 minutes per side. Always check if they turn pink and are opaque. This means they are fully cooked. Enjoy this spicy honey garlic shrimp dish, and don’t forget to check the Full Recipe for more details! To get the best shrimp, look for large, firm shrimp. They should feel smooth and have a fresh smell. Avoid shrimp that smell like ammonia or are slimy. Fresh shrimp have a slight sheen and a pink color. If buying frozen shrimp, check for ice crystals. This means they may have thawed and refrozen. Cook shrimp quickly using high heat. This keeps them juicy and tender. Start with a hot pan and add oil. Add shrimp in a single layer; avoid crowding. Cook for just 2-3 minutes on one side until pink. Flip and then add your sauce. Cook for another 1-2 minutes until cooked through. To boost flavor, add fresh herbs like cilantro or parsley. You can also use lime juice for a zesty kick. For extra heat, toss in more red pepper flakes. Want more depth? Try adding a splash of rice vinegar or a bit of sesame oil. These small changes can make your shrimp pop with flavor. For the full recipe, check out the [Full Recipe]. {{image_4}} You can easily add veggies to this dish. Bell peppers, snap peas, or broccoli work great. Start by sautéing the vegetables in the skillet before adding the shrimp. This way, they cook together perfectly. Toss them in with the shrimp and sauce for a balanced meal. The veggies soak up the sweet and spicy sauce, making each bite even better. Grilling is a fantastic way to enjoy this shrimp. Marinate the shrimp in the honey garlic sauce for about 30 minutes. Preheat your grill to medium heat. Skewer the shrimp and grill for 2-3 minutes on each side. You’ll get a nice char and smoky flavor. This method is perfect for summer cookouts or outdoor gatherings. Turn this dish into tacos for a fun twist. Use corn tortillas or flour ones, whichever you prefer. Cook the shrimp as usual, then fill each taco with them. Top with cabbage, avocado, and a squeeze of lime. The crunch from the cabbage and creaminess from the avocado balance the heat. Enjoy these tacos with your friends for a tasty meal. For the full recipe, check the section above. To keep your spicy honey garlic shrimp fresh, let it cool first. Place the shrimp in an airtight container. Store it in the fridge for up to three days. This way, you can enjoy it again later. When you're ready to eat the leftovers, reheat them gently. Use a skillet over medium heat. Add a splash of water or broth to keep the shrimp moist. Stir it often so it heats evenly. This will help maintain its flavor and texture. If you want to store shrimp longer, freezing is a great option. First, cool the shrimp completely. Then, place it in a freezer-safe bag. Squeeze out any air before sealing it. You can keep it in the freezer for up to three months. When you're ready to eat, thaw it overnight in the fridge. Reheat as mentioned above for the best taste. For the full recipe, check out the details to make this tasty dish! The best way to peel shrimp is to start at the head. Hold the body and gently pull off the shell. You can also pinch the tail to detach it. To devein, make a shallow cut along the back. Use a small knife or toothpick to pull out the dark vein. Rinse the shrimp under cold water after. This step helps clean them well. Yes, you can make Spicy Honey Garlic Shrimp in advance. Cook the shrimp and sauce, then let them cool. Store them in an airtight container in the fridge. They will stay fresh for up to two days. When ready to serve, reheat them in a skillet. This helps keep their flavor bright and tasty. You can serve Spicy Honey Garlic Shrimp with several delicious sides. Steamed jasmine rice is a classic choice. It soaks up the sauce well. You can also try it with quinoa for a healthier option. Fresh veggies or a crisp salad add color and crunch. For more details on the full recipe, check out the Full Recipe section. In this blog post, we explored the complete guide to making Spicy Honey Garlic Shrimp. We covered the ingredients, including substitutions and nutritional info. You learned step-by-step instructions for prep and cooking, adjusted for shrimp sizes. The tips shared help you choose the best shrimp and achieve perfect flavor. We also discussed tasty variations and storage tips for leftovers. Remember, you can find the full recipe for Spicy Honey Garlic Shrimp linked in this post. Enjoy cooking and sharing your delicious dish!](https://goldendishy.com/wp-content/uploads/2025/06/cf05c4bf-72ca-4483-afe2-f2d6fc570350-768x768.webp)
![To make Garlic Butter Shrimp Skewers, you'll need: - 1 pound large shrimp, peeled and deveined - 4 tablespoons unsalted butter - 4 cloves garlic, minced - 1 teaspoon red pepper flakes (adjust based on desired spiciness) - 1 tablespoon fresh parsley, finely chopped - 1 tablespoon freshly squeezed lemon juice - Salt and pepper to taste - 1 teaspoon smoked paprika - Skewers (either wooden, soaked, or metal) When choosing shrimp, fresh is often best. Look for shrimp that smell like the ocean, not fishy. The shells should be shiny and clean. If fresh shrimp isn’t available, frozen shrimp is a great option. Frozen shrimp can be just as good if they are properly handled. - Check for a firm texture. - Avoid shrimp that are mushy or have black spots. - If buying frozen, look for shrimp with no added ingredients. Using quality ingredients makes a big difference. For butter, I recommend brands like Kerrygold or Plugrá. They offer rich flavor that enhances the dish. For spices, consider McCormick or Penzeys. They have high-quality spices that bring out the best in your garlic butter. Using fresh herbs, like parsley, also boosts the flavor. Look for herbs that are bright and fragrant. This ensures your Garlic Butter Shrimp Skewers taste amazing! For the full recipe, check out the complete instructions above. Start by gathering your ingredients. If you use wooden skewers, soak them in water for at least 30 minutes. This step stops them from burning. While they soak, you can mince the garlic. Use a sharp knife to chop the garlic finely. The smaller the pieces, the better the flavor will blend. Next, melt 4 tablespoons of unsalted butter in a medium saucepan over medium heat. As it melts, add the minced garlic and red pepper flakes. Stir it often for about 1-2 minutes. Watch closely; you want the garlic fragrant but not browned. Once ready, remove the pan from heat. Add 1 tablespoon of lemon juice and chopped parsley. Then season with salt, pepper, and smoked paprika to taste. Mix well to create a rich garlic butter flavor. Now, it’s time to grill! Add the shrimp to a large bowl. Pour half of the garlic butter mixture over them. Toss gently to coat each shrimp. Thread 4-5 shrimp onto each skewer. Preheat your grill or grill pan over medium-high heat. Lightly grease the grill with oil. This helps prevent sticking. Place the skewers on the grill. Cook for about 2-3 minutes on each side. You’ll know they are done when the shrimp turn pink and opaque. Brush on some of the reserved garlic butter mixture while grilling for extra flavor. Once cooked, drizzle any remaining garlic butter over the skewers before serving. This dish is ready to impress! For the full recipe, check out the section above. To make perfect shrimp skewers, focus on time and heat. Grill the shrimp for about 2-3 minutes on each side. Use medium-high heat to get a nice sear. If your grill is too hot, the shrimp may cook too fast and become tough. Always keep an eye on them. One common mistake is not soaking wooden skewers. Soak them for at least 30 minutes. This stops them from burning. Another mistake is overcooking the shrimp. They should be pink and opaque when done. If they curl too much, they may be overcooked. Lastly, don’t forget to brush on more garlic butter while grilling. It boosts the flavor! You can easily enhance the flavor of your shrimp skewers. Add fresh herbs like basil or cilantro for a burst of freshness. Consider using spices like cumin or coriander for a warm twist. A dash of lemon zest can also brighten the dish. Feel free to play around with flavors to find your favorite mix. For a detailed recipe, check out the [Full Recipe]. {{image_4}} You can swap shrimp for other proteins. Chicken is a great choice. Use boneless, skinless chicken breast. Cut it into bite-sized pieces. Just marinate it in the same garlic butter mix. You can also use fish. Salmon or swordfish work well. They add a rich flavor. Follow the same steps for grilling. Adding veggies to your skewers makes a full meal. Bell peppers, zucchini, and cherry tomatoes are perfect. They add color and crunch. Cut all veggies into similar sizes. This way, they cook evenly with the shrimp. Thread them onto the skewers with the shrimp. This adds a tasty twist to your dish. You can change up the flavors easily. For a spicy kick, add more red pepper flakes. If you love herbs, try fresh basil or thyme. Mix these herbs into the garlic butter. For a citrus twist, add lime juice instead of lemon. You can even add zest from the citrus fruits. This will bring a fresh taste to your skewers. Enjoy experimenting with different flavors from the Full Recipe! Store leftover shrimp skewers in an airtight container. Let them cool to room temperature first. Place a piece of parchment paper between layers to avoid sticking. Keep them in the fridge for up to three days. To reheat, gently warm the skewers in a skillet over low heat. Add a little butter or oil to keep them moist. Heat for about 3-5 minutes until warm. You can also use a microwave, but be careful not to overcook. Heat for 30 seconds at a time, checking often. If you want to freeze shrimp skewers, first wrap them tightly in plastic wrap. Then, place them in a freezer bag. Remove as much air as possible. They can last up to three months in the freezer. When ready to eat, thaw in the fridge overnight before reheating. For the full recipe, check out the details above. Enjoy your garlic butter shrimp skewers! The best skewers for grilling shrimp are metal or soaked wooden skewers. Metal skewers handle high heat well and are reusable. Soaking wooden skewers for at least 30 minutes prevents them from burning. Both types work great for Garlic Butter Shrimp Skewers. Shrimp are fully cooked when they turn pink and opaque. They also curl into a "C" shape. If they look gray or have a rubbery texture, they need more time. For the best results, grill shrimp for about 2-3 minutes on each side. Yes, you can prepare Garlic Butter Shrimp Skewers ahead of time. Marinate the shrimp in the garlic butter mixture and store them in the fridge. They can stay fresh for up to 24 hours. Just grill them right before serving for the best taste. To sum up, this guide covered Garlic Butter Shrimp Skewers in detail. We explored key ingredients, cooking steps, and tips for the perfect dish. Remember, choosing good shrimp and seasoning well makes a difference. Enjoy grilling with variations like chicken or veggies to switch things up. Proper storage ensures your leftovers stay tasty. Follow these steps for delicious results every time. Your journey to perfect skewers starts here—enjoy every bite you take!](https://goldendishy.com/wp-content/uploads/2025/06/728f68f4-b8bf-4bba-b9a3-49ab34a89912-768x768.webp)