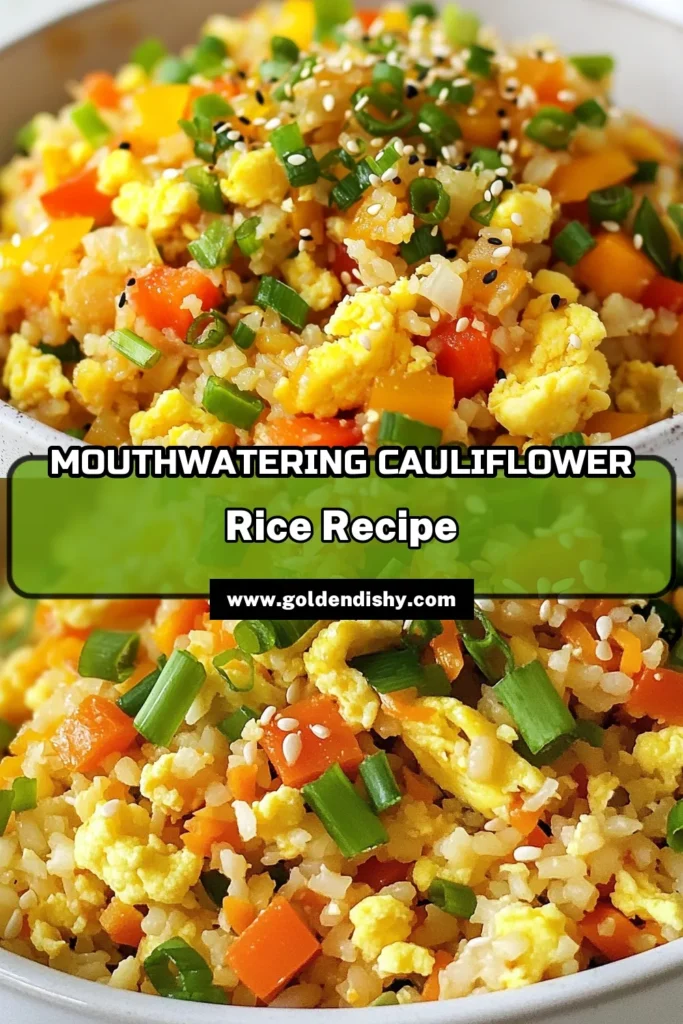
Cauliflower Fried Rice Flavorful and Healthy Recipe

Are you ready to transform your meals with a healthy twist? In this article, I’ll guide you through making delicious Cauliflower Fried Rice. Packed with fresh veggies and flavors, this dish is easy to whip up. It’s not just light on carbs but also full of taste! Whether you’re a beginner or a seasoned cook, you’ll enjoy the step-by-step instructions and tips. Let’s get cooking!
Why I Love This Recipe
- Healthy Alternative: This cauliflower fried rice is a lighter, low-carb alternative to traditional fried rice, making it perfect for anyone looking to cut calories while still enjoying a delicious meal.
- Quick and Easy: With a total preparation and cooking time of just 20 minutes, this recipe is ideal for busy weeknights when you need a meal on the table fast.
- Customizable: You can easily swap in your favorite vegetables or proteins, allowing you to tailor the dish to your taste preferences or what you have on hand.
- Flavor Packed: The combination of sesame oil, garlic, and ginger infuses the cauliflower rice with a rich, savory flavor that makes every bite enjoyable.
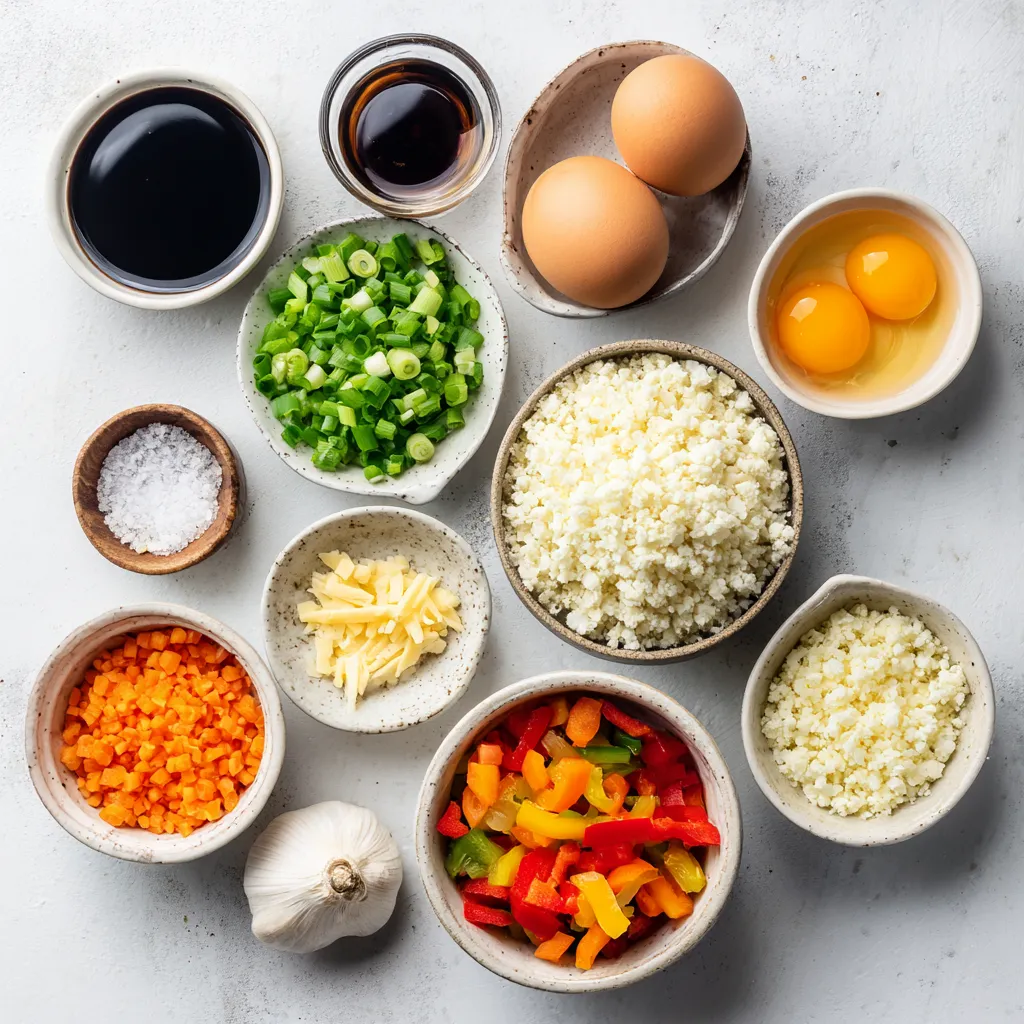
Ingredients
Main Ingredients for Cauliflower Fried Rice
– Cauliflower: Head to Rice Transformation
Cauliflower is the star of this dish. It transforms into a rice-like texture with a food processor. This veggie is low in carbs and high in fiber. It makes fried rice lighter and healthier.
– Fresh Vegetables: Carrots, Bell Peppers, and Green Onions
I love adding fresh veggies. Diced carrots add sweetness and crunch. Bell peppers bring color and flavor. Green onions offer a mild, fresh taste that brightens the dish.
– Essential Aromatics: Garlic and Ginger
Garlic and ginger create a wonderful aroma. They add depth and warmth to the dish. Minced garlic brings a sharp flavor, while grated ginger adds a slight zing.
Seasonings and Sauces
– Soy Sauce or Tamari: Flavor Base
Soy sauce is a key ingredient. It gives the dish a savory, umami flavor. Tamari is a great gluten-free option. Use it to keep the taste strong and satisfying.
– Rice Vinegar: Extra Flavor Boost
A splash of rice vinegar adds brightness. It balances the savory notes and enhances the overall flavor. This touch makes each bite pop with freshness.
– Optional Add-ins: Peas, Corn, or Other Vegetables
You can mix in peas or corn for extra sweetness. Feel free to add any favorite veggies. This flexibility makes the dish fun and customizable.
Protein Options
– Eggs: Traditional or Substitutes
Beaten eggs are classic in fried rice. They add protein and richness. You can swap them with a plant-based egg substitute for a vegan version.
– Adding Chicken, Tofu, or Shrimp for Extra Protein
Boost the protein by adding cooked chicken, tofu, or shrimp. These options make the dish hearty and filling. Choose what you like best for a personal touch.

Step-by-Step Instructions
Preparation of Cauliflower
To start, trim the outer leaves and thick stem of the cauliflower. Cut the head into smaller florets. Use a food processor to pulse these florets. You want them to look like rice grains. This texture makes the dish light and fluffy. Set the cauliflower rice aside for later use.
Cooking the Vegetables
Next, heat a large skillet or wok over medium-high heat. Pour in the sesame oil. Allow it to warm until it shimmers gently. Add the finely chopped green onions, diced carrot, and bell pepper. Stir-fry these veggies for about 3-4 minutes. You want them to soften and show bright colors.
Now, it’s time to add aromatics. Introduce the minced garlic and grated ginger into the mix. Sauté them for another minute. This step fills your kitchen with a delicious aroma.
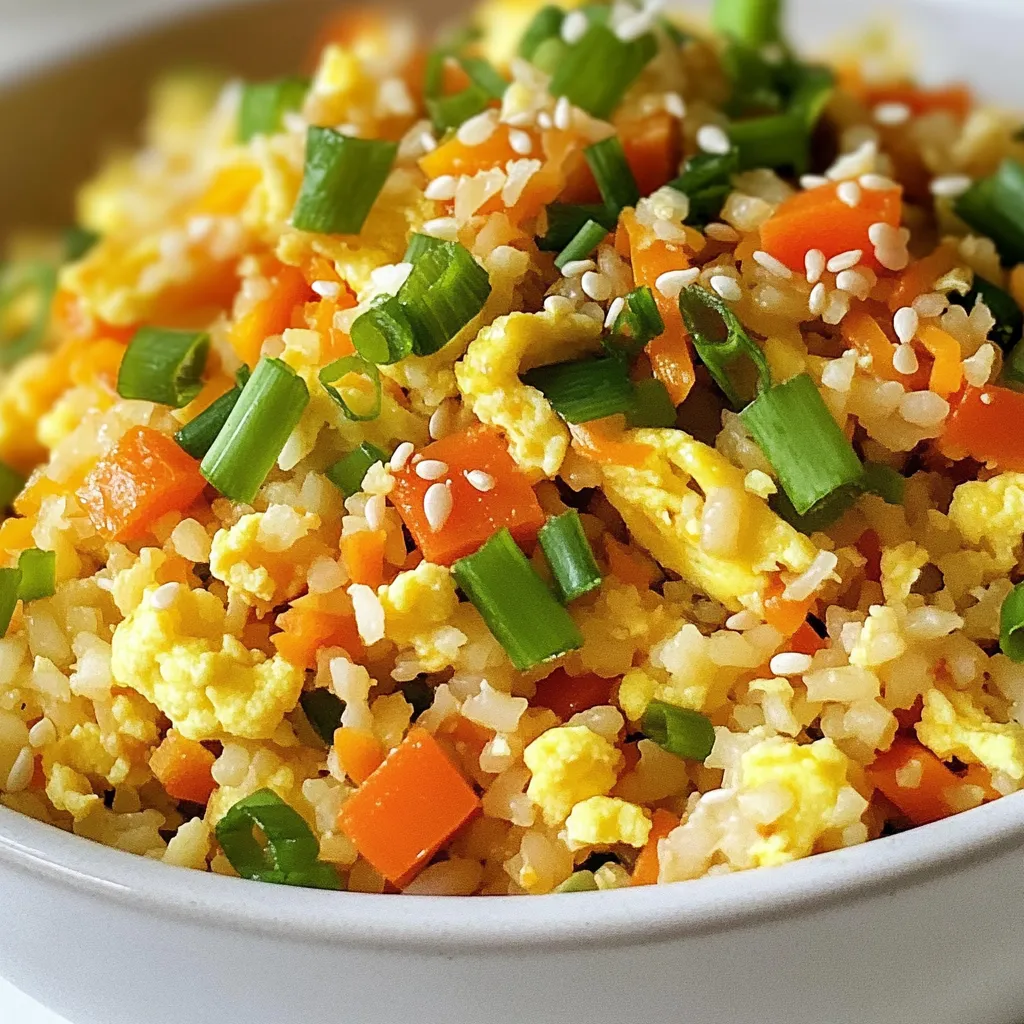
Completing the Fried Rice
Push the vegetable mixture to one side of the skillet. Create a clear area for the eggs. Pour the beaten eggs into this space and scramble them gently. Cook until they are firm and no longer runny. Then, combine them with the veggies.
Next, incorporate the cauliflower rice into the skillet. Mix all the ingredients gently. Make sure every grain of cauliflower gets coated with flavor.
Now, drizzle soy sauce and rice vinegar over the mixture. Stir everything well to combine. Season with salt and pepper to your taste. Let it cook for about 5-6 minutes. Stir occasionally, ensuring the cauliflower rice gets tender but still has a slight bite.
If you want more veggies, fold in peas or corn. Cook for an additional 2 minutes to heat them through. Enjoy your delicious cauliflower fried rice!
Tips & Tricks
Achieving the Perfect Texture
How to Prevent Soggy Fried Rice
To keep your cauliflower fried rice from getting soggy, use dry cauliflower. After processing, let it sit for a few minutes. This helps remove excess moisture. Also, cook over high heat. This method ensures that everything cooks quickly, so the rice stays firm.
Choosing the Right Cauliflower Freshness
Fresh cauliflower makes a big difference. Look for heads that are firm and have bright green leaves. Avoid any that show signs of browning or wilting. A fresh head of cauliflower will give you the best texture.
Flavor Enhancements
Experimenting with Seasonings
Don’t be afraid to play with spices! Adding a pinch of chili flakes can give your dish some heat. You can also try adding cumin or smoked paprika for a different twist. These flavors make each bite exciting.
Adding Fresh Herbs for Extra Flavor
Fresh herbs like cilantro or basil can brighten the dish. Chop them finely and sprinkle them on top just before serving. This small step adds a burst of freshness that elevates the meal.
Cooking Tools and Equipment
Best Skillet or Wok to Use
A large skillet or wok works best for frying the rice. It should have a flat bottom to ensure even heat. Non-stick surfaces help prevent sticking, making it easier to stir and toss the ingredients.
Recommended Food Processor for Ricing Cauliflower
When ricing cauliflower, a good food processor makes it fast. Look for a model with a strong motor. It should easily chop the florets into small bits. This ensures uniform size for even cooking.
Pro Tips
- Use Fresh Cauliflower: Always choose a firm and fresh head of cauliflower for the best texture and flavor in your fried rice.
- Don’t Overcook the Cauliflower: Keep a close eye on the cauliflower rice while cooking; it should be tender yet retain a slight crunch for the best eating experience.
- Experiment with Vegetables: Feel free to add your favorite vegetables, such as snap peas or broccoli, to customize the dish and add more nutrition.
- Perfect the Seasoning: Taste as you go! Adjust the soy sauce and seasoning to your preference to balance the flavors perfectly.

Variations
Vegetarian Options
Substituting Eggs with Plant-Based Alternatives
If you want a vegan dish, you can skip the eggs. Use a mix of chickpea flour and water instead. This mix will help bind your fried rice and add protein. It also gives a nice texture.
Adding Tofu for a Protein Boost
Tofu is a great choice for extra protein. Cube firm tofu and sauté it in the skillet before adding the cauliflower rice. This adds a lovely texture and flavor to your dish.
Additional Vegetables to Include
Seasonal Veggies for Flavor Variation
Add seasonal vegetables for new tastes. Think about using zucchini in summer or root veggies in winter. Each season brings fresh flavors that can elevate your dish.
Creative Add-ins: Mushrooms, Broccoli, and More
Mushrooms and broccoli are fantastic choices. They add earthiness and crunch. You can also try bell peppers, peas, or spinach for added nutrients and color.
Flavor Profiles
Making Spicy Cauliflower Fried Rice
Want a kick? Add red pepper flakes or sriracha for heat. You can mix these into the soy sauce for an even spread of spice. It adds a fun twist to your dish.
Sweet and Savory Combinations
Mix sweet and savory flavors for something unique. A dash of pineapple juice or a sprinkle of coconut sugar can elevate the taste. This combo brings a delightful balance to your meal.
Storage Info
How to Store Leftovers
– Refrigeration Guidelines: Cool the fried rice to room temperature. Store in an airtight container. It stays fresh for up to 4 days in the fridge.
– Best Storage Containers to Use: Use glass or BPA-free plastic containers. These help keep your food safe and reduce odors.
Reheating Methods
– Microwave vs. Stovetop: Pros and Cons: The microwave heats quickly but may make the rice soggy. The stovetop takes longer but keeps the texture nice.
– Tips for Preserving Texture During Reheating: Add a splash of water or oil when using the microwave. Stir often on the stovetop to avoid sticking.
Freezing Cauliflower Fried Rice
– Instructions for Freezing and Thawing Effectively: Cool the fried rice first, then portion it into freezer bags. Lay them flat for easy stacking. Thaw in the fridge overnight before reheating.
– Best Practices for Long-Term Storage: Label the bags with the date. Use within 2-3 months for the best taste.
FAQs
Can I use frozen cauliflower rice?
Yes, you can use frozen cauliflower rice. It saves time and is convenient. Frozen cauliflower rice is often pre-processed, making it easy to cook. However, fresh cauliflower rice has a better texture. Frozen rice can become mushy if overcooked. When using frozen rice, cook it straight from the freezer. No need to thaw first.
How many carbs are in cauliflower fried rice?
Cauliflower fried rice is low in carbs. One serving contains about 10 grams of carbs. This is much lower than traditional fried rice. The cauliflower replaces rice, cutting down on carbs. It also gives you fiber and vitamins. This dish is great for low-carb diets.
What can I substitute for soy sauce?
You can substitute soy sauce with tamari for a gluten-free option. Tamari is similar in taste and works well in this recipe. If you want a low-sodium option, try coconut aminos. This adds a sweet, savory flavor without extra salt. You can also use homemade sauces made from broth and spices.
Cauliflower fried rice is a simple, tasty dish. You can transform cauliflower into a rice alternative with fresh veggies, aromatics, and great seasonings. There are many protein choices, like eggs or tofu, to make it filling.
As you cook, keep those tips in mind for the best texture and flavor. Explore various vegetables and seasonings to create your own version. Store leftovers properly, and enjoy this healthy dish multiple times. With these steps, you’ll master cauliflower fried rice and impress anyone who tries i

Cauliflower Fried Rice Delight
Ingredients
- 1 medium head cauliflower, processed into a rice-like texture
- 2 tablespoons sesame oil
- 3 pieces green onions, finely chopped
- 1 small carrot, peeled and diced
- 1 piece bell pepper, diced
- 3 cloves garlic, minced
- 1 inch fresh ginger, grated
- 2 large eggs, beaten (or egg substitute)
- 2 tablespoons soy sauce (or tamari for gluten-free)
- 1 tablespoon rice vinegar
- to taste salt and pepper
- 0.5 cup peas, corn, or any favorite vegetables (optional)
Instructions
- Prepare the Cauliflower: Begin by removing the outer leaves and thick stem from the cauliflower. Cut the head into smaller florets. Use a food processor to pulse the florets until they achieve a rice-like consistency. Set the cauliflower rice aside for later use.
- Heat the Skillet: Place a large skillet or wok over medium-high heat. Pour in the sesame oil, allowing it to warm for about a minute until it shimmers gently.
- Sauté Vegetables: Add the finely chopped green onions, diced carrot, and bell pepper to the hot skillet. Stir-fry these ingredients for approximately 3-4 minutes, or until the vegetables begin to soften and become vibrant.
- Add Aromatics: Introduce the minced garlic and grated ginger into the mix. Continue to sauté for another minute, allowing the fragrant aroma to fill the kitchen.
- Scramble the Eggs: Push the vegetable mixture to one side of the skillet to create a clear area. Pour the beaten eggs into this space and scramble them gently with a spatula. Cook until they are fully set and no longer runny, then combine with the vegetable mixture.
- Incorporate Cauliflower Rice: Add the processed cauliflower rice to the skillet. Gently mix all ingredients together until well-integrated, ensuring every grain of cauliflower is coated with flavor.
- Season and Finish Cooking: Drizzle the soy sauce and rice vinegar over the fried rice. Stir to combine everything thoroughly. Season with salt and pepper according to your taste. Allow the mixture to cook for an additional 5-6 minutes, stirring occasionally, until the cauliflower rice is tender yet maintains a slight bite.
- Optional Vegetables: If desired, fold in the optional vegetables, such as peas and corn. Cook for an additional 2 minutes, allowing them to heat through.


![- 2 cups cooked rice (white or brown) - 1 pound boneless, skinless chicken breasts, diced - 2 cups broccoli florets (fresh or frozen) - 1 can (10.5 oz) cream of mushroom soup (or any creamy soup of your choice) - 1 cup shredded cheddar cheese, divided - 1/2 cup milk - 1 teaspoon garlic powder - 1/2 teaspoon onion powder - 1 teaspoon dried thyme - Salt and pepper to taste - 1/2 cup breadcrumbs (optional, for topping) - 2 tablespoons olive oil I love using fresh ingredients when I make this casserole. The chicken gives it protein. Broccoli adds a nice crunch and color. You can use frozen broccoli if fresh isn’t available. It works just as well! I recommend using cream of mushroom soup for a rich flavor. You can swap it with any creamy soup you enjoy. The cheddar cheese is key for that melty goodness on top. Split the cheese; half goes in the mix, and half stays for the topping. For seasoning, garlic powder and dried thyme bring out the best taste. Adjust salt and pepper to fit your palate. If you want a crunchy top, add breadcrumbs for texture. Drizzle olive oil to keep it all moist and flavorful. This combination makes a cozy, tasty meal. You’ll love how easy it is to prepare. Check the [Full Recipe] for all the steps to make this dish shine! First, preheat your oven to 350°F (175°C). This step is key. A hot oven helps your casserole cook evenly. While it heats, prepare your baking dish. Grease a 9x13-inch dish with olive oil or cooking spray. This prevents sticking and makes for easy cleanup. Next, we cook the chicken. In a large skillet, heat 2 tablespoons of olive oil over medium heat. Once the oil is hot, add the diced chicken. Season the chicken with 1 teaspoon of garlic powder, 1/2 teaspoon of onion powder, 1 teaspoon of dried thyme, and salt and pepper to taste. Sauté it for about 5-7 minutes. Stir the chicken often to ensure even cooking. You want it to be fully cooked and lightly browned. In a large mixing bowl, combine your cooked rice, steamed broccoli florets, a can of cream of mushroom soup, and 1/2 cup of milk. Add half of your shredded cheddar cheese too. Mix these ingredients well until the mixture looks creamy. This step is important. A well-mixed casserole ensures every bite is full of flavor. Once your chicken is cooked, add it to the rice and broccoli mixture. Stir gently to combine everything evenly. Now, it’s time to bake. Spread the chicken and rice mixture in your greased baking dish. Sprinkle the remaining cheddar cheese over the top. If you want a crunchy topping, add 1/2 cup of breadcrumbs. Cover the dish tightly with aluminum foil. This keeps moisture in while baking. Place it in the preheated oven and bake for 25 minutes. After that, carefully remove the foil. Bake for an additional 10-15 minutes. You want the top to be golden brown and the cheese to be bubbling. When it's done, let the casserole rest for about 5 minutes. This helps the layers set before you serve. To make your chicken tender and moist, start with good-quality chicken. Sauté the diced chicken in olive oil over medium heat. Season it well with garlic powder, onion powder, thyme, salt, and pepper. Cook until it is no longer pink. This usually takes about 5-7 minutes. Stir it often for even cooking. For casserole success, preheat your oven to 350°F (175°C) before baking. Cover the dish with foil for the first part of baking. This keeps the dish moist. Remove the foil for the last 10-15 minutes to brown the cheese and breadcrumbs. For an appealing look, garnish your casserole with fresh parsley or chives. This adds a bright color and fresh flavor. You can also use individual ramekins for serving. This makes it easy to serve and adds a cozy touch to your table. Store leftovers in an airtight container in the fridge. They will last up to 3-4 days. If you want to freeze the casserole, wrap it tightly in foil or plastic wrap. It can last up to 3 months in the freezer. When reheating, you have two options: the microwave or the oven. For the microwave, heat in short bursts to avoid drying it out. Stir occasionally to heat evenly. For oven reheating, cover with foil and bake at 350°F (175°C) for about 20 minutes, or until heated through. {{image_4}} For a gluten-free option, swap the cream of mushroom soup with a gluten-free brand. You can also use gluten-free breadcrumbs or skip them altogether. For a low-fat version, cut back on cheese and milk. Use low-fat milk and just half the cheese. This keeps the dish tasty while reducing calories. You can change the flavor by adding different veggies. Carrots and bell peppers work great. They add color and crunch too! If you want a cheese twist, try mozzarella or pepper jack for a spicy kick. Each cheese brings its own unique taste, making each casserole a new experience. Using leftover rotisserie chicken is a smart time-saver. Just shred it and mix it in. For rice, consider quinoa or cauliflower rice for a low-carb option. Cauliflower rice is light and absorbs flavors well. It’s a great way to sneak in more veggies into your meal. Feel free to get creative. This dish is versatile, and you can tailor it to your taste! Chicken Broccoli Rice Casserole shines on its own, but you can enhance your meal with sides. Here are some tasty options: - Garlic Bread: Crisp and buttery, it pairs well with the creamy casserole. - Steamed Vegetables: Lightly steamed carrots or green beans add color and crunch. - Simple Salad: A fresh garden salad with lettuce, tomatoes, and cucumbers balances the rich flavors. For a quick salad, mix leafy greens with olive oil and lemon juice. This adds a refreshing touch to your meal. To complete your dinner, consider drinks that match the flavors of the casserole: - White Wine: A chilled Chardonnay or Sauvignon Blanc complements the dish well. - Sparkling Water: For a non-alcoholic option, sparkling water with lemon is refreshing. For kids, serve some apple juice or lemonade. These drinks are fun and pair nicely with the casserole's flavors. How long does it take to cook chicken in the casserole? It takes about 5 to 7 minutes to cook the chicken in the skillet. You want it cooked through and lightly browned. This step is key for flavor. Once you add the chicken to the casserole, it will bake for about 35 minutes. This helps all the flavors blend well. Can I prepare this dish ahead and refrigerate it? Yes, you can prepare the casserole ahead of time. Just mix all the ingredients as usual. Then, cover it and place it in the fridge. It’s best to bake it within 24 hours for best taste. What can I use instead of cream of mushroom soup? If you don’t have cream of mushroom soup, you can use cream of chicken soup. You can also make a homemade creamy base using sour cream or Greek yogurt mixed with milk. This keeps the dish rich and smooth. How do I store leftovers? To store leftovers, let the casserole cool first. Then, place it in an airtight container. It will stay fresh in the fridge for up to 3 days. Make sure to reheat only the portion you plan to eat. Can I freeze Chicken Broccoli Rice Casserole for future meals? Yes, you can freeze the casserole. Just cover it tightly with plastic wrap or foil. It will last in the freezer for up to 2 months. When ready to eat, thaw it in the fridge overnight before baking. For more details, check out the [Full Recipe]. It’s a great way to ensure you have all the steps at hand! In this article, we explored the key ingredients for Chicken Broccoli Rice Casserole and shared easy steps to make it. You learned about cooking tips, variations, and serving suggestions to enhance your meal. Remember, this dish is not only tasty but also nutritious. Try different ingredients to suit your taste or dietary needs. Enjoy creating this delicious casserole and share it with your family. You’ll love how simple and fun it is to prepare!](https://goldendishy.com/wp-content/uploads/2025/07/8f73cfa4-d8c9-44a2-908a-c2367089e61b-768x768.webp)

. This recipe includes all the details you need for perfecting this rich side dish. Enjoy making it! We covered the key steps to make creamy garlic mashed potatoes. First, we explored essential ingredients and shared brands to try. Next, I laid out easy prep instructions and tips for texture and flavor. Then, we looked at tasty variations, like vegan options. Finally, I highlighted how to store and reheat your potatoes. These mashed potatoes will elevate your meals. Try new variations to keep things exciting. Enjoy crafting this dish that your family will love!](https://goldendishy.com/wp-content/uploads/2025/06/88d864b9-3d37-4779-9fe5-8809feb11d6c-768x768.webp)

![- Bell peppers and their colors: You can use four large bell peppers. Choose any color you like: red, yellow, green, or orange. Each adds its own taste and look to the dish. - Protein options: For the filling, you can select either ground turkey or beef. Both options will give you a hearty and satisfying meal. - Base ingredients: You will need one cup of cooked rice. You can use either white or brown rice. Additionally, add one cup of black beans, rinsed and drained, and one cup of corn. You can choose fresh, frozen, or canned corn. - Flavor enhancers: To boost the flavor, use one cup of salsa. You can pick your favorite brand or make it homemade. Also, add one tablespoon of taco seasoning. You can use store-bought or make your own. - Toppings: For the top of the peppers, use one cup of shredded cheddar cheese. This cheese gives a nice gooey texture. You can add extra cheese for a more decadent touch. Fresh cilantro is a great garnish, adding color and a bit of fresh flavor. You can find the full recipe in the earlier sections of this article. Happy cooking! Preheat the oven to 375°F (190°C). This helps cook the peppers evenly. While it heats, grab a baking dish. Set it aside for the stuffed peppers. Prepare the bell peppers by slicing the tops off. Remove the seeds and membranes, which can taste bitter. Brush each pepper with olive oil. This adds flavor and helps them roast nicely. Place the peppers upright in the baking dish. Cook the meat in a large skillet over medium heat. Add 1 pound of ground turkey or beef. Break it apart with a spatula as it cooks. Make sure it browns well. Once cooked, drain any excess fat. This keeps the filling lean and tasty. Next, add rice, black beans, corn, salsa, and seasoning to the skillet. Use 1 cup of cooked rice, 1 cup of rinsed black beans, and 1 cup of corn. Pour in 1 cup of salsa and 1 tablespoon of taco seasoning. Sprinkle some salt and pepper too. Mix everything well. Simmer the mixture for about 5 minutes. This lets the flavors meld together, making the filling more delicious. Stir it occasionally to avoid sticking. Now, mix in half of the shredded cheddar cheese. This makes the filling creamy and rich. Remove the skillet from heat. Stuff the peppers by spooning the mixture into each one. Press down gently to pack it in well. This ensures every bite is full of flavor. Top with more cheese by sprinkling the remaining cheddar over each filled pepper. It will melt and brown nicely while baking. Bake the peppers by covering the baking dish with aluminum foil. Place it in the oven for 25-30 minutes. In the last 10 minutes, remove the foil. This helps the cheese bubble and turn golden. Once done, cool the peppers for a few minutes before serving. The filling will be very hot. If you like, garnish with fresh cilantro for extra flavor. Enjoy your taco stuffed bell peppers! Remember, you can find the full recipe above for all the details. How to choose fresh bell peppers: Pick bell peppers that are firm and shiny. Look for smooth skin with no blemishes. A good pepper feels heavy for its size. Colors like red, yellow, and orange are sweeter. Green peppers are a bit more bitter. All colors work well in this dish. Ensuring optimal cooking temperature and timing: Set your oven to 375°F (190°C) before you start cooking. This temperature helps the peppers cook evenly. Bake them for 25-30 minutes. In the last 10 minutes, uncover the dish to let the cheese brown. Suggestions for additional spices or ingredients: Add cumin or chili powder for an extra kick. You can also mix in diced tomatoes or jalapeños for more flavor. If you love heat, try adding some hot sauce to the filling. Offering a vegetarian option: For a vegetarian version, swap the meat for lentils or extra beans. You can use quinoa instead of rice for a healthy twist. This way, everyone can enjoy taco stuffed bell peppers! Plating ideas for presentation: Serve the peppers on a colorful platter. You can place them upright for a fun look. Add a dollop of sour cream on the side. Fresh cilantro on top adds a pop of green. Recommended side dishes for a complete meal: Pair your stuffed peppers with a fresh salad or tortilla chips. A side of guacamole or salsa also works great. These sides make the meal more fun and filling. For the full details, check out the Full Recipe! {{image_4}} You can mix up the protein in taco stuffed bell peppers. If you want a meatless option, try using black beans or lentils. They add great flavor and protein. For a twist, you can also use ground chicken or pork. When it comes to cheese, feel free to get creative. While cheddar is classic, you might try Monterey Jack or pepper jack for extra spice. You can also use cream cheese for a creamier filling. For salsa, any kind works! Chunky salsa adds texture, while smooth salsa blends in. You can even make your own with fresh tomatoes, onions, and peppers. Grilling adds a smoky flavor. Wrap the stuffed peppers in foil and place them on the grill. Cook for about 15 to 20 minutes until tender. You can also use a slow cooker. Place the stuffed peppers in the slow cooker with a bit of sauce. Cook on low for 4 to 6 hours for a hands-off approach. If you need a quick meal, the microwave is your friend. Just place the stuffed peppers in a microwave-safe dish. Cover with a lid or plastic wrap. Heat for about 5 to 7 minutes, checking for doneness. Using seasonal veggies makes your dish brighter. In summer, add fresh zucchini or corn. In fall, consider adding diced sweet potatoes or pumpkin. These add flavor and nutrition. For holidays, you can theme your peppers. For Halloween, use orange peppers and stuff them with spicy fillings. For Christmas, use red and green peppers and add festive spices. It’s a fun way to celebrate! For the full recipe, check out [Full Recipe]. To store leftovers, place the stuffed peppers in an airtight container. This keeps them fresh and tasty. You can keep them in the fridge for up to three days. Make sure they cool down first to avoid steam build-up. If you want to save some for later, freezing is a great option. Wrap each stuffed pepper tightly in plastic wrap. Then, place them in a freezer-safe bag. They can last for up to three months in the freezer. When you’re ready to eat, thaw them overnight in the fridge. To reheat, bake at 350°F (175°C) for about 25 minutes, or until heated through. For easy meal prep, you can cook a big batch in advance. Make the filling and stuff the peppers ahead of time. Store them in the fridge for two days before baking. This way, you can have a quick meal ready on busy nights. You can also use different colors of bell peppers for fun and variety. What can I substitute for rice in the recipe? You can use quinoa or cauliflower rice instead of regular rice. Quinoa adds protein and fiber. Cauliflower rice keeps it low-carb. Both options work well and keep the dish tasty. How do I know when the peppers are fully cooked? The peppers should be tender but not mushy. You can poke them with a fork. If they give easily but hold their shape, they are ready. The cheese should be melted and bubbly on top too! Caloric content and portion sizes Each stuffed pepper is about 300 calories. This includes the filling and toppings. If you use ground turkey, it may be lower in calories. Adjust the portion size based on your hunger. Health benefits of ingredients used Bell peppers are rich in vitamins A and C. They help boost your immune system. Black beans provide protein and fiber, promoting good digestion. Corn adds vitamins and a sweet crunch. What drinks pair well with taco stuffed bell peppers? A refreshing drink like lemonade or iced tea works great. For adults, a light beer or margarita adds fun. Choose drinks that balance the spice of the peppers. Can taco stuffed bell peppers be made in advance for gatherings? Yes! You can prepare the stuffed peppers ahead of time. Just store them in the fridge. Bake them when your guests arrive. They will taste fresh and hot from the oven! For the full recipe, check the earlier section. Taco stuffed bell peppers are fun and easy to make. We covered the key ingredients, steps, and helpful tips for a great dish. You learned how to mix flavors and pack ingredients for maximum yum. With ideas for storage and meal prep, you’re ready to enjoy these peppers anytime. Get creative with variations to keep things fresh. Whether for a family dinner or a gathering, these peppers can impress. Happy cooking!](https://goldendishy.com/wp-content/uploads/2025/06/e36cd186-0c48-4bd5-9184-2d07a9c06671-768x768.webp)