Creamy Sun-Dried Tomato Gnocchi Irresistible Delight

If you love creamy pasta dishes, you’ll adore my Creamy Sun-Dried Tomato Gnocchi! This recipe blends rich flavors with simple ingredients for a meal that feels luxurious yet quick to make. Whether you’re cooking for family or entertaining friends, this dish will impress everyone at the table. Stick around to discover how to whip up this delightful dish that warms the heart and pleases the palate!
Why I Love This Recipe
- Quick and Easy: This recipe comes together in just 25 minutes, making it perfect for a weeknight dinner or a last-minute gathering.
- Rich and Creamy Flavor: The combination of sun-dried tomatoes and heavy cream creates a luxurious sauce that’s both comforting and indulgent.
- Customizable: You can easily adjust the herbs and spices to suit your taste, or even add in vegetables or proteins for a heartier dish.
- Impressive Presentation: With just a sprinkle of Parmesan and fresh basil, this dish looks gourmet, making it a great choice for entertaining.
Ingredients
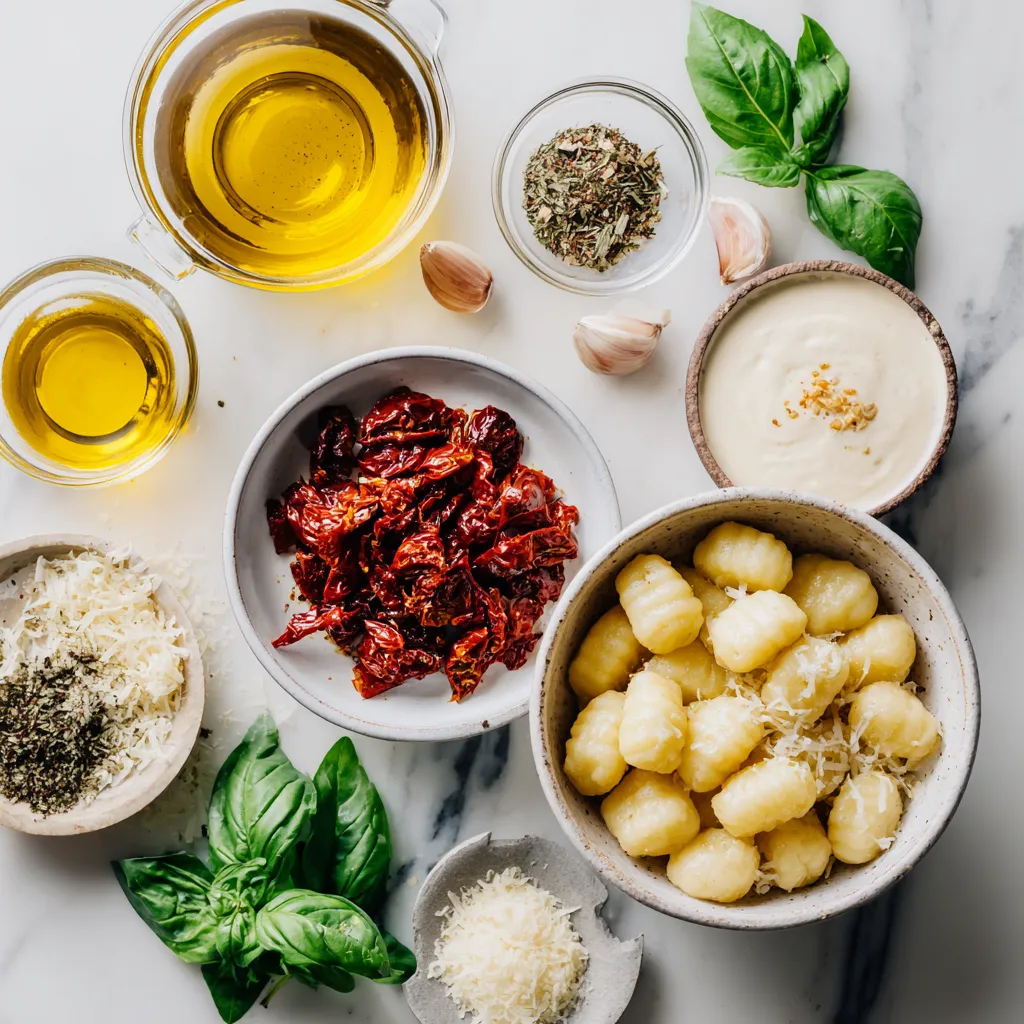
To make creamy sun-dried tomato gnocchi, gather these fresh and flavorful ingredients:
– Potato gnocchi: 1 package (16 oz)
– Sun-dried tomatoes: 1 cup, packed in oil, drained and chopped
– Heavy cream: 1 cup
– Extra virgin olive oil: 2 tablespoons
– Garlic: 2 cloves, finely minced
– Dried herbs: 1 teaspoon basil, 1 teaspoon oregano
– Seasoning: Salt and freshly cracked black pepper to taste
– Parmesan cheese: ½ cup freshly grated
– Garnish: Fresh basil leaves
These ingredients come together to create a rich, creamy dish. The potato gnocchi serves as a soft and pillowy base. Sun-dried tomatoes add a burst of umami flavor. Heavy cream brings creaminess, while garlic adds depth. The herbs add a nice touch of earthiness, and Parmesan cheese gives a savory finish. Fresh basil leaves make the dish pop with color and flavor.
When you pick your ingredients, choose high-quality sun-dried tomatoes. This choice boosts flavor and keeps the dish rich. Fresh basil will also brighten your plate and enhance the taste. Using fresh ingredients makes this dish not just tasty but also visually appealing.

Step-by-Step Instructions
Preparing the Gnocchi
1. Boil salted water in a large pot. Wait until it reaches a rolling boil.
2. Add the potato gnocchi to the boiling water. Cook them until they float, about 2-3 minutes.
3. Use a slotted spoon to remove the gnocchi. Let any extra water drain off.
4. Set the cooked gnocchi aside in a bowl while you make the sauce.
Making the Creamy Sauce
1. Heat extra virgin olive oil in a large skillet over medium heat.
2. Add finely minced garlic and sauté for about 1 minute. Stir often to avoid browning.
3. Add the chopped sun-dried tomatoes to the pan. Cook for 2-3 minutes to infuse the flavor.
4. Pour in the heavy cream. Stir gently to combine with the garlic and tomatoes.
5. Bring the mixture to a gentle simmer. Increase the heat slightly to warm the cream.
Final Steps
1. Add dried basil, oregano, salt, and pepper. Stir well and let the sauce simmer for about 5 minutes. This helps thicken it.
2. Stir in freshly grated Parmesan cheese. Mix until it melts smoothly into the sauce.
3. Gently fold in the cooked gnocchi. Make sure the dumplings are fully coated in the creamy sauce.
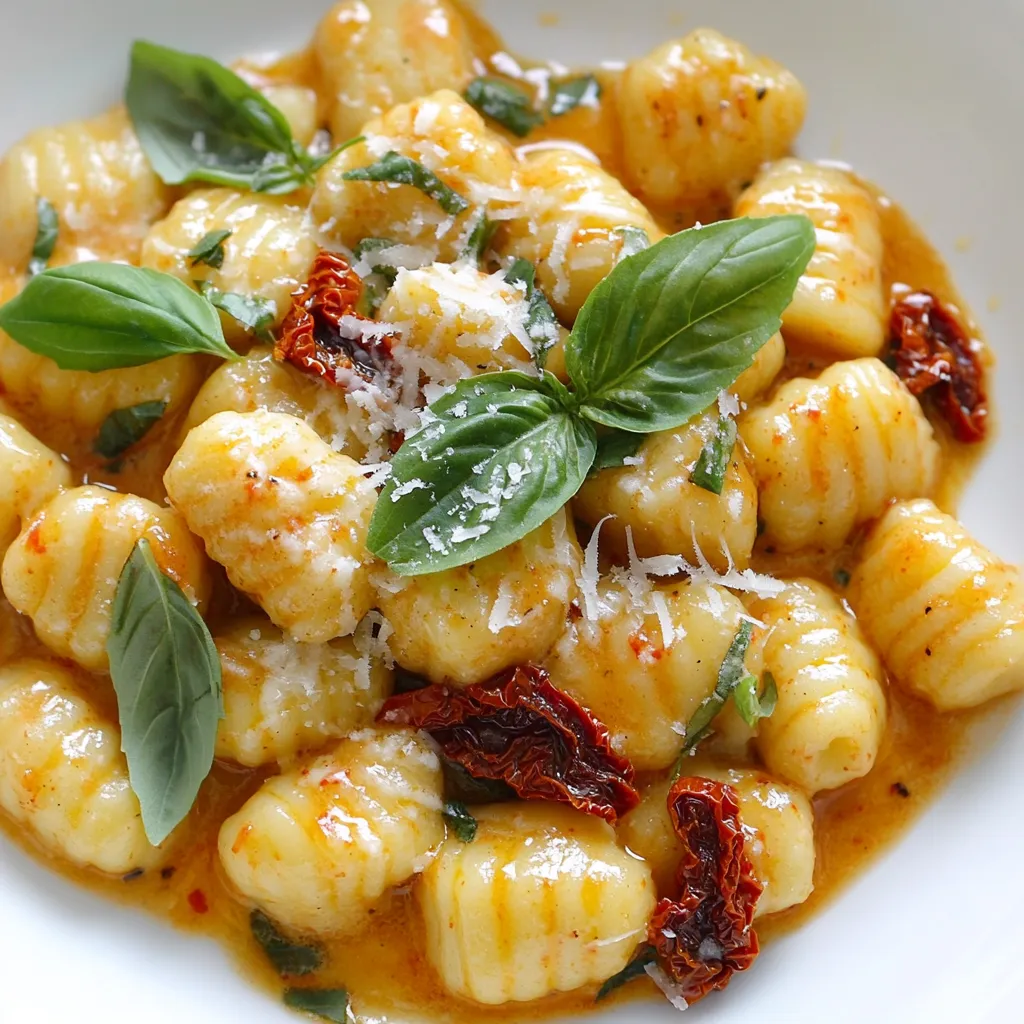
4. Serve hot on plates. Garnish with fresh basil leaves and more Parmesan cheese. Enjoy!
Tips & Tricks
Flavor Enhancement Tips
To boost flavor in your creamy sun-dried tomato gnocchi, use fresh herbs. Fresh basil works wonders. You can also try thyme or rosemary for a twist. For cheese, swap Parmesan with goat cheese or feta. Each option adds a unique taste.
Presentation Suggestions
When plating, use shallow bowls to showcase your dish. This gives a restaurant feel. Sprinkle extra Parmesan on top for a touch of elegance. Add fresh basil leaves for color. A drizzle of high-quality olive oil enhances the look and flavor.
Cooking Techniques
Sauté garlic on medium heat to avoid burning. Stir it well until fragrant. This step adds depth to your sauce. For cream thickness, simmer longer for a thicker sauce. If you prefer a lighter sauce, add a splash of milk or broth to thin it out.
Pro Tips
- Use Quality Gnocchi: Opt for fresh or high-quality store-bought gnocchi for the best texture and flavor. This will elevate your dish significantly.
- Customize Your Cream: For a lighter version, substitute half of the heavy cream with vegetable or chicken broth. This will still give you a creamy consistency while reducing calories.
- Herb Freshness: If you have access to fresh herbs, use them instead of dried. Fresh basil and oregano will impart a brighter flavor to your sauce.
- Perfect Cheese Melting: Grate your Parmesan cheese fresh for the best melting results. Pre-grated cheese can contain anti-caking agents that prevent smooth melting.

Variations
Dietary Adjustments
You can easily make this dish suit your diet. For those who need a gluten-free option, try using cauliflower gnocchi. They have a nice texture and taste great with the creamy sauce. If you prefer a vegan version, substitute the heavy cream with coconut cream or cashew cream. Use a dairy-free cheese to maintain that rich flavor without animal products.
Ingredient Swaps
Feel free to get creative with the ingredients. You can add other vegetables like spinach or mushrooms to boost nutrition and flavor. Spinach adds a lovely green color, while mushrooms provide an earthy taste. For cheese, try using goat cheese or feta instead of Parmesan. Each cheese brings a unique flavor that changes the dish’s character.
Additional Serving Ideas
Pair your creamy sun-dried tomato gnocchi with side dishes for a complete meal. A fresh green salad or garlic bread works well. If you want to add protein, toss in cooked chicken or shrimp. Both options elevate the dish and make it heartier. You can also serve it with a side of roasted vegetables for a colorful plate.
Storage Info
Leftover Storage Guidelines
To keep your creamy sun-dried tomato gnocchi fresh, store it in an airtight container. Place it in the fridge. It will last about 3 days. If you want to save it longer, consider freezing. To freeze, let the dish cool completely. Then, transfer it to a freezer-safe container. It can last for up to 3 months. Just leave some space at the top for expansion.
Reheating Instructions
When reheating, keep the texture nice and creamy. The best way is to use a skillet. Heat it over low to medium heat. Add a splash of cream or water to help loosen the sauce. Stir gently until warmed through. You can also use the microwave. Place a portion in a microwave-safe bowl. Cover it loosely to avoid splatters. Heat in short bursts, stirring in between. This way, you keep all the yummy flavors intact.
FAQs
How long does it take to make creamy sun-dried tomato gnocchi?
Making creamy sun-dried tomato gnocchi takes about 25 minutes. You spend around 10 minutes prepping the ingredients, like chopping sun-dried tomatoes and mincing garlic. Cooking the gnocchi takes only 2-3 minutes in boiling water. The sauce takes about 10 minutes to make. This quick dish is great for busy nights!
Can I make this dish in advance?
You can prepare this dish in advance. Cook the gnocchi and sauce separately. Store the cooked gnocchi in the fridge for one to two days. Keep the sauce in a sealed container. When ready to eat, just reheat both parts. This way, you save time during busy days.
What can I serve with creamy sun-dried tomato gnocchi?
Creamy sun-dried tomato gnocchi pairs well with many sides. A fresh salad with mixed greens adds a nice crunch. Garlic bread is another great choice, perfect for soaking up the sauce. You can also serve roasted vegetables for a colorful plate. Grilled chicken or shrimp adds protein and makes it even heartier.
Is this dish suitable for special diets?
This dish can fit various diets with a few tweaks. For gluten-free options, use cauliflower gnocchi instead of potato gnocchi. To make it vegan, swap the heavy cream for coconut cream and use nutritional yeast in place of Parmesan cheese. These changes keep the dish tasty while meeting dietary needs.
This blog post outlined a tasty creamy sun-dried tomato gnocchi dish. You learned about the key ingredients, simple steps for preparation, and helpful tips for flavor. I also shared variations for special diets and ingredient swaps. Remember, you can easily adjust this dish to fit your needs. Cooking should be fun and flexible. Try it out, and enjoy experimenting in your kitche

Creamy Sun-Dried Tomato Gnocchi Delight
Ingredients
- 16 oz potato gnocchi
- 1 cup sun-dried tomatoes, packed in oil, drained and chopped
- 1 cup heavy cream
- 2 tablespoons extra virgin olive oil
- 2 cloves garlic, finely minced
- 1 teaspoon dried basil
- 1 teaspoon dried oregano
- to taste salt and freshly cracked black pepper
- 0.5 cup freshly grated Parmesan cheese
- for garnish fresh basil leaves
Instructions
- Start by boiling a large pot of salted water. Once it's at a rolling boil, add the potato gnocchi. Cook according to the package instructions. When the gnocchi float to the surface (this usually takes 2-3 minutes), use a slotted spoon to remove them from the pot, allowing any excess water to drain. Set them aside in a bowl.
- In a large, deep skillet, heat the extra virgin olive oil over medium heat. Add the finely minced garlic and sauté for about 1 minute, stirring frequently, until it’s fragrant but not browned—this will enhance the flavor of the oil.
- Add the chopped sun-dried tomatoes to the skillet. Cook them for another 2-3 minutes, stirring occasionally. This step will help infuse their rich flavor into the oil.
- Carefully pour in the heavy cream, stirring gently to combine it with the tomatoes and garlic. Increase the heat slightly and bring the mixture to a gentle simmer, letting the cream warm through.
- Once simmering, add the dried basil, dried oregano, and season with salt and freshly cracked black pepper. Mix well and allow the sauce to cook for about 5 minutes, stirring occasionally. This will give the sauce time to thicken slightly.
- Stir in the freshly grated Parmesan cheese until it melts smoothly into the creamy sauce, creating a rich and cohesive mix.
- Gently fold the cooked gnocchi into the sauce, ensuring all the dumplings are evenly coated with the creamy, flavorful mixture.
- Serve hot on elegantly plated dishes. Garnish each serving with fresh basil leaves and an extra sprinkle of Parmesan cheese for that finishing touch.


![To make a tasty Chicken Zoodle Soup, gather these fresh ingredients: - 2 medium zucchinis, spiralized into noodles (zoodles) - 1 pound boneless, skinless chicken breast, diced into bite-sized pieces - 4 cups low-sodium chicken broth - 1 medium onion, finely chopped - 2 cloves garlic, minced - 2 medium carrots, peeled and sliced into thin rounds - 1 celery stalk, diced into small pieces - 1 teaspoon dried thyme - 1 teaspoon dried oregano - 1 tablespoon extra virgin olive oil - Salt and freshly ground black pepper to taste - Fresh parsley, finely chopped (for garnish) You can also add optional toppings like grated cheese or a squeeze of lemon for extra flavor. Using fresh herbs adds a bright touch to your bowl. Each ingredient plays a role, from the chicken's protein to the zoodles' crunch. For the full recipe, check out the detailed steps to create this comforting dish. To make Chicken Zoodle Soup, start by preparing your zoodles. You can use a spiralizer to turn the zucchinis into long, thin noodles. If you don’t have a spiralizer, a vegetable peeler works too. Just slice the zucchini into thin strips. Next, chop your vegetables. Finely chop the onion and mince the garlic. Peel the carrots and slice them into thin rounds. Finally, dice the celery into small pieces. This will help the veggies cook evenly. Now, it’s time to cook the chicken and vegetables. In a large pot, heat one tablespoon of extra virgin olive oil over medium heat. When hot, add the chopped onion and minced garlic. Stir for about 2 minutes until they smell great. Then, add the sliced carrots and diced celery. Cook for 5 to 7 minutes until they soften. After the veggies soften, add the diced chicken to the pot. Sprinkle in one teaspoon each of dried thyme and oregano, along with salt and pepper to taste. Cook for another 5 to 7 minutes until the chicken is no longer pink. Then, pour in the low-sodium chicken broth. Turn the heat up to bring it to a boil. Once it boils, lower the heat and let it simmer for about 10 minutes. This allows all the flavors to blend well. Now comes the fun part! When your soup has simmered, it’s time to add the zoodles. Stir them into the broth and cook for an additional 3 to 5 minutes. You want them tender but still a bit firm, so check them often. After cooking, taste the soup. If it needs more flavor, add more salt or pepper to your liking. Finally, ladle the hot soup into bowls. Use fresh parsley to garnish each bowl for a pop of color. This step adds a fresh touch to your comforting meal. For the full recipe, make sure to check out the complete instructions. Enjoy your delicious Chicken Zoodle Soup! - How to make the best zoodles Start with firm zucchinis. Use a spiralizer to cut them into thin noodles. This gives the best texture. Avoid wet zucchinis; they can turn soggy. If needed, salt the zoodles and let them sit for 15 minutes to draw out moisture. Rinse and pat them dry before cooking. - Perfecting the soup flavor Use low-sodium chicken broth for a balanced taste. Fresh herbs like thyme and oregano add depth. Sauté your onions and garlic well to build a strong base flavor. Taste the soup as it cooks, adjusting salt and pepper for the perfect bite. - Avoiding mushy zucchini noodles Add zoodles towards the end of cooking. They only need 3 to 5 minutes to soften. Overcooking makes them mushy and less appealing. Keep them slightly firm for the best texture in your soup. - Ideal serving dishes Use warm, deep bowls to enhance the cozy feel of your soup. The depth keeps the soup hot longer. If you like, serve with a side of crusty bread or a light salad. - Accompaniments like bread or salad Crusty bread pairs well with this soup. It’s perfect for dipping. A fresh side salad can add crunch and flavor to your meal. Choose greens like spinach or arugula for a nice contrast. - Garnishing techniques for presentation Finish your soup with a sprinkle of fresh parsley. This adds color and freshness. A slice of lemon on the side can brighten the flavors, too. For a fun twist, add a few chili flakes for heat. For the complete method, check out the Full Recipe. {{image_4}} You can switch up the chicken for many options. Try turkey, tofu, or chickpeas for a plant-based meal. Each brings its own taste and texture to the soup. For those who want low-carb or dairy-free options, use vegetable broth instead of chicken broth. You can also replace the chicken with cauliflower or mushrooms. These choices keep the soup hearty and tasty. Want to add more veggies? Toss in spinach, bell peppers, or green beans. They add color and crunch to your bowl. To add spice and kick, consider cayenne pepper or red pepper flakes. Just a pinch can warm up your soup without being too hot. Herbs can change the flavor based on the season. In winter, use rosemary or sage. In summer, fresh basil and cilantro brighten the dish. You can also incorporate noodles or pasta for a different twist. Whole wheat pasta or rice noodles work well. They make the soup even more filling. For the full recipe, check out the details above. Enjoy experimenting with your Chicken Zoodle Soup! To keep your Chicken Zoodle Soup fresh, store it in the fridge. Use an airtight container. Make sure the soup cools first. This helps prevent condensation. You can freeze the soup if you want to store it longer. Use freezer-safe bags or containers. Leave some space at the top for expansion. To reheat, warm it on the stove over low heat. Stir often to avoid burning. You can also use the microwave. Heat in short bursts, stirring in between. In the fridge, your soup lasts about three to four days. If you freeze it, it can last up to three months. Just remember to label the containers with the date. Look for signs of spoilage. If the soup smells sour or has mold, it’s time to toss it. Always trust your senses; they guide you well. What are zoodles and how can they be made? Zoodles are zucchini noodles. You can make them by spiralizing zucchinis. Use a spiralizer or a peeler for thin strips. They are a great, low-carb alternative to pasta. Can I make Chicken Zoodle Soup ahead of time? Yes, you can make the soup ahead. Store it in the fridge for up to three days. Just add the zoodles when you're ready to eat. This keeps them fresh and firm. How do I prevent zoodles from becoming soggy? To keep zoodles from getting soggy, add them at the end of cooking. Only cook them for a few minutes. This way, they stay crisp and tasty. Can I use rotisserie chicken for this recipe? Absolutely! Rotisserie chicken saves time. Just shred or cube the chicken and add it to the soup. It adds a nice flavor boost, too. Is it possible to make this in a slow cooker? Yes, you can use a slow cooker. Cook the chicken and veggies on low for 4-6 hours. Add zoodles in the last 15 minutes to keep them tender. How do I make the soup gluten-free? To make the soup gluten-free, use gluten-free chicken broth. Ensure all added spices are also gluten-free. This way, everyone can enjoy your delicious Chicken Zoodle Soup. For a full recipe, check out the [Full Recipe]. You now have a clear guide to making Chicken Zoodle Soup. We covered the key ingredients, preparation steps, and cooking instructions. I shared useful tips to keep your zoodles from turning mushy and ways to enhance the flavor. Remember, you can customize your soup with ingredient swaps to fit your needs. Store leftovers properly to enjoy later. Cooking doesn’t have to be complicated. Experiment and have fun with this recipe. Your kitchen can be a place of creativity and health. Enjoy your tasty, homemade soup!](https://goldendishy.com/wp-content/uploads/2025/06/e4db2e18-4a3d-4a81-8032-e96fb997d624-768x768.webp)


![- 4 large bell peppers (any vibrant color) - 1 cup quinoa, thoroughly rinsed and drained - 2 cups vegetable broth - 1 can (15 oz) black beans, well rinsed and drained - 1 cup corn (fresh, frozen, or canned, drained) - 1 cup cherry tomatoes, halved - 1 teaspoon ground cumin - 1 teaspoon smoked paprika - 1 teaspoon garlic powder - Salt and freshly cracked black pepper to taste - 1 tablespoon extra virgin olive oil - ½ cup shredded cheddar cheese (optional but recommended) - Fresh cilantro or parsley, finely chopped for garnish - Additional vegetables (e.g., zucchini, mushrooms) - Spices and herbs (e.g., oregano, chili powder) When making stuffed bell pepper boats, you have many options. I love using colorful bell peppers. They add a fun look to your dish. Choose ones that are firm and bright. For the filling, I use quinoa. It’s not only healthy but also tasty. Rinse it well before cooking. The vegetable broth adds flavor and makes it rich. Black beans are another great choice. They are filling and packed with protein. Rinse them well too, to get rid of extra salt. Corn brings sweetness to the dish. You can use fresh, frozen, or canned corn. Cherry tomatoes add a nice juicy burst. Spices like cumin and paprika give depth. Garlic powder adds that warm flavor we all love. Don’t forget to season with salt and pepper to make it pop. Finally, I drizzle olive oil on the filling. It helps everything blend together. If you love cheese, add some cheddar on top for creaminess. Feel free to customize your stuffed peppers with optional add-ins. You can mix in other veggies like zucchini or mushrooms. Extra spices can make a big impact too. This recipe is flexible. You can adjust it to fit your taste. Explore and have fun with your stuffed bell pepper boats! For the complete guide, check out the Full Recipe I have shared. - Preheat the oven to 375°F (190°C). - Prepare the bell peppers by cutting off their tops. Carefully remove the seeds and membranes. Make sure they sit upright in a baking dish. - Combine 1 cup of quinoa and 2 cups of vegetable broth in a saucepan. - Bring this mix to a boil, then reduce the heat to low. Cover the pot and let it simmer. Cook for about 15 minutes or until the quinoa is fluffy and the broth has absorbed. - In a large mixing bowl, combine the cooked quinoa with one can of black beans, one cup of corn, and spices. - Add 1 teaspoon of ground cumin, 1 teaspoon of smoked paprika, and 1 teaspoon of garlic powder. Season with salt and black pepper. - Drizzle 1 tablespoon of olive oil over the mixture. Stir until everything is well blended. - Carefully spoon the filling into each prepared bell pepper. Press it down gently to pack it in. - If you like, top each stuffed pepper with ½ cup of shredded cheddar cheese for added flavor. - Pour a little water into the bottom of the baking dish. Cover the dish with aluminum foil. This helps keep the peppers moist. - Bake the stuffed peppers in the preheated oven for 25-30 minutes. Check for doneness; they should be fork-tender. Enjoy your delicious Stuffed Bell Pepper Boats with vibrant colors and flavors! For the full recipe, please refer back to the recipe section. To start, cutting bell peppers right matters. Slice off the tops using a sharp knife. Be careful not to cut too deep. Next, remove the seeds and white membranes inside. A small spoon works great for this. Rinse the peppers under cold water to clean them. For even cooking, place your stuffed peppers tightly in the baking dish. This helps them cook at the same rate. Mixing flavors is key, too. Use spices like cumin and smoked paprika to boost taste. You can taste the filling before you stuff the peppers. Adjust the salt and pepper as needed. Serving your stuffed bell pepper boats can be fun. Use a colorful platter to catch the eye. Arrange the peppers upright, showing off their filling. You can add a wedge of lime on the side for a fresh touch. A sprinkle of chopped cilantro or parsley adds color and flavor. You can prepare stuffed peppers ahead of time. Stuff them and cover with foil. Store them in the fridge for up to a day. This makes meal prep easy for busy nights. For sides, consider a fresh salad or crusty bread. You can also pair them with rice or quinoa for a filling meal. These peppers are great for family dinners or potlucks. For the full recipe, check out Stuffed Bell Pepper Boats. {{image_4}} You can easily make this dish vegetarian. Substituting quinoa with rice or couscous works well. Rice gives a nice texture, while couscous cooks faster. Both options taste great in these stuffed bell pepper boats. Adding different vegetables also boosts flavor and nutrition. Try diced zucchini, mushrooms, or spinach. These veggies add color and crunch. You can mix and match to fit your taste. Want to add meat? Ground turkey or beef makes a hearty filling. Just cook the meat before adding it to the quinoa mixture. This step ensures the meat is safe to eat. When adding meat, adjust the spices. You might want to use more cumin or paprika. This adjustment gives the dish a richer taste. Cheese can take your stuffed peppers to the next level. Mozzarella or feta are great choices. Mozzarella melts beautifully, while feta adds a tangy twist. For even more flavor, add layers of salsa or sauce. It keeps the filling moist and adds a kick. You can also drizzle some sauce on top before baking. This extra step makes the dish even more delicious. Check out the [Full Recipe] for all the details! To keep your stuffed bell pepper boats fresh, store them in an airtight container. This helps lock in moisture and flavor. You can keep them in the fridge for about 3 to 4 days. If you want to save them for later, allow them to cool completely before storing. You can freeze stuffed peppers both before and after baking. If you freeze them before cooking, wrap them tightly in plastic wrap and then in aluminum foil. This keeps out air and prevents freezer burn. If you choose to freeze them after baking, let them cool first. Then, place them in a freezer-safe container. They will stay good for up to 3 months. To reheat your stuffed peppers, the oven works best. Preheat it to 350°F (175°C). Place the peppers in a baking dish and cover with foil. Bake for about 20 to 25 minutes until heated through. You can also use a microwave if you're in a hurry. Just place one pepper on a plate and heat for 2 to 3 minutes. This method may make them a bit softer, but they'll still taste great! To make stuffed bell peppers in advance, prepare the filling first. Cook the quinoa and mix it with your beans, corn, and spices. Once mixed, stuff each bell pepper with the filling. You can store them in the fridge for up to two days before baking. Cover them tightly to keep them fresh. When ready to bake, just pop them into the oven. This saves you time and effort on busy nights. Yes, you can use other types of peppers! Try using poblano, Anaheim, or even jalapeño peppers. Each type adds a unique flavor and spice level. Poblano peppers are mild and have a rich taste. They also hold a good amount of filling. If you like a bit of heat, jalapeños are a great choice. Just remember to adjust the cooking time if your peppers are smaller. Stuffed bell pepper boats pair well with many side dishes. Some great options include a fresh green salad, roasted vegetables, or rice. You can also serve them with a side of guacamole or salsa for added flavor. If you want something warm, consider serving bread or cornbread. These sides complement the flavors and make for a complete meal. To adjust the spice level, you can add or reduce spices. For less heat, skip the cumin and paprika. If you want more flavor, add some chili powder or crushed red pepper. You can also mix in diced jalapeños or hot sauce. Start with a little and taste as you go. This way, you can find the perfect balance for your taste. Yes, this dish can be gluten-free! The main ingredients, like quinoa and beans, are naturally gluten-free. Just be sure to check that your vegetable broth is gluten-free as well. If you add other ingredients, like sauces or spices, check their labels. This way, you can enjoy a safe and tasty meal. Stuffed bell peppers are simple and fun to make. We covered the key ingredients and steps to prepare them. You learned how to customize flavors and presentation. Remember, you can use different spices, grains, or veggies. These peppers can please everyone, regardless of diet. Enjoy your meal prep and share these tasty, healthy treats with friends and family. Happy cooking!](https://goldendishy.com/wp-content/uploads/2025/07/06b7afd9-4005-4ab6-8aaa-ba374b5d3167-768x768.webp)

