
Slow Cooker Rustic Chicken Stew Hearty Comfort Meal
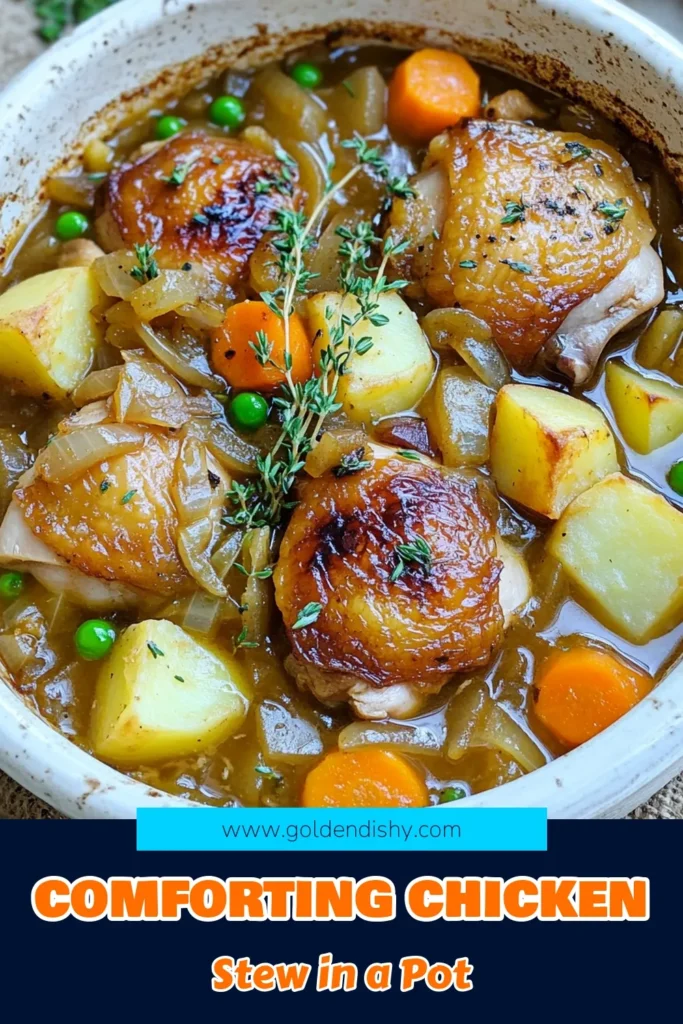
Are you craving a warm, hearty meal that practically cooks itself? Look no further than this slow cooker rustic chicken stew! Packed with tender chicken, fresh veggies, and savory herbs, it’s comfort food at its best. I’ll guide you through each step, from selecting ingredients to serving tips. Get ready to fill your home with mouthwatering aromas while making a cozy dinner that everyone will love!
Ingredients
Main Ingredients
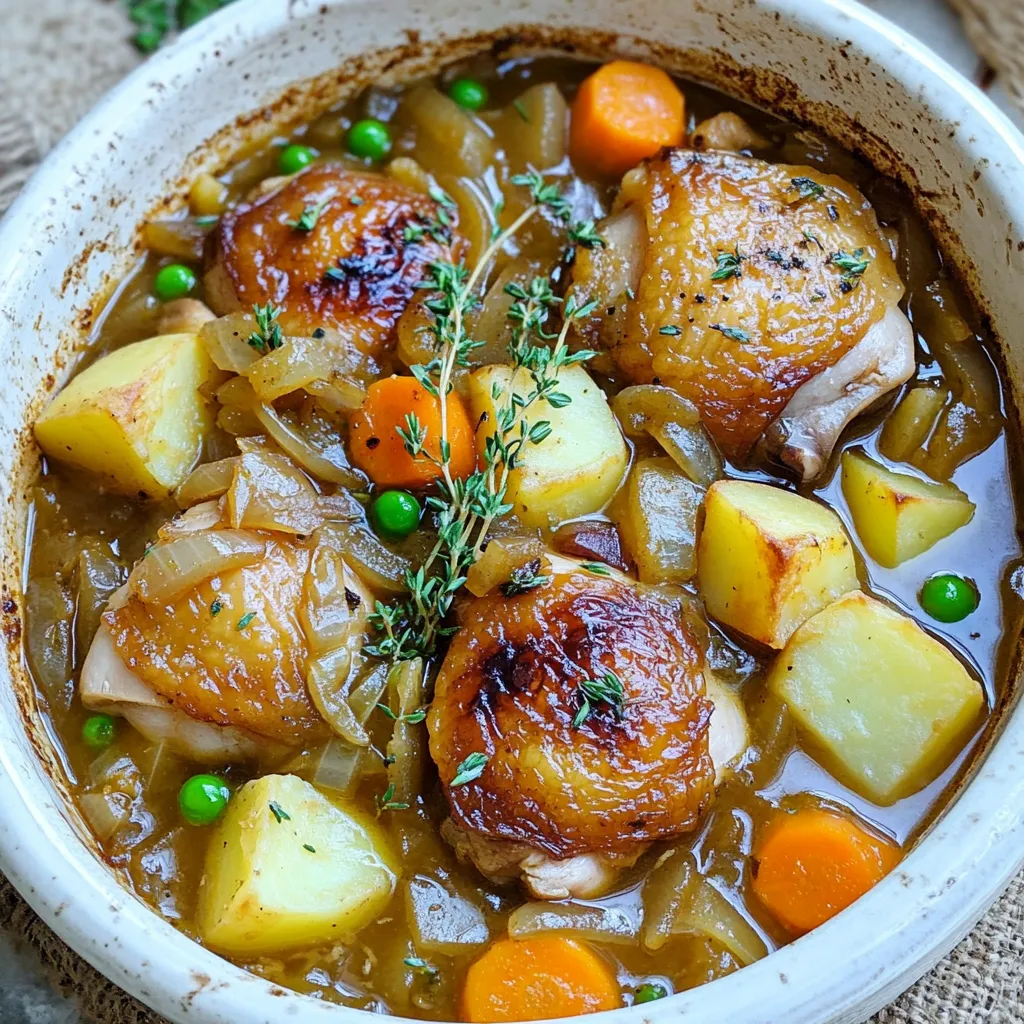
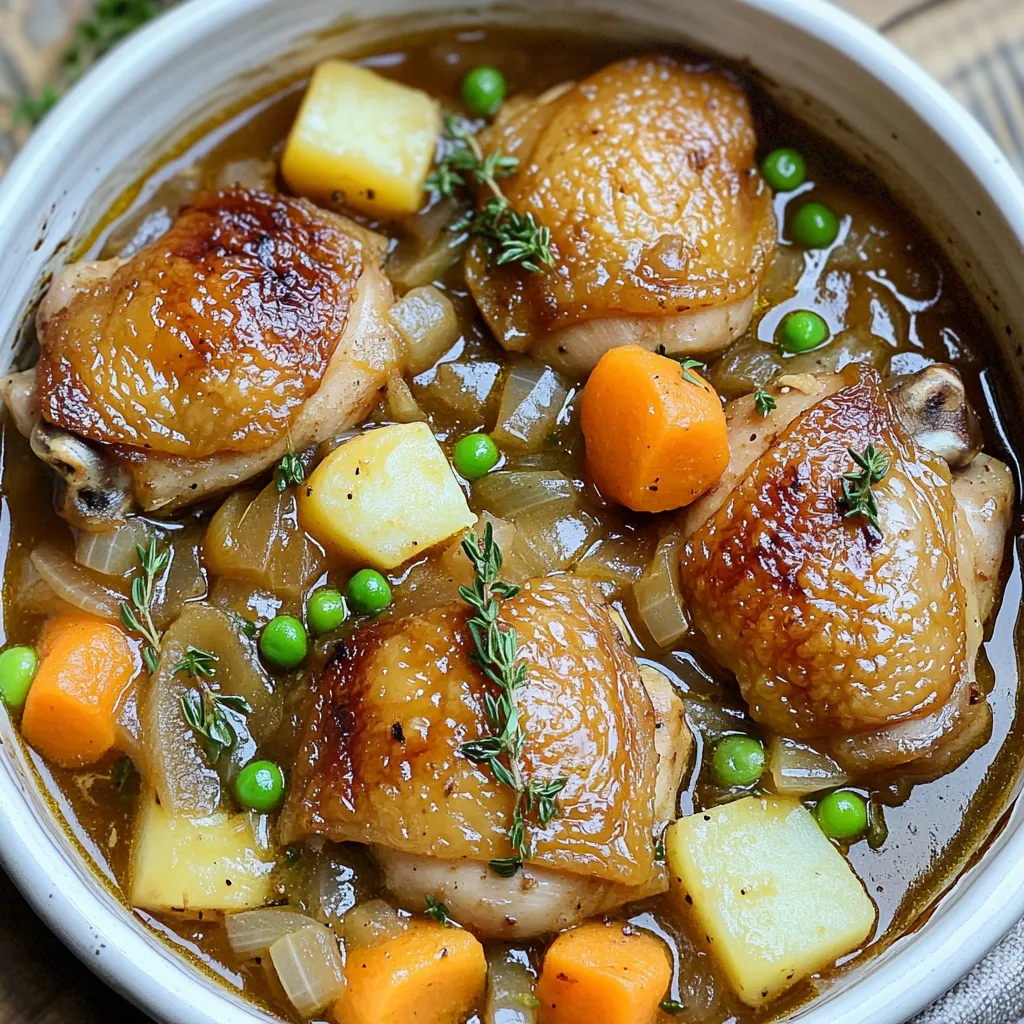
– 4 boneless, skinless chicken thighs
– 4 medium carrots, peeled and sliced into rounds
– 3 medium potatoes, peeled and cubed
– 1 large onion, finely diced
– 3 cloves garlic, minced
– 1 cup frozen peas
– Salt and freshly ground black pepper, to taste
Herbs and Seasonings
– 1 tablespoon fresh thyme leaves
– 1 tablespoon fresh rosemary, finely chopped
– 1 bay leaf
Broth and Oils
– 2 cups low-sodium chicken broth
– 2 tablespoons olive oil
When you start making this stew, the main ingredients are key. Chicken thighs give a rich flavor and tenderness. Carrots and potatoes add sweetness and heartiness. Onions and garlic create a lovely base. The frozen peas at the end bring a pop of color and freshness.
For herbs, fresh thyme and rosemary brighten the dish. They add depth without overpowering the other flavors. The bay leaf gives a subtle, earthy note. Use salt and pepper to enhance the taste, adjusting to your preference.
The broth is crucial. Low-sodium chicken broth keeps it light, while olive oil adds richness. This mix creates a warm and hearty flavor that comforts you.
Optional Garnishes
– Fresh parsley, chopped
For presentation, fresh parsley adds a touch of green. It makes the dish look inviting. Ladle the stew into rustic bowls. Serve with crusty bread for a complete meal. Enjoy the warmth and comfort of this hearty stew!
Step-by-Step Instructions
Preparation Steps
– First, season the chicken thighs with salt and pepper on both sides.
– In a large skillet, heat 2 tablespoons of olive oil over medium heat.
– Once the oil is hot, add the chicken thighs. Sear them for 4-5 minutes on each side.
– They should turn golden-brown. After searing, place the chicken in the slow cooker.
– In the same skillet, add the finely diced onion. Sauté for about 3 minutes until they are translucent.
– Add the minced garlic and sauté for an additional minute. This makes the garlic fragrant.
Slow Cooker Additions
– Transfer the sautéed onions and garlic into the slow cooker, layering them over the chicken.
– Next, add 4 medium sliced carrots and 3 cubed potatoes on top. Spread them out evenly.
– Pour 2 cups of low-sodium chicken broth over all the ingredients.
– Sprinkle 1 tablespoon of fresh thyme and 1 tablespoon of fresh rosemary on top.
– Place 1 bay leaf in the mixture. Stir gently to mix everything. Check that the chicken is submerged in the broth.
Cooking Times
– Cover the slow cooker with its lid. Cook on low for 6-7 hours for tender chicken.
– Alternatively, you can cook on high for 3-4 hours if you’re short on time.
– About 30 minutes before serving, stir in 1 cup of frozen peas to warm them through.
– Taste the stew and adjust seasoning with more salt or pepper if needed.
– Once done, remove the bay leaf. Shred the chicken directly in the slow cooker for a rustic touch.
Tips & Tricks
Cooking Tips
Searing the chicken gives it great flavor. It adds a nice crust and locks in juices. Don’t skip this step! It makes a big difference in taste. Adjust the seasonings to fit your taste. Add more salt or pepper if you like it bolder. You can also add a splash of lemon juice for brightness.
Ingredient Modifications
If you have dietary needs, swap the chicken thighs for breasts. They cook faster and are leaner. For a vegetarian option, use mushrooms or hearty beans. You can change up the veggies too. Use what’s in season! Sweet potatoes or parsnips can add a unique twist.
Serving Suggestions
Pair your stew with crusty bread for dipping. It soaks up the broth well. You can also serve it with a side salad for freshness. To serve, use rustic bowls and fill them generously. Garnish with fresh parsley for color and flavor. Mixing in shredded chicken right before serving gives it a homey touch.
Variations
Different Protein Options
For this stew, I prefer using chicken thighs. They have more flavor and stay juicy. You can also use chicken breasts if you like a leaner meat. They cook faster but can dry out. For a twist, try alternative meats like pork or beef. Just adjust the cooking time based on the meat you choose.
If you want a vegetarian option, use hearty vegetables like mushrooms and lentils. These add depth and protein. Tofu is also a great choice. It soaks up flavors well, making the stew rich.
Flavor Enhancements
To make the stew pop, add more herbs and spices. Fresh parsley and basil can brighten the dish. A pinch of paprika gives warmth. If you like it spicy, toss in some diced jalapeños or a dash of hot sauce. This will boost the heat and flavor.
Experiment with different combinations. Thyme and rosemary are classic, but try adding oregano for a twist. The key is to balance flavors. Taste as you go to find your perfect mix.
Stew Texture Adjustments
You can tweak the texture of your stew to fit your taste. For a thicker stew, mix in some cornstarch or flour. Create a slurry by mixing it with water first, then stir it in. This will help it thicken without clumps.
If you prefer a brothier stew, just add extra chicken broth. You can also include more vegetables for a chunkier feel. For a creamier base, stir in some heavy cream or coconut milk near the end. This will give your stew a rich and comforting finish.
Storage Info
Storing Leftovers
To keep your Slow Cooker Rustic Chicken Stew fresh, store leftovers in airtight containers. Make sure the stew cools down before you seal it. This keeps moisture out and prevents spoiling. You can refrigerate the stew for up to three days. If you want to keep it longer, freezing is a great option. Divide the stew into portions and use freezer-safe bags. This way, you can thaw only what you need later.
Reheating Guidelines
Reheating stew properly is key to keeping its taste. The safest way is to use the stove. Place the stew in a pot and heat it on low. Stir often to avoid hot spots. If you want to use the microwave, transfer it to a microwave-safe bowl. Heat in short bursts, stirring in between. This helps maintain the flavor and texture. Always check the stew’s temperature before serving. It should reach 165°F to be safe to eat.
Shelf Life
In the fridge, your stew stays fresh for about three days. If you freeze it, it can last up to three months. Look for signs of spoilage, like an off smell or changes in color. If the stew has a strange taste or looks unusual, it’s best to toss it. Freshness is important for both safety and flavor. Enjoy your stew while it’s at its best!
FAQs
Can I use frozen chicken?
Yes, you can use frozen chicken in this stew. Just remember to adjust cooking time. If your chicken is still frozen, add about an hour to the cooking time on low. Always make sure the chicken reaches a safe internal temperature of 165°F. This method works well, and it keeps the stew juicy.
How do I thicken my stew?
You can thicken your stew using a few easy methods. Here are some options:
– Cornstarch: Mix 1 tablespoon with 2 tablespoons of cold water. Stir this mix into the stew.
– Flour: Mix 2 tablespoons of flour with cold water. Add it to the stew and stir well.
– Mashed Potatoes: Simply mash some of the potatoes in the stew for a thicker texture.
Try one of these and see which you like best!
What if I don’t have fresh herbs?
If you don’t have fresh herbs, you can use dried ones. Use about one-third of the amount. For example:
– 1 teaspoon dried thyme instead of 1 tablespoon fresh
– 1 teaspoon dried rosemary instead of 1 tablespoon fresh
Dried herbs still bring great flavor. Just add them early in the cooking to allow the flavors to blend well.
This blog post covers how to make a delicious chicken stew. We explored the main ingredients like chicken thighs, veggies, and herbs. You learned step-by-step instructions, cooking tips, and variations to suit your taste.
Remember to enjoy the process and use fresh ingredients for the best flavor. You can always adjust the recipe to make it your own. Happy cooking!

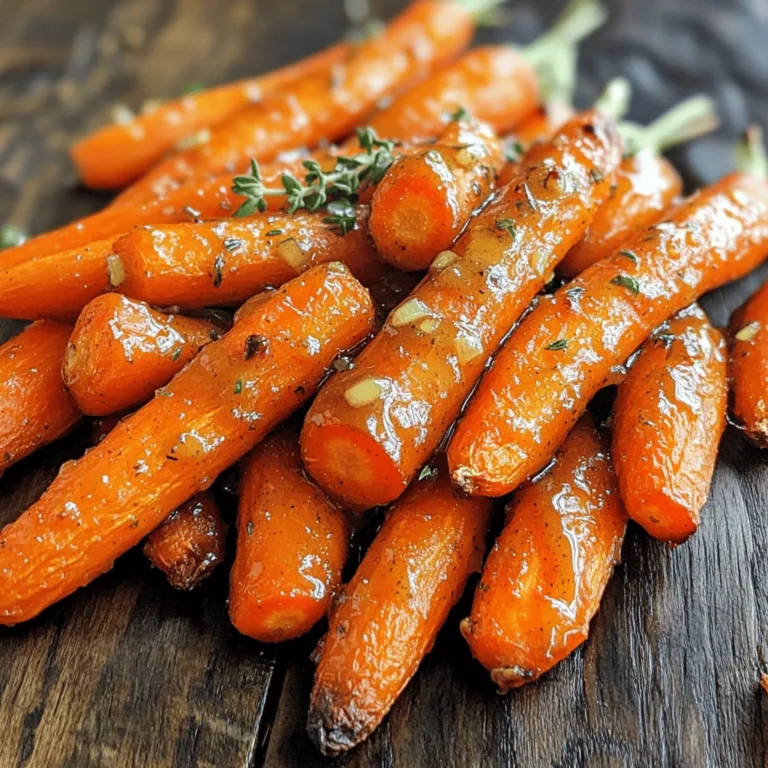
![- 1 lb baby carrots (or regular carrots, peeled and sliced into sticks) - 2 tablespoons olive oil - 3 tablespoons pure maple syrup - 2 tablespoons Dijon mustard - 1 tablespoon fresh thyme leaves (or 1 teaspoon dried thyme) These key items create the sweet and tangy glaze that makes the carrots shine. Baby carrots are sweet and tender, while regular carrots add a heartier texture. The olive oil helps the glaze stick and adds a rich flavor. Pure maple syrup brings sweetness, and Dijon mustard adds a kick. Fresh thyme gives an earthy note that ties it all together. - Salt and pepper to taste - Zest of 1 lemon (for garnish) - Additional herbs (like parsley or chives) These optional items can elevate your dish. Salt and pepper enhance all flavors. Lemon zest adds a bright note that contrasts beautifully with the sweet glaze. Extra herbs can give a pop of color and flavor. Feel free to mix and match these garnishes to make your dish unique. For the full recipe, check out [Full Recipe]. First, you need to preheat your oven to 425°F (220°C). This step helps the carrots roast perfectly. If you’re using regular carrots, peel them first. Then, slice them into sticks about 1/2 inch thick. Cutting them evenly ensures they cook at the same rate. Baby carrots can go straight into the oven without any slicing. Next, grab a small mixing bowl. In it, whisk together the following ingredients: - 2 tablespoons olive oil - 3 tablespoons pure maple syrup - 2 tablespoons Dijon mustard - 1 tablespoon fresh thyme leaves (or 1 teaspoon dried thyme) - A pinch of salt and pepper Whisk until all the ingredients blend into a smooth glaze. This glaze gives the carrots a sweet and tangy flavor that really shines. Now, transfer the carrots to a large mixing bowl. Pour the glaze over the carrots. Toss them gently to coat each piece evenly. You want every carrot stick to be covered in that tasty mixture. Spread the glazed carrots in a single layer on a baking sheet lined with parchment paper. Make sure there's space between each piece; this helps them roast evenly. Place the baking sheet in the oven and roast for 20-25 minutes. Remember to toss the carrots halfway through. This ensures they brown nicely on all sides. When they finish roasting, the carrots should be tender and caramelized, looking delicious. You can find the full recipe for these amazing Maple Dijon Glazed Carrots to make them at home! To make your Maple Dijon glazed carrots pop, think about adding spices or herbs. Try a pinch of cayenne for heat or a dash of garlic powder for depth. Fresh herbs like parsley or dill can also brighten the dish. These small changes can bring a new twist to the recipe. Adjusting sweetness levels is another way to suit your taste. If you love sweet, add more maple syrup. If you prefer less sweetness, cut back slightly. Balancing the sweet and tangy flavors makes each bite exciting. Even cooking is key for great roasted carrots. Cut your carrots into uniform pieces. This ensures they cook at the same rate. For baby carrots, you can roast them whole. If using regular carrots, aim for 1/2 inch thick sticks. If you want to try alternatives to oven roasting, consider steaming or sautéing. Steaming keeps the carrots tender and bright. Sautéing in a pan with the glaze gives a nice caramelization as well. Both methods can work well, but roasting brings out the best flavors. Find the full recipe for Maple Dijon glazed carrots to explore even more cooking tips! {{image_4}} You can easily swap out some ingredients in this recipe. If you're out of maple syrup, try honey or agave syrup. Both add a nice sweetness but change the flavor a bit. You can also use brown sugar, but it will change the glaze's texture. For the mustard, Dijon is great, but you can use yellow mustard for a milder taste. Spicy brown mustard adds a kick. You can even try whole grain mustard for a rustic feel. Each option brings a new twist to the dish. You can make these glazed carrots on the stovetop if you prefer. Simply steam the carrots until tender. Then, toss them in the glaze in a pan over low heat. This method gives you a softer texture. If you're hosting a big dinner, you can serve these carrots in many ways. For a casual meal, serve them right from the baking dish. For a fancy dinner, arrange them on a platter and drizzle extra glaze on top. You can even add some nuts for crunch. For the full recipe, check the link provided. Enjoy exploring these variations! To keep your maple Dijon glazed carrots fresh, use airtight containers. Glass or plastic containers work well. Make sure the carrots cool down before sealing them. This helps prevent moisture build-up. Store the leftovers in the fridge. They stay good for about three to five days. When reheating glazed carrots, the oven is best. Preheat it to 350°F (175°C). Spread the carrots on a baking sheet and heat for about 10 minutes. This keeps them crispy and tasty. You can also use the microwave. Heat them in short bursts of 30 seconds. Stir between each burst to keep flavors intact. How long do roasted carrots last in the fridge? Roasted carrots can last about 3 to 5 days in the fridge. Store them in an airtight container. This helps keep them fresh and tasty. Can I make this recipe ahead of time? Yes, you can make this recipe ahead of time. Roast the carrots and let them cool. Then, store them in the fridge. Reheat them before serving for the best flavor. Is this recipe suitable for vegan diets? Yes, this recipe is vegan-friendly. It uses maple syrup and mustard, which are both plant-based. You can enjoy this dish without any animal products. How can I make this gluten-free? This recipe is already gluten-free. Dijon mustard is often gluten-free, but always check the label. This way, you ensure it fits your diet. What meals pair well with glazed carrots? Glazed carrots pair well with roasted chicken, grilled fish, or a hearty grain dish. Their sweet and tangy flavor adds balance to savory meals. Can I use other vegetables in this recipe? Yes! You can use other veggies like parsnips or sweet potatoes. Just adjust the cooking time for different vegetables. Enjoy the variety! For the full recipe, check out the Maple Dijon Glazed Carrots recipe to explore all the tasty details. Maple Dijon glazed carrots are both tasty and easy to make. We covered essential ingredients like carrots, olive oil, and Dijon mustard. Each step, from roasting to optional flavor tweaks, helps you create the best dish. Remember to store leftovers properly and reheat them for full flavor. Feel free to experiment with variations to match your taste. With this recipe, you can impress at any meal. Now, gather your ingredients and enjoy making these delicious carrots!](https://goldendishy.com/wp-content/uploads/2025/07/c1b9af90-3a4b-46ea-8cf2-4dca4008c015-768x768.webp)
![To make your delicious crispy zucchini tacos, you'll need a few fresh ingredients. Here’s what you should gather: - 2 medium zucchinis, sliced into thin rounds - 1 cup cornmeal and seasonings: chili powder, garlic powder, onion powder, ground cumin - Fresh toppings: shredded lettuce, diced tomatoes, avocado slices, sour cream or Greek yogurt - Tortilla options: soft corn or flour These ingredients work together to create a tasty and fun meal. The zucchini brings a nice crunch, while the cornmeal adds flavor. Don’t forget the toppings! They add freshness and creaminess. If you want the full recipe, check out the Full Recipe for all the details. Set your oven to 425°F (220°C). This high heat will help make the zucchini crispy. Line a large baking sheet with parchment paper. This step prevents the zucchini from sticking and makes cleanup easy. In a medium mixing bowl, combine 1 cup of cornmeal with spices. Add 1 tablespoon of chili powder, 1 teaspoon of garlic powder, 1 teaspoon of onion powder, and 1/2 teaspoon of ground cumin. Season this mix with salt and freshly cracked black pepper. Mix well until everything is blended. This coating gives the zucchini great flavor and crunch. Take your zucchini rounds and dip them into the cornmeal mixture. Make sure both sides are coated evenly. Arrange the coated zucchini on the baking sheet in a single layer. Avoid overlapping the rounds to ensure they cook evenly. Place the baking sheet in the preheated oven and bake for 20-25 minutes. Halfway through, flip the zucchini rounds for an even golden brown color. Enjoy the crispy goodness as you prepare your tacos! For the complete recipe, see the [Full Recipe]. To get the best crispy texture, the coating needs to be even. Make sure you coat each zucchini round well. This way, every bite has flavor. Use a good amount of cornmeal mix on both sides. When you bake, flip the zucchini halfway. This helps them brown nicely and stay crisp. Warm tortillas before you fill them. You can heat them in a skillet over medium heat. Just a minute on each side makes them soft. You can also wrap them in foil and pop them in the oven. Give them a few minutes so they get warm and pliable. For a colorful dish, use a bright platter. Layer your crispy zucchini tacos with fresh toppings. Add shredded lettuce, diced tomatoes, and avocado slices. Finish with a dollop of sour cream or Greek yogurt. Serve with lime wedges for extra zest. A sprinkle of fresh cilantro adds a lovely touch. Use these tips to make your tacos not just tasty, but also beautiful! {{image_4}} You can easily make your crispy zucchini tacos vegan. For a creamy topping, replace sour cream with cashew cream or dairy-free yogurt. Both options give a rich flavor. You can also use mashed avocado as a spread. It adds creaminess and healthy fats. For toppings, use fresh veggies like radishes or sliced jalapeños for a spicy kick. These swaps keep your meal tasty and plant-based. To boost the flavor of your zucchini coating, try adding more spices. Smoked paprika can add a nice depth. You might also enjoy a pinch of cayenne for heat. Fresh herbs like cilantro or parsley can brighten the dish. Mix them into your cornmeal for an extra layer of flavor. Don't hesitate to experiment! The right spices can take your tacos to the next level. Zucchini is great, but many other veggies work well too. You can use sliced eggplant or summer squash for a similar texture. Carrots add a sweet crunch, while bell peppers bring color and flavor. For a different twist, try sweet potatoes. Just cut them into thin slices and bake. Each veggie offers a unique taste, so have fun mixing it up! You’ll find your favorite combinations. For the complete experience, check out the [Full Recipe]. To keep your crispy zucchini tacos fresh, use an airtight container. Place any leftover tacos in the container. You can store them in the fridge for up to three days. This method helps keep them from getting soggy. If you have extra zucchini rounds, store them separately. This way, they stay crispy longer. When you're ready to enjoy your leftovers, reheating correctly is key. The best way to revive that crunch is in the oven. Preheat your oven to 375°F (190°C). Place the tacos on a baking sheet. Heat them for about 10-15 minutes. This method ensures your tacos stay crispy. You can also use an air fryer for faster results. Just heat them for 5-7 minutes at 350°F (175°C). You can freeze crispy zucchini tacos, but it's best to freeze the zucchini rounds separately. After baking, let them cool completely. Then, place them in a single layer on a baking sheet and freeze for a few hours. Once frozen, transfer them to a freezer bag. This prevents sticking. You can store them in the freezer for up to three months. When ready to eat, bake them straight from the freezer. This keeps them crunchy and delicious. For the full recipe, check the detailed instructions above. To make crispy zucchini tacos, follow these steps: 1. Preheat your oven to 425°F (220°C). 2. Prepare a baking sheet with parchment paper. 3. Mix cornmeal and spices in a bowl. 4. Dip zucchini rounds in the cornmeal mix. 5. Arrange the coated zucchini on the baking sheet. 6. Bake for 20-25 minutes, flipping halfway. 7. Warm your tortillas in a skillet or oven. 8. Assemble tacos with zucchini, lettuce, tomatoes, avocado, and sour cream. This simple process makes crispy zucchini tacos that are full of flavor. The baking gives the zucchini a nice crunch while keeping the inside tender. You can find the full recipe above. You can use either corn or flour tortillas for zucchini tacos. - Corn Tortillas: - They are gluten-free. - They have a distinct flavor that pairs well with the zucchini. - Flour Tortillas: - They are soft and chewy. - They hold up well with toppings and fillings. Both options are great, so choose based on your taste! I often prefer corn tortillas for their authentic flavor. Yes, you can prepare some parts ahead of time. - Zucchini Rounds: You can coat and bake the zucchini earlier in the day. Store them in an airtight container. - Tortillas: Warm them just before serving to keep them soft. - Toppings: Dice your tomatoes and slice your avocado in advance, but keep them in the fridge. This way, you can quickly assemble the tacos when you're ready to eat. Enjoy your meal without the rush! This blog post covered how to make crispy zucchini tacos. You learned about the ingredients, instructions, and tips for perfecting texture. I also shared variations for dietary needs and options to store leftovers. Crispy zucchini tacos are fun, easy to make, and delicious. You can enjoy them during any meal. Experiment with the toppings to make each taco special. Enjoy your cooking!](https://goldendishy.com/wp-content/uploads/2025/06/dad710f9-4001-4f00-9608-4b60580076cc-768x768.webp)
