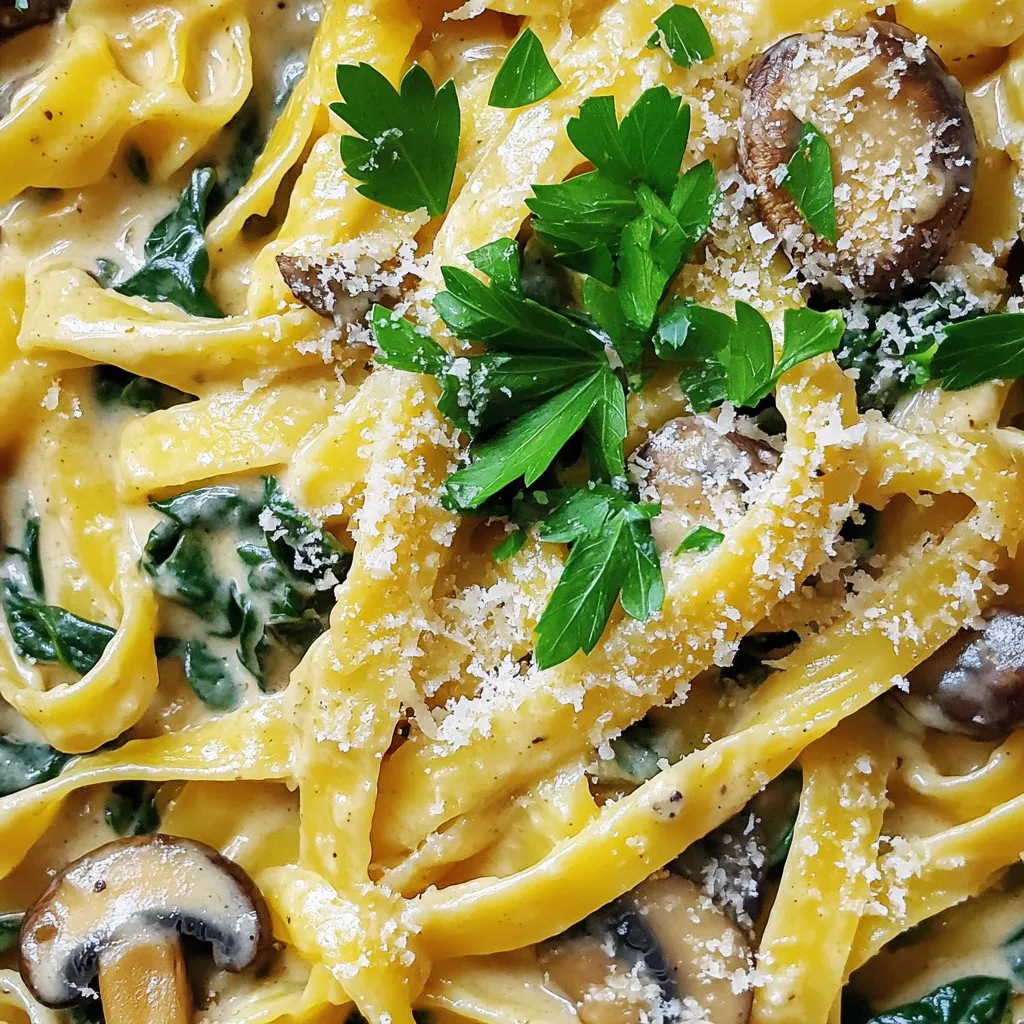
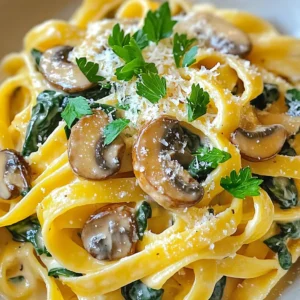
Creamy Mushroom Spinach Pasta Delightful and Easy Dish

Are you ready to whip up a dish that’s as creamy as it is delicious? This Creamy Mushroom Spinach Pasta combines fresh spinach, savory mushrooms, and rich cream for a meal that’s quick and easy. Whether you’re a busy parent or just craving comfort food, this recipe has you covered. Let’s dive into how you can create this delightful dish in no time!
Ingredients
Main Ingredients
– 8 oz (225g) fettuccine or spaghetti
– 2 tablespoons olive oil
– 1 medium onion, finely chopped
– 3 cloves garlic, minced
– 12 oz (340g) mushrooms, sliced (preferably a mix of cremini and button)
– 5 oz (140g) fresh spinach, roughly chopped
Dairy Ingredients
– 1 cup (240ml) heavy cream
– ½ cup (50g) grated Parmesan cheese
– Salt and pepper to taste
– ½ teaspoon nutmeg
– Fresh parsley, chopped for garnish
To make creamy mushroom spinach pasta, you need simple yet fresh ingredients. Start with fettuccine or spaghetti as your base. The pasta brings a nice bite to the dish. You will also need olive oil to sauté the onions and garlic.
The mushrooms add texture and a rich flavor. I recommend using a mix of cremini and button mushrooms. Fresh spinach brightens the dish and adds color.
For the creamy sauce, heavy cream gives that luscious texture. Grated Parmesan cheese enhances the flavor and adds a savory note. Don’t forget to season with salt, pepper, and nutmeg for the perfect balance. Finally, fresh parsley will elevate the dish and make it look stunning on the plate.
Gather these ingredients, and you’re ready to start cooking.
Tips & Tricks
Perfecting the Pasta
– Checking for al dente texture: Cook the pasta just until it is firm to the bite. This means you want to feel a slight resistance when you chew. It should not be mushy. Taste a piece a minute or two before the package time is up. This simple check helps keep your pasta perfect.
– Using reserved pasta water: Before draining your pasta, save about half a cup of the cooking water. This starchy water is a secret weapon. You can add it to your sauce to adjust the thickness. Just a little bit makes the sauce creamy and helps it cling to the pasta.
Flavor Enhancements
– Seasoning with salt, pepper, and nutmeg: Start with a pinch of salt and pepper while cooking. This enhances the taste of your dish. Nutmeg adds warmth and depth. Just a half teaspoon is all you need. It lifts the flavors of the mushrooms and cream.
– Choosing additional garnishes: Fresh parsley adds a bright touch. It also gives a nice crunch. You might also sprinkle more Parmesan on top. For extra flavor, consider a sprinkle of red pepper flakes for some heat.
Variations
Ingredient Substitutions
– Using plant-based cream and cheese: If you prefer a vegan dish, swap heavy cream for a plant-based option. Cashew cream or coconut cream works well. Use vegan cheese instead of Parmesan for a creamy texture.
– Mixing in different vegetables: You can add other veggies for more color and flavor. Try bell peppers, zucchini, or broccoli. These add nutrients and make the dish more exciting.
Dietary Considerations
– Making it gluten-free: Choose gluten-free pasta options. Many brands offer great pasta made from rice or lentils. It tastes good and keeps the dish gluten-free.
– Incorporating protein sources: If you want more protein, add cooked chicken or shrimp. You can also use chickpeas for a vegetarian option. This makes the dish heartier and more filling.
Storage Info
Storing Leftovers
To keep your creamy mushroom spinach pasta fresh, store it right. Place the leftover pasta in an airtight container. This helps keep out air and moisture. You can use glass or plastic containers. Make sure the lid seals well.
Refrigerate the pasta within two hours of cooking. This keeps it safe to eat. The creamy sauce will thicken as it cools. It’s best to eat the leftovers within three days for the best taste.
Reheating Instructions
You can reheat your pasta in two ways: the microwave or the stovetop. If you use the microwave, place the pasta in a bowl. Add a splash of water or cream for moisture. Cover the bowl with a lid or a plate. Heat it for about one minute. Stir and heat for another minute if needed.
For the stovetop, use a skillet over low heat. Add the pasta and a little cream or water. Stir gently. This helps keep the sauce creamy. Avoid high heat, as it can make the sauce separate.
By following these tips, you can enjoy your creamy mushroom spinach pasta even days later!

FAQs
Can I use a different type of pasta?
Yes, you can use other pasta types. Here are some options:
– Penne
– Rigatoni
– Fusilli
– Whole wheat pasta
Each shape holds sauce differently. Choose what you prefer!
How can I make it vegan?
To make this dish vegan, swap a few ingredients. Use:
– Plant-based cream instead of heavy cream
– Nutritional yeast for Parmesan cheese
– Olive oil for butter (if needed)
These changes create a creamy and tasty vegan version!
What can I serve with Creamy Mushroom Spinach Pasta?
This pasta pairs well with various side dishes. Consider:
– Garlic bread for crunch
– A fresh green salad for lightness
– Roasted vegetables for added flavor
These sides complement the pasta perfectly!
How long does this dish last in the fridge?
You can store Creamy Mushroom Spinach Pasta in the fridge for up to 3 days. Look for these signs to check if it’s still good:
– Off smell
– Change in color
– Mold growth
If you see any of these signs, it’s best to throw it away.
In this post, we explored how to make creamy mushroom spinach pasta. We covered key ingredients like fettuccine, heavy cream, and fresh mushrooms. I shared step-by-step cooking methods to ensure perfect results. Additionally, we discussed clever tips and variations for different diets.
This dish is simple, yet it packs a punch of flavor. You can customize it to fit your preferences. Enjoy experimenting with this recipe and make it your own!


![- 9 lasagna noodles - 2 cups cooked chicken, shredded - 2 cups Alfredo sauce (store-bought or homemade) - 2 cups ricotta cheese - 2 cups shredded mozzarella cheese - 1 cup grated Parmesan cheese - 1 cup fresh spinach, chopped - 1 teaspoon garlic powder - 1 teaspoon onion powder - Salt and pepper to taste - Fresh basil leaves for garnish Each ingredient plays a big role in flavor and texture. - Lasagna noodles form the base, holding all the layers together. - Cooked chicken adds protein and heartiness. Use rotisserie chicken for ease. - Alfredo sauce gives creaminess and rich flavor. Store-bought saves time, or you can make your own. - Ricotta cheese provides a creamy filling. It’s soft and mild, blending well with other flavors. - Shredded mozzarella cheese melts beautifully, adding gooey texture. - Grated Parmesan cheese gives a salty, nutty kick on top. - Fresh spinach brings a pop of color and nutrients. - Garlic and onion powder enhance the flavor without overpowering the dish. - Salt and pepper are essential for seasoning, balancing the taste. - Fresh basil adds brightness when you serve the dish. You can change some ingredients to suit your taste. - Swap chicken for turkey or keep it meatless with a veggie mix. - Use cottage cheese instead of ricotta for a lighter option. - Try different cheeses like gouda or cheddar for unique flavors. - If you don't have Alfredo sauce, use a white sauce or a creamy tomato sauce. - For a gluten-free version, look for gluten-free lasagna noodles. These adjustments keep the spirit of the dish while catering to your needs. For the complete recipe, check the Full Recipe. To start, bring a large pot of salted water to a boil. This water helps cook the noodles evenly. Add 9 lasagna noodles to the pot. Cook them according to the package instructions. Aim for an al dente texture, which means they should be slightly firm. Once cooked, drain the noodles. Rinse them briefly under cold water to stop the cooking process and prevent sticking. Set them aside on a clean surface or a plate. Now, grab a spacious mixing bowl. In this bowl, combine 2 cups of shredded cooked chicken, 2 cups of ricotta cheese, and 1 cup of chopped fresh spinach. Add 1 teaspoon each of garlic powder and onion powder for flavor. Don’t forget to sprinkle in some salt and pepper to taste. Mix all these ingredients thoroughly. You want a nice, smooth filling that binds together well. This mixture is the heart of your lasagna. Take a 9x13 inch baking dish and spread a thin layer of Alfredo sauce on the bottom. This helps prevent the noodles from sticking. Lay down 3 noodles side by side over the sauce. Next, spread half of your chicken and ricotta mixture over the noodles. Top this layer with a third of the shredded mozzarella cheese. Repeat this layering: add another 3 noodles, the remaining chicken mixture, and another third of mozzarella cheese. For the final layer, place the last 3 noodles on top. Cover these noodles with the rest of the Alfredo sauce. Finish with the remaining mozzarella and all of the grated Parmesan cheese on top. This will create a beautiful, bubbly crust when baked. Now, cover the dish with aluminum foil and place it in your preheated oven at 375°F (190°C). Bake for 25 minutes. After that, remove the foil and bake for another 15 minutes. Keep an eye on it until the cheese is bubbly and golden brown. This step is key for that perfect, cheesy finish. When you layer your lasagna, start with a thin layer of sauce. This helps the noodles not stick. Use three noodles for each layer. Spread half of your filling evenly over the noodles. Sprinkle some cheese on top. Repeat until you have used all ingredients. Finish with noodles, sauce, and lots of cheese on top. Bake your lasagna at 375°F (190°C). Cover it with foil for the first 25 minutes. This keeps it moist. After that, take off the foil and bake for another 15 minutes. This makes the cheese bubbly and golden. Let it cool for 10 minutes before slicing. This helps the layers hold together. Cut the lasagna into squares for serving. Garnish with fresh basil leaves and extra Parmesan cheese. This makes it look great! Pair it with a green salad or garlic bread for a complete meal. Enjoy your cheesy chicken Alfredo lasagna with family or friends for a comforting dinner. For the full recipe, check the earlier section. {{image_4}} You can easily make a vegetarian version of this dish. Just swap the chicken for a mix of veggies. Try using mushrooms, zucchini, or bell peppers instead. For added flavor, sauté the veggies before mixing them with the ricotta. This change keeps the dish creamy and satisfying. Feel free to add more vegetables or proteins. Spinach is great for color and taste. You can also toss in some chopped broccoli or roasted red peppers. If you want more protein, consider adding cooked lentils or chickpeas. These ingredients boost nutrition and make the dish heartier. You can switch up the sauce or cheese for a twist. Use a white sauce or pesto instead of Alfredo for a different flavor. For cheese, try blending mozzarella with gouda or fontina for a richer taste. Mixing cheeses adds depth and makes each bite unique. For the full recipe, check out [Full Recipe]. After enjoying your cheesy chicken Alfredo lasagna, you may have some leftovers. To store them, let the lasagna cool completely. Then, cover it tightly with plastic wrap or aluminum foil. You can also place it in an airtight container. This helps keep it fresh for up to three days in the fridge. Make sure to keep it away from strong-smelling foods to avoid any unwanted flavors. When it's time to enjoy your leftovers, reheating is simple. Preheat your oven to 350°F (175°C). Place the lasagna in a baking dish. If you want, add a splash of Alfredo sauce on top to keep it moist. Cover it with foil to prevent drying out. Bake for about 20-25 minutes, or until heated through. You can also reheat individual slices in the microwave for about 1-2 minutes on high. Just check and stir halfway through for even heating. If you want to save some for later, freezing is a great option. Cut the lasagna into portions for easy serving. Wrap each piece tightly in plastic wrap, then foil. This double wrapping helps prevent freezer burn. You can freeze it for up to three months. When ready to eat, let it thaw in the fridge overnight. Reheat in the oven or microwave as mentioned above. Enjoy your homemade meal anytime! For the full recipe, refer to the earlier section. Yes, you can use different pasta shapes. You might try wide egg noodles or even gluten-free options. Just make sure they fit well in your dish. Cook them according to the package directions. This way, they will blend smoothly with the other layers. To make Alfredo sauce, start with butter and cream. Melt 1/2 cup of butter in a pan. Then stir in 1 cup of heavy cream. Cook for about 5 minutes on low heat. Add 1 cup of grated Parmesan cheese. Mix well until it melts. Season with salt, pepper, and garlic powder for flavor. Homemade sauce tastes fresh and creamy. You can tell your lasagna is done when the cheese on top is golden brown and bubbly. Insert a knife in the center; it should slide in easily. If the layers are hot and firm, your lasagna is ready to enjoy. Let it cool a bit before serving for the best slices. For the full recipe, check out the details above. This blog post covered key ingredients for an amazing lasagna. You learned about substitutions, step-by-step cooking, and tips for a perfect dish. I shared tasty variations and smart storage ideas. When you try this recipe, you’ll enjoy a delicious meal that fits your taste. Remember, cooking is fun. Experiment with different flavors and enjoy the process!](https://goldendishy.com/wp-content/uploads/2025/07/68bc65d6-2565-4554-ba8a-7f3921e48887-768x768.webp)
![- 4 large bell peppers (any vibrant color) - 1 cup quinoa, thoroughly rinsed and drained - 2 cups vegetable broth - 1 can (15 oz) black beans, well rinsed and drained - 1 cup corn (fresh, frozen, or canned, drained) - 1 cup cherry tomatoes, halved - 1 teaspoon ground cumin - 1 teaspoon smoked paprika - 1 teaspoon garlic powder - Salt and freshly cracked black pepper to taste - 1 tablespoon extra virgin olive oil - ½ cup shredded cheddar cheese (optional but recommended) - Fresh cilantro or parsley, finely chopped for garnish - Additional vegetables (e.g., zucchini, mushrooms) - Spices and herbs (e.g., oregano, chili powder) When making stuffed bell pepper boats, you have many options. I love using colorful bell peppers. They add a fun look to your dish. Choose ones that are firm and bright. For the filling, I use quinoa. It’s not only healthy but also tasty. Rinse it well before cooking. The vegetable broth adds flavor and makes it rich. Black beans are another great choice. They are filling and packed with protein. Rinse them well too, to get rid of extra salt. Corn brings sweetness to the dish. You can use fresh, frozen, or canned corn. Cherry tomatoes add a nice juicy burst. Spices like cumin and paprika give depth. Garlic powder adds that warm flavor we all love. Don’t forget to season with salt and pepper to make it pop. Finally, I drizzle olive oil on the filling. It helps everything blend together. If you love cheese, add some cheddar on top for creaminess. Feel free to customize your stuffed peppers with optional add-ins. You can mix in other veggies like zucchini or mushrooms. Extra spices can make a big impact too. This recipe is flexible. You can adjust it to fit your taste. Explore and have fun with your stuffed bell pepper boats! For the complete guide, check out the Full Recipe I have shared. - Preheat the oven to 375°F (190°C). - Prepare the bell peppers by cutting off their tops. Carefully remove the seeds and membranes. Make sure they sit upright in a baking dish. - Combine 1 cup of quinoa and 2 cups of vegetable broth in a saucepan. - Bring this mix to a boil, then reduce the heat to low. Cover the pot and let it simmer. Cook for about 15 minutes or until the quinoa is fluffy and the broth has absorbed. - In a large mixing bowl, combine the cooked quinoa with one can of black beans, one cup of corn, and spices. - Add 1 teaspoon of ground cumin, 1 teaspoon of smoked paprika, and 1 teaspoon of garlic powder. Season with salt and black pepper. - Drizzle 1 tablespoon of olive oil over the mixture. Stir until everything is well blended. - Carefully spoon the filling into each prepared bell pepper. Press it down gently to pack it in. - If you like, top each stuffed pepper with ½ cup of shredded cheddar cheese for added flavor. - Pour a little water into the bottom of the baking dish. Cover the dish with aluminum foil. This helps keep the peppers moist. - Bake the stuffed peppers in the preheated oven for 25-30 minutes. Check for doneness; they should be fork-tender. Enjoy your delicious Stuffed Bell Pepper Boats with vibrant colors and flavors! For the full recipe, please refer back to the recipe section. To start, cutting bell peppers right matters. Slice off the tops using a sharp knife. Be careful not to cut too deep. Next, remove the seeds and white membranes inside. A small spoon works great for this. Rinse the peppers under cold water to clean them. For even cooking, place your stuffed peppers tightly in the baking dish. This helps them cook at the same rate. Mixing flavors is key, too. Use spices like cumin and smoked paprika to boost taste. You can taste the filling before you stuff the peppers. Adjust the salt and pepper as needed. Serving your stuffed bell pepper boats can be fun. Use a colorful platter to catch the eye. Arrange the peppers upright, showing off their filling. You can add a wedge of lime on the side for a fresh touch. A sprinkle of chopped cilantro or parsley adds color and flavor. You can prepare stuffed peppers ahead of time. Stuff them and cover with foil. Store them in the fridge for up to a day. This makes meal prep easy for busy nights. For sides, consider a fresh salad or crusty bread. You can also pair them with rice or quinoa for a filling meal. These peppers are great for family dinners or potlucks. For the full recipe, check out Stuffed Bell Pepper Boats. {{image_4}} You can easily make this dish vegetarian. Substituting quinoa with rice or couscous works well. Rice gives a nice texture, while couscous cooks faster. Both options taste great in these stuffed bell pepper boats. Adding different vegetables also boosts flavor and nutrition. Try diced zucchini, mushrooms, or spinach. These veggies add color and crunch. You can mix and match to fit your taste. Want to add meat? Ground turkey or beef makes a hearty filling. Just cook the meat before adding it to the quinoa mixture. This step ensures the meat is safe to eat. When adding meat, adjust the spices. You might want to use more cumin or paprika. This adjustment gives the dish a richer taste. Cheese can take your stuffed peppers to the next level. Mozzarella or feta are great choices. Mozzarella melts beautifully, while feta adds a tangy twist. For even more flavor, add layers of salsa or sauce. It keeps the filling moist and adds a kick. You can also drizzle some sauce on top before baking. This extra step makes the dish even more delicious. Check out the [Full Recipe] for all the details! To keep your stuffed bell pepper boats fresh, store them in an airtight container. This helps lock in moisture and flavor. You can keep them in the fridge for about 3 to 4 days. If you want to save them for later, allow them to cool completely before storing. You can freeze stuffed peppers both before and after baking. If you freeze them before cooking, wrap them tightly in plastic wrap and then in aluminum foil. This keeps out air and prevents freezer burn. If you choose to freeze them after baking, let them cool first. Then, place them in a freezer-safe container. They will stay good for up to 3 months. To reheat your stuffed peppers, the oven works best. Preheat it to 350°F (175°C). Place the peppers in a baking dish and cover with foil. Bake for about 20 to 25 minutes until heated through. You can also use a microwave if you're in a hurry. Just place one pepper on a plate and heat for 2 to 3 minutes. This method may make them a bit softer, but they'll still taste great! To make stuffed bell peppers in advance, prepare the filling first. Cook the quinoa and mix it with your beans, corn, and spices. Once mixed, stuff each bell pepper with the filling. You can store them in the fridge for up to two days before baking. Cover them tightly to keep them fresh. When ready to bake, just pop them into the oven. This saves you time and effort on busy nights. Yes, you can use other types of peppers! Try using poblano, Anaheim, or even jalapeño peppers. Each type adds a unique flavor and spice level. Poblano peppers are mild and have a rich taste. They also hold a good amount of filling. If you like a bit of heat, jalapeños are a great choice. Just remember to adjust the cooking time if your peppers are smaller. Stuffed bell pepper boats pair well with many side dishes. Some great options include a fresh green salad, roasted vegetables, or rice. You can also serve them with a side of guacamole or salsa for added flavor. If you want something warm, consider serving bread or cornbread. These sides complement the flavors and make for a complete meal. To adjust the spice level, you can add or reduce spices. For less heat, skip the cumin and paprika. If you want more flavor, add some chili powder or crushed red pepper. You can also mix in diced jalapeños or hot sauce. Start with a little and taste as you go. This way, you can find the perfect balance for your taste. Yes, this dish can be gluten-free! The main ingredients, like quinoa and beans, are naturally gluten-free. Just be sure to check that your vegetable broth is gluten-free as well. If you add other ingredients, like sauces or spices, check their labels. This way, you can enjoy a safe and tasty meal. Stuffed bell peppers are simple and fun to make. We covered the key ingredients and steps to prepare them. You learned how to customize flavors and presentation. Remember, you can use different spices, grains, or veggies. These peppers can please everyone, regardless of diet. Enjoy your meal prep and share these tasty, healthy treats with friends and family. Happy cooking!](https://goldendishy.com/wp-content/uploads/2025/07/06b7afd9-4005-4ab6-8aaa-ba374b5d3167-768x768.webp)
![To make your Fajita Veggie Sheet Pan, gather these simple and fresh ingredients: - Bell peppers (red, yellow, or green) - Zucchini - Red onion - Cherry tomatoes - Black beans - Olive oil - Spices and seasonings (chili powder, cumin, garlic powder, salt, pepper) - Fresh cilantro for garnish - Lime wedges for serving - Tortillas (corn or flour) These ingredients create a colorful and tasty dish. Using fresh veggies adds great flavor and texture. The spices make everything pop! You can adjust the veggies based on what you have or prefer. For example, you might try adding corn or mushrooms. Each change can lead to a new twist on this tasty recipe. This Fajita Veggie Sheet Pan really shows how simple ingredients can shine together. When you gather these items, you set the stage for a fun cooking adventure. Check out the Full Recipe for complete details on how to bring this delicious dish to life. 1. First, preheat your oven to 425°F (220°C). This helps the veggies cook just right. 2. Next, line a large sheet pan with parchment paper. This makes cleanup easy. 3. In a big mixing bowl, combine the sliced bell pepper, zucchini rounds, red onion wedges, halved cherry tomatoes, and rinsed black beans. 4. Drizzle 3 tablespoons of olive oil over the mixture. It helps the flavors blend. 5. Now, add 2 teaspoons of chili powder, 1 teaspoon of ground cumin, and 1 teaspoon of garlic powder. Don't forget a pinch of salt and black pepper. 6. Toss everything gently until each piece is well-coated with oil and spices. 1. Spread the veggie and bean mixture evenly on the prepared sheet pan. Make sure they are not crowded. 2. Place the pan in the preheated oven and roast for 20-25 minutes. Stir halfway through for even cooking. 3. The veggies should be tender and have slightly caramelized edges when done. 1. To warm the tortillas, you can use a skillet or microwave. Just a minute or two will do. 2. Fill each warm tortilla with the roasted fajita veggies. 3. Top with fresh cilantro and a drizzle of lime juice for extra flavor. 4. Serve the filled tortillas on a platter, garnished with lime wedges and extra cilantro for a beautiful display. For the complete recipe, check out the [Full Recipe]. To get the best from your fajita veggies, even cooking is key. Spread the veggies in a single layer on the sheet pan. This helps them roast well. Stir them halfway through cooking. This way, they brown nicely on all sides. Each oven runs a bit differently. You may need to adjust the cooking time. Keep an eye on the veggies. They should be tender and slightly charred. Want to kick up the flavor? Add more spices! A pinch of smoked paprika or cayenne pepper can work wonders. Fresh herbs like oregano or thyme also add depth. Don’t forget lime juice! A squeeze right before serving makes the dish pop. It gives a fresh, zesty flavor that brightens everything up. When serving, arrange the filled tortillas on a pretty platter. It makes the meal more inviting. Garnish with lime wedges and extra cilantro for color. You can also sprinkle some crumbled cheese on top. This adds a nice touch and looks great. A vibrant display makes your Fajita Veggie Sheet Pan Delight even more appetizing. {{image_4}} You can swap out veggies to suit your taste. Try adding mushrooms or sweet potatoes. Seasonal choices like asparagus or butternut squash work well, too. Think of what’s fresh at your local market. Broccoli and cauliflower also add great texture. Mix and match for a colorful plate. Want to make this dish heartier? Tofu or tempeh are great choices. Cube them and toss with your veggies. You can also add chickpeas for extra protein. They blend well with the spices. If you eat meat, grilled chicken or shrimp can elevate this dish. Just season them like your veggies for a tasty mix. Experimenting with spices can change your dish. For a mild flavor, stick with cumin and garlic. If you like heat, add cayenne or smoked paprika. Try a taco seasoning mix for a new twist. You could even toss in fresh herbs like cilantro or oregano. This will keep your fajita veggie sheet pan exciting each time! To keep your fajita veggies fresh, store them in an airtight container. Place the container in the fridge. This way, your flavors stay bright. Use leftover veggies within three to four days for best taste. For reheating, the oven is your best friend. Preheat it to 350°F (175°C). Spread the veggies on a baking sheet and heat for about 10 minutes. This restores texture and taste. You can also use the microwave, but the oven keeps them crisp. If you have extras, try adding them to a salad or a quesadilla for a tasty twist. To freeze the fajita veggie mix, let it cool first. Then, transfer it to a freezer-safe bag. Remove as much air as you can before sealing. This helps prevent freezer burn. When ready to use, move it to the fridge overnight to thaw. Reheat as mentioned above, and enjoy! It takes about 10 minutes to prep. Roasting in the oven takes 20-25 minutes. Altogether, you can enjoy this dish in about 30-35 minutes. Yes, you can easily swap veggies. Try adding mushrooms, asparagus, or even corn. Just make sure they cut evenly for even cooking. Absolutely! This dish is great for meal prep. You can store it in the fridge for up to four days. Just reheat portions as needed. Corn or flour tortillas are both great options. Corn tortillas give a nice crunch, while flour tortillas are soft and chewy. To spice things up, add more chili powder. You can also include fresh jalapeños or a splash of hot sauce. Experiment with heat to find your perfect level. You can prepare the veggies and seasoning ahead. Just store them in the fridge. When ready, roast them for a quick, fresh meal. For the full recipe, check out the details in the main article! This blog post covered how to make delicious fajita veggies on a sheet pan. We talked about the ingredients, preparation steps, and tips for perfect roasting. You learned about storing leftovers and customizing the recipe to fit your taste. In summary, this dish is both fun and easy to prepare. You can explore different veggies and spices, making it your own. Enjoy this tasty meal with friends or family, and remember, cooking should always bring joy!](https://goldendishy.com/wp-content/uploads/2025/07/261fee1c-f0d4-4ba8-a84d-53625610978f-768x768.webp)


