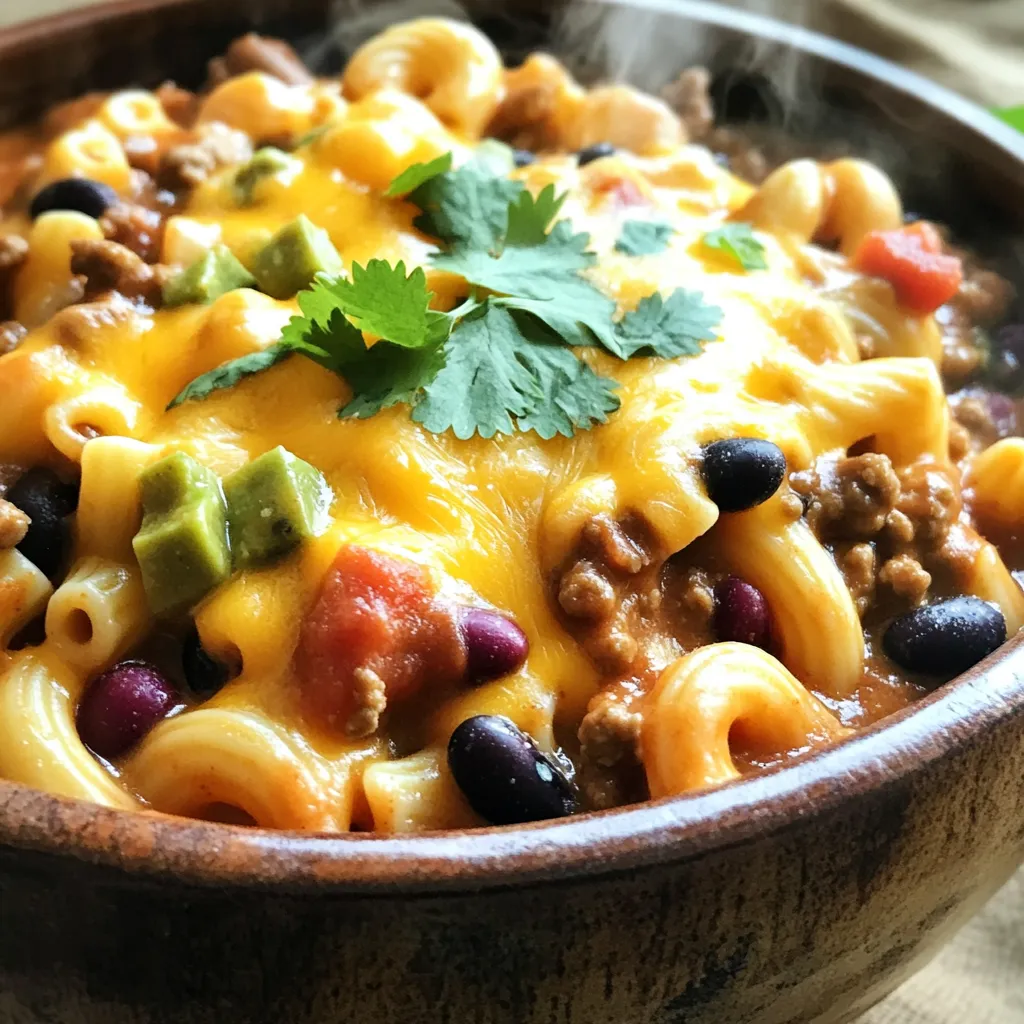
Slow Cooker Chili Mac and Cheese Comfort Dish

Looking for a dish that warms your heart and satisfies your taste buds? My Slow Cooker Chili Mac and Cheese is the answer! With creamy cheese, hearty beans, and tender pasta, it’s comfort food at its best. Plus, it’s easy to prepare and perfect for any night. Join me as we explore simple steps, tips, and variations to make this dish your new favorite family meal. Let’s dive in!
Ingredients
Main Ingredients
– 2 cups elbow macaroni
– 1 lb ground turkey or ground beef
– 1 can (15 oz) black beans, rinsed and drained
– 1 can (15 oz) kidney beans, rinsed and drained
These main ingredients form the heart of your chili mac and cheese. The elbow macaroni provides a fun shape and a base to soak up flavors. Ground turkey or beef adds protein and richness. Black beans and kidney beans bump up the fiber and give extra texture.
Pantry Staples
– 1 can (15 oz) diced tomatoes with green chilies
– 1 can (15 oz) tomato sauce
– 2 cups beef broth or vegetable broth
– 1 tablespoon chili powder
– 1 teaspoon ground cumin
– 1 teaspoon garlic powder
– 1 teaspoon onion powder
– 1 teaspoon smoked paprika
Using pantry staples makes this dish easy to prepare. The diced tomatoes with green chilies give a zesty kick. Tomato sauce adds depth, while broth keeps everything moist. The spices bring warmth and flavor, creating a balanced chili taste.
Cheese Selection
– 1 cup shredded sharp cheddar cheese
– 1 cup shredded mozzarella cheese
– Fresh cilantro leaves, for garnishing
Cheese is what makes this dish creamy and indulgent. Sharp cheddar packs a punch, while mozzarella adds stretch. Garnishing with fresh cilantro gives a pop of color and freshness, enhancing the overall dish.
These ingredients work together to create a comforting bowl of chili mac and cheese that warms both the heart and belly.
Step-by-Step Instructions
Preparing the Meat
First, I cook the ground turkey or beef. I heat a skillet over medium heat. Then, I add the meat and break it apart with a spatula. I cook it until it turns brown and is fully cooked, about 7 to 10 minutes. Next, I drain any excess fat from the skillet. After that, I transfer the browned meat to the slow cooker.
Combining Ingredients in the Slow Cooker
In the slow cooker, I add the ingredients. I start with 2 cups of elbow macaroni. Then, I add the black beans and kidney beans. I make sure to rinse and drain them first. After that, I mix in the diced tomatoes with their juice and the tomato sauce. Finally, I pour in 2 cups of beef or vegetable broth.
Seasoning the Dish
Next, I season the dish. I sprinkle in 1 tablespoon of chili powder, 1 teaspoon of ground cumin, and 1 teaspoon each of garlic powder and onion powder. I also add 1 teaspoon of smoked paprika and a pinch of salt and black pepper. Then, I stir everything well to mix the spices evenly.
Slow Cooking Time
Now, I cover the slow cooker with its lid. I can cook on high for 2 to 3 hours or on low for 4 to 5 hours. I check for tenderness about 30 minutes before the end. The macaroni should be soft but not mushy.
Incorporating Cheese
About 30 minutes before serving, I add the cheese. I carefully stir in 1 cup of shredded sharp cheddar and 1 cup of shredded mozzarella. I mix thoroughly to ensure the cheeses melt and create that creamy texture.
Final Touches
When cooking is done, I taste the chili mac for seasoning. If needed, I adjust with more salt and black pepper. To serve, I ladle the chili mac into bowls. I love garnishing each bowl with fresh cilantro leaves for color and flavor.
Tips & Tricks
Perfecting Your Chili Mac
To get the best flavor, cook your meat well. Brown it fully before adding it to the slow cooker. This step adds depth to your dish. Always taste your chili mac before serving. This way, you can adjust the salt and pepper to your liking. For spice lovers, consider adding jalapeños or hot sauce to kick things up a notch. You can also reduce the chili powder for a milder taste.
Slow Cooker Maintenance
Cleaning your slow cooker is simple. After it cools, wash the pot with warm, soapy water. Avoid using steel wool; it can scratch the surface. For leftovers, store them in an airtight container. This keeps your chili mac fresh in the fridge. If you want to keep it longer, freeze it in portions. Just thaw it in the fridge overnight before reheating.
Enhancing Flavor Profiles
Want to elevate your chili mac? Try adding bell peppers or corn for extra sweetness. You can also mix in spices like oregano or thyme for a unique twist. Pair your chili mac with crusty bread or cornbread for a complete meal. A side salad can add a refreshing crunch to balance the creamy dish. Enjoy experimenting with flavors to make this dish your own!
Variations
Vegetarian Option
You can make this chili mac meat-free. Just swap the ground turkey or beef for meat alternatives like tempeh or plant-based crumbles. These options provide great flavor and texture. You can also boost protein by adding more beans or lentils. Black beans and kidney beans work well and add a hearty feel. If you want to add more color, consider using chickpeas as a tasty addition.
Cheese Alternatives
Cheese lovers can have fun with different combinations. Try using pepper jack for a spicy kick or gouda for a smoky flavor. If you’re looking for dairy-free options, there are many great choices today. Look for dairy-free cheddar or mozzarella at your local store. These options melt nicely, making the dish creamy while keeping it plant-based.
Additional Flavor Add-Ins
Toppings can take this dish to the next level. Try adding jalapeños for heat or sour cream for creaminess. Avocados add a nice creaminess and fresh taste. If you want to sneak in some veggies, bell peppers or corn can work wonders. These add texture and sweetness to your chili mac. Explore these variations to find your favorite combination!
Storage Info
Leftover Storage
To store leftover chili mac, let it cool first. Then, place it in an airtight container. This keeps it fresh in the fridge for up to four days. If you want to keep it longer, freeze it. Use freezer-safe bags or containers. Make sure to remove as much air as possible. Label the bags with the date. This way, you’ll remember when you made it.
Reheating Instructions
When it’s time to eat the leftovers, you can reheat them in a few ways. The microwave is quick; just make sure to stir it halfway through. You can also use a pot on the stove. Add a splash of broth or milk to help keep it creamy. Stir often as it heats. Avoid cooking it too long, or it might dry out.
Shelf Life
Your chili mac can last up to four days in the fridge. If you freeze it, it can last for about three months. Always check for signs of spoilage. If it smells off or has changed color, it’s best to toss it. Keep your dish safe and tasty!
FAQs
Can I use gluten-free pasta?
Yes, you can use gluten-free pasta. Some good choices are brown rice pasta, quinoa pasta, or chickpea pasta. These options work well and keep a nice texture in your dish. Just make sure to adjust the cooking time as gluten-free pasta may cook faster.
How do I make chili mac spicier?
To spice up your chili mac, add diced jalapeños or a splash of hot sauce. You can also increase the chili powder or cumin. For a smoky flavor, try adding chipotle powder. Taste as you go to find the right heat level for you.
Can I make this recipe in advance?
Yes, you can prep this dish ahead of time. Cook the meat and mix all the ingredients, then store them in your slow cooker base in the fridge. In the morning, just plug it in and let it cook. This way, dinner is ready when you come home.
What can I serve with slow cooker chili mac and cheese?
For sides, crusty bread or cornbread pairs great with this dish. A fresh salad adds a nice crunch too. If you want more flavor, serve with pickled jalapeños or sliced avocado. These add extra taste and texture to your meal.
Is it possible to cook this on the stove instead?
Yes, you can cook chili mac on the stove. Start by browning the meat in a pot. Then, add the beans, tomatoes, broth, and spices. Stir in the elbow macaroni and let it simmer until the pasta is tender. Finally, mix in the cheese until it’s melted and creamy.
Chili mac is a hearty dish made with elbow macaroni, meat, beans, and cheese. We explored ingredients, cooking techniques, and variations to fit your taste. Remember, your slow cooker is a tool to enhance flavors. With the tips provided, you can elevate your dish, whether you keep it classic or try new twists. Always taste and adjust for your perfect bowl. Enjoy this comforting meal with friends and family, making long-lasting memories around the table. Happy cooking!

![To make your delicious crispy zucchini tacos, you'll need a few fresh ingredients. Here’s what you should gather: - 2 medium zucchinis, sliced into thin rounds - 1 cup cornmeal and seasonings: chili powder, garlic powder, onion powder, ground cumin - Fresh toppings: shredded lettuce, diced tomatoes, avocado slices, sour cream or Greek yogurt - Tortilla options: soft corn or flour These ingredients work together to create a tasty and fun meal. The zucchini brings a nice crunch, while the cornmeal adds flavor. Don’t forget the toppings! They add freshness and creaminess. If you want the full recipe, check out the Full Recipe for all the details. Set your oven to 425°F (220°C). This high heat will help make the zucchini crispy. Line a large baking sheet with parchment paper. This step prevents the zucchini from sticking and makes cleanup easy. In a medium mixing bowl, combine 1 cup of cornmeal with spices. Add 1 tablespoon of chili powder, 1 teaspoon of garlic powder, 1 teaspoon of onion powder, and 1/2 teaspoon of ground cumin. Season this mix with salt and freshly cracked black pepper. Mix well until everything is blended. This coating gives the zucchini great flavor and crunch. Take your zucchini rounds and dip them into the cornmeal mixture. Make sure both sides are coated evenly. Arrange the coated zucchini on the baking sheet in a single layer. Avoid overlapping the rounds to ensure they cook evenly. Place the baking sheet in the preheated oven and bake for 20-25 minutes. Halfway through, flip the zucchini rounds for an even golden brown color. Enjoy the crispy goodness as you prepare your tacos! For the complete recipe, see the [Full Recipe]. To get the best crispy texture, the coating needs to be even. Make sure you coat each zucchini round well. This way, every bite has flavor. Use a good amount of cornmeal mix on both sides. When you bake, flip the zucchini halfway. This helps them brown nicely and stay crisp. Warm tortillas before you fill them. You can heat them in a skillet over medium heat. Just a minute on each side makes them soft. You can also wrap them in foil and pop them in the oven. Give them a few minutes so they get warm and pliable. For a colorful dish, use a bright platter. Layer your crispy zucchini tacos with fresh toppings. Add shredded lettuce, diced tomatoes, and avocado slices. Finish with a dollop of sour cream or Greek yogurt. Serve with lime wedges for extra zest. A sprinkle of fresh cilantro adds a lovely touch. Use these tips to make your tacos not just tasty, but also beautiful! {{image_4}} You can easily make your crispy zucchini tacos vegan. For a creamy topping, replace sour cream with cashew cream or dairy-free yogurt. Both options give a rich flavor. You can also use mashed avocado as a spread. It adds creaminess and healthy fats. For toppings, use fresh veggies like radishes or sliced jalapeños for a spicy kick. These swaps keep your meal tasty and plant-based. To boost the flavor of your zucchini coating, try adding more spices. Smoked paprika can add a nice depth. You might also enjoy a pinch of cayenne for heat. Fresh herbs like cilantro or parsley can brighten the dish. Mix them into your cornmeal for an extra layer of flavor. Don't hesitate to experiment! The right spices can take your tacos to the next level. Zucchini is great, but many other veggies work well too. You can use sliced eggplant or summer squash for a similar texture. Carrots add a sweet crunch, while bell peppers bring color and flavor. For a different twist, try sweet potatoes. Just cut them into thin slices and bake. Each veggie offers a unique taste, so have fun mixing it up! You’ll find your favorite combinations. For the complete experience, check out the [Full Recipe]. To keep your crispy zucchini tacos fresh, use an airtight container. Place any leftover tacos in the container. You can store them in the fridge for up to three days. This method helps keep them from getting soggy. If you have extra zucchini rounds, store them separately. This way, they stay crispy longer. When you're ready to enjoy your leftovers, reheating correctly is key. The best way to revive that crunch is in the oven. Preheat your oven to 375°F (190°C). Place the tacos on a baking sheet. Heat them for about 10-15 minutes. This method ensures your tacos stay crispy. You can also use an air fryer for faster results. Just heat them for 5-7 minutes at 350°F (175°C). You can freeze crispy zucchini tacos, but it's best to freeze the zucchini rounds separately. After baking, let them cool completely. Then, place them in a single layer on a baking sheet and freeze for a few hours. Once frozen, transfer them to a freezer bag. This prevents sticking. You can store them in the freezer for up to three months. When ready to eat, bake them straight from the freezer. This keeps them crunchy and delicious. For the full recipe, check the detailed instructions above. To make crispy zucchini tacos, follow these steps: 1. Preheat your oven to 425°F (220°C). 2. Prepare a baking sheet with parchment paper. 3. Mix cornmeal and spices in a bowl. 4. Dip zucchini rounds in the cornmeal mix. 5. Arrange the coated zucchini on the baking sheet. 6. Bake for 20-25 minutes, flipping halfway. 7. Warm your tortillas in a skillet or oven. 8. Assemble tacos with zucchini, lettuce, tomatoes, avocado, and sour cream. This simple process makes crispy zucchini tacos that are full of flavor. The baking gives the zucchini a nice crunch while keeping the inside tender. You can find the full recipe above. You can use either corn or flour tortillas for zucchini tacos. - Corn Tortillas: - They are gluten-free. - They have a distinct flavor that pairs well with the zucchini. - Flour Tortillas: - They are soft and chewy. - They hold up well with toppings and fillings. Both options are great, so choose based on your taste! I often prefer corn tortillas for their authentic flavor. Yes, you can prepare some parts ahead of time. - Zucchini Rounds: You can coat and bake the zucchini earlier in the day. Store them in an airtight container. - Tortillas: Warm them just before serving to keep them soft. - Toppings: Dice your tomatoes and slice your avocado in advance, but keep them in the fridge. This way, you can quickly assemble the tacos when you're ready to eat. Enjoy your meal without the rush! This blog post covered how to make crispy zucchini tacos. You learned about the ingredients, instructions, and tips for perfecting texture. I also shared variations for dietary needs and options to store leftovers. Crispy zucchini tacos are fun, easy to make, and delicious. You can enjoy them during any meal. Experiment with the toppings to make each taco special. Enjoy your cooking!](https://goldendishy.com/wp-content/uploads/2025/06/dad710f9-4001-4f00-9608-4b60580076cc-768x768.webp)