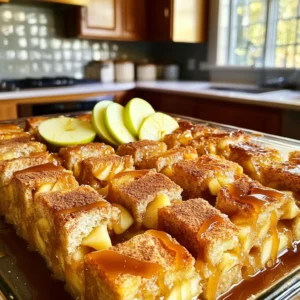
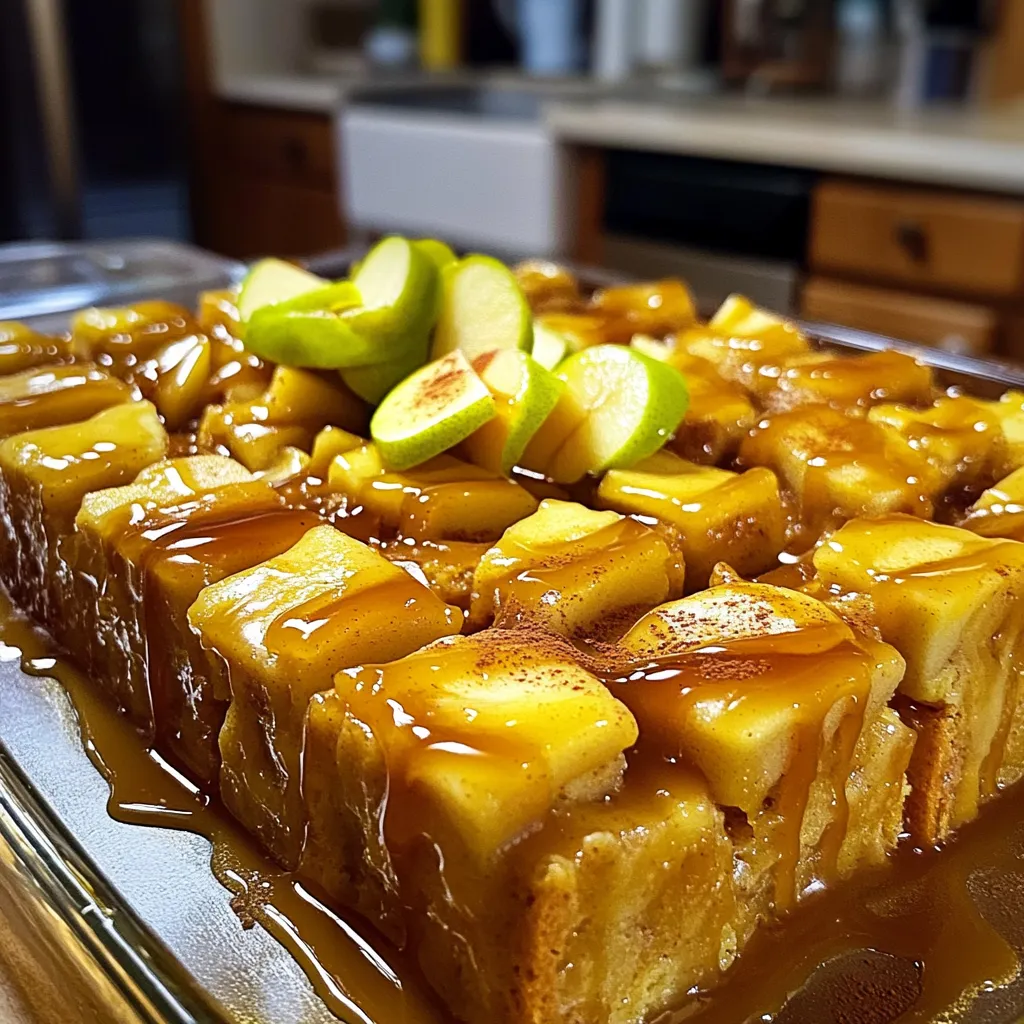
Caramel Apple Bread Pudding with Vanilla Sauce Delight

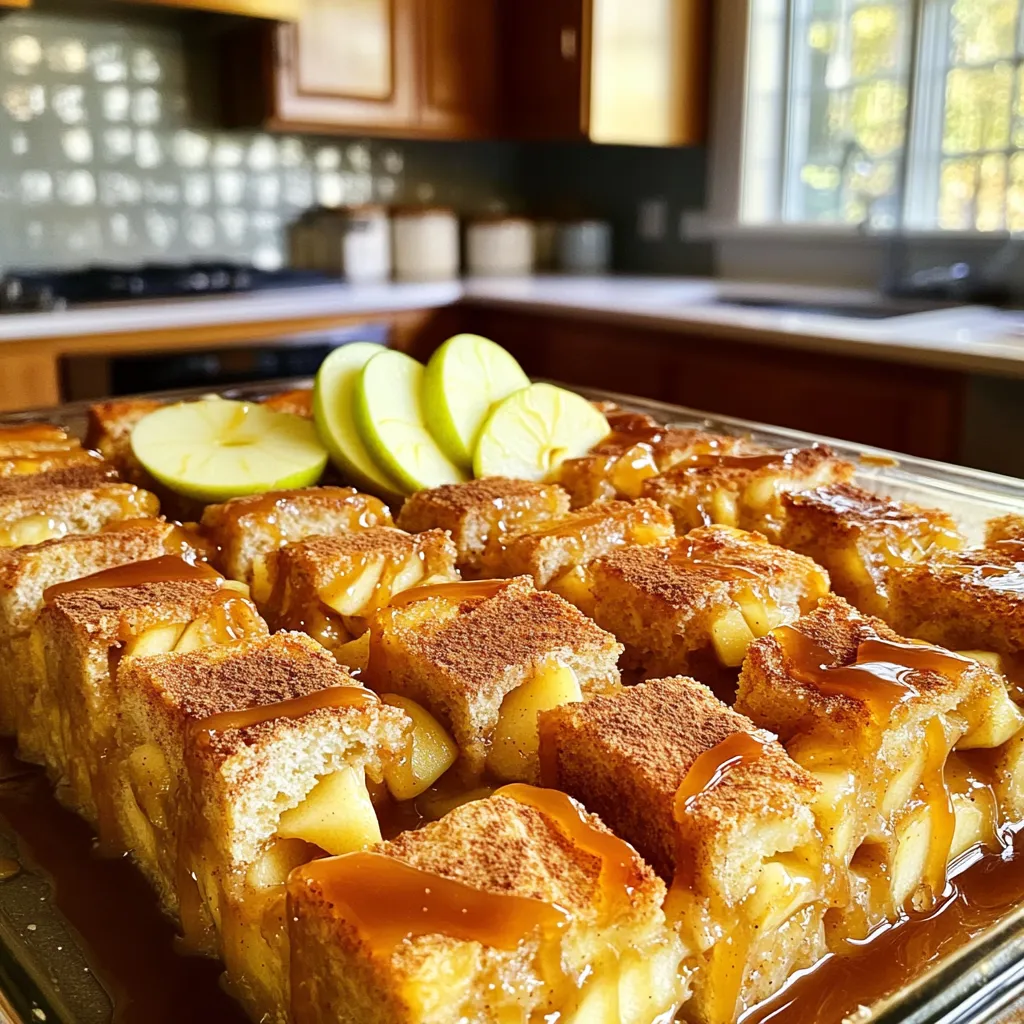
If you love warm, cozy desserts, you’re in for a treat! Caramel Apple Bread Pudding with Vanilla Sauce combines sweet apples, gooey caramel, and rich bread pudding into one decadent dish. In this post, I’ll guide you through simple steps to create this comforting dessert at home. Let’s dive into the ingredients, instructions, and tips to make it a hit at your next gathering!
Ingredients
List of Ingredients
– 6 cups of day-old bread, cubed
– 3 cups of whole milk
– 1 cup of heavy cream
– 1 cup of granulated sugar
– 4 large eggs
– 2 teaspoons of pure vanilla extract
– 3 medium apples, peeled, cored, and diced
– 1 teaspoon of ground cinnamon
– 1/2 teaspoon of ground nutmeg
– 1 cup of caramel sauce
– 1/2 cup of chopped pecans (optional)
– A pinch of salt
Recommended Bread Types
I find that using brioche or challah gives the best texture. These breads soak up the custard well. They add a soft, rich flavor. You want bread that is a bit stale. Fresh bread will turn mushy.
Optional Ingredients for Extra Flavor
For a deeper taste, try adding chocolate chips or raisins. You can also add a splash of bourbon or rum for warmth. If you like spice, try adding a pinch of ginger or clove. Each of these options will bring a new twist to your dish.
Step-by-Step Instructions
Preheating and Preparation
Start by preheating your oven to 350°F (175°C). Grease a 9×13 inch baking dish with butter or non-stick spray. This step helps to prevent sticking. Use a generous amount, as it ensures easy serving later.
Whisking the Custard
In a large mixing bowl, whisk together the following ingredients:
– 3 cups of whole milk
– 1 cup of heavy cream
– 1 cup of granulated sugar
– 4 large eggs
– 2 teaspoons of pure vanilla extract
– 1 teaspoon of ground cinnamon
– 1/2 teaspoon of ground nutmeg
– A pinch of salt
Mix these until smooth. This custard will soak into the bread and create a soft, creamy texture.
Soaking the Bread
Take 6 cups of cubed day-old bread and gently fold it into the custard. Make sure each piece gets coated. Allow this mixture to sit for 10-15 minutes. This soaking time is key for flavor and texture.
Incorporating Apples and Pecans
Once the bread is soaked, fold in 3 diced apples and, if you like, 1/2 cup of chopped pecans. Use Granny Smith or Honeycrisp apples for a tart flavor. This adds sweetness and crunch to the dish.
Baking the Bread Pudding
Pour the soaked bread mixture into your prepared baking dish. Spread it out evenly. Drizzle half of the caramel sauce over the top. Bake for 45-55 minutes. The center should be firm, and the top will be golden and delicious.
Making the Vanilla Sauce
In a small saucepan, combine:
– 1 cup of heavy cream
– 1/2 cup of granulated sugar
– 1 teaspoon of vanilla extract
Heat this mixture over medium heat, stirring until the sugar dissolves. Cook for about 5-7 minutes until it thickens slightly. Remove from heat and let it cool for a few minutes.
Serving Suggestions
Cut the bread pudding into squares. Drizzle the remaining caramel sauce and a generous amount of vanilla sauce over each piece. For a special touch, sprinkle cinnamon and add fresh apple slices on top. A scoop of vanilla ice cream pairs perfectly with this warm dessert. Enjoy!
Tips & Tricks
Tips for Perfect Bread Pudding
– Use day-old bread. It absorbs the custard better.
– Brioche or challah gives a soft and rich texture.
– Soak the bread for 10-15 minutes. This helps it soak up the flavors.
– Whisk the custard well to mix all the ingredients.
– Add diced apples evenly to ensure every bite has fruit.
– Drizzle caramel sauce on top before baking for extra sweetness.
Common Mistakes to Avoid
– Don’t skip the soaking step. Bread needs time to absorb.
– Avoid using fresh bread. It won’t soak up enough custard.
– Watch the baking time closely. Overbaking can dry it out.
– Skip the salt at your own risk. It enhances all the flavors.
– Don’t forget to let it cool slightly before serving. This helps it set.
Alternate Serving Suggestions
– Serve warm with a scoop of vanilla ice cream.
– Drizzle extra caramel sauce over each piece.
– Top with whipped cream for a light touch.
– Garnish with fresh apple slices or a sprinkle of cinnamon.
– Pair with a cup of coffee or tea for a cozy treat.

Variations
Flavor Variations
You can change the flavors in your caramel apple bread pudding to suit your taste. Here are some fun ideas:
– Add raisins or dried cranberries for a chewy texture.
– Swap apples for pears for a sweeter option.
– Use cinnamon rolls instead of bread for a unique twist.
– Add chocolate chips for a rich, decadent touch.
– Sprinkle in some orange zest for a fresh burst of flavor.
Dietary Modifications
If you have dietary needs, you can easily modify this recipe:
– Use gluten-free bread for a gluten-free option.
– Substitute almond milk for whole milk and heavy cream for a lighter version.
– Replace eggs with flaxseed meal mixed with water for a vegan recipe.
– Use maple syrup instead of sugar for a natural sweetener.
– Ensure your caramel sauce is dairy-free if needed.
Serving Variations
Serving your caramel apple bread pudding can be just as fun as making it:
– Top each piece with a scoop of vanilla ice cream for a warm-cool combo.
– Drizzle with whipped cream for a light, airy touch.
– Serve it warm with a side of fresh fruit for added freshness.
– Pair it with a cup of coffee or tea for a cozy dessert experience.
– Garnish with a sprinkle of nuts or a dash of cinnamon for extra flair.
Storage Info
How to Store Leftovers
To keep your caramel apple bread pudding fresh, let it cool completely first. Place it in an airtight container. You can store it in the fridge for up to five days. This way, you can enjoy a sweet treat whenever you like!
Reheating Instructions
When you’re ready to eat leftovers, preheat your oven to 350°F (175°C). Place the bread pudding in an oven-safe dish. Cover it with foil to keep it moist. Heat it for about 15-20 minutes. If you want, you can also microwave individual portions for 1-2 minutes on high.
Freezing and Thawing Tips
If you want to save some for later, you can freeze it. Cut the bread pudding into squares. Wrap each piece tightly in plastic wrap and then place it in a freezer bag. It can last for up to three months in the freezer. When you want to enjoy it, take it out and let it thaw in the fridge overnight. Then, reheat it as mentioned above for a delicious treat!
FAQs
Can I use different types of apples?
Yes, you can use different types of apples. Granny Smith offers a tart flavor that contrasts well with the sweet sauce. Honeycrisp gives a nice crunch and sweetness. Other types like Fuji or Gala can work too. Just pick apples that hold their shape when cooked.
How do I know when the bread pudding is done?
Check the center of the bread pudding. It should feel firm, not jiggly. The top should turn a golden brown. You can also insert a knife in the center. If it comes out clean, your pudding is ready.
Can I make this recipe ahead of time?
Yes, you can prepare this recipe ahead of time. You can soak the bread and mix the custard a day before. Just cover it and store it in the fridge. Bake it fresh on the day you want to serve it for the best taste.
What to serve with Caramel Apple Bread Pudding?
Serve it warm with a drizzle of vanilla sauce. A scoop of vanilla ice cream adds creaminess. You can also top it with fresh apple slices or a sprinkle of cinnamon. These add lovely flavors and textures to the dish.
How long does this dessert last in the fridge?
This dessert lasts about 3 to 4 days in the fridge. Make sure to cover it well to keep it fresh. Reheat individual servings in the microwave or oven. It will still taste great even after a few days!
This blog post covered the basics of making Caramel Apple Bread Pudding. We discussed essential ingredients, step-by-step instructions, and helpful tips. I shared serving suggestions, variations for different diets, and storage info.
By following these guidelines, you can create your own delicious bread pudding. Remember, you can experiment and make it your own. Enjoy creating this dessert and sharing it with others!


![- Sweet Potatoes and Main Components - 4 medium sweet potatoes, peeled and cut into 1-inch cubes - 1/4 cup unsalted butter, melted and slightly cooled - 2 large eggs, lightly beaten - Sweeteners and Flavor Enhancers - 1/2 cup packed brown sugar - 1/2 teaspoon ground cinnamon - 1/4 teaspoon ground nutmeg - 1/2 teaspoon pure vanilla extract - 1/4 teaspoon salt - Optional Toppings - 1 cup mini marshmallows (optional but recommended) - 1/2 cup crushed pecans (for topping) This sweet potato casserole is simple yet rich in flavor. The sweet potatoes provide a creamy base, while the butter and eggs bind everything together. The brown sugar adds a delightful sweetness, balanced by the warm spices of cinnamon and nutmeg. Don't skip the vanilla extract; it elevates the dish. For toppings, mini marshmallows add a fun touch, while crushed pecans give a nice crunch. You can always mix and match to suit your taste. This blend of ingredients makes the casserole a crowd-pleaser at any gathering. For the full recipe, check out Sweet Potato Delight Casserole. 1. Preheat the oven to 350°F (175°C). This warms the oven for baking. 2. Fill a large pot with water. Bring it to a boil, then add the sweet potatoes. Cook for 15-20 minutes until fork-tender. Drain them and let them cool. 3. In a bowl, mash the sweet potatoes until smooth. You can use a potato masher or fork for this. 4. Add brown sugar, melted butter, cinnamon, nutmeg, vanilla, and salt to the mashed sweet potatoes. Mix until everything is well combined, and the sugar is dissolved. 5. Fold in the beaten eggs carefully. Mix until fully combined with the sweet potato mix. 1. Grease a 9x13-inch baking dish with butter or cooking spray. Pour the sweet potato mixture into the dish. Spread it evenly with a spatula. 2. If you want extra sweetness, sprinkle mini marshmallows on top. 3. In a small bowl, mix crushed pecans with a tablespoon of brown sugar. Sprinkle this mix over the casserole for crunch and flavor. 4. Bake in the preheated oven for 25-30 minutes. The top should turn a golden brown color when done. 1. Let the casserole cool for a few minutes before serving. This helps it set and makes it easier to serve. 2. Serve in the baking dish for a rustic look. You can garnish with fresh mint or a dusting of cinnamon for a fun touch. Enjoy your Sweet Potato Delight Casserole! - Overcooking Sweet Potatoes: Cooking sweet potatoes too long can make them mushy. Aim for fork-tender. - Skipping the Cooling Time: Letting the potatoes cool helps the mix set well. Don't rush this step. - Balancing Sweetness: Sweet potatoes are naturally sweet. Adjust the brown sugar to your taste. - Experimenting with Spices: Try adding ginger or cloves for a unique twist. A little spice goes a long way. - Recommended Kitchen Tools: Use a potato masher for smooth sweet potatoes. A large bowl helps mix well. - Desired Texture and Consistency: Aim for a creamy texture. It should hold together but still be spoonable. Remember, these tips will help you create a perfect Sweet Potato Delight Casserole. Enjoy the process! {{image_4}} You can easily make a vegan sweet potato casserole. Just swap the eggs and butter. Use flaxseed meal mixed with water instead of eggs. For butter, use coconut oil or vegan butter. This keeps the dish creamy and tasty without dairy. For a gluten-free version, ensure your toppings are gluten-free. Most sweet potatoes are naturally gluten-free. Just check labels on any extras like marshmallows or sugar. If you want nut-free choices, skip the pecans. Instead, try using crushed graham crackers or oats. This gives a nice crunch without nuts. You can also add a sprinkle of cinnamon for more flavor. For sweeteners, you have options. Maple syrup or honey can replace brown sugar. These sweeteners add a different taste and can be healthier. Just remember to adjust the amount to keep it sweet. Check out the [Full Recipe] for more on making this dish your own! To keep your sweet potato casserole fresh, use these tips: - Refrigeration Tips: Allow the casserole to cool completely. Transfer it to an airtight container or cover the dish tightly with plastic wrap. Store it in the fridge for up to three days. This keeps it safe and tasty. - Freezing for Later: If you want to save some for later, freezing works well. Wrap the casserole tightly in plastic wrap, then in aluminum foil. This prevents freezer burn. You can freeze it for up to three months. When ready, thaw it in the fridge overnight before reheating. To enjoy your leftovers, follow these methods: - Best Methods for Reheating: The oven is the best choice for reheating. Preheat it to 350°F (175°C). Place the casserole in an oven-safe dish. Cover it with foil to keep it moist. Heat for about 20-25 minutes. - Ensuring Optimal Texture: To keep the topping crisp, remove the foil for the last 10 minutes. This helps the top brown nicely. If you use the microwave, heat in short bursts and stir in between to avoid hot spots. You can use unsweetened applesauce as a great egg substitute. Use 1/4 cup of applesauce for each egg. This keeps the dish moist and adds some natural sweetness. You can also try mashed bananas or flaxseed meal mixed with water. Use 1 tablespoon of flaxseed meal and 3 tablespoons of water, letting it sit for a few minutes to thicken. Sweet potato casserole lasts about 3 to 5 days in the fridge. Make sure to cover it tightly with plastic wrap or foil. This keeps it fresh and prevents it from absorbing other fridge odors. If you notice any off smell or mold, it’s best to throw it out. Yes, you can make sweet potato casserole ahead of time! Prepare it a day in advance and store it in the fridge. Just cover it well. When you are ready to bake, let it sit at room temperature for about 30 minutes before putting it in the oven. This helps it cook evenly. You can also freeze it for up to 2 months. Just thaw it in the fridge before baking. Check out the Full Recipe for more details! In this post, we explored sweet potato casserole, covering ingredients, preparation, and tips. We also discussed variations, storage, and common questions. Sweet potato casserole is easy to make and delicious. You can adjust it to fit your diet. Remember to avoid overcooking and cool it before serving. Enjoy making this comforting dish and share it with others!](https://goldendishy.com/wp-content/uploads/2025/07/98319592-8ca0-4761-9e68-56bba1fc8594-768x768.webp)


![To bake a delicious Raspberry Lemon Loaf, you need these key ingredients: - 1 ½ cups all-purpose flour - 1 teaspoon baking powder - ½ teaspoon baking soda - ¼ teaspoon salt - ½ cup unsalted butter, softened - 1 cup granulated sugar - 2 large eggs, at room temperature - 1 teaspoon pure vanilla extract - Zest of 1 lemon, finely grated - ½ cup freshly squeezed lemon juice - 1 cup fresh raspberries (or frozen, thawed, and drained) - ¼ cup powdered sugar for glazing - 1 tablespoon freshly squeezed lemon juice for glazing You can add extra flavor or texture with these options: - ½ cup chopped nuts, like walnuts or almonds - ½ teaspoon almond extract for a nutty taste - Lemon zest can be increased for a stronger flavor - A handful of blueberries can mix well with raspberries If you run out of an ingredient, here are some swaps: - Use coconut oil instead of butter for a dairy-free version - Applesauce can replace eggs for a vegan loaf - If you lack lemon juice, use lime juice instead - Whole wheat flour can stand in for all-purpose flour, but it may change the texture With these ingredients and options, you can customize your Raspberry Lemon Loaf to fit your taste! Start by preheating your oven to 350°F (175°C). Grab a 9x5 inch loaf pan. Grease it with butter and lightly dust it with flour. This will help the loaf come out easily. In a medium bowl, whisk together the following: - 1 ½ cups all-purpose flour - 1 teaspoon baking powder - ½ teaspoon baking soda - ¼ teaspoon salt Set this mixture aside for later use. This step ensures the leavening agents are evenly distributed. In a large mixing bowl, use an electric mixer to cream together: - ½ cup unsalted butter, softened - 1 cup granulated sugar Beat them for about 3-5 minutes. The mixture should turn light and fluffy. This helps air to blend into the butter. Now, add 2 large eggs one at a time. Mix well after each addition. Next, stir in: - 1 teaspoon pure vanilla extract - Zest of 1 lemon Make sure everything combines fully. This adds a nice flavor to your loaf. Slowly pour in ½ cup of freshly squeezed lemon juice. Mix gently until it blends well with the other wet ingredients. This step gives your loaf a bright, zesty taste. Gradually add the dry mixture to the wet mix. Stir gently until just combined. Be careful not to overmix. This keeps your loaf light and airy. Now, it’s time to add the fun part! Gently fold in 1 cup of fresh raspberries. If you use frozen ones, coat them lightly in flour. This helps them stay suspended in the batter. Pour the batter into your prepared loaf pan. Smooth the top with a spatula. Bake in the preheated oven for 50-60 minutes. Check for doneness by inserting a toothpick in the center. It should come out clean. Once baked, let the loaf cool in the pan for about 10 minutes. Then transfer it to a wire rack to cool completely. For glazing, mix together: - ¼ cup powdered sugar - 1 tablespoon freshly squeezed lemon juice Drizzle this glaze over the cooled loaf for a sweet finish. Slice the loaf into generous pieces. Enjoy the burst of raspberry and lemon flavors in every bite! You can serve it on pretty plates. Garnish with fresh raspberries and a sprinkle of lemon zest for an elegant touch. This loaf is perfect for breakfast or a sweet snack! For the Full Recipe, check out the detailed instructions. One big mistake is overmixing the batter. This can make the loaf tough. Mix until just combined for a light texture. Another mistake is not checking the oven temperature. An oven thermometer can help ensure accuracy. Also, if you forget to grease your pan, the loaf may stick. Always prepare your pan before pouring in the batter. For a soft and moist loaf, use room temperature ingredients. Cold butter or eggs can lead to uneven mixing. When folding in raspberries, do it gently. This helps keep them whole and prevents a mushy loaf. Make sure your oven is fully preheated. This ensures even baking and a perfect rise. To boost flavor, add more lemon zest. This can brighten the taste. You can also mix in a dash of almond extract for a unique twist. If you want a sweeter glaze, add more powdered sugar. For a touch of spice, a pinch of cinnamon can be delightful. Enjoy experimenting with flavors to find your perfect blend! {{image_4}} To make a gluten-free version, swap the all-purpose flour with a gluten-free blend. Use one that works well for baking. The texture may change slightly, but the taste will still shine. This version is just as delicious and perfect for those with gluten issues. For a vegan twist, replace the eggs with flax eggs. Mix one tablespoon of ground flaxseed with three tablespoons of water. Let it sit for five minutes. Use a plant-based butter instead of regular butter. This keeps the loaf moist and tasty while being dairy-free. You can switch out the raspberries for other fruits! Blueberries or strawberries work well. For a tropical touch, try diced pineapple or mango. Each fruit brings its own flavor, making your loaf unique. Experiment and find your favorite mix! For the full recipe, refer to the section above. After you bake your Raspberry Lemon Loaf, let it cool completely. Wrap it tightly in plastic wrap or foil. You can also place it in an airtight container. Store it at room temperature for up to three days. If you prefer, keep it in the fridge for about a week. This helps keep it fresh and moist. To freeze the loaf, first cool it completely. Then, slice it into even pieces. Wrap each slice in plastic wrap. Next, place the wrapped slices in a freezer-safe bag. You can freeze them for up to three months. When you’re ready to enjoy a slice, thaw it in the fridge overnight or let it sit at room temperature for a few hours. Reheating is simple. You can use a microwave or an oven. For the microwave, heat a slice for about 15-20 seconds. Check if it’s warm enough. If you use the oven, preheat it to 350°F (175°C). Place the slice on a baking sheet for about 5-10 minutes. This method keeps the loaf soft and tasty. Enjoy your Raspberry Lemon Loaf warm with a cup of tea or coffee! You can check if your loaf is done by inserting a toothpick in the center. If it comes out clean or with just a few crumbs, your loaf is ready. You can also look for a golden-brown crust and a slight spring back when you gently press the top. Yes, you can use frozen raspberries! Just make sure to thaw them and drain off any extra liquid. Toss them in some flour before folding them into the batter. This helps to keep them from sinking to the bottom while baking. If you don't have lemon juice, you can use lime juice or even apple cider vinegar. Both options will give a nice tang to your loaf. Just remember that the flavor will change slightly. The Raspberry Lemon Loaf will stay fresh for about 3-4 days at room temperature if stored in an airtight container. It also freezes well for up to 3 months. Just wrap it tightly before freezing. Absolutely! You can make the loaf a day or two ahead of time. Store it in an airtight container to keep it moist. You can also prepare the batter in advance and bake it later for a fresh treat. Be sure to check the [Full Recipe] for more tips! Here is the full recipe for Raspberry Lemon Dream Loaf. This treat is bright, sweet, and tangy. You will want to make it again and again. Ingredients: - 1 ½ cups all-purpose flour - 1 teaspoon baking powder - ½ teaspoon baking soda - ¼ teaspoon salt - ½ cup unsalted butter, softened to room temperature - 1 cup granulated sugar - 2 large eggs, at room temperature - 1 teaspoon pure vanilla extract - Zest of 1 lemon, finely grated - ½ cup freshly squeezed lemon juice - 1 cup fresh raspberries (or frozen raspberries, thawed and drained) - ¼ cup powdered sugar for glazing - 1 tablespoon freshly squeezed lemon juice for glazing This loaf serves about 10 people. Each slice has around 200 calories. You get a nice mix of carbs, fat, and protein. The fresh raspberries add fiber and vitamins, too. Slice the loaf into thick pieces. Each slice is perfect for a dessert or a snack. You can serve it on its own or with a cup of tea. The bright flavors make it a crowd-pleaser. For a fancy touch, add a few raspberries on top. Enjoy every bite! In this article, we explored the essential ingredients for a Raspberry Lemon Loaf, including optional add-ins and substitutions. I provided clear, step-by-step instructions to guide you from mixing to baking. We discussed tips for avoiding mistakes and achieving the right texture. You also learned about variations, storage methods, and answers to common questions. Now, with these insights, you can create a delicious loaf that suits your taste and needs. Enjoy baking and sharing this delightful treat!](https://goldendishy.com/wp-content/uploads/2025/07/83025fd5-21c0-4ee2-bbe4-d247d9a88122-768x768.webp)