
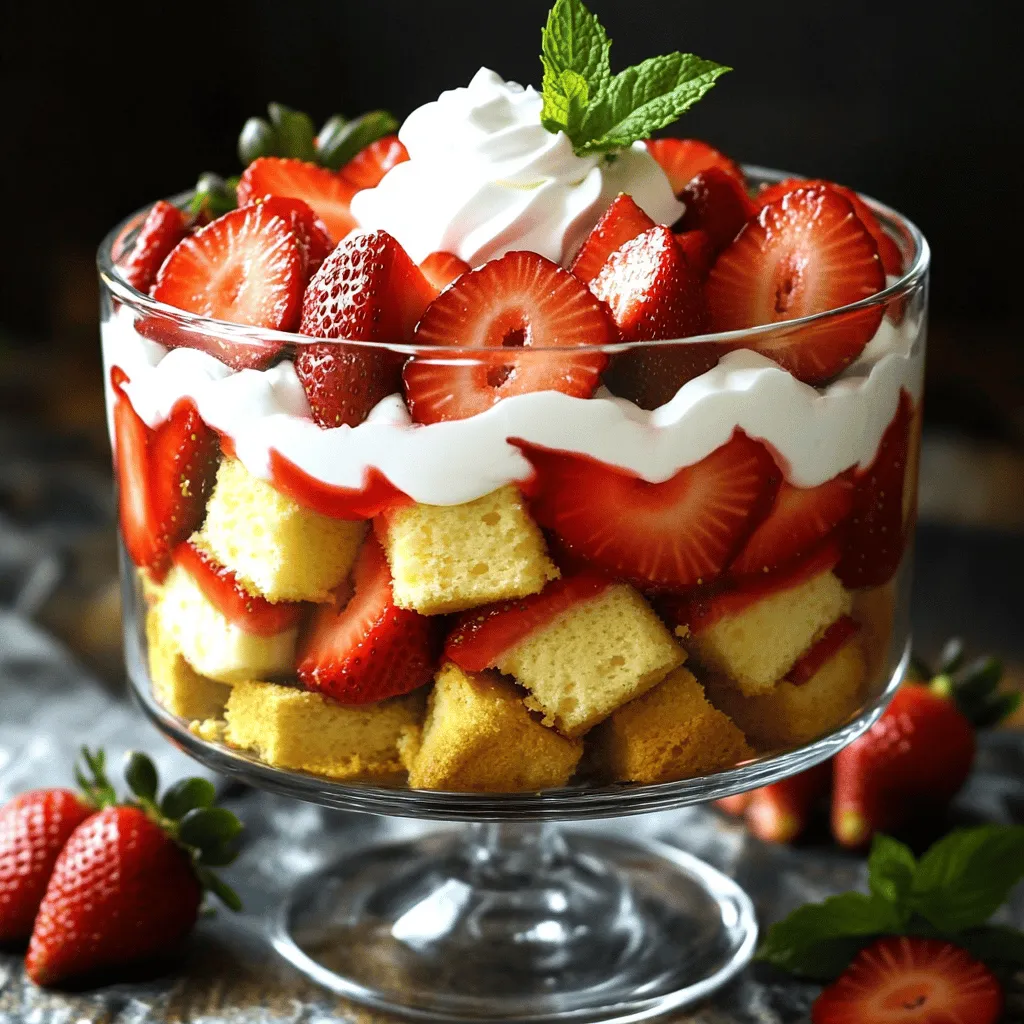
Strawberry Shortcake Trifle Fresh and Tasty Delight

Welcome to a dessert that screams summer: Strawberry Shortcake Trifle! This delightful treat layers juicy strawberries, fluffy cake, and creamy goodness into a stunning dish. Whether you’re hosting a party or simply craving something sweet, this recipe is a perfect choice. Join me as we dive into fresh ingredients, easy steps, and fun tips to make this trifle a showstopper. Get ready to impress your taste buds and loved ones!
Ingredients
Fresh Ingredients
– 2 cups fresh strawberries, hulled and sliced
– 1/4 cup granulated sugar
Cake Components
– 1 box (15 oz) vanilla cake mix or homemade vanilla cake
– 1/2 cup unsalted butter, softened
– 3 large eggs
Creamy Mixtures
– 1 cup heavy cream
– 1/4 cup powdered sugar
– 1 teaspoon vanilla extract
– 1 cup creamy Greek yogurt
– Fresh mint leaves for garnish (optional)
In making a strawberry shortcake trifle, the right ingredients matter greatly. Start with fresh strawberries. They give the dish a burst of flavor. You need two cups of strawberries. Wash, hull, and slice them. Next, mix the strawberries with a quarter cup of granulated sugar. This step helps draw out their natural juices.
For the cake, you can use either a box mix or your favorite homemade vanilla cake. You’ll need one box of vanilla cake mix, half a cup of softened unsalted butter, and three large eggs. If you choose to make it from scratch, ensure your recipe is simple and tasty.
To create that wonderful creamy layer, gather one cup of heavy cream, a quarter cup of powdered sugar, and one teaspoon of vanilla extract. These ingredients will whip up into a light, fluffy cream. Also, add in one cup of creamy Greek yogurt for a tangy twist. If you want to add color, consider fresh mint leaves for garnish. They can elevate the look of your trifle and add a refreshing taste.
Every ingredient plays a role in making this trifle a fresh and tasty delight.
Step-by-Step Instructions
Preparing the Strawberries
– Combine 2 cups of sliced strawberries with 1/4 cup of granulated sugar.
– Mix gently until the sugar coats the strawberries.
– Let the mixture rest for 30 minutes at room temperature. This helps the berries soften and release their tasty juices.
Baking the Cake
– Preheat your oven to 350°F (175°C).
– Grease a 9×13 inch baking dish.
– Prepare the cake mix according to the package instructions, or use your favorite homemade vanilla cake recipe.
– Pour the batter into the prepared dish.
– Bake for 25-30 minutes. Check with a toothpick; it should come out clean when done.
– Once baked, let the cake cool completely in the pan.
Assembling the Trifle
– Cut the cooled cake into small 1-inch cubes.
– In a mixing bowl, whip 1 cup of heavy cream until it thickens.
– Add 1/4 cup of powdered sugar and 1 teaspoon of vanilla extract. Continue whipping until stiff peaks form.
– In another bowl, stir 1 cup of creamy Greek yogurt until smooth. You can fold in some whipped cream for a lighter mix.
– To assemble, start with a layer of cake cubes at the bottom of a trifle dish or individual cups.
– Spoon a layer of the macerated strawberries over the cake.
– Follow with a layer of the Greek yogurt mixture, then top with whipped cream.
– Repeat the layers until all ingredients are used. Finish with a dollop of whipped cream.
– Chill in the fridge for at least 1 hour before serving. This helps the flavors blend nicely.
Tips & Tricks
Perfecting the Layers
To make your trifle shine, let your strawberries macerate. Mix the sliced strawberries with sugar and let them sit for 30 minutes. This step brings out their sweet juices. You can also play with the order of your layers. Try starting with cake, then yogurt, and finish with cream. This can add fun visuals.
Making Whipped Cream
For the best whipped cream, use cold heavy cream. Whip it until you see stiff peaks form. This means it holds its shape well. You can also use alternative sweeteners like honey or maple syrup. This adds a unique twist to your cream.
Serving Suggestions
Serve your trifle in individual cups for a personal touch. This makes it easy for guests. For a fancy finish, garnish with mint leaves and extra strawberry slices. This not only looks great but adds fresh flavor. Use clear glass dishes to show off those beautiful layers!
Variations
Seasonal Fruit Substitutes
You can swap strawberries for other fruits. Blueberries, raspberries, and peaches work great. Each fruit adds its own unique flavor. For example, blueberries bring a sweet-tart taste. Raspberries offer a delightful zing, while peaches add a juicy sweetness. Mix and match fruits to create your perfect trifle.
Gluten-Free Options
If you need a gluten-free trifle, use gluten-free cake mix. You can also make a homemade gluten-free cake. Look for recipes that use almond flour or coconut flour. These flours will keep your dessert light and fluffy. Always check labels to ensure no gluten sneaks in.
Healthier Alternatives
You can make this trifle a bit healthier. Swap whipped cream for creamy Greek yogurt. Greek yogurt adds protein and a tangy flavor. You can also cut back on sugar. Use less granulated sugar for the strawberries. This way, you enjoy a lighter dessert without losing taste.
Storage Information
Refrigeration Tips
To keep your strawberry shortcake trifle fresh, store it in the fridge. Use a tight lid to cover it. This helps keep the trifle moist and tasty. You can store it for up to three days before serving. The flavors will blend nicely during this time.
Freezing Guidelines
You can freeze your trifle, but it takes some care. The best way is to freeze each part separately. Freeze the cake cubes in an airtight bag. You can also freeze the whipped cream and yogurt mixtures in separate containers. Avoid freezing the strawberries, as they can get mushy.
Reheating Tips
If you have leftover trifle, reassemble it for serving. Start by layering the cake cubes at the bottom again. Then, add the strawberries and yogurt mixture as before. Finally, top with whipped cream. This way, you keep the layers looking nice and fresh.
FAQs
What is a trifle?
A trifle is a layered dessert. It usually has cake, fruit, and cream. You can see each layer through a clear dish. This makes trifles look very pretty. Traditional trifles use sponge cake. However, you can use any cake you like. The mix of textures and flavors makes trifles fun to eat.
Can I make strawberry shortcake trifle ahead of time?
Yes, you can make this trifle ahead of time. Prepare the trifle a few hours before serving. You can even make it a day in advance. Just keep it covered in the fridge. This helps the flavors blend well. Just remember to add any fresh toppings right before serving. This keeps them looking fresh and bright.
What other cakes can I use in a trifle?
You can use many different cakes in a trifle. Here are some great options:
– Pound cake
– Angel food cake
– Chocolate cake
– Lemon cake
– Spice cake
These cakes will work well with fruits and cream. Each type adds its own flavor and texture. Enjoy experimenting with different cakes in your trifles!
This blog post showcased how to create a delicious strawberry shortcake trifle. We discussed fresh ingredients, step-by-step baking, and assembly tips. You learned about variations, storage information, and FAQs. This dessert is great for any season and can be tailored to your taste. Remember, the right layers and flavors make all the difference. Enjoy crafting this easy, delightful treat for family and friends. Dive in and create a trifle that impresses everyone!


![To make the Easy Lemon Raspberry Loaf, you need a few simple ingredients. Here’s the list you will use: - 1 ¾ cups all-purpose flour - 1 cup granulated sugar - ½ cup unsalted butter - 2 large eggs - 1 teaspoon pure vanilla extract - 1 tablespoon fresh lemon zest - ½ cup freshly squeezed lemon juice - 1 teaspoon baking powder - ½ teaspoon baking soda - ¼ teaspoon fine sea salt - 1 cup fresh raspberries - Powdered sugar for dusting (optional) These ingredients help create a moist and zesty loaf. The lemon zest and juice add bright flavor. Fresh raspberries give you sweet bursts in every bite. Use unsalted butter to control the saltiness. It’s best to use fresh raspberries, but frozen will work too. Make sure to measure everything carefully. Baking is all about balance. Each ingredient plays a role in the final taste and texture. If you want to learn more about the steps to make this treat, check out the Full Recipe. - Setting the Temperature First, set your oven to 350°F (175°C). This step is crucial for even baking. - Preparing the Loaf Pan Grease a 9x5-inch loaf pan. You can also line it with parchment paper. This helps the loaf come out easily after baking. - Method of Mixing In a large bowl, combine softened butter and granulated sugar. Use a hand mixer or stand mixer to beat them together. - Desired Consistency Mix until the blend is light and fluffy. This should take about 3-4 minutes. The mixture should look pale and creamy. - Adding Eggs One at a Time Add the eggs one by one. Mix well after each egg to ensure they are fully blended. - Mixing Techniques After adding the eggs, stir in the vanilla extract and lemon zest. Mix gently but thoroughly to keep the batter smooth. - Combining Flour and Leavening Agents In another bowl, whisk together flour, baking powder, baking soda, and salt. This ensures even distribution of leavening agents. - Proper Mixing Technique Gradually add the dry mix to the wet mixture, alternating with lemon juice. Start and end with the dry ingredients. Mix gently, and don’t overmix. - Techniques to Preserve Raspberry Shape Carefully fold in the raspberries. Use a spatula to gently mix. This keeps the raspberries intact. - Ensuring Even Distribution Make sure the raspberries are evenly spread throughout the batter. This enhances the flavor in every slice. - Baking Time and Techniques for Doneness Pour the batter into the loaf pan. Bake for 55-60 minutes. To check doneness, insert a toothpick into the center of the loaf. It should come out clean. - Cooling Tips for Best Texture Once done, let the loaf cool in the pan for 10-15 minutes. Then, transfer it to a wire rack to cool completely. This helps achieve a perfect texture. Feel free to check the Full Recipe for more details! To make the best lemon raspberry loaf, avoid overmixing. Mixing too much can make the loaf dense. When you combine wet and dry ingredients, mix just until you see no flour. To check for doneness, insert a toothpick into the center. If it comes out clean or with a few crumbs, your loaf is ready. If not, bake a little longer. If the top is browning too fast, cover it with foil halfway through. Measuring ingredients incorrectly can lead to issues. Always use dry measuring cups for flour and sugar. Spoon the flour into the cup, then level it off with a knife. This keeps the correct ratio. Adjust baking time if you use a dark pan. Dark pans can cook faster, so start checking for doneness a few minutes early. Fresh lemon juice makes a big difference. Squeeze the lemons right before you use them. This keeps the juice bright and zesty. You can also add extras like nuts or spices. Chopped walnuts or a touch of cinnamon can add great depth. For a sweet twist, consider a lemon glaze on top for extra shine. {{image_4}} You can switch out raspberries for other fruits. Blueberries make a great choice. They add a sweet touch and look pretty too. Strawberries can also work well. Just chop them into smaller pieces. If you like seasonal fruits, use what is fresh. In summer, try peaches or cherries. In fall, apples or pears can add a nice twist. Each fruit brings its own flavor and charm to the loaf. If you need a gluten-free loaf, don’t worry. You can use almond flour or coconut flour. Both work great as substitutes. Just remember, the texture may change a bit. You might need to adjust the liquid too. Gluten-free flours absorb more moisture. Adding an extra egg or some yogurt can help keep it moist and fluffy. Want to jazz up your loaf? Adding nuts can give it a nice crunch. Chopped walnuts or pecans are perfect. Just fold them in gently with the raspberries. You can also add spices for warmth. Cinnamon or nutmeg can enhance the flavor. For a sweet finish, create a lemon glaze. Mix powdered sugar with lemon juice. Drizzle this over the cooled loaf for a zesty touch. These variations keep your lemon raspberry loaf exciting and fun! For the full recipe, check out the details provided earlier. Room Temperature Storage Store your lemon raspberry loaf at room temperature. Use an airtight container to keep it fresh. This will help it stay moist and tasty. It can last for up to three days this way. Refrigeration Guidelines If you want to keep it longer, put the loaf in the fridge. Wrap it tightly in plastic wrap or foil. This will keep it from drying out. It can last up to one week in the fridge. How to Freeze the Loaf Freezing the lemon raspberry loaf is easy. Wait until it cools completely. Then, wrap it in plastic wrap and foil. This protects it from freezer burn. You can freeze it for up to three months. Thawing Tips To thaw, take it out of the freezer. Leave it in the fridge overnight. If you want it warm, slice and heat it in the microwave for a few seconds. Freshness Indicators Check for signs of spoilage. Look for mold or a change in smell. If the loaf feels dry or hard, it’s time to toss it. Maximum Storage Duration In total, the loaf can last up to one week in the fridge or three months in the freezer. Proper storage helps maintain its delicious flavor and texture. To keep the loaf moist, use a few key ingredients. Butter adds fat and moisture. Eggs also help with texture. Additionally, use fresh lemon juice for tang and juiciness. Baking techniques matter too. Do not overmix the batter. This keeps air in the loaf. Bake at the right temperature and check for doneness with a toothpick. A little moist crumb is perfect! Yes, you can use frozen raspberries! Just make sure to thaw them first. Drain any extra juice to avoid a soggy loaf. Using frozen fruit may change the texture. Fresh raspberries give a firmer bite. However, frozen raspberries still add great flavor and color. You can substitute lemon juice with lime or orange juice. Lime juice adds a tart zing. Orange juice gives a sweeter flavor. Keep in mind that this changes the flavor profile. The loaf will taste different but still delicious! This loaf pairs well with tea or coffee. The bright lemon flavor complements hot drinks nicely. For a fun twist, serve it with whipped cream. Fresh berries on the side add a lovely touch too. For the full recipe, feel free to check the [Full Recipe]. You now know how to make a delicious Lemon Raspberry Loaf. We covered key ingredients, step-by-step instructions, and helpful tips for success. Remember, watch your mixing and baking time to avoid mistakes. Try different fruits or flavors to put your spin on it. Store it properly to keep it fresh. Whether for breakfast or dessert, this loaf will please everyone. Enjoy your baking adventure and the tasty treats you create!](https://goldendishy.com/wp-content/uploads/2025/07/5ff44623-bcfe-47fa-965b-01d738fc2f08-768x768.webp)