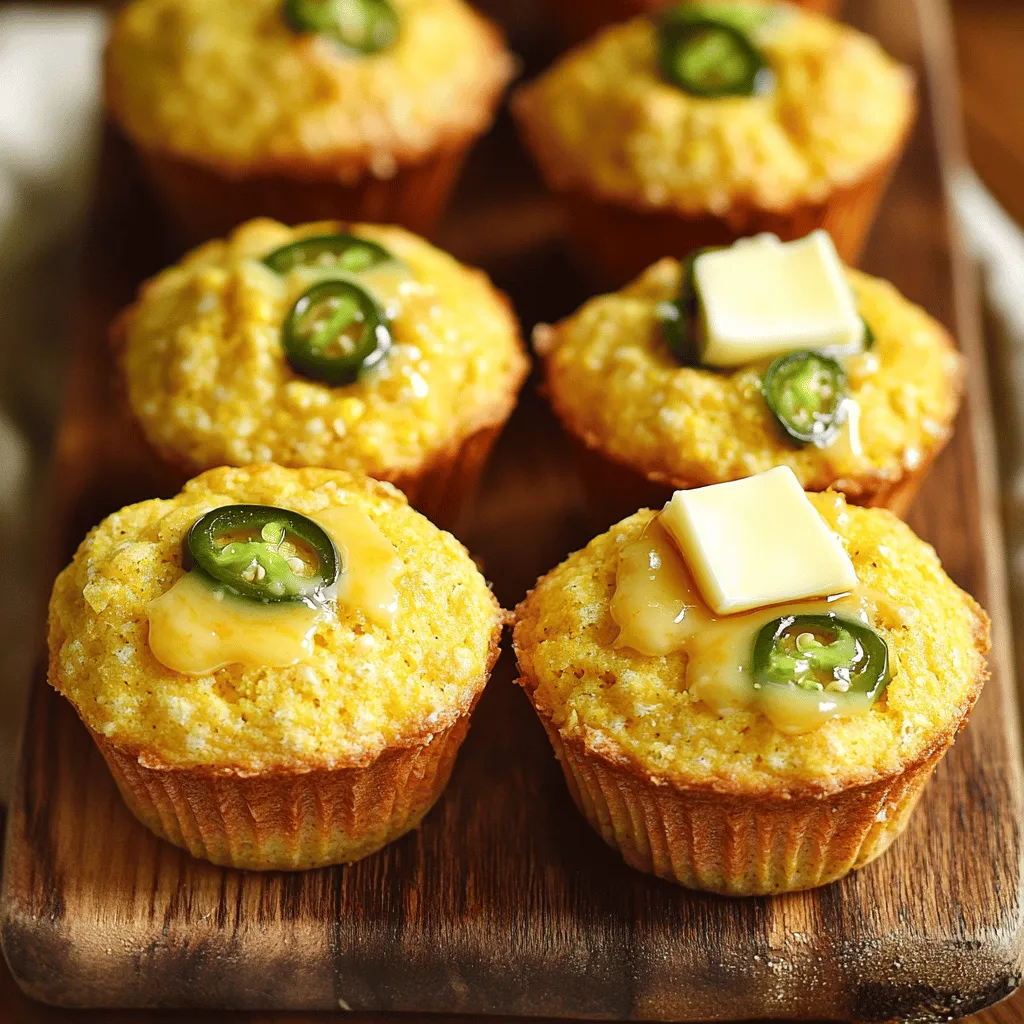
Jalapeño Cheddar Cornbread Muffins Savory and Flavorful

Craving a tasty twist on your regular cornbread? These Jalapeño Cheddar Cornbread Muffins are packed with bold flavor in every bite. I’ll guide you through simple steps to make these savory treats that will impress family and friends alike. With melted cheese and spicy jalapeños, they’re perfect for any meal. Let’s whip up a batch that will turn up the heat in your kitchen!
Ingredients
List of Required Ingredients
To make Jalapeño Cheddar Cornbread Muffins, gather these fresh ingredients:
– 1 cup cornmeal
– 1 cup all-purpose flour
– 1 tablespoon baking powder
– ½ teaspoon salt
– 1 cup buttermilk (or milk with a splash of vinegar)
– 1 large egg
– ¼ cup unsalted butter, melted
– 1 cup shredded sharp cheddar cheese
– 2-3 fresh jalapeños, diced (remove seeds for less heat)
– 2 tablespoons honey (optional, adds sweetness)
Ingredient Notes and Substitutions
– Cornmeal: Use yellow or white cornmeal. Both work well.
– All-purpose flour: You can use whole wheat flour for a heartier taste.
– Baking powder: This helps the muffins rise. Make sure it’s fresh.
– Salt: Enhances flavor. Don’t skip it!
– Buttermilk: If you don’t have it, mix regular milk with vinegar.
– Egg: It binds the ingredients. You can use a flax egg for a vegan option.
– Unsalted butter: Use olive oil or coconut oil for a dairy-free version.
– Cheddar cheese: Sharp cheddar gives great flavor, but feel free to try other cheeses.
– Jalapeños: Adjust the number based on your heat preference.
– Honey: This is optional. It adds a nice touch but can be left out.
Suggested Tools and Equipment
To make these muffins, you need a few basic tools:
– Muffin tin: A standard 12-cup muffin tin works best.
– Mixing bowls: Have at least two bowls for dry and wet ingredients.
– Whisk: This helps mix the dry ingredients smoothly.
– Spatula: Use it to fold the batter gently.
– Ice cream scoop or spoon: This helps fill the muffin cups evenly.
– Toothpick: For checking if the muffins are done baking.
– Wire rack: Cool your muffins on this after baking.
These ingredients and tools will set you up for success. Let’s make some delicious muffins!
Step-by-Step Instructions
Prepping the Oven and Muffin Tin
First, heat your oven to 400°F (200°C). This step is key for a nice rise. While the oven warms, prepare your muffin tin. Lightly grease it or use paper liners. This makes it easy to remove the muffins later.
Mixing Dry Ingredients
In a large bowl, add 1 cup of cornmeal, 1 cup of all-purpose flour, 1 tablespoon of baking powder, and ½ teaspoon of salt. Use a whisk to mix well. Mixing is important so each muffin has a good texture.
Preparing Wet Ingredients
In another bowl, whisk together 1 cup of buttermilk, 1 large egg, and ¼ cup of melted unsalted butter. If you want a hint of sweetness, add 2 tablespoons of honey. Stir until the mix is smooth. This mixture adds moisture and flavor to the muffins.
Combining Wet and Dry Mixtures
Now, gently pour the wet mixture into the dry ingredients. Use a spatula to fold both mixtures together. Mix until no dry flour is visible. Be careful not to overmix. This keeps your muffins fluffy.
Adding Cheese and Jalapeños
Next, fold in 1 cup of shredded sharp cheddar cheese and 2-3 diced jalapeños. If you want less heat, remove the seeds. Mix until everything is evenly added. The cheese and jalapeños give each muffin a savory kick.
Filling Muffin Tin and Baking
Using a spoon or ice cream scoop, fill each muffin cup about two-thirds full. This allows the muffins to rise nicely. Place the tin in the oven and bake for 15-20 minutes. They are ready when a toothpick comes out clean and the tops look golden brown. Enjoy the warm smell as they bake!
Tips & Tricks
How to Ensure Muffins Are Fluffy
To make your muffins fluffy, use fresh baking powder. This helps the muffins rise well. Mix the wet and dry ingredients just until combined. Overmixing can make the muffins tough. Also, fill each muffin cup only two-thirds full. This allows room for them to rise without spilling over.
Recommended Serving Suggestions
Serve these muffins warm for the best taste. You can add a pat of butter or drizzle honey on top. They pair well with soups or chili for a hearty meal. For breakfast, enjoy them with a side of fresh fruit or yogurt. You can also use them as a base for mini breakfast sandwiches.
Storage Tips and Reheating Instructions
Store the muffins in an airtight container at room temperature for up to three days. If you want to keep them longer, freeze them. Wrap each muffin in plastic wrap and place them in a freezer bag. To reheat, just pop them in the microwave for about 15-20 seconds or warm them in the oven at 350°F (175°C) for 10 minutes. This brings back their fresh taste and texture.
Variations
Spicy Jalapeño Cheddar vs. Milder Versions
You can adjust the heat in your muffins. For a spicy kick, keep the seeds in the jalapeños. This will give you a bold flavor. If you want milder muffins, remove the seeds before dicing. You can also use fewer jalapeños. Start with one and taste the batter. This way, you control the spice level perfectly.
Other Cheese Options to Use
While sharp cheddar shines in this recipe, other cheeses work well too. Try pepper jack for extra spice. It adds a fun twist with creamy texture. You can use Monterey Jack for a milder taste. For a gourmet touch, add crumbled feta or goat cheese. Each cheese will change the flavor, making it exciting to experiment.
Sweet Add-ins and Custom Flavors
Want to mix it up? Add two tablespoons of honey for a touch of sweetness. It balances the heat from the jalapeños. You can also toss in corn kernels for extra texture. Chopped scallions or fresh herbs like cilantro add fresh notes. Try experimenting with different ingredients to find your favorite flavor.
Serving Suggestions
Pairing with Dishes
Jalapeño cheddar cornbread muffins taste great with many meals. I like serving them with chili. Their spice and cheesy flavor balance the rich taste of the chili. They also work well with barbecue dishes. The muffins make a tasty side for smoky ribs or grilled chicken. You can even enjoy them with salads. A fresh green salad adds a nice crunch to the meal.
Best Drinks to Complement Muffins
When it comes to drinks, a cold glass of iced tea is perfect. The sweet tea contrasts nicely with the heat of the jalapeños. You might also try a light beer. It pairs well with the muffins’ savory flavors. If you prefer non-alcoholic options, lemonade is refreshing. The citrus cuts through the richness of the cheese.
Presentation Ideas for Serving
For a charming presentation, set the muffins on a wooden platter. This gives a warm, rustic feel. Serve them warm with butter or honey drizzled on top. You can also add fresh herbs, like parsley or cilantro, for color. Another fun idea is to serve them in muffin liners. This makes for a neat display and easy serving.
FAQs
Can I use different types of flour?
Yes, you can use other flours. For a gluten-free option, try corn flour or almond flour. Each type will change the texture a bit.
What can I substitute for buttermilk?
You can mix regular milk with a splash of vinegar to make a buttermilk substitute. This creates the acidity needed for the muffins to rise. Use one cup of milk and one tablespoon of vinegar.
How can I make these muffins spicier?
To add more heat, keep the seeds in the jalapeños. You can also add a pinch of cayenne pepper or hot sauce to the batter. This will give your muffins a nice kick.
Can I freeze Jalapeño Cheddar Cornbread Muffins?
Yes, you can freeze these muffins. Allow them to cool completely, then wrap them tightly in plastic wrap. Store them in a freezer bag for up to three months.
What’s the best way to store leftover muffins?
Store leftover muffins in an airtight container at room temperature for up to three days. For longer storage, keep them in the fridge. Reheat gently in the oven or microwave before enjoying.
You learned about the key ingredients for Jalapeño Cheddar Cornbread Muffins. We covered important tools and step-by-step instructions to bake them perfectly. Plus, I shared tips for fluffy muffins and fun variations. Remember, you can mix flavors and pair them with tasty drinks. Whether you enjoy them fresh or save some for later, these muffins are sure to please everyone. Get ready to bake and share your delicious results!

![To make Zucchini Ricotta Fritters, gather these simple ingredients: - 2 medium zucchinis, grated - 1 cup ricotta cheese - 1/2 cup all-purpose flour - 2 large eggs, beaten - 1/4 cup grated Parmesan cheese - 2 green onions, finely chopped - 1/2 teaspoon garlic powder - Salt and pepper, to taste - Olive oil, for frying - Fresh basil or parsley, for garnish These ingredients work together to create crispy, tasty fritters that everyone will love. The fresh zucchini adds moisture and flavor, while the ricotta cheese gives a creamy texture. Using grated Parmesan cheese enhances the savory taste of the fritters. Make sure to squeeze out as much moisture from the zucchini as you can. This step is key to ensure your fritters do not get soggy. You can use a clean kitchen towel for this. Want to dive deeper into making these fritters? Check out the Full Recipe for all the steps! Start by grating the zucchinis. You can use a box grater or a food processor. After grating, place the zucchini in a clean kitchen towel. Gather the towel around the zucchini and twist it. This will help squeeze out the extra moisture. Removing moisture is key. It keeps the fritters from becoming soggy. In a large bowl, combine the drained zucchini, ricotta cheese, flour, and beaten eggs. Add grated Parmesan, chopped green onions, garlic powder, salt, and pepper. Use a sturdy spoon to mix everything. The batter should be slightly chunky, not too smooth. This texture helps the fritters hold their shape when cooking. Heat a non-stick skillet over medium heat and add a few tablespoons of olive oil. Let the oil heat until it shimmers. Once hot, drop spoonfuls of batter into the skillet. Gently flatten each fritter with a spoon. Cook them for about 3-4 minutes on each side. They should turn golden brown and crispy. Don't overcrowd the skillet. If needed, cook in batches. After cooking, place the fritters on a plate lined with paper towels. This will absorb any excess oil. Serve warm with chopped basil or parsley for a fresh touch. To make your fritters crispy, start by removing moisture. Zucchini has a lot of water. When you grate it, you must squeeze it in a towel. This helps the fritters stay firm. Next, heat your oil until it shimmers. A hot skillet cooks the fritters quickly and keeps them crispy. If the oil is not hot enough, they can soak up too much oil and become soggy. Herbs and spices can elevate your fritters. I love adding fresh basil or parsley for brightness. You can also try a pinch of red pepper flakes for heat. For dips, a tangy yogurt sauce pairs well. You can also serve them with a tasty marinara. These additions make each bite even better. Avoid overcrowding your skillet. Too many fritters at once can lower the heat. This can lead to uneven cooking. Instead, cook them in small batches. Keep the cooked fritters warm by placing them on a plate in a low oven. This way, they stay warm and crisp until you serve them. {{image_4}} You can change the taste of your fritters easily. Try adding different cheeses like feta or mozzarella. You can also mix in finely chopped veggies such as bell peppers or spinach. Fresh herbs like dill or thyme add a nice touch too. These small changes can create a whole new snack experience. If you need a gluten-free version, use almond flour or coconut flour instead of all-purpose flour. Both options work well and will keep your fritters light and crispy. Just be sure to adjust the amount used, as these flours can absorb moisture differently. For a vegan twist, replace the ricotta with a plant-based cheese. Flaxseed meal can work well as an egg substitute. Just mix one tablespoon of flaxseed with three tablespoons of water and let it sit for a few minutes. If you want low-carb fritters, swap the flour for grated cauliflower. This keeps the fritters tasty while cutting down on carbs. For the full recipe, check out the [Full Recipe]. To keep your zucchini ricotta fritters fresh, you should refrigerate them. Place the leftover fritters in an airtight container. This helps prevent them from drying out. Make sure to layer them with paper towels to absorb extra moisture. You can store them for up to three days in the fridge. If you want to save some for later, freezing is a great option. First, let the fritters cool completely. Then, place them in a single layer on a baking sheet. Freeze them for about one hour. This step helps them keep their shape. After they are frozen, transfer them to a freezer bag. Label the bag with the date. They can stay good for up to two months. When you’re ready to eat your frozen fritters, reheat them in the oven. Preheat the oven to 375°F (190°C). Place the fritters on a baking sheet and bake for about 15-20 minutes. This method will help them regain their crispy texture. Enjoy your tasty snack! For the full recipe, check out the detailed instructions above. Yes, you can bake them! Place the fritters on a baking sheet lined with parchment paper. Brush them lightly with olive oil. Bake at 400°F for about 20-25 minutes. Flip them halfway through to get both sides crispy. To reheat, use an oven or an air fryer. Preheat the oven to 350°F. Place the fritters on a baking sheet and bake for about 10 minutes. This will keep them crispy. You can make the batter ahead of time! Store it in the fridge for up to 24 hours. Just remember to mix it again before cooking. The moisture from the zucchini can settle. Fritters are done when they are golden brown and crispy on both sides. You can also gently press them. If they feel firm and do not sink, they are ready. Yes, they are great for meal prep! You can cook them and store in the fridge for up to 3 days. They make a tasty snack or meal addition. For more details, check the Full Recipe. Zucchini ricotta fritters are a simple and tasty snack. You can enjoy them any time of the day. Here’s how to make them: - 2 medium zucchinis, grated - 1 cup ricotta cheese - 1/2 cup all-purpose flour - 2 large eggs, beaten - 1/4 cup grated Parmesan cheese - 2 green onions, finely chopped - 1/2 teaspoon garlic powder - Salt and pepper, to taste - Olive oil, for frying - Fresh basil or parsley, for garnish To start, I recommend grating the zucchinis. Use a box grater or food processor to make it quick. After grating, take a clean kitchen towel. Place the zucchini in the middle and twist the towel. This helps squeeze out extra moisture. It’s important to do this step to keep your fritters crispy. Next, grab a large mixing bowl. Add the drained zucchini, ricotta cheese, flour, beaten eggs, Parmesan, green onions, garlic powder, and some salt and pepper. Mix everything well with a spatula. The batter should feel a bit chunky. Now, heat a non-stick skillet over medium heat. Drizzle in some olive oil to coat the bottom. Let the oil heat until it looks shiny. This ensures a nice fry for your fritters. Once the oil is hot, drop spoonfuls of the batter into the skillet. Use the back of a spoon to flatten each fritter a bit. This helps them cook evenly. Fry for about 3-4 minutes on each side. You want them golden brown and crispy. Don’t overcrowd the skillet; work in batches if needed. When done, transfer the fritters to a plate lined with paper towels. This will soak up any extra oil. Serve them warm, topped with fresh basil or parsley. These toppings add a lovely touch to your dish. For the full recipe, check out the detailed instructions above. Enjoy making these tasty treats! In this blog post, we covered how to make Zucchini Ricotta Fritters from start to finish. We shared a list of simple ingredients and provided step-by-step cooking instructions. You learned tips to ensure crispiness and explored tasty variations. Storing and reheating tips were also discussed to help keep your fritters fresh. Overall, these fritters are easy to make and delicious. They offer a healthy twist for any meal. Enjoy experimenting with different flavors and variations!](https://goldendishy.com/wp-content/uploads/2025/06/35e9f5a9-d1bf-47b3-b252-98dbfdd31548-768x768.webp)
![- 1 lb Brussels sprouts, cleaned and halved - 3 tablespoons extra virgin olive oil - 4 cloves garlic, finely minced - 1/2 cup freshly grated Parmesan cheese - Zest of 1 lemon - 1/2 teaspoon red pepper flakes (optional for heat) - Fresh parsley for garnish - Sea salt and freshly cracked black pepper When I make Garlic Parmesan Brussels sprouts, I always start with the basics. Fresh Brussels sprouts are key. I buy about a pound and clean them well. Halving them helps them cook evenly and adds texture. Next, I add extra virgin olive oil. It coats the sprouts and gives them a rich flavor. I use about three tablespoons. Garlic is a must. Four cloves of finely minced garlic bring a great kick to the dish. Parmesan cheese is what makes these sprouts shine. I use half a cup of freshly grated cheese. The cheese melts and creates a tasty crust when roasted. For extra brightness, I often add zest from one lemon. It lifts the flavors and adds a fresh note. If you like heat, a half teaspoon of red pepper flakes gives the dish a spicy kick. Lastly, I season with sea salt and freshly cracked black pepper. These simple seasonings enhance the flavor without overpowering it. Don't forget to garnish with fresh parsley for a pop of color. This combination of ingredients makes a flavorful side dish that everyone will love. For the full recipe, check out the details above. - Preheat oven to 400°F (200°C). - Prepare a baking sheet with parchment paper. First, you want to make your oven hot. This helps cook the Brussels sprouts fast. The parchment paper makes cleanup simple and helps them roast better. - Mix Brussels sprouts with olive oil, garlic, and seasonings. Take your cleaned and halved Brussels sprouts and put them in a big bowl. Add the olive oil, minced garlic, sea salt, and black pepper. Toss everything together. Make sure each sprout gets coated nicely. This mix gives them great flavor. - Spread Brussels sprouts on the baking sheet. - Roast for 20 minutes, stirring halfway through. Now, spread the Brussels sprouts out on the baking sheet. Keep them in a single layer to roast evenly. Set the timer for 20 minutes, but remember to stir them halfway. This helps them get golden and crispy all over. - Add Parmesan cheese and return to oven for additional 5-7 minutes. - Garnish with parsley before serving. After roasting, take them out and sprinkle the grated Parmesan cheese on top. You can also add lemon zest and red pepper flakes if you like some heat. Put them back in the oven for 5-7 minutes. This melts the cheese and makes it bubbly. Once done, take them out and garnish with parsley. Serve them warm for the best taste. For the full details, check the Full Recipe. To get great Brussels sprouts, keep them in a single layer. This helps them cook evenly. If you crowd them, they will steam instead of roast. Stir them halfway through cooking. This ensures every side gets that nice, crispy brown. Want to brighten the dish? Add lemon zest before serving. It gives a fresh taste that pairs well with the savory flavors. You can also try different cheeses. Parmesan is great, but Pecorino Romano adds a nice twist. One common mistake is overcrowding the baking sheet. This leads to uneven cooking. Also, watch your cooking time. Undercooking makes them tough, while overcooking turns them mushy. Follow the recipe closely for the best results. For the full recipe, check out the details above. {{image_4}} To switch up the taste, try using different cheeses. Pecorino Romano adds a salty, sharp flavor. It brings a new twist to the dish. If you want a vegan option, use nutritional yeast. It gives a cheesy flavor without dairy. Plus, it's packed with nutrients! Adding protein can make your dish heartier. Toss in crispy bacon or pancetta for a savory touch. Their rich flavor pairs well with the sprouts. You can also add cooked chicken pieces. This makes the dish more filling and satisfying. For a vegetarian option, substitute the cheese with vegan alternatives. There are many great cheese substitutes that melt well. Use plant-based oil for roasting instead of olive oil. This keeps the dish fully vegan while still being delicious. For the full recipe, check out Garlic Parmesan Brussels Sprouts Delight! Store your Garlic Parmesan Brussels Sprouts in an airtight container. Refrigerating them helps keep their flavor fresh. They are best eaten within 3-5 days for optimal taste and texture. To restore crispiness, reheat the sprouts in the oven. Set your oven to 350°F (175°C) and bake for about 10-15 minutes. If you're in a hurry, you can use the microwave. However, be aware that the texture may suffer a bit. You can freeze Brussels sprouts before roasting for long-term storage. This way, they maintain their flavor. To reheat, simply thaw them first, then roast as per the [Full Recipe]. This will help you enjoy them fresh and tasty! To make your Brussels sprouts crispy, follow these tips: - Use high heat: Roasting at 400°F (200°C) gives the best results. - Spread them out: Place Brussels sprouts in a single layer on your baking sheet. - Don’t overcrowd: Give them room to breathe, which helps them roast better. - Toss halfway: Stir them at the halfway point of roasting for even browning. - Add cheese last: Sprinkle Parmesan cheese towards the end of the cooking time so it melts but does not burn. Yes, you can prepare Brussels sprouts in advance. Here’s how: - Clean and cut: Clean and halve the Brussels sprouts the day before. - Store properly: Keep them in an airtight container in the fridge. - Roast fresh: When ready to eat, toss them with oil and seasonings, and roast right before serving. Garlic Parmesan Brussels sprouts go well with many dishes. Here are a few: - Roasted chicken: The savory flavors complement crispy chicken well. - Grilled steak: The rich flavors of steak pair nicely with the sprouts. - Pasta dishes: They add a fresh, crunchy element to creamy pastas. Yes, Brussels sprouts are very healthy! They are: - Low in calories: Great for weight management. - High in fiber: Good for digestion. - Rich in vitamins: They provide vitamin C, vitamin K, and folate. Plus, they have antioxidants that help your body fight disease. Yes, you can use frozen Brussels sprouts. Here are some tips: - Thaw first: Thaw them completely before cooking for even roasting. - Pat dry: Remove moisture with a paper towel to help them crisp up. - Adjust cooking time: You may need to roast them a bit longer to achieve the same crispiness. For the full recipe, check out Garlic Parmesan Brussels Sprouts Delight. Garlic Parmesan Brussels sprouts are simple to make and full of flavor. We covered essential ingredients like fresh Brussels sprouts, olive oil, and cheese. You learned step-by-step how to prepare, toss, and roast them. Plus, I shared tips for perfecting your dish and variations to keep it exciting. Remember, the key to great Brussels sprouts is even cooking and the right flavors. Take your time to enjoy this healthy side dish. You’ll love the taste and how easy it is to make!](https://goldendishy.com/wp-content/uploads/2025/05/a403e98b-d04b-46c1-bd99-9a315ef16e11-768x768.webp)