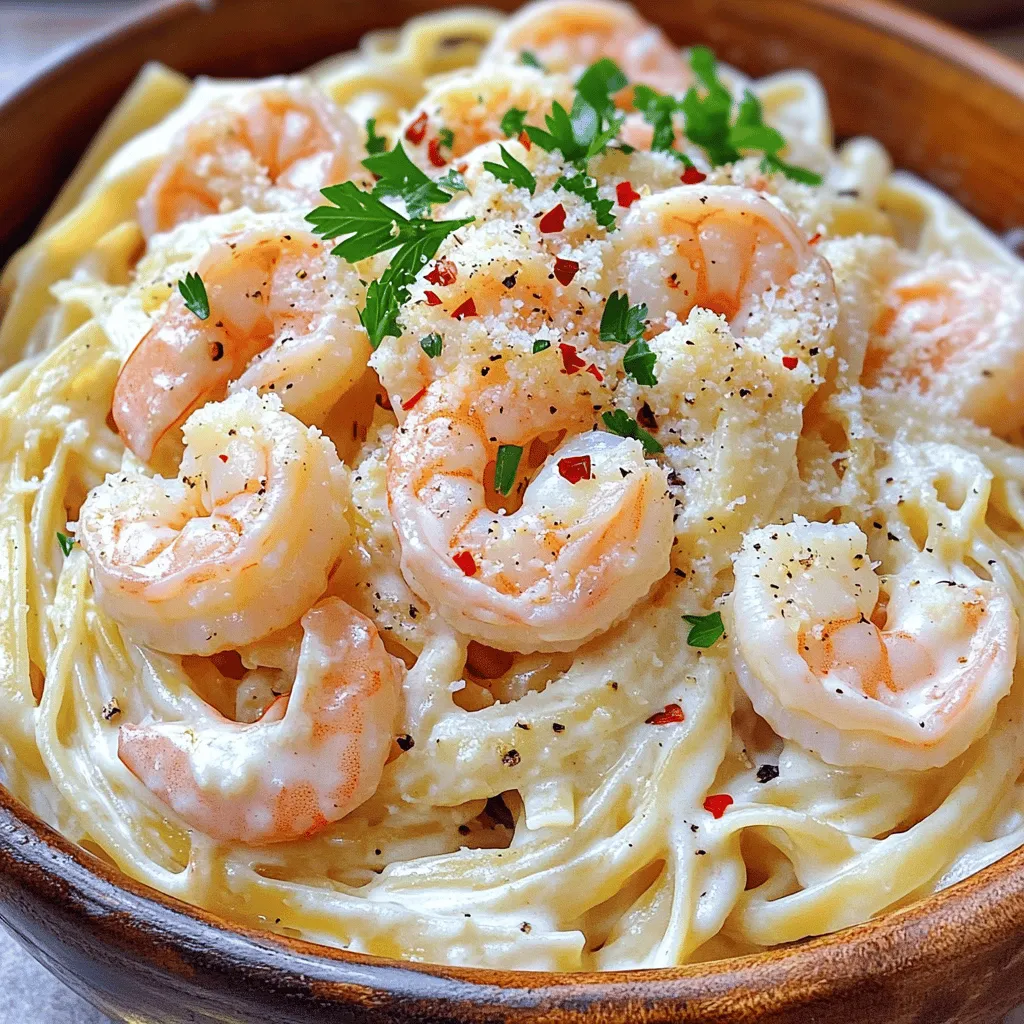
Creamy Garlic Shrimp Linguine Delicious Dinner Idea

Looking for a quick and tasty dinner? Creamy Garlic Shrimp Linguine is perfect for you! This dish blends tender shrimp with rich sauce and pasta for an easy meal everyone will love. I’ll guide you step-by-step, so even new cooks can shine in the kitchen. Grab your ingredients, and let’s get cooking. You’ll impress your family or guests in no time!
Ingredients
Main Ingredients for Creamy Garlic Shrimp Linguine
For this dish, you will need:
– 8 oz linguine pasta
– 1 lb large shrimp, peeled and deveined
– 4 cloves garlic, minced
– 1 cup heavy cream
– 1 cup chicken broth
– ½ cup freshly grated Parmesan cheese
– 2 tablespoons unsalted butter
– 1 tablespoon extra virgin olive oil
These main ingredients create a rich and creamy dish that shines. The shrimp adds protein and flavor, while the garlic brings a lovely aroma. The heavy cream and Parmesan cheese make the sauce smooth and satisfying.
Key Seasonings and Condiments
You should also add:
– Salt and freshly ground black pepper to taste
– ¼ teaspoon red pepper flakes (optional, for a bit of heat)
Salt and pepper enhance the natural taste of the shrimp and pasta. Red pepper flakes add a nice kick if you like some heat in your meal.
Optional Ingredients for Enhanced Flavor
For extra flavor, consider these:
– Fresh parsley, finely chopped (for garnish)
Using fresh parsley not only adds color but also brightens the dish. It gives a fresh taste that balances the creaminess of the sauce. You can also include a lemon wedge on the side for a zesty touch!
Step-by-Step Instructions
Preparing the Linguine
Start by filling a large pot with water. Add a good amount of salt to it. Bring the water to a rolling boil. Once it boils, add 8 oz of linguine pasta. Cook the pasta for 8-10 minutes, or until it’s al dente. Drain the pasta in a colander, but keep a little pasta water aside. This water can help if the sauce needs adjusting later.
Cooking the Shrimp
In a large skillet, melt 2 tablespoons of unsalted butter and 1 tablespoon of extra virgin olive oil over medium heat. Once the butter melts and bubbles, add 4 cloves of minced garlic. Sauté the garlic for about 1 minute. It should smell great but not brown. Next, add 1 pound of large shrimp to the skillet. Season them with salt, pepper, and optional ¼ teaspoon of red pepper flakes for heat. Cook the shrimp for 3-4 minutes. They should turn pink and opaque. Remove the shrimp and place them in a bowl.
Making the Creamy Sauce
In the same skillet, pour in 1 cup of chicken broth. Turn the heat up a bit and let it simmer for 3-4 minutes. This helps the flavor get stronger. Lower the heat to a gentle simmer and add 1 cup of heavy cream. Stir it well. Slowly sprinkle in ½ cup of freshly grated Parmesan cheese. Keep stirring until the cheese melts into a creamy sauce.
Combining Ingredients for Serving
Return the cooked shrimp to the skillet. Stir them in the creamy sauce. Then, add the drained linguine to the pan. Toss everything well to coat the pasta with the sauce. If it’s too thick, add a splash of the reserved pasta water. Taste and adjust the seasoning with more salt or pepper if needed. Before serving, sprinkle fresh chopped parsley over the dish for a pop of color.
Tips & Tricks
How to Achieve Perfectly Cooked Shrimp
To cook shrimp just right, start with fresh or thawed shrimp. They should look pink and feel firm. Heat your skillet over medium heat. Add butter and oil, then garlic. Sauté for a minute until fragrant. Next, add the shrimp and season with salt and pepper. Cook for 3 to 4 minutes. The shrimp should turn pink and opaque. Avoid overcooking; they can get rubbery.
Adjusting Sauce Consistency
If your sauce is too thick, don’t worry! You can easily adjust it. Save a bit of pasta water when you drain the linguine. This water is starchy and helps thicken sauces. Add a splash to the sauce if it seems too thick. Stir it in gradually until you reach your desired consistency. This trick makes the sauce creamy and smooth.
Presentation Tips for Serving
For a beautiful dish, serve the pasta in deep bowls. This keeps the sauce in and looks nice. Top with extra Parmesan cheese and fresh parsley for color. A bright lemon wedge on the side adds a fresh touch. Guests can squeeze it on top for extra flavor. This simple step makes your dish look gourmet!
Variations
Alternatives for Pasta Types
You can switch out linguine for other pasta types. Fettuccine, spaghetti, or even penne work well. If you prefer a gluten-free option, try rice noodles or gluten-free pasta. Each type gives a unique twist to the dish.
Substitutes for Dietary Preferences
For a lighter dish, use half-and-half instead of heavy cream. If you’re dairy-free, opt for coconut milk or a cashew cream. For those avoiding shrimp, chicken or tofu can be great alternatives. Just adjust the cooking time based on what you choose.
Ways to Add Extra Vegetables
Boost the nutrition by adding vegetables. Spinach or kale adds color and taste. You can also toss in bell peppers, zucchini, or cherry tomatoes. Sauté them with the garlic for a delicious flavor. This not only makes your dish tastier but also healthier.
Storage Info
Best Practices for Storing Leftovers
Store leftover creamy garlic shrimp linguine in an airtight container. Make sure it cools down first. Place it in the fridge within two hours of cooking. This helps keep it fresh for up to three days. If the pasta seems dry, add a splash of chicken broth or cream before storing.
Reheating Techniques
To reheat, use the stove for best results. Place the linguine in a skillet over medium heat. Add a little bit of chicken broth or cream to help it regain its creamy texture. Stir often until heated through. You can also microwave it, but this may dry it out. If using the microwave, cover the dish and add a splash of liquid.
Freezing Instructions
You can freeze creamy garlic shrimp linguine, though the texture may change. To freeze, place the cooled dish in a freezer-safe container. Seal it tightly and label it with the date. It can last up to three months in the freezer. When ready to eat, thaw it overnight in the fridge before reheating.
FAQs
Can I use frozen shrimp for this recipe?
Yes, you can use frozen shrimp. Just make sure to thaw them first. Place the shrimp in a bowl of cold water for about 10-15 minutes. This helps them cook evenly. Follow the rest of the recipe as usual. The taste remains great, even with frozen shrimp.
What can I substitute for heavy cream?
If you want a lighter option, use half-and-half or whole milk. You can also try coconut cream for a dairy-free choice. Each option alters the taste slightly. Adjust the seasoning as needed to keep flavors balanced.
How to make this dish lighter?
To lighten this dish, use whole wheat pasta instead of regular linguine. You can also reduce the amount of heavy cream. Swap in a mix of chicken broth and milk for a lower-calorie sauce. Adding more veggies, like spinach or zucchini, boosts nutrition too.
Can I make this recipe ahead of time?
Yes, you can prep this dish ahead of time. Cook the pasta and shrimp separately, then store them in the fridge. When ready to serve, reheat the shrimp and sauce together. Toss in the linguine just before serving for a fresh taste.
This blog post covered how to make creamy garlic shrimp linguine. We discussed main ingredients, seasonings, and optional flavors. I provided step-by-step instructions for cooking shrimp, making the sauce, and serving. You got tips for perfect shrimp, sauce adjustments, and great presentation ideas. I shared variations for different pasta and dietary needs, plus storage tips for leftovers.
Enjoy this dish today for a tasty meal that pleases everyone.

![To make these crispy fish tacos, gather these key items: - 1 lb white fish fillets (cod or tilapia work great) - 1 cup all-purpose flour - 1 cup cornmeal - 1 teaspoon paprika - 1/2 teaspoon cayenne pepper - 1/2 teaspoon garlic powder - 1/2 teaspoon salt - 1/4 teaspoon black pepper - 2 large eggs, beaten - Vegetable oil, for frying - 8 small corn tortillas The toppings add flavor and texture to your tacos. Here are my favorites: - 1/2 cup red cabbage, thinly sliced - 1 avocado, sliced - Fresh cilantro leaves, for garnish - Lime wedges, for serving To round out your meal, consider these sides: - Fresh salsa for a zesty kick - A drizzle of spicy crema for creaminess - Mexican rice for a hearty addition These ingredients make crispy fish tacos a fun and tasty weeknight meal. For the full recipe, be sure to check out the details above! Start by drying the fish fillets with paper towels. This step helps the coating stick better. Cut the fish into strips that are about 1 inch wide. This size cooks evenly and fits nicely in the tacos. In a medium bowl, mix the flour, cornmeal, paprika, cayenne pepper, garlic powder, salt, and black pepper. Stir until well combined. In another bowl, beat the eggs until smooth. This egg wash will help the coating stick. Heat about 1 inch of vegetable oil in a large skillet over medium-high heat. Check if the oil is hot by dropping in a pinch of the flour mix; if it sizzles, it's ready. Dip each fish strip into the egg wash, letting excess drip off. Then coat it in the flour mixture, pressing lightly to ensure it sticks. Place the coated fish in the hot oil, frying in batches to prevent overcrowding. Cook for 3-4 minutes on each side until golden brown. Transfer the fried fish to a plate lined with paper towels to absorb extra oil. Warm each corn tortilla in a dry skillet for about 30 seconds on each side. This makes them soft and easy to fold. For each tortilla, place 2-3 pieces of crispy fish. Top with sliced red cabbage, avocado, and fresh cilantro. Don’t forget to serve the tacos with lime wedges. A squeeze of lime adds a bright, fresh flavor. For the full recipe, you can check the complete details above. To get that perfect crunch, follow these steps: - Dry the Fish: Start by patting the fish fillets with paper towels. This removes moisture and helps them get crispy. - Use Cornmeal: Mixing cornmeal with flour gives extra texture and crunch. It makes the coating thicker and crispier. - Hot Oil: Make sure the oil is hot enough before frying. If it’s too cool, the fish will absorb oil and turn soggy. - Don’t Overcrowd: Fry the fish in batches. Too many pieces at once cools the oil and affects crispiness. Here are some common mistakes you should steer clear of: - Skipping the Egg Wash: The egg wash helps the coating stick. Don’t skip this step! - Not Heating the Oil Properly: Always test the oil. If it’s not hot, you’ll end up with greasy fish. - Using Wet Fish: Wet fish won’t fry well. Always dry them before coating. - Flipping Too Soon: Let the fish cook fully on one side before flipping. This helps it stay intact and crispy. Enhance your tacos with these tasty garnishes: - Fresh Cilantro: Adds a burst of freshness and color. - Avocado: Creamy avocado pairs well with crispy fish. - Lime Wedges: A squeeze of lime brightens up the flavors. - Salsa or Crema: A drizzle of spicy crema or your favorite salsa adds flavor and moisture. For the full recipe, check out [Full Recipe]. {{image_4}} If you want to try a different protein, shrimp works great. Just peel and devein before cooking. You can also use chicken strips. They need a bit more time to cook, so adjust frying time. Another option is tofu for a different texture. Press it to remove water and cut into strips. For a vegetarian twist, use cauliflower. Cut it into small florets, coat, and fry. It gets nice and crispy. If you want a vegan option, tempeh is fantastic. Slice it thin and marinate for flavor before frying. Just make sure to use a plant-based egg wash or a mixture of flour and water. To boost flavor, add lime zest to the coating mix. It brightens each bite. For spice, increase the cayenne pepper in the coating. You can also create a spicy sauce for drizzling on top. Mix yogurt or mayo with hot sauce for a creamy kick. Fresh herbs like cilantro or parsley can add freshness too. These variations keep the dish exciting, ensuring you can enjoy crispy fish tacos in many ways! Try out the full recipe to explore these options. To keep your crispy fish tacos fresh, store leftovers in an airtight container. Place the fish in one container and the toppings in another. This keeps the fish crispy and the toppings fresh. You can also wrap the tortillas in foil for better storage. To reheat, use the oven or an air fryer for best results. Preheat your oven to 350°F (175°C). Place the fish on a baking sheet and bake for about 10 minutes. If using an air fryer, heat it to 350°F (175°C) and fry for 5 minutes. This way, the fish stays crispy. Cooked fish lasts about 2-3 days in the fridge. Fresh toppings, like cabbage and avocado, can last 1-2 days. Store each item separately. If you have leftover tortillas, they can stay fresh in a sealed bag for up to a week. Always check for signs of spoilage before using any of the ingredients. For the full recipe, check the complete list of ingredients. I recommend using white fish like cod or tilapia. These fish have a mild flavor and cook well. They stay tender inside while getting crispy on the outside. Other good options include haddock or snapper. Yes, you can prepare the fish ahead of time. Cut the fish into strips and coat them. Keep the coated fish in the fridge for up to an hour. This helps the coating stick better when you fry them. If you can't find corn tortillas, flour tortillas are a good choice. You can also use lettuce leaves for a low-carb option. They add a nice crunch and freshness to your tacos. Crispy fish tacos can be gluten-free if you use gluten-free flour. Make sure to check the labels on your ingredients. Corn tortillas are naturally gluten-free, so they work well for this dish. For the best results, use gluten-free breadcrumbs or a gluten-free flour blend for coating the fish. Crispy fish tacos are a fun dish to make at home. We discussed key ingredients, topped it with tasty options, and paired it with sides. The steps from preparing the fish to frying it were simple and clear. Use my tips for crispy results and avoid common mistakes. You can also explore variations for flavors and dietary choices. Proper storage will keep your tacos fresh. Now, enjoy making and sharing your crispy fish tacos! They’re sure to impress.](https://goldendishy.com/wp-content/uploads/2025/06/e15c4a6f-d152-43b4-ae39-d2f9004115b6-768x768.webp)