
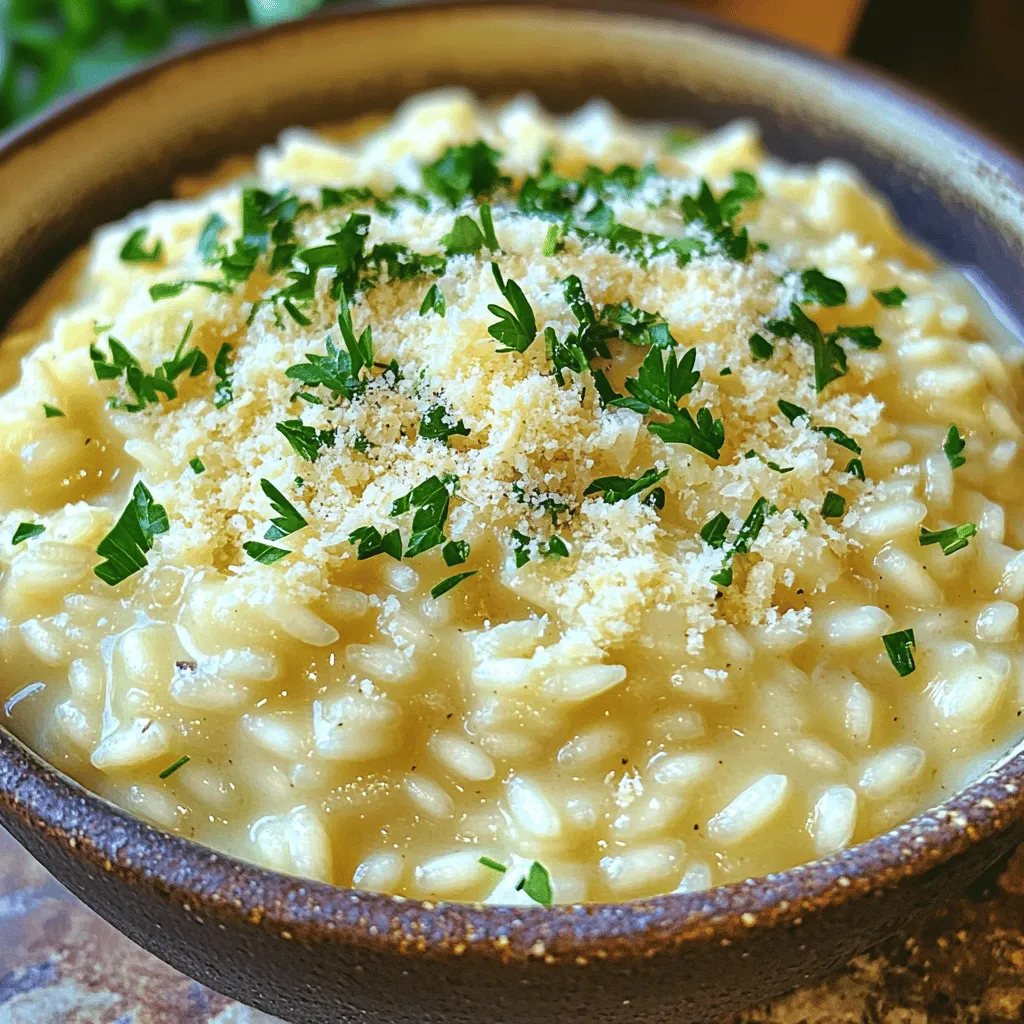
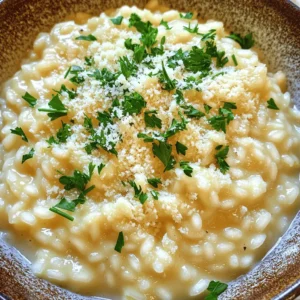
Creamy Garlic Parmesan Risotto Simple and Delicious Dish

If you crave a warm, comforting meal, creamy garlic Parmesan risotto fits the bill perfectly. This simple and delicious dish is rich, creamy, and packed with flavor. I will show you how to make this risotto with easy steps and ingredients. Get ready to impress your family and friends with a tasty meal that is sure to satisfy everyone’s palate!
Ingredients
Essential Ingredients for Creamy Garlic Parmesan Risotto
To make a great creamy garlic Parmesan risotto, you need the right ingredients. Here’s what you will need:
– 1 cup Arborio rice
– 4 cups vegetable broth (warmed)
– 1 medium onion, finely chopped
– 3 cloves garlic, minced
– 1 cup grated Parmesan cheese
– 1/2 cup heavy cream
– 2 tablespoons olive oil
– 2 tablespoons unsalted butter
– Salt and freshly ground black pepper to taste
– Fresh parsley for garnish (optional)
– Zest of 1 lemon (optional, for a fresh twist)
These ingredients come together to create a rich and creamy dish that warms the heart.
Optional Add-ins for Extra Flavor
You can make your risotto even better with some fun add-ins. Here are a few ideas:
– Cooked chicken or shrimp for protein
– Fresh herbs like basil or thyme for extra flavor
– Peas or spinach for a pop of color
– Mushrooms for a rich, earthy taste
Feel free to mix and match these options based on what you like!
Tips for Selecting Quality Ingredients
Choosing the best ingredients makes a big difference. Here are some tips:
– Rice: Always use Arborio rice for that creamy texture.
– Broth: Use high-quality vegetable broth for great flavor.
– Cheese: Freshly grated Parmesan cheese tastes better than pre-grated.
– Produce: Pick fresh garlic and onion for the best taste.
With these tips, your risotto will shine with flavor!
Step-by-Step Instructions
Preparing the Vegetable Broth
First, warm the vegetable broth in a saucepan over medium heat. This step is key. Keeping the broth warm helps the rice cook evenly. Once the broth is warm, lower the heat to keep it hot but not boiling. This makes adding it to the rice easier.
Cooking the Aromatics and Toasting the Rice
Next, grab a large skillet or saucepan. Pour in two tablespoons of olive oil and one tablespoon of unsalted butter. Heat it over medium heat until the butter melts. Add one finely chopped onion and cook for about three to four minutes. You want the onion to be soft and clear. Then, add three minced garlic cloves. Stir them for one minute. Be careful not to let the garlic burn, as this can ruin the flavor.
Now, add one cup of Arborio rice to the skillet. Stir the rice well to coat it with the oil and butter. Toast the rice for one to two minutes until it turns slightly clear. This step adds depth to the flavor.
Gradual Broth Addition and Achieving Creaminess
Now comes the fun part! Start adding the warm vegetable broth, one ladle at a time. Stir the rice as you add the broth. Wait until the rice fully absorbs the broth before adding more. Keep doing this for about 18 to 20 minutes. You want the rice to be creamy and al dente.
When the rice reaches the right texture, remove the skillet from heat. Stir in the remaining tablespoon of butter, half a cup of heavy cream, and one cup of grated Parmesan cheese. Mix everything until it’s all creamy and well combined. Season with salt, black pepper, and lemon zest if you like. Let the risotto sit for a minute. This resting time helps the flavors meld together better.
Tips & Tricks
How to Achieve the Perfect Creamy Texture
To get that creamy texture in your risotto, use Arborio rice. This rice has a high starch content. The starch makes the risotto rich and smooth. Stir in the broth slowly. This helps the rice absorb the liquid well. Remember to finish your dish with heavy cream and Parmesan cheese. They add to the creaminess and flavor.
The Importance of Constant Stirring
Stirring the risotto constantly is key. It helps release the rice’s starch. This starch thickens the dish and gives it a creamy feel. When you add broth, keep stirring. This keeps the rice from sticking to the pan. It also ensures even cooking. Take your time; it makes a big difference in the final taste.
Common Mistakes to Avoid
Avoid using regular rice; it won’t work well. Do not rush the broth addition. If you add it all at once, the rice won’t cook properly. Watch the heat; too high can burn the rice. Lastly, don’t skip the resting step. Letting it sit for a minute enhances the texture.
Variations
Adding Proteins: Chicken, Shrimp, or Tofu
You can add proteins to make your risotto heartier. Chicken adds a nice flavor. Cook it first in the skillet, then set it aside. Once the risotto is creamy, stir the chicken back in. Shrimp cooks quickly, so add it in the last few minutes of cooking. For a plant-based option, use tofu. Cube it and sauté it until golden. Mix it in just like the chicken.
Vegetarian and Vegan Adaptations
Making this dish vegetarian is easy. Just ensure your broth is vegetable-based. For a vegan twist, swap the heavy cream for coconut milk or a nut cream. You can also replace the Parmesan with nutritional yeast. This keeps the cheesy flavor while being plant-based. Don’t forget to check your butter; use vegan butter if needed.
Flavor Enhancements: Herbs, Spices, and Citrus
Enhancing flavors can elevate your risotto. Fresh herbs like basil and thyme add a burst of freshness. Stir them in at the end for the best taste. A pinch of red pepper flakes gives it a nice kick. You can also add lemon zest for a bright note. The zest adds a fresh twist that balances the richness. Experiment with flavors to find your favorite combination!
Storage Info
How to Store Leftover Risotto
Storing leftover risotto is simple. First, let the risotto cool down to room temperature. Then, transfer it to an airtight container. This keeps it fresh and prevents drying out. You can store it in the fridge for up to three days. For best results, try to eat it sooner rather than later.
Reheating Tips for Optimal Texture
Reheating risotto can be tricky. To keep it creamy, use a bit of broth or water. Heat it in a saucepan over low heat. Stir often to help it warm evenly. If it looks too thick, add a splash of broth. This helps restore its nice texture. You can also use the microwave, but add liquid to keep it moist.
Freezing Risotto: What You Need to Know
Freezing risotto is an option, but it may change the texture. To freeze, let it cool completely first. Pack it in freezer-safe bags or containers, leaving space for expansion. It stays good for about one month. When ready to eat, thaw it in the fridge overnight. Reheat it slowly and add liquid to bring back creaminess.
FAQs
What is the best rice for making risotto?
The best rice for risotto is Arborio rice. This rice has a high starch content, making it creamy. It absorbs liquid well and gives a nice texture. You can find Arborio rice in most grocery stores. Other good options include Carnaroli or Vialone Nano, but Arborio is the most common.
Can I make risotto ahead of time?
Yes, you can make risotto ahead of time. However, it may lose some creaminess. To store it, let it cool and put it in an airtight container. You can keep it in the fridge for up to three days. When ready to serve, add some broth and stir while heating. This will help restore its creamy texture.
How can I make risotto gluten-free?
Making risotto gluten-free is easy. Arborio rice is naturally gluten-free, so you are good there. Just be sure to use gluten-free broth as your base. Check the labels on all ingredients to ensure they are gluten-free. Enjoy your creamy dish without worry!
Creamy garlic parmesan risotto starts with the right ingredients and steps. You choose fresh items and follow simple cooking techniques for the best results. Remember to stir constantly for creamy texture and avoid common mistakes. You can adapt the dish with proteins or herbs to fit your taste. Store any leftovers properly to enjoy later. With this knowledge, you can make delicious risotto any time. Enjoy your cooking journey!
![- 2 boneless, skinless chicken breasts, sliced into thin strips - 8 ounces of fettuccine pasta - 4 cloves of garlic, finely minced - 1 cup of heavy cream - 1 teaspoon of Italian seasoning blend - ½ teaspoon of red pepper flakes (optional, for heat) - ½ cup of freshly grated Parmesan cheese - Fresh parsley, finely chopped, for a vibrant garnish - 1 tablespoon of extra virgin olive oil - 1 cup of chicken broth - Salt and freshly cracked black pepper, to taste When I prepare Creamy Garlic Chicken Pasta, I focus on fresh ingredients. The chicken must be juicy, the garlic fragrant, and the cream rich. I love using fettuccine because it holds the sauce well. The heavy cream makes the dish smooth and creamy, while the garlic brings a lovely flavor. For seasoning, I often use an Italian blend. It gives warmth and depth to the dish. The red pepper flakes add a tiny kick, but you can skip them if you want a milder taste. Fresh parsley not only adds color but also a fresh taste. Grated Parmesan cheese is a must for that cheesy goodness. Gathering these ingredients helps me create a quick and tasty meal. It’s all about balance—rich cream, savory garlic, and hearty chicken come together perfectly. If you want to see the full process, check out the Full Recipe. Start with a large pot. Fill it with water and add salt. Bring the water to a rolling boil. Once boiling, add 8 ounces of fettuccine pasta. Cook the pasta for about 8-10 minutes until it is al dente. When it’s done, drain the pasta in a colander. Remember to save about ½ cup of the pasta water for later. Grab a large skillet and place it over medium-high heat. Pour in 1 tablespoon of olive oil and let it warm up. While the oil heats, season 2 sliced chicken breasts with salt and pepper. Add the chicken strips to the hot skillet in a single layer. Cook them for about 5-6 minutes until golden brown and fully cooked. Once cooked, take the chicken out and keep it warm on a plate. In the same skillet, lower the heat to medium. Add 4 cloves of minced garlic and sauté for 1-2 minutes. Keep an eye on the garlic; you don’t want it to burn. After the garlic is fragrant, pour in 1 cup of chicken broth. Let it come to a gentle simmer. Next, stir in 1 cup of heavy cream, 1 teaspoon of Italian seasoning, and red pepper flakes if you like some heat. Allow this mixture to simmer for about 3-4 minutes until it thickens. Now it’s time to combine everything. Add the cooked fettuccine and the chicken back into the skillet. Toss them gently until they are well coated in the creamy sauce. If the sauce seems too thick, slowly add some reserved pasta water until you reach your desired consistency. Finally, sprinkle in ½ cup of grated Parmesan cheese. Stir it until it melts and blends into the sauce. Taste and adjust seasoning with salt and pepper if needed. For the full experience, check the Full Recipe. To make the cream sauce just right, simmering is key. Simmering helps all the flavors blend well. It also thickens the sauce without burning it. Keep the heat low, and stir often. This way, you can avoid garlic burnout. Garlic can turn bitter if cooked too long. Sauté it just until it smells good and turns light gold. Adjusting your seasonings can elevate this dish. Taste as you go. If you want more flavor, add salt or pepper. You can also use homemade broth for a fresh taste. Store-bought broth works too, but watch for added salt. This can affect your dish's flavor. Always check the label to control the salt level. Plating your creamy garlic chicken pasta can make a big difference. Use shallow bowls for a nice look. Make sure to spread the chicken and sauce evenly. For garnish, sprinkle fresh parsley on top. You can also add more Parmesan for richness. A drizzle of olive oil adds a shiny touch. Your guests will love the look and taste! {{image_4}} You can easily boost the nutrition of your creamy garlic chicken pasta by adding vegetables. I love using fresh spinach or mushrooms for a tasty twist. Spinach wilts nicely, adding color and flavor. Mushrooms bring a rich, earthy taste. To cook these veggies, add them to the skillet right after you sauté the garlic. Stir them in for just a few minutes until they're tender. This way, they soak up the garlic flavor while keeping their crunch. Switching up your pasta can bring new life to this dish. You can use whole wheat or gluten-free pasta if you want healthier options. Different pasta shapes, like penne or rotini, also work well. Just remember, cooking times may change. Whole wheat pasta takes a bit longer, while gluten-free pasta cooks faster. Keep an eye on it, and taste for doneness. If you want to try something new, swap the chicken for shrimp or tofu. Shrimp is quick to cook and adds a nice seafood flavor. Just sauté it for about 3-4 minutes until it turns pink. Tofu is a great plant-based option. Cut it into cubes and sauté it until golden brown. Adjust the cooking times based on what you choose to ensure all proteins are cooked through. Feel free to get creative with your creamy garlic chicken pasta. With these variations, you can make it your own! For a full recipe, check out the [Full Recipe]. To keep your Creamy Garlic Chicken Pasta fresh, store it in the fridge. Place the pasta in an airtight container. This helps prevent it from drying out. Make sure to consume it within three to four days for the best taste. When reheating, use the stovetop for the best results. Add a splash of chicken broth or water to help revive the sauce. Heat over low to medium heat, stirring often. This avoids overcooking the chicken and pasta. If you prefer the microwave, use a microwave-safe dish. Cover it with a lid or a damp paper towel to keep moisture in. Heat it in short bursts, stirring in between. Yes, you can freeze Creamy Garlic Chicken Pasta! However, the cream sauce may change texture. To freeze, let it cool completely. Place it in a freezer-safe container and seal tightly. Use it within one to two months. When ready to eat, thaw it overnight in the fridge. Reheat gently on the stovetop, adding a bit more cream or broth to restore creaminess. Making Creamy Garlic Chicken Pasta is quick and easy! It takes about 10 minutes to prep and 20 minutes to cook. In total, you're looking at around 30 minutes. This dish is perfect for a weeknight meal when you want something tasty without spending hours in the kitchen. Yes, you can easily make this recipe dairy-free! For the cream, use coconut cream or cashew cream instead. Both give a nice texture. Instead of Parmesan cheese, try nutritional yeast or a dairy-free cheese. This way, you still get a creamy dish without any dairy! Creamy Garlic Chicken Pasta pairs well with many side dishes. A simple green salad with a lemon vinaigrette adds freshness. You can also serve garlic bread for a comforting touch. If you prefer vegetables, steamed broccoli or roasted asparagus work well too. These sides balance the richness of the pasta nicely. Absolutely! You can control the spice level by adjusting the red pepper flakes. If you want more heat, add more flakes. For a milder dish, you can skip them entirely. Feel free to experiment until you get the flavor just right for your taste buds. You learned how to make Creamy Garlic Chicken Pasta with key ingredients like chicken, garlic, and cream. We walked through each step, from cooking pasta to making a rich sauce. I shared tips for perfecting flavors, including optional veggie and protein swaps. Storing leftovers was also covered. Remember, this dish is versatile and easy to adapt. Explore your creativity in the kitchen! Enjoy your meal and share the joy of cooking with others.](https://goldendishy.com/wp-content/uploads/2025/06/75e46cf8-cdb7-4cdf-96b4-9ca11b1b9102-768x768.webp)
. This Buddha bowl recipe highlights the joy of crispy tofu and fresh veggies. You learned about key ingredients like firm tofu, quinoa, and avocado. I shared tips for prepping and baking tofu to keep it crispy. Customize your bowl with different grains and seasonal veggies for variety. Lastly, my storage tips help you enjoy leftovers later. Make this dish your own, and enjoy healthy eating!](https://goldendishy.com/wp-content/uploads/2025/06/f58aaf25-4393-4431-ab1e-3aeff1cd4ada-768x768.webp)