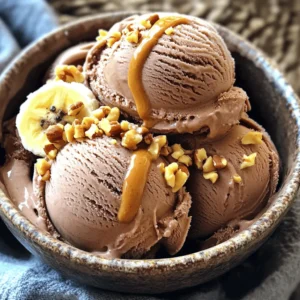
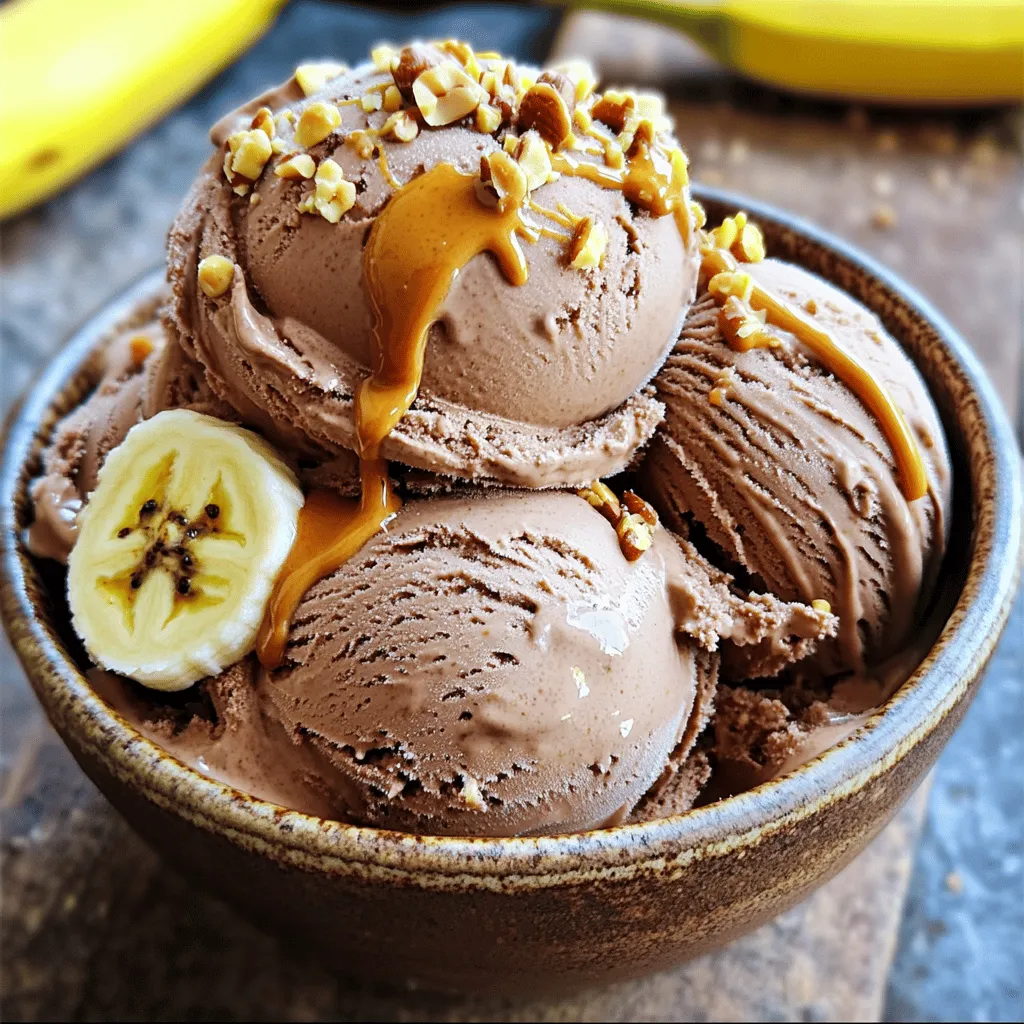
Chocolate Peanut Butter Banana Ice Cream Delight

- 4 ripe bananas, peeled and sliced - 2 tablespoons natural creamy peanut butter - 2 tablespoons unsweetened cocoa powder - 1 tablespoon honey or maple syrup (optional, to taste) - 1 teaspoon pure vanilla extract - Pinch of fine sea salt You can swap the bananas for frozen berries for a fruit twist. If you need a nut-free version, replace peanut butter with sunflower seed butter. You can also try almond butter or cashew butter for a different taste. If you want it sweeter, use agave syrup instead of honey or maple syrup. - Bananas: They offer potassium, fiber, and vitamin C. They also provide energy and help digestion. - Peanut Butter: It is a great source of protein and healthy fats. It can support heart health and keeps you full. - Cocoa Powder: This adds antioxidants to your dish, which helps fight free radicals. It may also boost mood and brain health. - Honey or Maple Syrup: These natural sweeteners can provide quick energy and contain vitamins and minerals. Start by peeling the ripe bananas. Slice them into 1/2-inch thick rounds. Lay the slices flat on a baking sheet. Make sure they do not touch or overlap. This helps them freeze evenly. Place the baking sheet in the freezer. Let the banana slices freeze for at least 2 hours. They should be solid and firm when ready. After the bananas freeze, take the baking sheet out of the freezer. Let the bananas sit at room temperature for 5 minutes. This softens them slightly, making it easier to blend. In a food processor, add the frozen banana slices. Then, add the creamy peanut butter, cocoa powder, honey or syrup, vanilla extract, and a pinch of salt. Blend everything on high speed until it is smooth and creamy. This takes about 1 to 3 minutes. Stop to scrape down the sides if needed. Taste the mixture after blending. If you want it sweeter, add more honey or syrup. Blend for a few more seconds to mix it well. Once it has the right flavor, transfer the ice cream to an airtight container. Use a spatula to smooth the top. Seal it and return it to the freezer for 1 to 2 hours. This makes it easier to scoop. Before serving, let the ice cream sit at room temperature for about 5 minutes. This helps soften it, so it's easy to scoop into bowls. Taste your ice cream after blending. If it's not sweet enough, add honey or syrup. Blend it again until mixed. Adjust based on your taste buds. Remember, ripe bananas add natural sweetness, so choose the ripest ones. For a creamier texture, try using full-fat coconut milk or yogurt. Add a splash during blending. You can also use more peanut butter for extra creaminess. Just be careful not to overpower the banana flavor. When freezing your ice cream, use an airtight container. This prevents ice crystals from forming. Let it sit at room temperature for just five minutes before serving. This makes it easier to scoop. For best taste, consume within a week of making it. {{image_4}} You can boost this ice cream with spices and extracts. A pinch of cinnamon adds warmth. You might also try a dash of nutmeg for a unique twist. If you love vanilla, add more pure vanilla extract. For a fun kick, consider adding a splash of coffee extract. This enhances the chocolate flavor and makes it deeper. If you prefer dairy-free options, swap out peanut butter for almond butter. This keeps the creaminess while adding a new taste. You can also use agave syrup instead of honey or maple syrup. For a nut-free version, try sunflower seed butter. Each choice offers a different flavor but keeps the ice cream delicious. To make your ice cream even more fun, think about toppings. Crushed nuts like almonds or walnuts add crunch. Chocolate shavings or mini chocolate chips give a sweet touch. You can also use fresh fruit like sliced strawberries or blueberries. For added flavor, drizzle extra peanut butter or chocolate sauce on top. These toppings turn a simple dessert into a treat to remember. Store your Chocolate Peanut Butter Banana Ice Cream in an airtight container. This keeps it fresh and prevents ice crystals. Place the container in the coldest part of your freezer. A good spot is the back, away from the door. This helps maintain a steady temperature. When stored properly, this ice cream lasts about one week in the freezer. After that, it may lose some flavor and texture. It’s best to enjoy it fresh. If you notice any freezer burn or off smells, it's time to toss it. If you have leftovers and refreeze, ensure the ice cream is in an airtight container. Let it sit at room temperature for a few minutes before scooping. This makes it easier to serve. If it seems too hard, blend it again for a smoother texture. Yes, you can use a blender instead. A high-speed blender works well. If you don't have that, you can mash the bananas first and then mix in the other ingredients by hand. It will take more effort but can still work out fine. Ripe bananas are best for this recipe. Look for bananas with brown spots. These bananas are sweeter and have a creamier texture. Avoid green bananas as they won’t blend well. This recipe is already vegan if you skip the honey. Use maple syrup instead for sweetness. All the other ingredients are plant-based, making it a great vegan treat. You can use either! Cocoa powder gives a rich chocolate taste. If you opt for chocolate syrup, reduce or skip the honey. Adjust the sweetness to your liking since syrup adds sugar. To lower calories, use less peanut butter and omit the honey or syrup. You can also swap the peanut butter for a lighter nut butter. This keeps the flavor while cutting calories. This blog post covered the key ingredients and their swaps, plus health benefits. You learned to prepare and blend bananas for the right texture. I shared tips for sweetness, creaminess, and freezing best practices. You can also explore flavor options and creative toppings. Finally, I provided storage info to keep your treat fresh. Remember, making your own ice cream can be fun and healthy. Enjoy experimenting with new flavors and enjoy your homemade dessert!

WANT TO SAVE THIS RECIPE?

Get ready to treat yourself to a cool and creamy delight! My Chocolate Peanut Butter Banana Ice Cream combines rich chocolate, nutty peanut butter, and sweet bananas for a perfect snack. You can make this easy and healthy dessert in just a few steps. Quit waiting! Let’s dive into the ingredient list and get this tasty ice cream going!

Ingredients

List of Ingredients

– 4 ripe bananas, peeled and sliced

– 2 tablespoons natural creamy peanut butter

– 2 tablespoons unsweetened cocoa powder

– 1 tablespoon honey or maple syrup (optional, to taste)

– 1 teaspoon pure vanilla extract

– Pinch of fine sea salt

Ingredient Substitutions

You can swap the bananas for frozen berries for a fruit twist. If you need a nut-free version, replace peanut butter with sunflower seed butter. You can also try almond butter or cashew butter for a different taste. If you want it sweeter, use agave syrup instead of honey or maple syrup.

Health Benefits of Key Ingredients

Bananas: They offer potassium, fiber, and vitamin C. They also provide energy and help digestion.

Peanut Butter: It is a great source of protein and healthy fats. It can support heart health and keeps you full.

Cocoa Powder: This adds antioxidants to your dish, which helps fight free radicals. It may also boost mood and brain health.

Honey or Maple Syrup: These natural sweeteners can provide quick energy and contain vitamins and minerals.

Step-by-Step Instructions

Preparation of Bananas

Start by peeling the ripe bananas. Slice them into 1/2-inch thick rounds. Lay the slices flat on a baking sheet. Make sure they do not touch or overlap. This helps them freeze evenly. Place the baking sheet in the freezer. Let the banana slices freeze for at least 2 hours. They should be solid and firm when ready.

Blending the Ingredients

After the bananas freeze, take the baking sheet out of the freezer. Let the bananas sit at room temperature for 5 minutes. This softens them slightly, making it easier to blend. In a food processor, add the frozen banana slices. Then, add the creamy peanut butter, cocoa powder, honey or syrup, vanilla extract, and a pinch of salt. Blend everything on high speed until it is smooth and creamy. This takes about 1 to 3 minutes. Stop to scrape down the sides if needed.

Tips for Achieving the Perfect Texture

Taste the mixture after blending. If you want it sweeter, add more honey or syrup. Blend for a few more seconds to mix it well. Once it has the right flavor, transfer the ice cream to an airtight container. Use a spatula to smooth the top. Seal it and return it to the freezer for 1 to 2 hours. This makes it easier to scoop. Before serving, let the ice cream sit at room temperature for about 5 minutes. This helps soften it, so it’s easy to scoop into bowls.

Tips & Tricks

Sweetness Adjustments

Taste your ice cream after blending. If it’s not sweet enough, add honey or syrup. Blend it again until mixed. Adjust based on your taste buds. Remember, ripe bananas add natural sweetness, so choose the ripest ones.

Making It Creamier

For a creamier texture, try using full-fat coconut milk or yogurt. Add a splash during blending. You can also use more peanut butter for extra creaminess. Just be careful not to overpower the banana flavor.

Best Practices for Freezing

When freezing your ice cream, use an airtight container. This prevents ice crystals from forming. Let it sit at room temperature for just five minutes before serving. This makes it easier to scoop. For best taste, consume within a week of making it.

Variations

Adding Flavor Enhancements

You can boost this ice cream with spices and extracts. A pinch of cinnamon adds warmth. You might also try a dash of nutmeg for a unique twist. If you love vanilla, add more pure vanilla extract. For a fun kick, consider adding a splash of coffee extract. This enhances the chocolate flavor and makes it deeper.

Alternative Ingredients

If you prefer dairy-free options, swap out peanut butter for almond butter. This keeps the creaminess while adding a new taste. You can also use agave syrup instead of honey or maple syrup. For a nut-free version, try sunflower seed butter. Each choice offers a different flavor but keeps the ice cream delicious.

Creative Toppings and Mix-ins

To make your ice cream even more fun, think about toppings. Crushed nuts like almonds or walnuts add crunch. Chocolate shavings or mini chocolate chips give a sweet touch. You can also use fresh fruit like sliced strawberries or blueberries. For added flavor, drizzle extra peanut butter or chocolate sauce on top. These toppings turn a simple dessert into a treat to remember.

Storage Info

Optimal Storage Conditions

Store your Chocolate Peanut Butter Banana Ice Cream in an airtight container. This keeps it fresh and prevents ice crystals. Place the container in the coldest part of your freezer. A good spot is the back, away from the door. This helps maintain a steady temperature.

How Long It Lasts

When stored properly, this ice cream lasts about one week in the freezer. After that, it may lose some flavor and texture. It’s best to enjoy it fresh. If you notice any freezer burn or off smells, it’s time to toss it.

Re-freezing Tips

If you have leftovers and refreeze, ensure the ice cream is in an airtight container. Let it sit at room temperature for a few minutes before scooping. This makes it easier to serve. If it seems too hard, blend it again for a smoother texture.

FAQs

Can I make this recipe without a food processor?

Yes, you can use a blender instead. A high-speed blender works well. If you don’t have that, you can mash the bananas first and then mix in the other ingredients by hand. It will take more effort but can still work out fine.

What are the best bananas to use?

Ripe bananas are best for this recipe. Look for bananas with brown spots. These bananas are sweeter and have a creamier texture. Avoid green bananas as they won’t blend well.

How to make this ice cream vegan-friendly?

This recipe is already vegan if you skip the honey. Use maple syrup instead for sweetness. All the other ingredients are plant-based, making it a great vegan treat.

Can I use cocoa powder or chocolate syrup?

You can use either! Cocoa powder gives a rich chocolate taste. If you opt for chocolate syrup, reduce or skip the honey. Adjust the sweetness to your liking since syrup adds sugar.

How can I make this recipe lower in calories?

To lower calories, use less peanut butter and omit the honey or syrup. You can also swap the peanut butter for a lighter nut butter. This keeps the flavor while cutting calories.

This blog post covered the key ingredients and their swaps, plus health benefits. You learned to prepare and blend bananas for the right texture. I shared tips for sweetness, creaminess, and freezing best practices. You can also explore flavor options and creative toppings. Finally, I provided storage info to keep your treat fresh.

Remember, making your own ice cream can be fun and healthy. Enjoy experimenting with new flavors and enjoy your homemade dessert!

- 4 ripe bananas, peeled and sliced - 2 tablespoons natural creamy peanut butter - 2 tablespoons unsweetened cocoa powder - 1 tablespoon honey or maple syrup (optional, to taste) - 1 teaspoon pure vanilla extract - Pinch of fine sea salt You can swap the bananas for frozen berries for a fruit twist. If you need a nut-free version, replace peanut butter with sunflower seed butter. You can also try almond butter or cashew butter for a different taste. If you want it sweeter, use agave syrup instead of honey or maple syrup. - Bananas: They offer potassium, fiber, and vitamin C. They also provide energy and help digestion. - Peanut Butter: It is a great source of protein and healthy fats. It can support heart health and keeps you full. - Cocoa Powder: This adds antioxidants to your dish, which helps fight free radicals. It may also boost mood and brain health. - Honey or Maple Syrup: These natural sweeteners can provide quick energy and contain vitamins and minerals. Start by peeling the ripe bananas. Slice them into 1/2-inch thick rounds. Lay the slices flat on a baking sheet. Make sure they do not touch or overlap. This helps them freeze evenly. Place the baking sheet in the freezer. Let the banana slices freeze for at least 2 hours. They should be solid and firm when ready. After the bananas freeze, take the baking sheet out of the freezer. Let the bananas sit at room temperature for 5 minutes. This softens them slightly, making it easier to blend. In a food processor, add the frozen banana slices. Then, add the creamy peanut butter, cocoa powder, honey or syrup, vanilla extract, and a pinch of salt. Blend everything on high speed until it is smooth and creamy. This takes about 1 to 3 minutes. Stop to scrape down the sides if needed. Taste the mixture after blending. If you want it sweeter, add more honey or syrup. Blend for a few more seconds to mix it well. Once it has the right flavor, transfer the ice cream to an airtight container. Use a spatula to smooth the top. Seal it and return it to the freezer for 1 to 2 hours. This makes it easier to scoop. Before serving, let the ice cream sit at room temperature for about 5 minutes. This helps soften it, so it's easy to scoop into bowls. Taste your ice cream after blending. If it's not sweet enough, add honey or syrup. Blend it again until mixed. Adjust based on your taste buds. Remember, ripe bananas add natural sweetness, so choose the ripest ones. For a creamier texture, try using full-fat coconut milk or yogurt. Add a splash during blending. You can also use more peanut butter for extra creaminess. Just be careful not to overpower the banana flavor. When freezing your ice cream, use an airtight container. This prevents ice crystals from forming. Let it sit at room temperature for just five minutes before serving. This makes it easier to scoop. For best taste, consume within a week of making it. {{image_4}} You can boost this ice cream with spices and extracts. A pinch of cinnamon adds warmth. You might also try a dash of nutmeg for a unique twist. If you love vanilla, add more pure vanilla extract. For a fun kick, consider adding a splash of coffee extract. This enhances the chocolate flavor and makes it deeper. If you prefer dairy-free options, swap out peanut butter for almond butter. This keeps the creaminess while adding a new taste. You can also use agave syrup instead of honey or maple syrup. For a nut-free version, try sunflower seed butter. Each choice offers a different flavor but keeps the ice cream delicious. To make your ice cream even more fun, think about toppings. Crushed nuts like almonds or walnuts add crunch. Chocolate shavings or mini chocolate chips give a sweet touch. You can also use fresh fruit like sliced strawberries or blueberries. For added flavor, drizzle extra peanut butter or chocolate sauce on top. These toppings turn a simple dessert into a treat to remember. Store your Chocolate Peanut Butter Banana Ice Cream in an airtight container. This keeps it fresh and prevents ice crystals. Place the container in the coldest part of your freezer. A good spot is the back, away from the door. This helps maintain a steady temperature. When stored properly, this ice cream lasts about one week in the freezer. After that, it may lose some flavor and texture. It’s best to enjoy it fresh. If you notice any freezer burn or off smells, it's time to toss it. If you have leftovers and refreeze, ensure the ice cream is in an airtight container. Let it sit at room temperature for a few minutes before scooping. This makes it easier to serve. If it seems too hard, blend it again for a smoother texture. Yes, you can use a blender instead. A high-speed blender works well. If you don't have that, you can mash the bananas first and then mix in the other ingredients by hand. It will take more effort but can still work out fine. Ripe bananas are best for this recipe. Look for bananas with brown spots. These bananas are sweeter and have a creamier texture. Avoid green bananas as they won’t blend well. This recipe is already vegan if you skip the honey. Use maple syrup instead for sweetness. All the other ingredients are plant-based, making it a great vegan treat. You can use either! Cocoa powder gives a rich chocolate taste. If you opt for chocolate syrup, reduce or skip the honey. Adjust the sweetness to your liking since syrup adds sugar. To lower calories, use less peanut butter and omit the honey or syrup. You can also swap the peanut butter for a lighter nut butter. This keeps the flavor while cutting calories. This blog post covered the key ingredients and their swaps, plus health benefits. You learned to prepare and blend bananas for the right texture. I shared tips for sweetness, creaminess, and freezing best practices. You can also explore flavor options and creative toppings. Finally, I provided storage info to keep your treat fresh. Remember, making your own ice cream can be fun and healthy. Enjoy experimenting with new flavors and enjoy your homemade dessert!

Chocolate Peanut Butter Banana Ice Cream

Indulge in the creamy delight of Chocolate Peanut Butter Banana Bliss! This easy recipe transforms ripe bananas, peanut butter, and cocoa powder into a luscious ice cream treat. Perfect for satisfying your sweet tooth without guilt, it requires just a few simple ingredients and minimal prep time. Discover how to make this delicious dessert that everyone will love. Click through for the full recipe and enjoy a guilt-free treat today!

Ingredients
  

4 ripe bananas, peeled and sliced

2 tablespoons natural creamy peanut butter

2 tablespoons unsweetened cocoa powder

1 tablespoon honey or maple syrup (optional, to taste)

1 teaspoon pure vanilla extract

Pinch of fine sea salt

Instructions
 

Begin by peeling and slicing the ripe bananas into approximately 1/2-inch thick rounds. Arrange the slices in a single, even layer on a baking sheet, ensuring they do not overlap. Place the baking sheet in the freezer and allow the banana slices to freeze for at least 2 hours or until they are completely solid.

    After the banana slices have fully frozen, remove the baking sheet from the freezer. Let the bananas sit at room temperature for about 5 minutes to allow them to soften slightly. This will make blending easier.

      In a food processor, combine the frozen banana slices, creamy peanut butter, unsweetened cocoa powder, honey or maple syrup (if using), pure vanilla extract, and a pinch of fine sea salt.

        Blend the ingredients on high speed until the mixture transforms into a smooth, creamy consistency. If necessary, stop the processor occasionally to scrape down the sides to ensure everything incorporates evenly. This blending process typically takes between 1 to 3 minutes, depending on your food processor's strength.

          After blending, taste the mixture for sweetness. If you desire a sweeter flavor, you can add more honey or syrup at this stage. Blend again for a few seconds to fully incorporate the sweetness.

            Once blended to your satisfaction, carefully transfer the ice cream mixture to an airtight container, using a spatula to smooth and level the top. Seal the container and return it to the freezer for an additional 1 to 2 hours to allow it to firm up to a scoopable texture.

              When you’re ready to serve, take the container of ice cream from the freezer and let it sit at room temperature for about 5 minutes. This will soften the mixture slightly, making it easier to scoop into bowls.

                Prep Time: 10 minutes | Total Time: 2 hours 10 minutes | Servings: 4-6

                  - Presentation Tips: Serve the delicious banana bliss in elegant bowls, and enhance the dish by topping with crushed nuts or decadent chocolate shavings for added texture. For a more indulgent touch, drizzle some extra peanut butter on top before serving!

                    WANT TO SAVE THIS RECIPE?

                    Related Posts