
Garlic Butter Herb Mushrooms Flavorful Delight Recipe

Get ready to elevate your meals with my Garlic Butter Herb Mushrooms. This flavorful delight comes together quickly using fresh ingredients like buttery mushrooms, garlic, and fragrant herbs. Perfect for any dish or just on their own, these savory bites will impress your family and friends. Join me as I share the simple steps to create this mouthwatering side dish that packs a punch of flavor in every bite!
Ingredients
Main Ingredients
– 500g fresh button mushrooms, thoroughly cleaned and stems trimmed
– 4 tablespoons unsalted butter
– 3 cloves of garlic, finely minced
– 1 tablespoon fresh thyme leaves, stripped from the stem
– 1 tablespoon fresh parsley, finely chopped
Additional Seasonings
– 1 teaspoon dried oregano
– Sea salt and freshly ground black pepper, to taste
– Zest of 1 lemon, finely grated
– 2 tablespoons fresh lemon juice, squeezed
Serving Suggestions
– Pair with warm, crusty bread for a delightful experience.
– Garnish with extra fresh herbs for added color and flavor.
Garlic butter herb mushrooms are a treat! With just a few simple ingredients, you create a rich and tasty dish. Fresh button mushrooms are the star here. They soak up the buttery garlic goodness and shine through.
Unsalted butter adds a creamy base. I love using it because it lets the garlic’s flavor pop. Fresh herbs like thyme and parsley bring a garden-fresh taste that brightens the dish.
Seasonings are key! Dried oregano adds depth, while sea salt and black pepper balance the flavors. Lemon zest and juice give a refreshing kick. You can taste the layers of flavor with every bite.
For serving, I suggest warm, crusty bread. It’s perfect for soaking up the leftover butter sauce. Plus, a sprinkle of fresh herbs on top makes the dish look beautiful. Enjoy your flavorful delight!
Step-by-Step Instructions
Preparing the Skillet
– Melting the butter
Start by taking a large skillet. Put it on medium heat. Add the unsalted butter. Watch it melt until it foams lightly. This step gives the dish a rich flavor.
– Sautéing the garlic
When the butter is foamy, add three cloves of minced garlic. Stir it often for one to two minutes. The garlic should become fragrant but not brown. This step adds a nice depth to the dish.
Cooking the Mushrooms
– Sautéing technique
Next, raise the heat to medium-high. Add 500 grams of cleaned button mushrooms. Make sure to arrange them in a single layer. This helps them cook evenly.
– Cooking time and temperature
Sauté the mushrooms for five to seven minutes. Turn them occasionally. You want them to turn golden and tender. This cooking method enhances their natural flavor.
Adding Flavor
– Incorporating herbs and seasoning
After the mushrooms are cooked, sprinkle in fresh thyme, parsley, and dried oregano. Add a pinch of sea salt and freshly cracked black pepper. Toss everything together well.
– Final touches with lemon
Remove the skillet from heat. Add lemon zest and lemon juice. Mix gently to coat the mushrooms. This brightens the flavors and adds a fresh twist. Taste your dish and adjust the seasoning if needed. Enjoy the burst of flavor!
Tips & Tricks
Perfecting the Sauté
To achieve even cooking, place your mushrooms in a single layer. This helps them cook at the same rate. If you crowd the pan, some will steam instead of sauté. Adjust your heat levels carefully. Start at medium to melt the butter and sauté the garlic. Then, raise it to medium-high when you add the mushrooms. This prevents burning and keeps the flavor bright.
Flavor Enhancements
You can boost flavor by adding more herbs. Try rosemary or basil for a different twist. If you want a citrus kick, swap lemon for lime or orange juice. Each brings a unique taste that complements the mushrooms well.
Presentation Tips
Serve your garlic butter herb mushrooms in a rustic wooden bowl for style. A splash of color comes from extra fresh herbs on top. You can also pair them with warm, crusty bread. This way, your guests can soak up the delicious butter sauce. It’s a simple detail that makes a big difference!

Variations
Different Mushroom Types
You can swap the button mushrooms for other tasty varieties. Cremini mushrooms add a deeper flavor. Portobello mushrooms bring a hearty texture. Shiitake mushrooms offer a nice umami kick. Each type adds its own unique taste to the dish. You can mix and match for your perfect blend.
Dietary Adjustments
If you’re vegan, use plant-based butter instead of unsalted butter. This keeps the dish creamy and rich. For gluten-free options, ensure your butter and other ingredients are certified gluten-free. You can enjoy the full flavor without worry about dietary needs.
Flavorful Additions
Want to jazz up your mushrooms? Try adding a sprinkle of cheese like Parmesan or feta. A drizzle of balsamic glaze can add a sweet tang. You can also toss in some red pepper flakes for a spicy kick. Each addition can make your dish even more special and fun!
Storage Info
Proper Storage Techniques
To keep garlic butter herb mushrooms fresh, store them in the fridge. Use an airtight container. This helps keep moisture out and flavor in. For best results, eat them within three days. If you need to store them longer, freeze them. For freezing, place the cooled mushrooms in a freezer-safe bag. Remove as much air as you can before sealing.
Reheating Tips
When it’s time to enjoy your mushrooms again, reheating them right is key. I recommend using a skillet on low heat. This helps keep the butter sauce intact. Stir gently to warm them evenly. You can also use a microwave, but do it in short bursts. This prevents them from getting too mushy.
Shelf Life
These tasty mushrooms last about three days in the fridge. In the freezer, they can last up to two months. Just remember to label your containers with the date. This way, you can enjoy your garlic butter herb mushrooms without worry!
FAQs
How do you clean mushrooms?
To clean mushrooms, use a damp cloth or paper towel. Gently wipe each mushroom to remove dirt. Avoid soaking them in water, as they absorb moisture. This can make them soggy during cooking. Trim the stems if needed, but keep the caps whole for better flavor.
Can you use canned mushrooms for this recipe?
You can use canned mushrooms, but they may change the texture. Canned mushrooms are softer and lack that crispy bite. Fresh mushrooms have a stronger taste and a firmer texture, which makes the dish more enjoyable. If you must use canned, drain and rinse them well to remove excess salt.
What can I serve with garlic butter herb mushrooms?
These mushrooms pair well with many dishes. Consider serving them with:
– Grilled chicken or steak
– Pasta with olive oil or cream sauce
– Risotto for a creamy side
– Crusty bread to soak up the sauce
– A fresh salad for a balanced meal
Feel free to mix and match!
This blog post covered how to make garlic butter herb mushrooms. We discussed main ingredients, cooking steps, and tips for the best results. You learned about storage and reheating.
In conclusion, this dish is easy and fun to make. Explore variations and tweaks to match your taste. Enjoy serving these mushrooms with your favorite sides and impress everyone at the table. Your kitchen adventures start here!

![Creating Peach and Basil Flatbread is simple and fun. Here’s what you need: - Pre-made flatbread or naan - Ripe peaches - Fresh mozzarella cheese - Fresh basil leaves - Olive oil - Balsamic glaze (optional) - Salt and pepper - Red pepper flakes (optional) Each ingredient adds its own flair. The flatbread or naan forms a sturdy base. Ripe peaches bring sweetness. Fresh mozzarella melts beautifully, creating a rich layer. Fresh basil adds a burst of flavor that ties everything together. Olive oil enhances the taste and helps with crispness. Balsamic glaze can heighten the sweet and tangy notes. Remember to season with salt and pepper for balance. If you like some heat, sprinkle red pepper flakes on top. This mix of ingredients makes for a delightful summer treat. You can find the full recipe to guide you through the steps. 1. Preheat your oven to 425°F (220°C). This helps the flatbread bake evenly. 2. Line a baking sheet with parchment paper. This keeps the flatbread from sticking. Place your flatbread or naan on the lined sheet. 3. Brush the flatbread with olive oil using a spoon or brush. This adds flavor and helps it crisp up. 4. Spread the shredded mozzarella cheese evenly over the flatbread. This creates a creamy base. 5. Layer the thinly sliced peaches on top of the cheese. Make sure each slice is well-placed for the best taste. 6. Season with salt, pepper, and red pepper flakes if you like some heat. This adds extra flavor. 1. Bake the flatbread in the oven for 10-12 minutes. Keep an eye on it until the cheese melts and bubbles. 2. Watch for the cheese to brown lightly. This gives the flatbread a nice, toasty flavor. 1. After baking, take the flatbread out of the oven. Sprinkle the torn basil leaves on top while it's hot. This brings out the fresh aroma. 2. If you want, drizzle balsamic glaze over the flatbread for extra flavor. This adds a sweet and tangy twist. 3. Let the flatbread cool for a couple of minutes. Then slice it up for sharing or enjoying by yourself. This method makes a Peach and Basil Flatbread that bursts with flavor, perfect for summer. For the complete recipe, check [Full Recipe]. - Selecting ripe peaches for the best flavor Choose peaches that feel slightly soft but are not mushy. Look for a rich color, usually yellow or orange, indicating ripeness. The aroma should be sweet and fragrant. These factors ensure your flatbread bursts with juicy flavor. - Cheese melting tips for a creamy texture Use fresh mozzarella for the best melt. Shred it yourself for a creamier texture. Spread the cheese evenly on the flatbread, ensuring each bite has that gooey goodness. Bake until bubbly and golden for added richness. - Seasoning tricks for additional flavor enhancement Season your flatbread with salt and pepper. Add red pepper flakes for a spicy kick if you like heat. A drizzle of balsamic glaze at the end gives a sweet tang. These little touches elevate the dish. - Best sides or drinks to pair with the dish Serve with a fresh green salad or a cool cucumber salad. A chilled white wine or sparkling water pairs nicely. These sides balance the sweetness of the peaches and the creaminess of the cheese. - Presentation tips to impress guests Use a wooden board or a large platter for serving. Garnish with extra basil leaves for color. A small bowl of balsamic glaze on the side invites guests to add more if they wish. This presentation makes the dish even more tempting. For the full recipe, you can check out the details above. Enjoy creating your Peach and Basil Flatbread! {{image_4}} You can change the cheese to create new flavors. Goat cheese adds a tangy taste. Feta cheese brings a salty bite. Both pair well with peaches. You can also add proteins to make it heartier. Prosciutto gives a nice savory touch. Grilled chicken adds a juicy element. Both options enhance the flatbread's flavor. Try different toppings to switch things up. Arugula adds peppery notes. Toasted nuts give a crunchy texture. Both add depth and interest to each bite. You can also explore different herbs. Mint offers a refreshing twist, while thyme adds warmth. Each herb changes the flatbread's character, making it unique. For the full recipe, check the details above to get started on this delightful dish! To keep your Peach and Basil Flatbread fresh, store leftovers in the fridge. Wrap the flatbread in plastic wrap or foil. This helps to prevent it from drying out. You can also place it in an airtight container for extra protection. The flatbread lasts for about 2 to 3 days in the fridge. After that, the quality may decline. When reheating, the oven works best for keeping that crispy texture. Preheat your oven to 350°F (175°C). Place the flatbread directly on the oven rack or on a baking sheet. Heat for about 5 to 8 minutes until warm. If you use a microwave, the flatbread may become soggy. To maintain crispness, heat it in short bursts and check often. Enjoy your flatbread just like it was fresh from the oven! How do I know when the peaches are ripe enough? Look for peaches that are slightly soft to the touch. The color should be a warm golden hue. A sweet aroma is a good sign of ripeness too. If they feel hard, give them a few more days at room temperature. Can I use frozen flatbread or naan for this recipe? Yes, you can use frozen flatbread or naan. Just thaw them first. You may need to adjust baking time. Keep an eye on the cheese to avoid burning. What can I substitute for mozzarella cheese? If you don’t have mozzarella, try goat cheese or feta. They add a tangy flavor. You can also use provolone for a similar texture. How do I make this flatbread in advance? You can prepare the flatbread up to the baking step. Assemble it and store it in the fridge. Bake it when you are ready to serve. This keeps the flatbread fresh and tasty. For the best results, use it within a day. In this blog post, we explored how to make delicious Peach and Basil Flatbread. I shared key ingredients, easy steps, and tips for the best results. Remember to use ripe peaches and choose your cheese wisely. You can even mix in proteins or herbs for unique flavors. Storing leftovers properly keeps them fresh. With easy reheating tips, you can enjoy your flatbread again. Try this recipe for a tasty treat and impress your friends and family! Happy cooking!](https://goldendishy.com/wp-content/uploads/2025/07/1088bccc-4c8b-4254-a72a-0cec77bef739-768x768.webp)
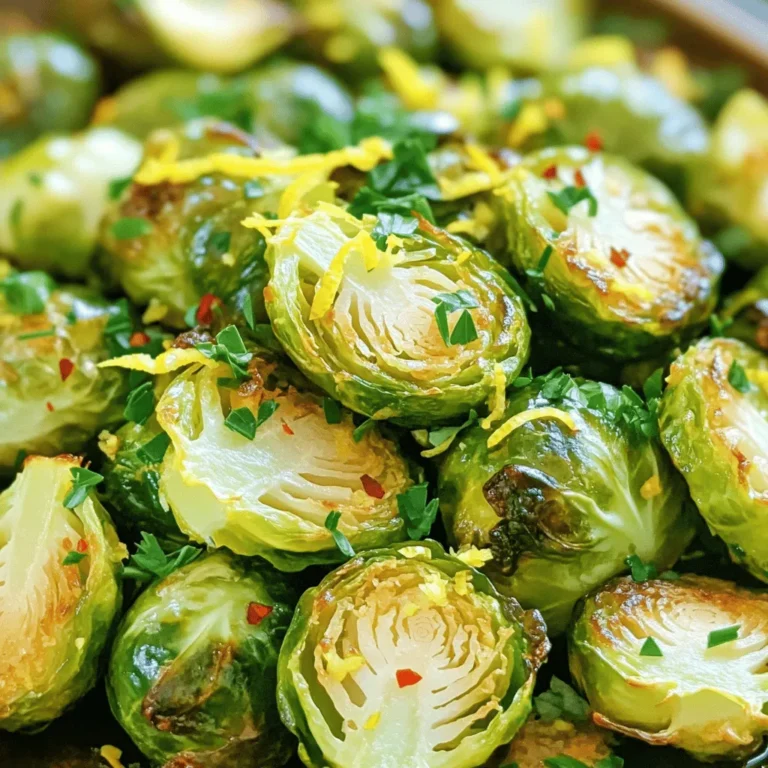
![- 1 lb Brussels sprouts, cleaned and halved - 3 tablespoons extra virgin olive oil - 4 cloves garlic, finely minced - 1/2 cup freshly grated Parmesan cheese - Zest of 1 lemon - 1/2 teaspoon red pepper flakes (optional for heat) - Fresh parsley for garnish - Sea salt and freshly cracked black pepper When I make Garlic Parmesan Brussels sprouts, I always start with the basics. Fresh Brussels sprouts are key. I buy about a pound and clean them well. Halving them helps them cook evenly and adds texture. Next, I add extra virgin olive oil. It coats the sprouts and gives them a rich flavor. I use about three tablespoons. Garlic is a must. Four cloves of finely minced garlic bring a great kick to the dish. Parmesan cheese is what makes these sprouts shine. I use half a cup of freshly grated cheese. The cheese melts and creates a tasty crust when roasted. For extra brightness, I often add zest from one lemon. It lifts the flavors and adds a fresh note. If you like heat, a half teaspoon of red pepper flakes gives the dish a spicy kick. Lastly, I season with sea salt and freshly cracked black pepper. These simple seasonings enhance the flavor without overpowering it. Don't forget to garnish with fresh parsley for a pop of color. This combination of ingredients makes a flavorful side dish that everyone will love. For the full recipe, check out the details above. - Preheat oven to 400°F (200°C). - Prepare a baking sheet with parchment paper. First, you want to make your oven hot. This helps cook the Brussels sprouts fast. The parchment paper makes cleanup simple and helps them roast better. - Mix Brussels sprouts with olive oil, garlic, and seasonings. Take your cleaned and halved Brussels sprouts and put them in a big bowl. Add the olive oil, minced garlic, sea salt, and black pepper. Toss everything together. Make sure each sprout gets coated nicely. This mix gives them great flavor. - Spread Brussels sprouts on the baking sheet. - Roast for 20 minutes, stirring halfway through. Now, spread the Brussels sprouts out on the baking sheet. Keep them in a single layer to roast evenly. Set the timer for 20 minutes, but remember to stir them halfway. This helps them get golden and crispy all over. - Add Parmesan cheese and return to oven for additional 5-7 minutes. - Garnish with parsley before serving. After roasting, take them out and sprinkle the grated Parmesan cheese on top. You can also add lemon zest and red pepper flakes if you like some heat. Put them back in the oven for 5-7 minutes. This melts the cheese and makes it bubbly. Once done, take them out and garnish with parsley. Serve them warm for the best taste. For the full details, check the Full Recipe. To get great Brussels sprouts, keep them in a single layer. This helps them cook evenly. If you crowd them, they will steam instead of roast. Stir them halfway through cooking. This ensures every side gets that nice, crispy brown. Want to brighten the dish? Add lemon zest before serving. It gives a fresh taste that pairs well with the savory flavors. You can also try different cheeses. Parmesan is great, but Pecorino Romano adds a nice twist. One common mistake is overcrowding the baking sheet. This leads to uneven cooking. Also, watch your cooking time. Undercooking makes them tough, while overcooking turns them mushy. Follow the recipe closely for the best results. For the full recipe, check out the details above. {{image_4}} To switch up the taste, try using different cheeses. Pecorino Romano adds a salty, sharp flavor. It brings a new twist to the dish. If you want a vegan option, use nutritional yeast. It gives a cheesy flavor without dairy. Plus, it's packed with nutrients! Adding protein can make your dish heartier. Toss in crispy bacon or pancetta for a savory touch. Their rich flavor pairs well with the sprouts. You can also add cooked chicken pieces. This makes the dish more filling and satisfying. For a vegetarian option, substitute the cheese with vegan alternatives. There are many great cheese substitutes that melt well. Use plant-based oil for roasting instead of olive oil. This keeps the dish fully vegan while still being delicious. For the full recipe, check out Garlic Parmesan Brussels Sprouts Delight! Store your Garlic Parmesan Brussels Sprouts in an airtight container. Refrigerating them helps keep their flavor fresh. They are best eaten within 3-5 days for optimal taste and texture. To restore crispiness, reheat the sprouts in the oven. Set your oven to 350°F (175°C) and bake for about 10-15 minutes. If you're in a hurry, you can use the microwave. However, be aware that the texture may suffer a bit. You can freeze Brussels sprouts before roasting for long-term storage. This way, they maintain their flavor. To reheat, simply thaw them first, then roast as per the [Full Recipe]. This will help you enjoy them fresh and tasty! To make your Brussels sprouts crispy, follow these tips: - Use high heat: Roasting at 400°F (200°C) gives the best results. - Spread them out: Place Brussels sprouts in a single layer on your baking sheet. - Don’t overcrowd: Give them room to breathe, which helps them roast better. - Toss halfway: Stir them at the halfway point of roasting for even browning. - Add cheese last: Sprinkle Parmesan cheese towards the end of the cooking time so it melts but does not burn. Yes, you can prepare Brussels sprouts in advance. Here’s how: - Clean and cut: Clean and halve the Brussels sprouts the day before. - Store properly: Keep them in an airtight container in the fridge. - Roast fresh: When ready to eat, toss them with oil and seasonings, and roast right before serving. Garlic Parmesan Brussels sprouts go well with many dishes. Here are a few: - Roasted chicken: The savory flavors complement crispy chicken well. - Grilled steak: The rich flavors of steak pair nicely with the sprouts. - Pasta dishes: They add a fresh, crunchy element to creamy pastas. Yes, Brussels sprouts are very healthy! They are: - Low in calories: Great for weight management. - High in fiber: Good for digestion. - Rich in vitamins: They provide vitamin C, vitamin K, and folate. Plus, they have antioxidants that help your body fight disease. Yes, you can use frozen Brussels sprouts. Here are some tips: - Thaw first: Thaw them completely before cooking for even roasting. - Pat dry: Remove moisture with a paper towel to help them crisp up. - Adjust cooking time: You may need to roast them a bit longer to achieve the same crispiness. For the full recipe, check out Garlic Parmesan Brussels Sprouts Delight. Garlic Parmesan Brussels sprouts are simple to make and full of flavor. We covered essential ingredients like fresh Brussels sprouts, olive oil, and cheese. You learned step-by-step how to prepare, toss, and roast them. Plus, I shared tips for perfecting your dish and variations to keep it exciting. Remember, the key to great Brussels sprouts is even cooking and the right flavors. Take your time to enjoy this healthy side dish. You’ll love the taste and how easy it is to make!](https://goldendishy.com/wp-content/uploads/2025/05/a403e98b-d04b-46c1-bd99-9a315ef16e11-768x768.webp)
![- 1 pound fresh okra - 2 tablespoons extra virgin olive oil - 1 teaspoon garlic powder - 1 teaspoon smoked paprika - 1/2 teaspoon ground cumin - 1/2 teaspoon salt - 1/4 teaspoon freshly ground black pepper - 1/4 teaspoon cayenne pepper (optional) - 2 tablespoons freshly grated Parmesan cheese (optional) Gathering the right ingredients is key to making crispy garlic okra chips. Fresh okra offers a unique taste and great texture. When you pick out okra, look for bright green pods that are firm and smooth. The olive oil serves as the base for your spices. It helps to crisp the okra and adds a rich flavor. Garlic powder brings a punch of taste without any hassle. Smoked paprika adds depth and a slight smokiness, which pairs well with the okra. Ground cumin gives the chips an earthy note. Salt and pepper enhance all the flavors, while cayenne pepper adds a spicy kick if you want it. Finally, Parmesan cheese can add richness, making the chips even more delicious. - Calories per serving: About 120 calories - Key vitamins and minerals: High in vitamins A and C, magnesium, and fiber - Health benefits of okra: Okra is low in calories and packed with nutrients. It supports digestion, boosts heart health, and provides antioxidants. Eating crispy garlic okra chips is not just tasty; it's also good for you. Enjoy this snack guilt-free while getting your nutrition. For the full recipe, check out the [Full Recipe] section! 1. Preheat your oven to 425°F (220°C). This step helps the okra get crispy. 2. Line a large baking sheet with parchment paper. This prevents sticking and makes cleanup easy. 3. Trim the ends of the okra pods, cutting off just the stem. 4. Cut the okra into halves or thirds. Aim for even sizes so they cook well. 1. In a large bowl, mix the extra virgin olive oil, garlic powder, smoked paprika, ground cumin, salt, black pepper, and optional cayenne pepper. Stir until you have a smooth paste. 2. Add the cut okra to the bowl. Toss gently but well. Make sure each piece gets coated with the paste. 1. Spread the okra in a single layer on the baking sheet. Don’t overcrowd the pan. This will keep them crispy. 2. Bake in the preheated oven for 20-25 minutes. Flip the chips halfway through to brown them evenly. 3. If you want to add Parmesan cheese, sprinkle it on during the last 5 minutes. This makes a tasty cheesy crust. 4. Once golden brown and crispy, take the baking sheet out of the oven. Let the okra cool slightly before serving for the best crunch. You can find the full recipe above to guide you through this process. To make crispy garlic okra chips, cut the okra evenly. This helps all pieces cook the same. Aim for pieces that are about the same size. When they are even, they will brown nicely. Also, avoid overcrowding the baking sheet. If you put too many pieces on one pan, they will steam instead of crisp. Spread them out and use two sheets if needed. Using fresh ingredients makes a big difference. Fresh okra has a better taste and texture. Also, feel free to adjust the spices. If you love garlic, add more garlic powder. For a kick, increase the cayenne pepper. Taste the mixture as you go. This way, you can make the flavor just right for you. Pair these chips with dips for extra flavor. A creamy ranch or spicy aioli works well. You can also serve them with salsa for a fresh twist. For presentation, use a bright bowl. Garnish with parsley or lime slices for a pop of color. This makes your dish look even more appetizing. Enjoy your crispy garlic okra chips as a fun snack or side dish. Check out the Full Recipe for more details! {{image_4}} You can easily change the taste of your okra chips. For spicy garlic okra chips, add cayenne pepper or chili powder. This will give them a nice kick. You might also try mixing in some smoked paprika for a deeper flavor. If you prefer fresh herbs, add chopped rosemary or thyme. These herb-infused options brighten the dish and add a lovely aroma. If you’re looking for vegan alternatives, skip the cheese. The chips will still taste great without it. You can also use nutritional yeast for a cheesy flavor. For gluten-free options, you’re in luck! This recipe is naturally gluten-free. Just ensure that any additional spices used are also gluten-free. Crispy okra chips are not just for snacking. Use them in salads for extra crunch. They can also be a fun topping on soups. Try mixing them into a grain bowl for added flavor. You can even crush them and use them as a crispy coating for chicken or fish. The possibilities are endless! Check out the Full Recipe for more details on how to make these tasty snacks. To keep your crispy garlic okra chips fresh, store them in airtight containers. This method helps keep moisture out and maintains that delightful crunch. When stored properly, they can last for about 3-5 days at room temperature. For best results, place them in a cool, dark spot in your kitchen. If you live in a warm climate or want to make them last longer, consider storing them in the refrigerator. This will help retain their flavor and texture for about a week. Just remember to let them cool completely before sealing them up. Want to enjoy okra chips later? You can freeze them! First, let the chips cool fully. Then, place them in a single layer on a baking sheet and pop them in the freezer for a few hours. Once frozen, transfer them to a freezer-safe bag. This way, you can enjoy them anytime. When you’re ready to eat your frozen okra chips, don’t thaw them. Just bake them straight from the freezer at 425°F (220°C) for about 10-15 minutes. This will help them regain their crispy texture. For the best flavor, eat your crispy garlic okra chips within the first couple of days. They taste freshest right after baking. If you notice any signs of spoilage, like an off smell or a soft texture, it’s best to toss them. Keeping an eye on your snacks ensures you always enjoy them at their best! To make Crispy Garlic Okra Chips, start with fresh okra. Preheat your oven to 425°F. Wash and dry your okra. Cut the okra into halves or thirds. In a bowl, mix olive oil, garlic powder, smoked paprika, cumin, salt, black pepper, and optional cayenne pepper. Toss the cut okra in this mix until well coated. Spread the okra on a baking sheet. Bake for 20-25 minutes, flipping halfway. Enjoy a tasty snack! For the full recipe, check the section above. Yes, you can use frozen okra, but it may change the texture. Frozen okra tends to be softer after cooking. This means your chips may not be as crisp. If you use frozen okra, thaw it first and pat it dry. This helps reduce moisture. For best results, fresh okra gives the best crunch. You can find pre-made garlic okra chips at many grocery stores. Look in the snack aisle or natural food sections. Brands like Southern Style and Veggie Chips offer tasty options. You can also check online retailers like Amazon or health-focused sites. Always read labels for the best flavor and quality. To add spice to your chips, try these tips: - Add more cayenne pepper for heat. - Mix in chili powder or red pepper flakes. - Use spicy seasoning blends like Cajun or taco seasoning. - Experiment with fresh jalapeños for a bold twist. These changes will give your chips a fiery kick! This blog covered the fun and tasty world of crispy okra. You learned about the ingredients, from fresh okra to spices, and how they bring flavor. The step-by-step guide made cooking easy and clear. Our tips will help you achieve the best crunch and taste. You can even try different flavors and modify the recipe to fit your diet. Remember to store your okra properly for the best taste. Now, it's time to enjoy your crispy okra chips, whether as a snack or a side dish!](https://goldendishy.com/wp-content/uploads/2025/07/49c08959-fe34-4929-8f55-872212e9bd7e-768x768.webp)
![A classic Caesar salad has a few key components. First, you need fresh romaine lettuce. It adds a nice crunch. Next, croutons bring texture and flavor. You can buy them or make your own. Parmesan cheese gives a rich taste. The dressing is vital too. You need mayonnaise, Dijon mustard, and lemon juice. Garlic adds depth, while Worcestershire sauce is optional for extra flavor. Don't forget salt and pepper to enhance everything. You can add other ingredients to make your Caesar salad special. Grilled chicken or shrimp makes it a full meal. Avocado adds creaminess. For a twist, try capers or anchovies. They give a salty kick. Fresh herbs like parsley or basil can brighten the salad. These options let you customize your dish to your taste. If you're missing an ingredient, don’t worry! You can use Greek yogurt instead of mayonnaise for a lighter dressing. If you don’t have Dijon mustard, regular mustard works too. For cheese, try Pecorino Romano if you can't find Parmesan. If you're out of Worcestershire sauce, soy sauce can be a good substitute. These swaps keep your salad tasty and fresh. For the complete recipe, check out the Full Recipe. To start, you need to make the dressing. In a medium bowl, whisk together these ingredients: - 1/4 cup mayonnaise - 2 tablespoons Dijon mustard - 2 tablespoons fresh lemon juice - 1 teaspoon Worcestershire sauce (optional) - 1 clove garlic, minced - Salt and freshly cracked black pepper Mix until smooth and creamy. The dressing should have a nice tang from the lemon and mustard. Adjust the salt and pepper to your taste. If you like it zestier, add a bit more lemon juice. Next, grab a large bowl. Add the chopped romaine lettuce: - 1 large head of romaine lettuce, washed and chopped - A drizzle of olive oil Toss the lettuce gently to coat it with the oil. This step helps keep the leaves crisp. Now, pour the dressing over the lettuce and toss again. Make sure every leaf gets a good coating. Now, fold in the croutons and sprinkle: - 1 cup of croutons - 1/2 cup grated Parmesan cheese Be gentle here to keep the croutons crunchy. Taste the salad and adjust the seasoning if needed. Transfer the salad to a serving platter or individual bowls. For a nice touch, garnish with more Parmesan cheese and a sprinkle of black pepper. Serve it right away for the best crunch. If you want more ideas, try adding grilled chicken or shrimp for a heartier meal. Check out the Full Recipe for more tips! To get that perfect crunch, start with fresh romaine lettuce. Look for crisp, vibrant leaves. Wash them well, then chop them into bite-sized pieces. This helps each bite stay crunchy. Next, use good quality croutons. You can make your own by toasting bread with olive oil and garlic. This adds flavor and keeps them crunchy. Mix the croutons in just before serving. This way, they won’t get soggy. When applying dressing, less is more. Start with a small amount. Toss the salad gently to coat the leaves without bruising them. If the salad seems dry, add more dressing little by little. Always taste as you go. This lets you find the right balance for your flavor. Remember, the goal is to enhance the salad, not drown it. Taste is personal, so feel free to adjust. If you like it tangy, add more lemon juice or Dijon mustard. If you want it richer, add more Parmesan cheese. Salt and pepper are key too. A little extra can elevate the dish. Experiment with Worcestershire sauce for unique depth. This can give your salad a signature twist. {{image_4}} Adding grilled chicken or shrimp makes your Caesar salad hearty. Both options bring flavor and protein. For grilled chicken, season it with salt and pepper. Cook it until it is golden brown. Slice it thin and place it on top of your salad. For shrimp, sauté them in olive oil with garlic. Cook until they turn pink. Either choice takes your salad to the next level. If you want a veggie-packed salad, add more vegetables. Try diced bell peppers, cucumbers, or cherry tomatoes. These add crunch and freshness. You can also include roasted veggies like zucchini or asparagus for depth. This gives your Caesar salad a colorful twist. Each vegetable choice adds its own flavor, making it unique. Get creative with your ingredients for a fun twist. Consider adding avocado for creaminess. You can also sprinkle nuts like pine nuts or walnuts for crunch. Another option is to use different cheeses. Feta or blue cheese can change the flavor profile. Lastly, add a touch of hot sauce for some heat. Experimenting with these unique ingredients can make your Caesar salad exciting. For the full recipe, check out the [Full Recipe]. To keep your Classic Caesar Salad fresh, store it in the fridge. Place the salad in an airtight container. If you have leftover dressing, store it separately. This keeps the croutons crunchy and the lettuce crisp. Always add croutons just before serving. This way, they stay crunchy and not soggy. You can also wrap the lettuce in a damp paper towel. This helps the leaves stay fresh longer. When stored properly, Classic Caesar Salad lasts about 2 to 3 days. If the lettuce wilts or the croutons become soft, it’s best to toss it out. Always check for signs of spoilage before enjoying leftovers. A Caesar Salad stands out due to its unique dressing and ingredients. It typically includes romaine lettuce, croutons, and Parmesan cheese. The dressing is creamy, made with mayonnaise, mustard, lemon juice, garlic, and Worcestershire sauce. This mix gives the salad its rich flavor. The crunch of the croutons and the fresh lettuce create a delightful texture. Yes, you can make Caesar Dressing from scratch. It’s simple and rewarding. Just whisk together mayonnaise, Dijon mustard, lemon juice, garlic, and Worcestershire sauce. This homemade version tastes fresher than store-bought dressings. You can adjust flavors according to your taste. For a twist, add a bit of anchovy paste for a classic touch. Absolutely! A Caesar Salad can be made nut-free. Traditional recipes do not include nuts. Just focus on the core ingredients: romaine lettuce, croutons, and the creamy dressing. If you make your own croutons, ensure the bread you use is also nut-free. Everyone can enjoy this tasty salad without nuts. To make a Caesar Salad healthier, try these tips: - Use Greek yogurt instead of mayonnaise for the dressing. - Add more vegetables like cherry tomatoes or cucumbers for extra nutrients. - Use whole-grain croutons for more fiber. - Limit the cheese or use a lower-fat version. These changes keep the flavors while boosting the nutrition. You can find the full recipe for a Classic Caesar Salad here: Crispy Caesar Delight 🥗. This recipe guides you through making a fresh and flavorful salad that you will love. This blog post covers how to make a classic Caesar salad. We discussed key ingredients and tips for adding flavor. You learned how to prepare the dressing and toss the salad correctly. I shared storage info and answered common questions about Caesar salads. Keep experimenting with variations, whether adding protein or fresh veggies. Enjoy making your salad just right for you! Your perfect Caesar awaits.](https://goldendishy.com/wp-content/uploads/2025/06/57ecdae1-38df-4f5b-a4b6-710b22066cc6-768x768.webp)
![To create a vibrant Summer Berry Spinach Salad, gather the following ingredients: - 5 cups fresh baby spinach - 1 cup mixed berries (strawberries, blueberries, raspberries) - ½ cup crumbled feta cheese - ¼ cup sliced almonds - ¼ red onion - 3 tablespoons olive oil - 2 tablespoons balsamic vinegar - 1 tablespoon honey - Salt and pepper to taste Each ingredient plays a key role in this dish. The fresh baby spinach adds a crisp base. Mixed berries bring natural sweetness and color. Feta cheese provides a creamy texture that balances the sweet berries. Sliced almonds add crunch, while red onion gives a nice bite. For the dressing, high-quality olive oil and balsamic vinegar create a rich flavor. Honey enhances sweetness, making it perfect for summer. Salt and pepper round out the taste. This Summer Berry Spinach Salad is not only easy to make but also a feast for the eyes. You can find the full recipe details above for a step-by-step guide. Enjoy this refreshing dish any sunny day! Start by washing the fresh baby spinach. Place it in a large bowl and rinse it under cold water. Ensure you remove any grit or dirt. After washing, pat the spinach dry with a clean kitchen towel. This helps keep the leaves crisp. Now, place the dried spinach in your salad bowl. This vibrant green will serve as the salad’s base layer. Next, focus on the mixed berries. Rinse them gently under cold running water. Make sure to dry them with a clean kitchen towel. If you have strawberries, slice them into thin rounds or quarters. This step ensures an even distribution of sweetness. Add all the berries to the bowl with the spinach. You will create a colorful mix that looks as good as it tastes. Now, it’s time to build your salad. Evenly sprinkle crumbled feta cheese over the spinach and berry mix. This adds a creamy tang that complements the sweetness of the berries. In a small skillet, heat over medium heat. Add sliced almonds and toast them for about 3-4 minutes. Stir them frequently to avoid burning. Once they are golden brown, take them off the heat and let them cool slightly. For the dressing, mix olive oil, balsamic vinegar, honey, and a pinch of salt and pepper in a small bowl. Whisk these ingredients together until they are smooth. Drizzle the dressing generously over the salad. Toss gently to coat every leaf and berry well. Just before serving, scatter the toasted almonds and thinly sliced red onions on top. This adds crunch and a nice flavor contrast. For the full recipe, refer to the earlier section. To make the best Summer Berry Spinach Salad, start by choosing ripe and juicy berries. Look for berries that are bright in color and free from any bruises. Strawberries should be deep red, blueberries should be plump, and raspberries should have a rich hue. Firm berries taste better and hold up well in your salad. Next, identify fresh spinach leaves. Choose baby spinach with vibrant green color and no signs of wilting. The leaves should feel crisp and firm to the touch. Avoid any spinach that looks yellow or slimy. Fresh spinach provides a nice base for your salad. Adjust the sweetness of your dressing with honey. You can add more or less honey based on your taste. If you prefer a sweeter salad, add an extra tablespoon. This will help balance the flavors in your dish. Vinegar is key for balancing flavors. Balsamic vinegar brings a sweet acidity that pairs well with berries. If you want a tangier taste, try adding a splash of lemon juice. Experiment with the vinegar to find the right balance for your palate. Garnishing your salad adds visual appeal. Scatter a few whole berries on top for a pop of color. You can also sprinkle a bit more feta cheese for extra flair. A light dusting of fresh herbs, like mint, can elevate the look as well. For serving suggestions, consider a large platter for gatherings. This makes it easy for everyone to help themselves. You can also serve individual bowls for a more personal touch. Either way, your salad will look beautiful and inviting. For the full recipe, check out [Full Recipe]. {{image_4}} You can switch out the feta cheese for other options. Goat cheese adds a rich creaminess. If you want a dairy-free option, try avocado. It brings a smooth texture and healthy fats. When it comes to nuts or seeds, feel free to mix it up. Walnuts or pecans can add a nice crunch. Sunflower seeds or pumpkin seeds offer a different flavor and texture. These swaps can make your salad unique. To make this salad more filling, add grilled chicken or shrimp. Both proteins pair well with the berries and spinach. Just cook them with a bit of salt and pepper for flavor. You can also include more vegetables. Chopped cucumbers or bell peppers can add freshness. Carrots or radishes bring extra crunch and color. These add-ins can change the salad’s look and taste. For vegan options, replace the feta with tofu. It soaks up flavors well and adds protein. You can use maple syrup instead of honey for sweetness. If gluten is a concern, this salad is already gluten-free. Just make sure your dressing is gluten-free too. With these simple swaps, everyone can enjoy this vibrant dish. For the full recipe, check out the Summer Berry Spinach Salad. To keep your Summer Berry Spinach Salad fresh, use an airtight container. Glass or plastic containers work well for this purpose. Always make sure the container seals tightly to prevent air from getting inside. The salad will stay fresh for about 1 to 2 days in the fridge. However, the spinach may wilt over time. The berries can last longer, but they may lose some texture. You can prepare parts of the salad ahead of time. Wash and dry the spinach, then store it in a container with a paper towel. This will keep it crisp. You can also rinse the berries and slice the strawberries ahead of time. Just remember to keep them dry and in the fridge. For the dressing, mix all the ingredients in a jar. Seal it and store it in the fridge. You can make the dressing a few days in advance. Just give it a good shake before using it. This way, you can assemble the salad quickly when you are ready to serve. For the full recipe, click here: [Full Recipe]. To make a vegan version, you can swap out the feta cheese. Use avocado for creaminess or a vegan cheese. For the dressing, replace honey with maple syrup. This keeps the sweetness while making it plant-based. Yes, you can use frozen berries. They add great flavor and nutrition. Just remember to thaw them before adding to the salad. This helps avoid extra water in your dish. Frozen berries may not be as firm as fresh, so use them carefully. Store the salad in an airtight container in the fridge. This keeps it fresh longer. If you have leftovers, keep the dressing separate. This way, the salad stays crisp and tasty. The salad lasts about 2-3 days in the fridge. However, the berries and spinach may wilt over time. To enjoy the best taste, eat it within a day or two. This blog post covered a refreshing Summer Berry Spinach Salad. We discussed the ingredients you need, step-by-step prep, and assembly. Tips for choosing fresh items improve your salad's taste. We explored fun variations and how to store leftovers. In conclusion, this salad is easy to make and versatile. You can adjust it to fit your taste. Enjoy creating your healthy and vibrant dish!](https://goldendishy.com/wp-content/uploads/2025/07/d7cbd640-e74d-48cd-91ef-5930b3ae459b-768x768.webp)