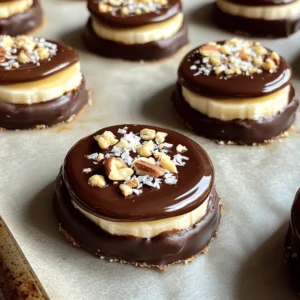
Chocolate Covered Banana Bites Tasty Snack Recipe

Looking for a quick and yummy snack? Chocolate covered banana bites are the perfect treat! They’re easy to make with just a few simple ingredients. You’ll love how the sweet banana pairs with rich chocolate. Plus, you can customize them with your favorite toppings. Join me as I show you how to whip up these tasty bites in no time. Let’s dive into this delicious recipe together!
Ingredients
List of Ingredients for Chocolate Covered Banana Bites
– 2 ripe bananas
– 1 cup dark chocolate chips
– 1 tablespoon coconut oil
– 1/4 cup crushed nuts
– 1/4 cup unsweetened shredded coconut
– A pinch of sea salt for garnish (optional)
To make chocolate-covered banana bites, gather these tasty ingredients. Start with ripe bananas. They give the best flavor and sweetness. Next, you’ll need dark chocolate chips. If you want a sweeter treat, you can use milk chocolate instead.
Coconut oil helps the chocolate melt smoothly. It gives the chocolate a nice shine. Then, grab some crushed nuts. Almonds and walnuts work great, but choose your favorite. Unsweetened shredded coconut adds a delightful tropical twist. Finally, if you like, add a pinch of sea salt. This will balance the sweet chocolate and banana.
With these ingredients, you can create a delicious snack that everyone will love. Enjoy the fun of making these tasty bites!
Step-by-Step Instructions
Preparation of Bananas
Start by peeling the bananas. This step is easy and quick. Slice the bananas into 1-inch thick rounds. Each piece should be bite-sized for easy eating. Using a sharp knife helps you get clean cuts.
Melting the Chocolate
In a microwave-safe bowl, mix the dark chocolate chips with the coconut oil. The oil makes the chocolate smooth and shiny. Heat the mixture in the microwave for 30 seconds at a time. Stir well after each interval. Keep heating until the chocolate is completely melted. You want a nice, silky texture.
Dipping the Banana Slices
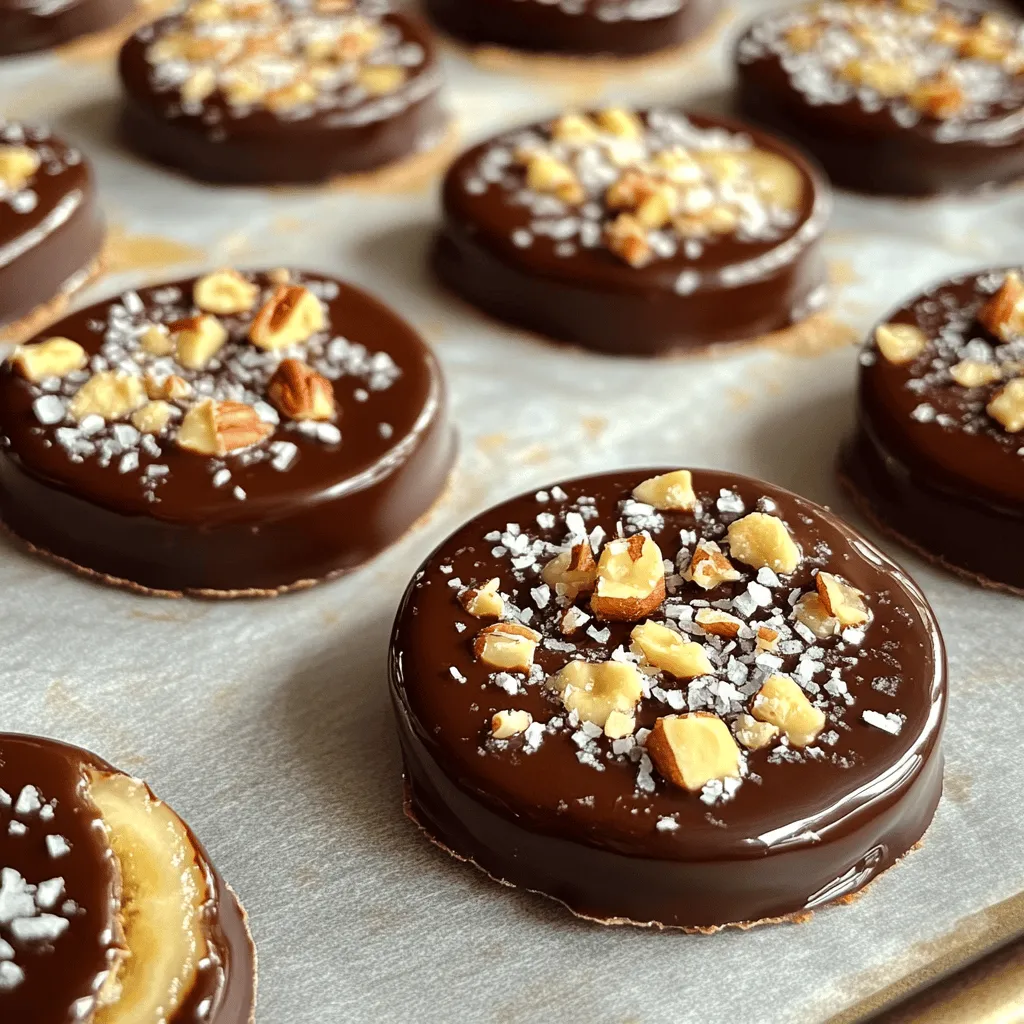
Take each banana slice and dip it into the melted chocolate. Make sure to coat each piece well. Allow any excess chocolate to drip back into the bowl. This keeps your bites from being too messy.
Adding Toppings
While the chocolate is still soft, it’s time to add toppings. Sprinkle crushed nuts and shredded coconut over each chocolate-coated banana. This adds flavor and crunch. For a fun twist, add a pinch of sea salt on top. It balances the sweetness perfectly.
Setting the Bites
Prepare a baking sheet by lining it with parchment paper. This helps the bites not stick. Place the chocolate-coated banana slices on the sheet. Spread them out evenly. Put the baking sheet in the freezer. Let the bites harden for at least 30 minutes. This step ensures the chocolate sets nicely.
Tips & Tricks
Choosing the Right Chocolate
When picking chocolate, you have options. Dark chocolate gives a rich taste. Milk chocolate is sweeter and creamier. You can choose based on your mood or taste. If you want a vegan option, look for dairy-free chocolate chips. Many brands offer great choices that melt well.
Enhancing Flavor and Texture
For added crunch and flavor, use nuts. Almonds and walnuts work well. You can also try pecans or hazelnuts for fun. Don’t forget about toppings! Sprinkling unsweetened shredded coconut adds a nice touch. Try adding mini chocolate chips or colorful sprinkles for a playful look.
Ensuring Perfect Chocolate Coating
To coat your banana bites well, avoid rushing. Dip them quickly but evenly in the chocolate. Make sure to let excess chocolate drip off. This keeps the bites from being too messy. If the chocolate isn’t smooth, reheat it in short bursts. Stir well until silky. A smooth finish makes your bites look more appetizing!

Variations
Alternative Fruits to Use
You can switch up the fruit in this recipe. Strawberries work well with chocolate. Their natural sweetness pairs great with the rich chocolate. Just wash, hull, and dip them whole or slice them in half. Apples also make a fun choice. Slice them into thin wedges for a crunchy bite. You can even make a fruit platter. Mix banana bites, strawberries, and apple slices. This adds color and variety to your snack.
Different Chocolate Options
Chocolate comes in many forms. White chocolate provides a sweet twist. It pairs nicely with fruits like bananas and strawberries. You can also try flavored chocolate. Options like mint or orange add a fun taste. Just melt it like dark chocolate. The added flavors will surprise your taste buds.
Healthier Versions
If you want a healthier treat, there are options. You can find sugar-free chocolate. These alternatives taste great and cut down on sugar. Another idea is to use yogurt instead of chocolate. Dip your banana slices in plain or flavored yogurt. Freeze them for a creamy, healthy snack. Both options keep the fun without the guilt.
Storage Info
Best Practices for Storage
To keep your chocolate-covered banana bites fresh, use an airtight container. This helps prevent moisture from ruining your tasty treat. I recommend a container that seals well. It protects your bites from other smells in the freezer.
You can store these bites in the refrigerator or freezer. The fridge keeps them soft, but they may not last long. The freezer is best for long-term storage. Just make sure they are in the airtight container. They will stay fresh and ready to eat.
How Long Do They Last?
When stored properly, chocolate-covered banana bites last about a week in the freezer. In the fridge, eat them within three days for the best taste.
Look for signs of spoilage. If the bananas turn brown or the chocolate looks dull, it’s time to toss them. A good way to check is by smelling the bites. If they smell off, do not eat them. Enjoy your snacks while they are fresh!
FAQs
Can I use frozen bananas for this recipe?
Yes, you can use frozen bananas. Just make sure they are ripe. Frozen bananas add a creamy texture. However, they may not hold their shape as well. If you use frozen bananas, slice them while still slightly firm.
How do I make chocolate-covered banana bites without coconut oil?
You can skip the coconut oil if you want. Just melt the chocolate chips alone. The chocolate may be thicker without the oil. You might need to dip quickly to ensure a good coating.
What size should the banana slices be?
Slice the bananas into 1-inch thick rounds. This size is perfect for dipping and snacking. They should be easy to hold and eat. Avoid making them too thin, or they may break.
Can I make these banana bites ahead of time?
Yes, you can prepare them ahead of time. After dipping, freeze the banana bites for about 30 minutes. Store them in an airtight container. They last in the freezer for up to a week.
Where can I buy pre-made chocolate-covered banana bites?
You can find pre-made chocolate-covered banana bites in many grocery stores. Check the frozen section or snack aisle. Some health food stores may also carry them. Always read the labels for added ingredients.
Chocolate-covered banana bites are easy and fun to make. We covered all the steps: preparing bananas, melting chocolate, and adding tasty toppings. With tips on choosing chocolate and extra flavors, you can customize these treats. Whether you keep them simple or explore various fruits, there’s a version for everyone. Remember to store them well for fresh bites. Enjoy the sweet crunch and treat yourself to a delicious snack!


![To bake a delicious Raspberry Lemon Loaf, you need these key ingredients: - 1 ½ cups all-purpose flour - 1 teaspoon baking powder - ½ teaspoon baking soda - ¼ teaspoon salt - ½ cup unsalted butter, softened - 1 cup granulated sugar - 2 large eggs, at room temperature - 1 teaspoon pure vanilla extract - Zest of 1 lemon, finely grated - ½ cup freshly squeezed lemon juice - 1 cup fresh raspberries (or frozen, thawed, and drained) - ¼ cup powdered sugar for glazing - 1 tablespoon freshly squeezed lemon juice for glazing You can add extra flavor or texture with these options: - ½ cup chopped nuts, like walnuts or almonds - ½ teaspoon almond extract for a nutty taste - Lemon zest can be increased for a stronger flavor - A handful of blueberries can mix well with raspberries If you run out of an ingredient, here are some swaps: - Use coconut oil instead of butter for a dairy-free version - Applesauce can replace eggs for a vegan loaf - If you lack lemon juice, use lime juice instead - Whole wheat flour can stand in for all-purpose flour, but it may change the texture With these ingredients and options, you can customize your Raspberry Lemon Loaf to fit your taste! Start by preheating your oven to 350°F (175°C). Grab a 9x5 inch loaf pan. Grease it with butter and lightly dust it with flour. This will help the loaf come out easily. In a medium bowl, whisk together the following: - 1 ½ cups all-purpose flour - 1 teaspoon baking powder - ½ teaspoon baking soda - ¼ teaspoon salt Set this mixture aside for later use. This step ensures the leavening agents are evenly distributed. In a large mixing bowl, use an electric mixer to cream together: - ½ cup unsalted butter, softened - 1 cup granulated sugar Beat them for about 3-5 minutes. The mixture should turn light and fluffy. This helps air to blend into the butter. Now, add 2 large eggs one at a time. Mix well after each addition. Next, stir in: - 1 teaspoon pure vanilla extract - Zest of 1 lemon Make sure everything combines fully. This adds a nice flavor to your loaf. Slowly pour in ½ cup of freshly squeezed lemon juice. Mix gently until it blends well with the other wet ingredients. This step gives your loaf a bright, zesty taste. Gradually add the dry mixture to the wet mix. Stir gently until just combined. Be careful not to overmix. This keeps your loaf light and airy. Now, it’s time to add the fun part! Gently fold in 1 cup of fresh raspberries. If you use frozen ones, coat them lightly in flour. This helps them stay suspended in the batter. Pour the batter into your prepared loaf pan. Smooth the top with a spatula. Bake in the preheated oven for 50-60 minutes. Check for doneness by inserting a toothpick in the center. It should come out clean. Once baked, let the loaf cool in the pan for about 10 minutes. Then transfer it to a wire rack to cool completely. For glazing, mix together: - ¼ cup powdered sugar - 1 tablespoon freshly squeezed lemon juice Drizzle this glaze over the cooled loaf for a sweet finish. Slice the loaf into generous pieces. Enjoy the burst of raspberry and lemon flavors in every bite! You can serve it on pretty plates. Garnish with fresh raspberries and a sprinkle of lemon zest for an elegant touch. This loaf is perfect for breakfast or a sweet snack! For the Full Recipe, check out the detailed instructions. One big mistake is overmixing the batter. This can make the loaf tough. Mix until just combined for a light texture. Another mistake is not checking the oven temperature. An oven thermometer can help ensure accuracy. Also, if you forget to grease your pan, the loaf may stick. Always prepare your pan before pouring in the batter. For a soft and moist loaf, use room temperature ingredients. Cold butter or eggs can lead to uneven mixing. When folding in raspberries, do it gently. This helps keep them whole and prevents a mushy loaf. Make sure your oven is fully preheated. This ensures even baking and a perfect rise. To boost flavor, add more lemon zest. This can brighten the taste. You can also mix in a dash of almond extract for a unique twist. If you want a sweeter glaze, add more powdered sugar. For a touch of spice, a pinch of cinnamon can be delightful. Enjoy experimenting with flavors to find your perfect blend! {{image_4}} To make a gluten-free version, swap the all-purpose flour with a gluten-free blend. Use one that works well for baking. The texture may change slightly, but the taste will still shine. This version is just as delicious and perfect for those with gluten issues. For a vegan twist, replace the eggs with flax eggs. Mix one tablespoon of ground flaxseed with three tablespoons of water. Let it sit for five minutes. Use a plant-based butter instead of regular butter. This keeps the loaf moist and tasty while being dairy-free. You can switch out the raspberries for other fruits! Blueberries or strawberries work well. For a tropical touch, try diced pineapple or mango. Each fruit brings its own flavor, making your loaf unique. Experiment and find your favorite mix! For the full recipe, refer to the section above. After you bake your Raspberry Lemon Loaf, let it cool completely. Wrap it tightly in plastic wrap or foil. You can also place it in an airtight container. Store it at room temperature for up to three days. If you prefer, keep it in the fridge for about a week. This helps keep it fresh and moist. To freeze the loaf, first cool it completely. Then, slice it into even pieces. Wrap each slice in plastic wrap. Next, place the wrapped slices in a freezer-safe bag. You can freeze them for up to three months. When you’re ready to enjoy a slice, thaw it in the fridge overnight or let it sit at room temperature for a few hours. Reheating is simple. You can use a microwave or an oven. For the microwave, heat a slice for about 15-20 seconds. Check if it’s warm enough. If you use the oven, preheat it to 350°F (175°C). Place the slice on a baking sheet for about 5-10 minutes. This method keeps the loaf soft and tasty. Enjoy your Raspberry Lemon Loaf warm with a cup of tea or coffee! You can check if your loaf is done by inserting a toothpick in the center. If it comes out clean or with just a few crumbs, your loaf is ready. You can also look for a golden-brown crust and a slight spring back when you gently press the top. Yes, you can use frozen raspberries! Just make sure to thaw them and drain off any extra liquid. Toss them in some flour before folding them into the batter. This helps to keep them from sinking to the bottom while baking. If you don't have lemon juice, you can use lime juice or even apple cider vinegar. Both options will give a nice tang to your loaf. Just remember that the flavor will change slightly. The Raspberry Lemon Loaf will stay fresh for about 3-4 days at room temperature if stored in an airtight container. It also freezes well for up to 3 months. Just wrap it tightly before freezing. Absolutely! You can make the loaf a day or two ahead of time. Store it in an airtight container to keep it moist. You can also prepare the batter in advance and bake it later for a fresh treat. Be sure to check the [Full Recipe] for more tips! Here is the full recipe for Raspberry Lemon Dream Loaf. This treat is bright, sweet, and tangy. You will want to make it again and again. Ingredients: - 1 ½ cups all-purpose flour - 1 teaspoon baking powder - ½ teaspoon baking soda - ¼ teaspoon salt - ½ cup unsalted butter, softened to room temperature - 1 cup granulated sugar - 2 large eggs, at room temperature - 1 teaspoon pure vanilla extract - Zest of 1 lemon, finely grated - ½ cup freshly squeezed lemon juice - 1 cup fresh raspberries (or frozen raspberries, thawed and drained) - ¼ cup powdered sugar for glazing - 1 tablespoon freshly squeezed lemon juice for glazing This loaf serves about 10 people. Each slice has around 200 calories. You get a nice mix of carbs, fat, and protein. The fresh raspberries add fiber and vitamins, too. Slice the loaf into thick pieces. Each slice is perfect for a dessert or a snack. You can serve it on its own or with a cup of tea. The bright flavors make it a crowd-pleaser. For a fancy touch, add a few raspberries on top. Enjoy every bite! In this article, we explored the essential ingredients for a Raspberry Lemon Loaf, including optional add-ins and substitutions. I provided clear, step-by-step instructions to guide you from mixing to baking. We discussed tips for avoiding mistakes and achieving the right texture. You also learned about variations, storage methods, and answers to common questions. Now, with these insights, you can create a delicious loaf that suits your taste and needs. Enjoy baking and sharing this delightful treat!](https://goldendishy.com/wp-content/uploads/2025/07/83025fd5-21c0-4ee2-bbe4-d247d9a88122-768x768.webp)


![To make healthy peanut butter oat bars, you need a few key items: - 2 cups rolled oats - 1/2 cup natural peanut butter - 1/4 cup honey or maple syrup - 1/4 cup unsweetened applesauce - 1/2 cup mixed nuts (almonds, walnuts, cashews), roughly chopped - 1/4 cup dark chocolate chips (optional) - 1/2 teaspoon ground cinnamon - 1/4 teaspoon sea salt These ingredients work together to create a tasty and nutritious snack. The oats provide fiber, while the peanut butter adds protein and healthy fats. Honey or maple syrup gives sweetness, and applesauce keeps the bars moist. You can easily change your bars by adding extra flavors or textures. Here are some fun options: - Dried fruits (like cranberries or raisins) - Seeds (like chia or flaxseed) - Protein powder for an extra boost - Coconut flakes for added flavor Feel free to mix and match these add-ins to suit your taste. These oat bars pack a nutritious punch. Here’s a quick look at what you’ll get: - Calories: About 150 per bar - Protein: Around 5g, thanks to the peanut butter and nuts - Fiber: Approximately 3g from the oats and nuts - Healthy Fats: Includes unsaturated fats from the peanut butter and nuts These bars not only taste great but also fuel your body. With their balanced nutrition, they make a perfect snack or breakfast option. For the complete recipe, check the Full Recipe link. Start by preheating your oven to 350°F (175°C). This step ensures even baking. Next, grab an 8x8-inch baking pan. Line it with parchment paper, letting some paper hang over the edges. This makes it easy to lift the bars out later. In a large mixing bowl, combine 2 cups of rolled oats, 1/2 teaspoon of ground cinnamon, and 1/4 teaspoon of sea salt. Stir well until the dry ingredients are mixed evenly. This mix creates a solid base for your bars. In a separate bowl, blend together 1/2 cup of natural peanut butter, 1/4 cup of honey or maple syrup, and 1/4 cup of unsweetened applesauce. Mix vigorously until the mixture is smooth. Pour this wet mixture into the bowl with the dry ingredients. Stir thoroughly, ensuring all the oats are coated. Now, it’s time for the fun part! Fold in 1/2 cup of roughly chopped mixed nuts and 1/4 cup of dark chocolate chips, if you want a sweet touch. Make sure to distribute these extras evenly throughout the batter. Spoon the mixture into your prepared baking pan. Use a spatula or your hands to press the mixture down firmly. This ensures the bars hold their shape while baking. Bake in the preheated oven for 20-25 minutes. Look for a lovely golden brown color on the edges. Once done, remove the pan from the oven. Let it cool for about 10 minutes. Use the parchment paper to lift the bars from the pan and place them on a wire rack. Allow them to cool completely before cutting into your desired size. You can store any leftovers in an airtight container to keep them fresh. Enjoy these tasty treats as a snack or a quick breakfast! For the complete recipe, see the Full Recipe section. To get the best texture for your peanut butter oat bars, use rolled oats. They stay chewy and hold together well. If you want a softer bar, add a bit more applesauce. For crunch, add more nuts. Press the mixture firmly into the pan. This helps the bars hold their shape when baked. Store your bars in an airtight container. This keeps them fresh and moist. You can also layer parchment paper between bars to prevent sticking. If you want to keep them longer, freeze them. They freeze well for up to three months. Just wrap them tightly in plastic wrap before placing them in a freezer bag. These bars make a great snack or breakfast. Cut them into small squares for easy grabbing. Pair them with yogurt or fruit for a balanced meal. You can also drizzle some honey on top for added sweetness. Feel free to explore the [Full Recipe] for more ideas on how to enjoy these delicious treats! {{image_4}} You can change up the nuts in your oat bars. Use almonds, walnuts, or cashews. If you like seeds, try adding pumpkin seeds or sunflower seeds. These options add crunch and healthy fats. Mix and match to find your favorite combination. If you want a different sweet taste, try maple syrup instead of honey. You can also use agave nectar for a milder flavor. For a low-calorie option, consider stevia or monk fruit sweetener. Each sweetener changes the taste just a little. Adding fruits and spices can make your bars pop with flavor. Try mashed bananas or dried fruits like cranberries or apricots. For spices, add a pinch of nutmeg or ginger for warmth. You can even fold in some cocoa powder for a chocolatey twist. These small changes can make your bars exciting and unique. To keep your healthy peanut butter oat bars fresh, store them in an airtight container. This helps to lock in moisture and flavor. You can keep them at room temperature for up to a week. If you want them to last longer, consider refrigerating them. The cool air helps maintain their taste and texture. Freezing is a great way to extend the life of your oat bars. Wrap each bar tightly in plastic wrap. Then place them in a freezer-safe bag or container. You can freeze the bars for up to three months. When you're ready to enjoy them, just take out a bar and let it thaw on the counter. If you prefer warm bars, you can reheat them. Simply place a bar in the microwave for about 15-20 seconds. This warms them up nicely and brings back their fresh-baked taste. If you stored them in the fridge, let them sit at room temperature for a few minutes before warming to avoid cold centers. For more details, check out the Full Recipe. Yes, you can swap peanut butter for almond, cashew, or sunbutter. Each nut butter brings its own flavor. Almond butter gives a creamy texture, while cashew butter is milder. Sunbutter is a great option for nut allergies. Just make sure to choose a natural nut butter without added sugars or oils. These oat bars last about one week at room temperature. Keep them in an airtight container. For longer storage, they can stay fresh in the fridge for about two weeks. If you want to enjoy them later, freeze the bars. They can last up to three months in the freezer. Just thaw them when you are ready to eat. Yes, this recipe is gluten-free if you use certified gluten-free oats. Most rolled oats are naturally gluten-free. However, some brands may process oats with gluten-containing grains. Always check the label before buying. This way, you can enjoy your oat bars without worry. Yes, you can skip added sugars. Use ripe bananas instead of honey or maple syrup. Applesauce also adds natural sweetness. You can add a bit more applesauce if you want a sweeter taste. This keeps the oat bars healthy and tasty without extra sugar. You now have a complete guide to making healthy peanut butter oat bars. We covered essential ingredients and fun add-ins to suit your taste. Step-by-step instructions ensure your bars come out perfectly every time. I shared tips for the best texture and storage methods to keep them fresh. You can also explore different variations for added flavor. These oat bars are easy to make, fun to customize, and nutritious. Enjoy your delicious, homemade snacks!](https://goldendishy.com/wp-content/uploads/2025/07/83a658d4-f414-4ba0-9f79-92aafa211a05-768x768.webp)
![To make white chocolate raspberry scones, you need simple ingredients. These items come together to create a sweet treat. The scones balance rich white chocolate with tart raspberries, making them delightful. - 2 cups all-purpose flour - 1/2 cup granulated sugar - 2 teaspoons baking powder - 1/2 teaspoon salt - 1/4 cup cold unsalted butter, cubed - 1/2 cup heavy cream - 1 large egg - 1 teaspoon pure vanilla extract - 1 cup fresh raspberries - 1/2 cup white chocolate chips (plus extra for topping) - 1 tablespoon milk (for brushing) You can add mix-ins for more flavor. Some ideas include: - Lemon zest for brightness - Chopped nuts for crunch - A dash of almond extract for depth These options let you tailor the scones to your taste. 1. Preheat your oven to 425°F (220°C). This helps the scones rise well. 2. Line a baking sheet with parchment paper for easy cleanup later. 3. In a large bowl, mix together 2 cups of all-purpose flour, 1/2 cup of granulated sugar, 2 teaspoons of baking powder, and 1/2 teaspoon of salt. Whisk them until smooth. 4. Cut 1/4 cup of cold, unsalted butter into small cubes. Add it to the flour mix. Use a pastry cutter or your fingertips to mix until it looks like coarse crumbs. 5. In another bowl, whisk together 1/2 cup of heavy cream, 1 large egg, and 1 teaspoon of pure vanilla extract. This will add flavor and richness to your scones. 6. Pour the wet mix into the dry mix. Stir gently with a spatula until they just combine. Don't overmix; this keeps the scones tender. 7. Fold in 1 cup of fresh raspberries and 1/2 cup of white chocolate chips. Be careful not to break the raspberries. 8. Lightly flour a clean surface and turn the dough out onto it. Shape it into a disc about 1 inch thick. 9. Cut the disc into 8 wedges. Place these on the prepared baking sheet, leaving 2 inches between each one. 10. Brush the tops with 1 tablespoon of milk. This gives them a nice shine. Add some extra white chocolate chips on top for sweetness. 11. Bake for 15-20 minutes until golden brown. Check doneness with a toothpick. If it comes out clean, they are ready. 12. Once baked, remove the scones from the oven. Let them cool on a wire rack for the best texture. 13. For serving, arrange the warm scones on a pretty platter. Garnish with fresh raspberries and drizzle melted white chocolate on top. 14. Enjoy them with a cup of tea or coffee for a delightful treat. For the full recipe, check [Full Recipe]. To make light and fluffy scones, use cold butter. The cold butter creates small pockets of air. This helps your scones rise well as they bake. Aim for a crumbly texture when mixing the butter into the flour. You want to see small clumps of butter. These clumps will melt and create steam, leading to a tender scone. Another tip is to avoid overmixing. When you mix wet and dry ingredients, do it gently. Stir just until combined. This keeps the scones tender and flaky. One common mistake is using warm butter. Warm butter will not create the same fluffy texture. Always stick with cold, cubed butter. Another mistake is overworking the dough. If you knead or mix too much, your scones can become tough. Remember, treat the dough gently. Make sure to space the scones well on the baking sheet. If they are too close, they won't bake evenly. Keep about 2 inches of space between each scone. You can enhance the flavor by adding a pinch of salt. It balances the sweetness of the white chocolate. For visual appeal, sprinkle extra white chocolate chips on top before baking. This adds a lovely touch. A drizzle of melted chocolate after baking looks fancy too. Try serving the scones warm with fresh raspberries. This not only looks great but also adds a burst of flavor. For the full recipe, check the section above. {{image_4}} You can easily change the recipe for white chocolate raspberry scones. Use different berries, like blueberries or strawberries. You can also try nuts, like chopped pecans or walnuts, for crunch. If you want a zesty twist, add lemon or orange zest. This adds a fresh flavor that pairs well with the sweetness of white chocolate. Mixing flavors can make your scones unique. For a tropical vibe, add shredded coconut along with the raspberries. If you love spices, try cinnamon or cardamom for warmth. A touch of almond extract can boost the flavor too. These combinations can take your scones to a new level. You can make these scones gluten-free by using a gluten-free flour blend. Just ensure it has a binding agent, like xanthan gum. For a dairy-free option, swap heavy cream with coconut cream or almond milk. Use dairy-free butter or margarine instead of regular butter. These simple swaps let everyone enjoy these scones, no matter their diet. For more ideas and details, check out the Full Recipe. To keep your white chocolate raspberry scones fresh, store them in an airtight container. This helps them stay soft and moist. You can leave them at room temperature for up to two days. If you want to keep them longer, refrigerate them. Just remember to wrap them well to avoid drying out. Reheating scones is easy. Preheat your oven to 350°F (175°C). Place the scones on a baking sheet and cover them lightly with foil. Heat for about 10 minutes. This method warms them up nicely without making them tough. You can also use a microwave for a quick fix. Just heat them for about 15-20 seconds. Enjoy them warm for the best taste. If you want to save some scones for later, freezing is a great option. First, let the scones cool completely. Then, wrap each one in plastic wrap. Place the wrapped scones in a freezer bag or container. They can stay frozen for up to three months. When you are ready to enjoy, thaw them overnight in the fridge and reheat as mentioned above. For the full recipe, check out the detailed instructions above. Yes, you can use frozen raspberries. They work well in scones but may change the texture. Thaw the raspberries first and drain excess liquid. This step helps keep the dough from getting too wet. Frozen raspberries may break apart more easily. Just handle them gently when mixing into the dough. The scones are done when they turn golden brown. Insert a toothpick into the center of a scone. If it comes out clean, the scones are baked through. Baking time is about 15-20 minutes at 425°F. Watch them closely toward the end to prevent burning. These scones pair well with tea or coffee. A nice cup of Earl Grey tea complements the sweet flavors. You can also enjoy them with fresh cream or a dollop of clotted cream. Adding a few fresh raspberries on the side enhances the presentation and taste. For a sweet touch, drizzle melted white chocolate over them just before serving. In this post, we covered how to make delicious white chocolate raspberry scones. We detailed the ingredients, step-by-step instructions, and tips to ensure great texture and flavor. You learned about variations and storage ideas to keep your scones fresh. Remember to avoid common mistakes and experiment with mix-ins for unique flavors. I hope you feel confident to bake these tasty treats and share them with others. Enjoy every bite!](https://goldendishy.com/wp-content/uploads/2025/07/437e04f1-a683-4ca4-9d0f-364a7bf5e892-768x768.webp)