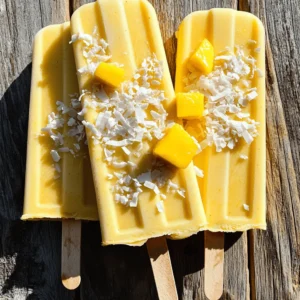
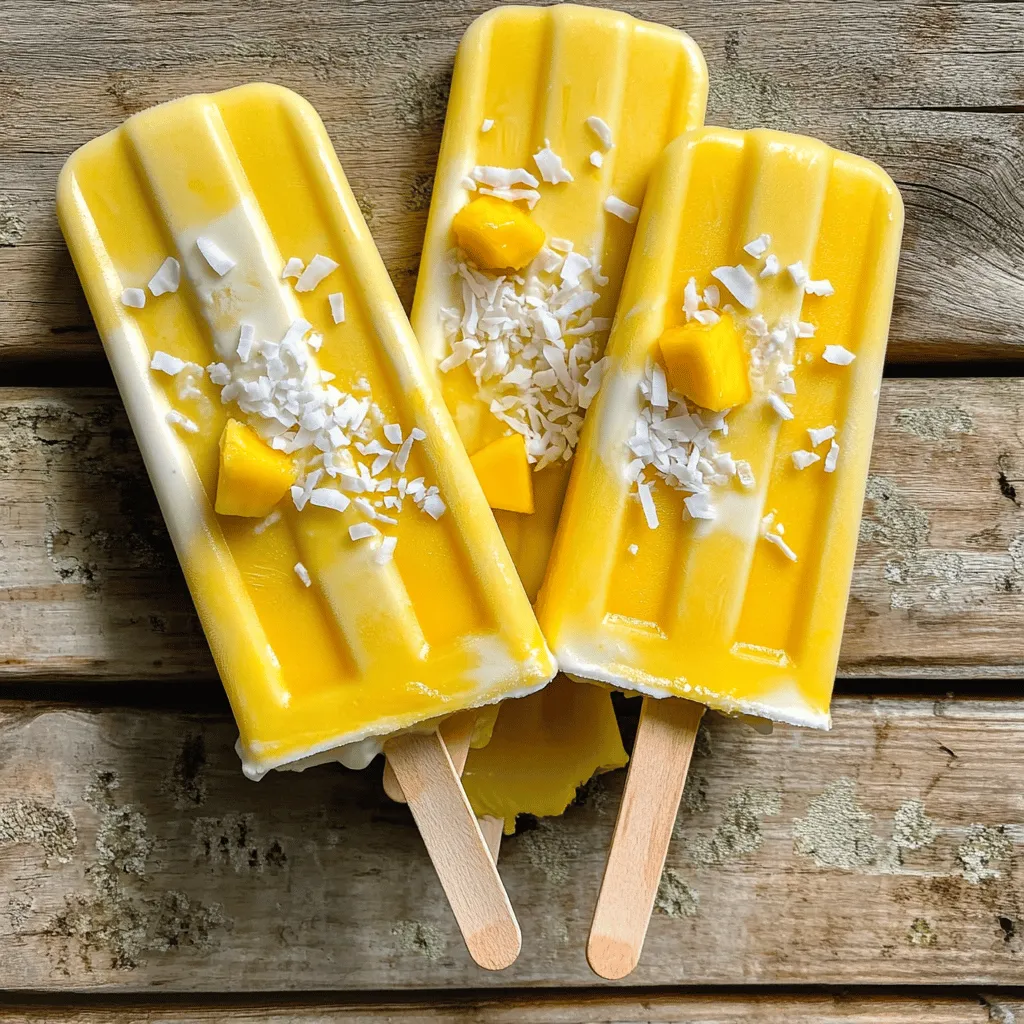
Creamy Coconut Mango Popsicles Refreshing Summer Treat

When the sun hits, there’s nothing quite like a cold treat to cool you down. These Creamy Coconut Mango Popsicles are a must-try for summer! With sweet mangoes and rich coconut milk, each bite bursts with tropical flavor. Plus, you’ll find they’re easy to make, and fun to customize. Dive into this refreshing recipe that will brighten your sunny days and keep you wanting more. Let’s get started!
Ingredients
List of Ingredients
– 2 ripe mangoes, peeled and diced
– 1 cup full-fat coconut milk
– 1/2 cup Greek yogurt (dairy-free option available)
– 2 tablespoons honey or maple syrup
– 1 tablespoon fresh lime juice
– A pinch of salt
– Optional garnishes (shredded coconut, diced mango)
To make the best creamy coconut mango popsicles, you need fresh and ripe ingredients. Start with two ripe mangoes. They should be sweet and soft. Peel and dice them for easy blending. The coconut milk adds creaminess. I always use full-fat coconut milk for the best texture. It makes the popsicles rich and delicious.
Next, you’ll want half a cup of Greek yogurt. You can use dairy-free yogurt if you prefer. This also adds creaminess and a slight tang. For sweetness, add two tablespoons of honey or maple syrup. Adjust this to your taste, depending on how sweet you like your popsicles.
Fresh lime juice gives a bright flavor. Just one tablespoon will do. Don’t forget a pinch of salt. It enhances all the flavors. If you want extra texture, consider garnishes like shredded coconut or diced mango. This will make your popsicles look and taste even better.
Step-by-Step Instructions
Blend the Ingredients
Start by gathering your ripe mangoes. Peel and dice them into small pieces. In a high-speed blender, add the diced mangoes, one cup of full-fat coconut milk, and half a cup of Greek yogurt. Use dairy-free yogurt if you prefer a vegan option. Next, pour in two tablespoons of honey or maple syrup for sweetness. Then, add one tablespoon of fresh lime juice and a pinch of salt to enhance the flavors. Blend everything on high until the mixture is smooth and creamy. Make sure there are no chunks of mango left.
Taste and Adjust
After blending, it’s time to taste your mixture. Take a small spoonful and check the sweetness. If you want it sweeter, add more honey or syrup. Blend again to mix it well. This step allows you to customize the flavor to your liking.
Fill the Molds
Carefully pour the creamy mango-coconut mixture into your popsicle molds. Leave a small gap at the top of each mold. This gap allows the mixture to expand as it freezes. If you’d like some extra texture, sprinkle shredded coconut or small pieces of diced mango into the molds before filling them completely.
Insert Sticks and Freeze
Once your molds are filled, place the popsicle sticks into them. Make sure the sticks stand upright. Transfer the molds to the freezer. Let them freeze for at least four to six hours. This time will ensure your popsicles are firm and ready to enjoy.
Unmold and Enjoy
When you’re ready to eat your popsicles, remove them from the freezer. Run warm water over the outside of the molds for a few seconds. This will help loosen the popsicles. Gently pull them out without breaking them. Serve your popsicles on a nice plate or board. Enjoy the tropical flavors!
Tips & Tricks
Achieving the Perfect Creaminess
Using full-fat coconut milk is key for rich, creamy popsicles. It gives a smooth texture that makes each bite delightful. Low-fat versions can make your popsicles icy and less enjoyable. Full-fat coconut milk adds flavor and creaminess. This simple swap can elevate your treat from good to great.
Sweetness Adjustments
You can easily customize the sweetness of your popsicles. Start with two tablespoons of honey or maple syrup. Blend the mixture and taste it. If you want it sweeter, add more sweetener. Blend again to mix. This way, you can create a popsicle that suits your taste perfectly.
Presentation Ideas
How you serve your popsicles can make them even more fun. Try placing them on a colorful plate or a wooden board. For a special touch, sprinkle shredded coconut or add a slice of fresh mango on the side. These small details make your popsicles look beautiful and inviting.

Variations
Dairy-Free Options
To make these creamy coconut mango popsicles dairy-free, swap the Greek yogurt. Use a plant-based yogurt instead. Coconut yogurt works well too. This keeps the texture rich, just like the original. You can also blend in a banana for extra creaminess.
Different Fruits to Try
Mangoes shine in this recipe, but you can mix it up! Pineapple adds a tropical twist. Peaches or strawberries can create a sweet treat too. For a berry burst, use blueberries or raspberries. Just remember to adjust the sweetness based on the fruit’s natural flavor.
Adding Flavor Enhancements
Want to jazz up your popsicles? Try adding fresh herbs! Mint or basil can give a fresh taste. A pinch of cinnamon adds warmth and depth. You can also infuse a splash of vanilla extract for a comforting flavor. These small touches can make your popsicles stand out!
Storage Info
Proper Storage Techniques
To keep your popsicles fresh, store them in airtight containers. This keeps them from ice crystals. You can also wrap them in plastic wrap. Label the containers with the date. This helps you know when they were made.
Shelf Life
You can keep these creamy coconut mango popsicles in the freezer for about 2 to 3 months. They will stay safe to eat after this time. However, the taste and texture may change. For the best flavor, enjoy them within a month.
Reviving Frozen Popsicles
If your popsicles have been frozen too long, they might lose some creaminess. To refresh them, blend the popsicle in a blender until smooth. You can add a splash of coconut milk if needed. Pour the mixture back into molds and freeze again. This gives them a new life. Enjoy your tropical treat!
FAQs
Can I use frozen mangoes instead of fresh?
Yes, you can use frozen mangoes. They are convenient and blend well. However, frozen mangoes may change the texture slightly. They can make the popsicles a bit icier than fresh mangoes. If you want a creamier popsicle, use fresh mangoes when possible.
How long do the popsicles take to freeze?
The popsicles typically take about 4 to 6 hours to freeze. Make sure they are firm before serving. For best results, leave them in the freezer overnight. This extra time ensures they are completely set and easy to unmold.
What can I substitute for honey?
You can substitute honey with maple syrup or agave nectar. Both options will keep the popsicles sweet. Maple syrup adds a light flavor, while agave is milder. Adjust the amount based on your taste preference.
Are these popsicles vegan?
Yes, these popsicles can be made vegan-friendly. Simply replace Greek yogurt with dairy-free yogurt. Use maple syrup instead of honey. This way, you keep the creamy texture while making it suitable for a vegan diet.
In this blog post, we explored how to make delicious mango popsicles. We covered ingredients, step-by-step instructions, meaningful tips, and fun variations. Making these treats is easy and fun for everyone. Remember to adjust sweetness to suit your taste. Try different fruits or swap out the yogurt for a dairy-free option. Enjoy sharing these popsicles with friends and family or treat yourself! Now, get ready to chill with your homemade mango popsicles.


![- 1 ½ cups graham cracker crumbs - ½ cup unsalted butter, melted - 2 tablespoons granulated sugar - 16 oz cream cheese, softened to room temperature - 1 cup granulated sugar - 3 large eggs, at room temperature - 1 teaspoon pure vanilla extract - 2 tablespoons fresh lemon zest - ½ cup freshly squeezed lemon juice - 1 cup fresh blueberries - Powdered sugar for dusting (optional) The key to great Lemon Blueberry Cheesecake Bars lies in using fresh, high-quality ingredients. The combination of cream cheese and lemon creates a creamy texture with a bright flavor. The blueberries add bursts of sweetness and color. - If you need a gluten-free option, try almond flour or gluten-free cookies for the crust. - For a vegan version, you can use plant-based cream cheese. Look for brands that offer a similar taste. - If you want to cut sugar, use coconut sugar or a sugar substitute like stevia. These substitutions help you customize the recipe to fit your needs while keeping it delicious. For the full recipe, check the detailed instructions above. 1. First, preheat your oven to 350°F (175°C). This step is key for even baking. 2. Next, prepare an 8x8 inch baking pan. Line it with parchment paper. Let the paper hang over the sides. This helps when lifting the bars out later. 3. In a medium mixing bowl, combine 1 ½ cups of graham cracker crumbs, ½ cup melted unsalted butter, and 2 tablespoons of granulated sugar. Mix until it looks like damp sand. 4. Press this mixture firmly into the bottom of the pan. This forms your crust. Bake it for 8-10 minutes until it turns lightly golden. Remove it from the oven and let it cool slightly. 1. In a large bowl, use an electric mixer to beat 16 oz of softened cream cheese with 1 cup of granulated sugar. Mix until it is smooth and creamy. This should take about 2-3 minutes. 2. Add 3 large eggs, one at a time. Mix on low speed after each egg. Avoid overmixing to keep air bubbles out. 3. Now, stir in 1 teaspoon of vanilla extract, 2 tablespoons of fresh lemon zest, and ½ cup of freshly squeezed lemon juice. Make sure everything blends well. 4. Gently fold in 1 cup of fresh blueberries with a spatula. Be careful not to crush them; you want them whole in the bars. 1. Pour the cheesecake mixture over the cooled crust in the pan. Spread it evenly using a spatula. 2. Bake the mixture in the preheated oven for 25-30 minutes. The center should look set but still jiggle slightly. It will firm up more as it cools. 3. Once baked, take the pan out and let it cool to room temperature. After it cools, refrigerate for at least 4 hours. For best results, leave it overnight. 4. When you’re ready to serve, lift the cheesecake out of the pan using the parchment paper. Cut into squares and enjoy! You can dust the tops with powdered sugar for a nice touch. For the full recipe and more details, check out the [Full Recipe]. Avoiding cracks in the cheesecake To prevent cracks, do not overmix the batter. Overmixing adds air, which can create bubbles. Also, use room temperature ingredients. Cold cream cheese can make lumps. Bake the bars at a lower temperature for a longer time. A water bath can help keep the heat even. Achieving the perfect texture For a creamy texture, blend the cream cheese until smooth. Mix in the eggs one at a time. This keeps the batter light and fluffy. Do not rush this step. After baking, let the bars cool slowly to room temp. Chill them in the fridge for at least four hours. Creative ways to present the bars Cut the bars into squares and place them on a nice plate. You can garnish with fresh blueberries and lemon slices for color. A drizzle of lemon glaze adds shine and flavor. Serve them with a dollop of whipped cream for extra flair. Complementary toppings and sides Top each bar with a sprinkle of powdered sugar for sweetness. A scoop of vanilla ice cream pairs well, too. You can also serve with a side of lemon curd for a zesty punch. Fresh mint leaves add a pop of color and freshness. Fixing undercooked bars If the bars are too soft, return them to the oven. Bake for an additional 5-10 minutes. The center should have a slight jiggle but not be runny. Make sure to let them cool before checking the texture. Preventing overbaking Keep an eye on your bars as they bake. If the edges start to brown too much, cover them with foil. Use a toothpick to check doneness. It should come out mostly clean but with a bit of moist filling clinging to it. {{image_4}} You can mix up the flavors in your cheesecake bars easily. Swap blueberries for other berries like raspberries or strawberries. You can even use a mix of berries for a fun twist. If you love chocolate, add some chocolate chips. This makes the bars sweeter and richer. If you need gluten-free options, use gluten-free graham crackers for the crust. They work just as well and taste great. For those on a dairy-free diet, try using vegan cream cheese. It gives you a similar creamy texture without the dairy. Change the fruits based on what’s in season. In summer, use fresh peaches or cherries for a juicy taste. In the fall, think about adding pumpkin or apple flavors. You can also dress up the bars for holidays. Try adding whipped cream or holiday-themed sprinkles for fun. These variations let you enjoy lemon blueberry cheesecake bars in new ways. Don't forget to check out the Full Recipe for more details! To store leftover Lemon Blueberry Cheesecake Bars, place them in an airtight container. This keeps them fresh and tasty. You can also cover them with plastic wrap. Store them in the fridge for up to five days. For the best flavor, eat them within the first two days. You can freeze these cheesecake bars for longer storage. First, cut them into squares. Wrap each square in plastic wrap, then place them in a freezer-safe bag. They will last about three months in the freezer. When you're ready to enjoy them, take out the bars and place them in the fridge overnight to thaw. You can also let them sit at room temperature for about 30 minutes before serving. If you plan to serve these bars at a gathering, make them a day ahead. This allows the flavors to blend nicely. To keep the bars fresh, store them in the fridge until you're ready to serve. For a beautiful touch, dust the tops with powdered sugar just before serving. This keeps the bars looking fresh and inviting even a day later. For the full recipe, check out the Lemon Blueberry Cheesecake Bars section. Lemon Blueberry Cheesecake Bars are a creamy and tangy dessert. They combine smooth cheesecake with fresh blueberries and zesty lemon. The base is a crispy graham cracker crust that adds crunch. These bars are easy to slice and serve, making them perfect for gatherings. You can enjoy them chilled, which enhances the flavors. Each bite is a delightful mix of sweet and tart. Yes, you can make these bars ahead of time. They taste even better when chilled overnight. Prepare the bars and let them cool to room temperature. Place them in the fridge for at least four hours. If you want to make them days in advance, store them in an airtight container. Just remember to cut them into squares before serving. This way, you save time on the day of your event. You can tell when cheesecake bars are done by looking for a few signs. The edges should be set, while the center may jiggle slightly. This jiggle means they will firm up as they cool. Another sign is a light golden color around the edges. If you see cracks forming, they may be overbaked. Keep an eye on them during the last few minutes of baking. Yes, there are several substitutes for eggs in this recipe. You can use unsweetened applesauce; a quarter cup replaces one egg. Another option is silken tofu, blended until smooth. Use about one quarter cup for each egg needed. You can also try using flaxseed meal mixed with water. One tablespoon of flaxseed meal mixed with three tablespoons of water equals one egg. These alternatives keep your cheesecake rich and creamy. In this blog post, we covered how to create delicious lemon blueberry cheesecake bars. We started with the ingredients, explored substitutions, and shared step-by-step instructions. Tips for serving, variations, and storage were also discussed. These tips help ensure your cheesecake turns out perfectly every time. Remember, baking is fun, and experimenting with flavors leads to great treats. Enjoy your baking journey and share your creations with friends and family!](https://goldendishy.com/wp-content/uploads/2025/07/2e10f80d-a440-4f9c-b53b-c6e4b2946195-768x768.webp)

