Cinnamon Sugar Apple Skillet Cake Irresistible Treat
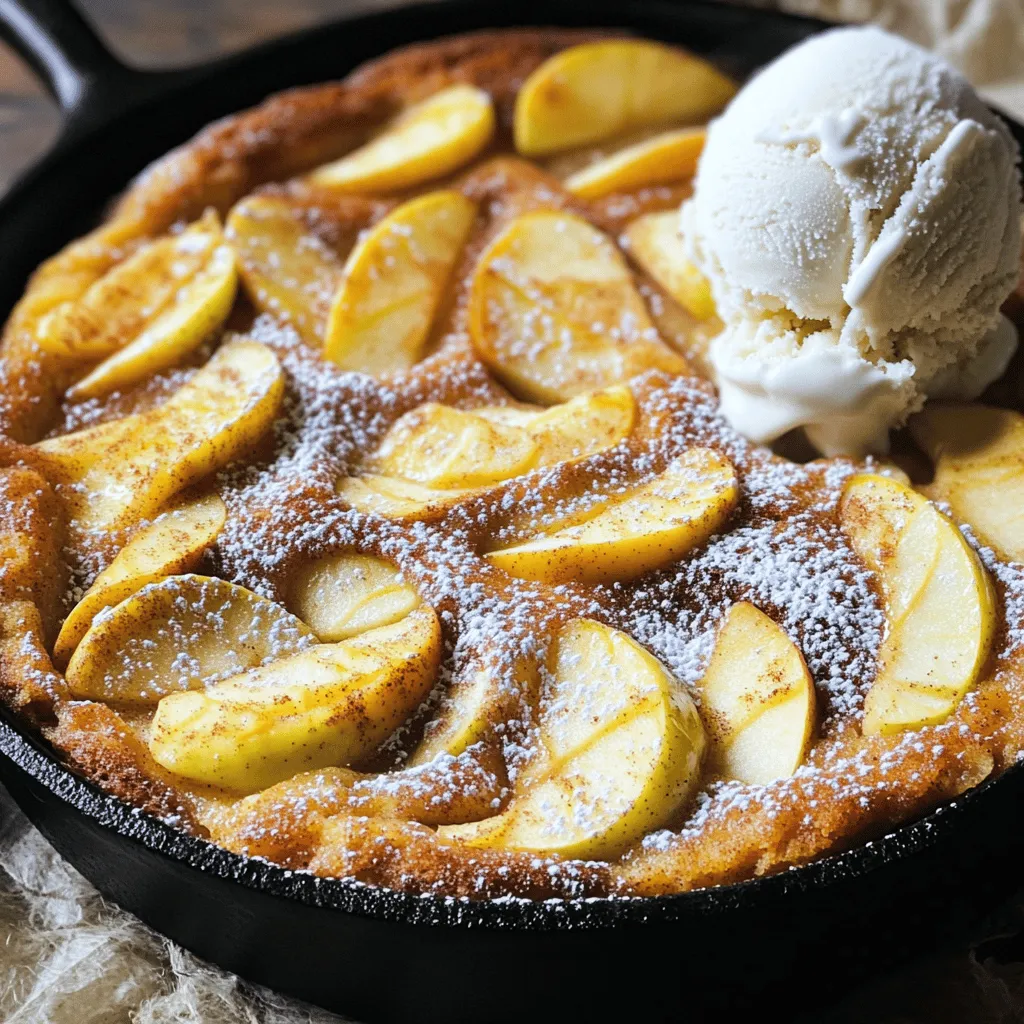
Are you ready to bake a treat that warms your heart and fills your kitchen with amazing scents? This Cinnamon Sugar Apple Skillet Cake is the perfect blend of sweet apples and warm spices. It’s easy to make, and you’ll impress everyone at your next gathering. Let me guide you through every step to create this delightful dessert. Grab your skillet, and let’s dive into this delicious adventure!
Ingredients
Main Ingredients
– 2 medium apples (Granny Smith or Honeycrisp recommended), peeled, cored, and thinly sliced
– 1 tablespoon fresh lemon juice
– 1 cup granulated sugar, divided
– 1 teaspoon ground cinnamon, divided
– 1½ cups all-purpose flour
– 2 teaspoons baking powder
– ½ teaspoon baking soda
– ½ teaspoon fine salt
– ½ cup unsalted butter, melted and slightly cooled
– 2 large eggs, at room temperature
– ½ cup milk, at room temperature
– 1 teaspoon pure vanilla extract
Each main ingredient plays a role in the cake’s taste and texture. The apples give it a sweet and tangy flavor. The sugar adds sweetness, while cinnamon brings warmth. Flour and leavening agents create the cake’s soft structure. Butter keeps it moist, and eggs add richness. Milk and vanilla enhance the overall flavor.
Optional Ingredients
– Powdered sugar for dusting
– Ice cream pairing suggestions
Adding powdered sugar on top gives the cake a nice look and extra sweetness. Pairing it with ice cream makes each bite even better. Vanilla ice cream works well, but you can choose your favorite. The warm cake and cold ice cream create a lovely contrast that everyone will enjoy.
Step-by-Step Instructions
Preparation Steps
1. First, preheat your oven to 350°F (175°C). This sets the stage for perfect baking.
2. Next, prepare the apple mixture. In a medium bowl, mix the thinly sliced apples with 1 tablespoon of fresh lemon juice. Add ¼ cup of granulated sugar and ½ teaspoon of ground cinnamon. Toss gently until the apples are well-coated. This step helps soften the apples and enhances their flavor.
Mixing the Ingredients
1. In a large mixing bowl, whisk together 1½ cups of all-purpose flour, 2 teaspoons of baking powder, ½ teaspoon of baking soda, ½ teaspoon of fine salt, ¾ cup of granulated sugar, and ½ teaspoon of cinnamon. Make sure it’s well mixed.
2. In another bowl, whisk ½ cup of melted unsalted butter, 2 large eggs, ½ cup of milk, and 1 teaspoon of pure vanilla extract until smooth. Then, pour this mixture into the dry ingredients. Stir gently with a spatula until just combined. The batter should be a little lumpy. Don’t overmix!
3. Now, prepare your skillet. Place a 10-inch cast-iron skillet over medium heat. Grease it lightly with cooking spray or a dab of butter to prevent sticking.
Baking the Cake
1. Carefully pour the batter into the skillet. Spread it evenly across the bottom.
2. Neatly arrange the marinated apple slices on top of the batter. Press them down gently so they sink slightly into the batter.
3. Transfer the skillet to the preheated oven. Bake for 30-35 minutes. Check doneness by inserting a toothpick into the center. It should come out clean.
4. Once baked, take the skillet out of the oven. Let the cake cool for about 10 minutes before serving. For a sweet finish, dust with powdered sugar. Enjoy your warm Cinnamon Sugar Apple Skillet Cake!
Tips & Tricks
Perfecting the Cake
How to avoid dense texture when mixing
To keep your cake light, mix the batter gently. When you combine the wet and dry ingredients, stir just until you see no dry flour. It’s okay if the batter is a bit lumpy. Overmixing makes the cake dense and tough.
Best apples for flavor and texture
I recommend using Granny Smith or Honeycrisp apples. They provide a nice tartness that balances the sweetness of the cake. Both types hold their shape when baked, giving a lovely texture. You want apples that are crisp and flavorful for the best result.
Serving Suggestions
Presentation styles for serving
Serve the cake warm in the skillet for a cozy feel. You can cut it into wedges or spoon it out. For a more elegant touch, place a slice on a plate and sprinkle with powdered sugar. This adds a nice contrast against the warm cake.
Complementary toppings and pairings
This cake goes great with a scoop of vanilla ice cream. The cold ice cream melts slightly on the warm cake. You can also add a drizzle of caramel sauce or a sprinkle of extra cinnamon to enhance the flavors. These toppings make the dish even more special.

Variations
Flavor Additions
You can add more flavor to your Cinnamon Sugar Apple Skillet Cake. Try using spices like nutmeg or a hint of vanilla bean. Nutmeg gives a warm taste that pairs well with apples. Vanilla bean adds a lovely aroma and depth.
You might also consider adding nuts or dried fruit. Chopped walnuts or pecans provide a nice crunch. Dried cranberries or raisins can add sweetness and chewiness. Mix these into the batter or sprinkle on top for a fun twist.
Dietary Adjustments
If you need a gluten-free option, you can swap all-purpose flour for a gluten-free blend. Look for one that contains xanthan gum for better texture. This keeps the cake light and fluffy.
For vegan adjustments, replace the eggs with flaxseed meal or applesauce. Use a plant-based milk instead of regular milk. You can also use coconut oil or a vegan butter substitute for a dairy-free cake. These changes make it easy for everyone to enjoy this treat!
Storage Info
Short-term Storage
To keep your cinnamon sugar apple skillet cake fresh, follow these simple steps:
– Allow the cake to cool completely.
– Store it in an airtight container.
– Place it at room temperature for up to three days.
Using a cake dome works great too. It keeps the cake moist and tasty. If you want to keep it in the fridge, use a container. This way, it stays fresh for about a week.
Long-term Storage
If you want to enjoy your cake later, freezing is the best option. Here’s how to do it:
– Wrap the cooled cake tightly in plastic wrap.
– Place it in a freezer-safe bag or container.
– It can stay in the freezer for up to three months.
When you want to eat it, thaw the cake in the fridge overnight. For reheating, preheat your oven to 350°F (175°C). Heat the cake for about 10-15 minutes. This will help bring back its warmth and flavor. Enjoy your delicious cake whenever you like!
FAQs
Common Questions
How can I make the cake moister?
To make the cake moister, use more apples. Adding an extra apple boosts moisture. You can also try adding a bit more milk. If you do, add just a tablespoon or two at a time. This helps keep the balance right.
Can I use a different type of skillet?
Yes, you can use any oven-safe skillet. A non-stick skillet works well too. Just make sure it is safe for high heat. If you use a different size, adjust the baking time as needed.
Troubleshooting
What to do if the cake sinks in the middle?
If the cake sinks, it may be underbaked. Check the baking time and test with a toothpick. If the toothpick comes out wet, return it to the oven for a few more minutes. Make sure you mix the batter gently to avoid air pockets.
How to adjust for high altitude baking?
At high altitudes, reduce the sugar by one to two tablespoons. You might need to add a bit more flour too. This helps keep the cake from rising too fast and collapsing. Increasing the oven temperature by 15 to 25 degrees can also help.
Recipe Serving Size
How many servings does this cake yield?
This cake yields about eight servings. It is perfect for sharing with family and friends. It’s a great dessert for gatherings or cozy nights.
Can I double the recipe for larger gatherings?
Yes, you can double the recipe easily. Just use a larger skillet or two skillets. Keep an eye on the baking time, as it may take longer with more batter.
This blog post covered how to make a delicious apple cake. We discussed the main and optional ingredients, preparation steps, and mixing methods. I shared tips for perfecting your cake and creative variations to try. You learned about storing your cake for short and long-term freshness, along with answers to common questions.
Remember, baking is fun and a creative outlet. Enjoy making this cake and share it with friends and family. Your skills in the kitchen can grow with every bite!

![- 1 cup all-purpose flour - 1 cup whole wheat flour - 1 tablespoon pumpkin pie spice - ½ cup granulated sugar - 1 can (15 oz) pumpkin puree - 2 large eggs - ½ cup brewed coffee, cooled - ⅓ cup vegetable oil - Optional mix-ins: ½ cup chocolate chips or nuts - Baking soda - Baking powder - Salt - Brown sugar - Pure vanilla extract The main ingredients form the base of your muffins. The blend of all-purpose and whole wheat flour adds great texture. Pumpkin puree brings moisture and a rich flavor. You can’t forget the pumpkin pie spice; it gives that cozy fall taste. Granulated sugar adds sweetness, while brown sugar provides depth. For the additional ingredients, eggs help the muffins rise and become fluffy. Brewed coffee gives a coffee kick, enhancing the flavor without being too strong. Vegetable oil keeps them moist. If you want, add chocolate chips or nuts for extra fun. Now, let’s talk staples. Baking soda and baking powder help the muffins rise. Salt balances the sweetness. Finally, pure vanilla extract adds a warm note that ties everything together. You can find the full recipe at the end. Set your oven to 350°F (175°C). This temperature helps the muffins rise nicely. Line or grease the muffin tin to keep the muffins from sticking. I prefer using paper liners for easy cleanup. In a large mixing bowl, whisk together the flours, baking soda, baking powder, pumpkin pie spice, and salt. This step is key for even flavor and texture. Make sure there are no lumps in the mixture. In another bowl, mix the granulated sugar and brown sugar until smooth. Then, add the pumpkin puree, eggs, cooled coffee, vegetable oil, and vanilla extract. Stir until everything is well combined. The mixture should look creamy and inviting. Gradually mix the dry ingredients into the wet mixture. Use a spatula to fold gently. Avoid overmixing; a few lumps are just fine. If you want, gently fold in chocolate chips or nuts for added flavor and texture. Spoon the batter into the muffin tins. Fill each cup about two-thirds full to allow for rising. Place the muffin tin in the oven and bake for 18-22 minutes. To check for doneness, insert a toothpick into a muffin. If it comes out clean, they are ready. Let the muffins cool in the pan for about 5 minutes. After that, transfer them to a wire rack to cool completely. Enjoy them warm for a cozy treat! For an extra touch, serve with cinnamon sugar or maple syrup. You can find the full recipe [here]. To make your muffins light and fluffy, avoid overmixing the batter. Stir gently until the dry and wet ingredients just come together. A few lumps are okay! Also, use room temperature ingredients. This helps the batter mix better and rise well. For a stronger coffee taste, try substituting brewed coffee with espresso. This adds depth to the flavor. Another great tip is to sprinkle some cinnamon sugar on top of the muffins before baking. This gives them a sweet, crispy crust that enhances their cozy taste. These muffins taste best when warm. Enjoy them with a fresh cup of coffee. For added sweetness, drizzle some maple syrup on top or spread a little cream cheese frosting. These simple touches make your cozy fall treat even more delightful! {{image_4}} You can easily make these muffins gluten-free. Simply swap the all-purpose flour with a gluten-free flour mix. Make sure to check the blend. Some mixes work better in baked goods than others. Using a good quality mix helps maintain texture and taste. If you want a dairy-free version, use almond milk instead of regular milk. Almond milk adds a light flavor that pairs well with the spices. For oil, replace vegetable oil with coconut oil. Coconut oil adds a subtle sweetness and complements the pumpkin nicely. To add some crunch, you can mix in nuts like walnuts or pecans. They add a nice texture and flavor. You can also play with spices. Try adding a pinch of nutmeg or cardamom for a twist. If you love chocolate, consider adding chocolate chunks. They melt perfectly and create a rich taste. To keep your pumpkin spice latte muffins fresh, place them in an airtight container at room temperature. This method helps maintain their soft texture and rich flavor. If you have a lot of muffins, you can stack them with parchment paper between layers. This prevents them from sticking together. If you want to enjoy these muffins later, freezing is a great option. First, let the muffins cool completely. Wrap each muffin in plastic wrap, then place them in a freezer bag. Make sure to remove as much air as possible to avoid freezer burn. You can store them in the freezer for up to three months. When you're ready to eat one, take it out and let it thaw at room temperature. You can also reheat it in the microwave for about 15-20 seconds. To keep your muffins moist and tasty over time, consider these tips: - Add a slice of bread to the container. This helps keep the muffins moist. - Avoid exposing them to direct sunlight or heat sources, as this can dry them out. - If you notice any muffins getting stale, you can toast them lightly. This can bring back some of their original flavor. Storing your pumpkin spice latte muffins correctly ensures you can enjoy their warm, cozy flavors for days to come. For the full recipe, check the earlier section! Yes, you can add more pumpkin puree. However, this change will affect the muffins. Adding extra puree makes the muffins moister. It may also make them denser. If you want a lighter muffin, keep the amount as in the Full Recipe. You can try adding an extra tablespoon at first. This way, you can see how the texture changes. These muffins last about three days at room temperature. Keep them in an airtight container. They can also last about a week in the fridge. The cold helps keep them fresh longer. If you want to save them for later, freeze them. They stay good for about three months in the freezer. Just remember to wrap them well. Yes, you can make these muffins without eggs. Here are some good substitutes: - 1/4 cup unsweetened applesauce - 1/4 cup mashed banana - 1 tablespoon flaxseed meal mixed with 2.5 tablespoons water Each option helps bind the muffins. They also add moisture. Choose the one you like best for a vegan version. You can use several options instead of brewed coffee. Here are some alternatives: - Brewed tea for a lighter flavor - Milk or almond milk for a creamy texture - Pumpkin spice tea for a fall twist These options help keep the muffins moist and tasty. You can experiment with what you have at home. These Pumpkin Spice Latte Muffins mix simple ingredients in easy steps. You learned how to combine flours, spices, and pumpkin puree for a tasty treat. I shared tips for perfect muffins and ways to store them well. Remember, you can adjust flavors to your liking. Try nuts or different spices for variety. Whether you enjoy them warm or frozen, these muffins are sure to please. Happy baking!](https://goldendishy.com/wp-content/uploads/2025/06/a78bef71-23f4-423c-981c-d5caf094e886-768x768.webp)
![To make Peach Cobbler French Toast, gather these items: - 4 slices of thick bread (brioche or challah is best) - 2 ripe peaches, sliced (canned peaches work too; drain them) - 2 large eggs - 1 cup milk (whole or almond milk is great) - 1 tablespoon pure vanilla extract - 1 teaspoon ground cinnamon - 1 tablespoon brown sugar - 1 tablespoon unsalted butter (for cooking) - ½ cup granola (optional, for crunch) - Whipped cream (optional, for serving) If you have dietary needs, consider these swaps: - For gluten-free, use gluten-free bread. - Vegan? Swap eggs with flaxseed meal and use plant-based milk. - For low-sugar diets, try a sugar substitute in place of brown sugar. Picking peaches is easy with these tips: - Look for peaches that are firm but slightly soft when squeezed. - Choose fruit with a sweet smell; this indicates ripeness. - Avoid peaches with bruises or dark spots, as these can affect flavor and texture. By following these tips and using the right ingredients, you’ll make a delightful Peach Cobbler French Toast that everyone will love! Check out the Full Recipe for more details. Making Peach Cobbler French Toast is a fun and simple process. I’ll walk you through each step to ensure your dish turns out perfectly. 1. Mixing the egg custard: In a medium bowl, whisk together 2 large eggs, 1 cup of milk, 1 tablespoon of pure vanilla extract, and 1 teaspoon of ground cinnamon. Mix well until it is smooth and creamy. This egg custard gives the French toast its rich flavor. 2. Soaking the bread slices: Pour the egg mixture into a shallow dish. Take 4 slices of thick bread, like brioche or challah. Place each slice in the dish, soaking for about 2-3 minutes on each side. Make sure they absorb the custard well. 3. Preparing the peach topping: While the bread soaks, slice 2 ripe peaches. If you use canned peaches, ensure they are drained. In a small saucepan, combine the sliced peaches with 1 tablespoon of brown sugar. Cook over medium heat for about 5-7 minutes, stirring often. When the peaches are soft and syrupy, take them off the heat. 4. Cooking the French toast: Heat a skillet over medium heat and add 1 tablespoon of unsalted butter. Let the butter melt completely. Place the soaked bread slices in the skillet. Cook each side for 3-4 minutes until golden brown. The butter helps give the toast a nice, crisp texture. Once cooked, arrange the French toast on plates and spoon the warm peach topping over each slice. For a delightful crunch, you can sprinkle granola on top. If you want to indulge, add a dollop of whipped cream. For detailed steps, refer to the Full Recipe. - Achieving the perfect golden crust: To get that nice, golden crust, use thick bread. Brioche or challah works best. Soak each slice well, but don't leave it too long. This ensures the center stays soft while the outside crisps up. - Temperature control for even cooking: Keep your skillet or griddle at medium heat. If it’s too hot, the bread will burn before cooking through. If it’s too cool, you won’t get the lovely crust. Adjust as needed while cooking each slice. - How to avoid soggy bread: Soak the bread just enough to absorb the flavors. If the bread is too soggy, it won’t cook well. A quick 2-3 minute soak on each side is perfect for keeping it fluffy yet not falling apart. - Pairing with syrup or whipped cream: Drizzle with maple syrup for sweetness. A dollop of whipped cream adds a creamy touch. Both make your Peach Cobbler French Toast even more delightful. - Presentation ideas for special occasions: Stack the slices on a platter. Add warm peach syrup on top. Garnish with fresh peach slices. A sprinkle of cinnamon creates an eye-catching centerpiece for brunch. - Best sides to complement Peach Cobbler French Toast: Serve with crispy bacon or sausages for a savory balance. Fresh fruit adds color and freshness, making your meal more appealing. You can also add a light salad for a refreshing touch. For the full recipe, check out [Full Recipe]. {{image_4}} You can make Peach Cobbler French Toast to fit your diet. If you need gluten-free options, choose gluten-free bread. Many brands offer tasty alternatives. For dairy-free choices, almond or oat milk works well. Both give a nice flavor. You can also swap out spices. Try nutmeg or allspice for a twist. Extracts like almond or maple add a fun taste. To make this dish even better, think about adding nuts or seeds. Chopped pecans or walnuts give a nice crunch. You can also mix in berries. Blueberries or raspberries pair well with peaches. They add color and flavor. If you want new fruit choices, try apples or mango. Both fruits bring a fresh taste and keep it exciting. With these tips, you can create your own unique version. Check out the Full Recipe for more details! To keep your Peach Cobbler French Toast fresh, follow these tips: - Refrigerate promptly: Place leftover French toast in an airtight container within two hours of cooking. - Layer wisely: If you have multiple pieces, insert parchment paper between them to prevent sticking. - Use within three days: For the best taste and texture, enjoy your leftovers within this time. When it comes to reheating, use a skillet or microwave: - Skillet method: Heat on low for about 3-4 minutes on each side. This keeps the toast crispy. - Microwave method: Heat on medium for 30-second intervals until warm. This method may soften the toast. You can freeze Peach Cobbler French Toast for later enjoyment! Here’s how: - Cool completely: Let the French toast cool to room temperature before freezing. - Wrap well: Use freezer-safe bags or wrap each slice in plastic wrap, then aluminum foil. - Label and date: Write the date on the bag for easy tracking. To thaw and reheat: - Thaw overnight: Place in the fridge for several hours or overnight. - Reheat: Use the skillet method mentioned above or microwave for 1-2 minutes until hot. Now you can enjoy this delicious treat anytime! Check out the Full Recipe for all the details. Choosing the right bread makes a big difference. I recommend using thick slices of brioche or challah. These breads soak up the egg mixture well and become nice and fluffy. Look for bread that is fresh but not too soft. You want a sturdy texture that holds up during cooking. Yes, you can prepare some parts ahead of time. You can soak the bread slices in the egg mixture and store them in the fridge for a few hours. Just be sure to cook them right before serving. You can also prepare the peach topping in advance and warm it up when you are ready to eat. If you don’t have peaches, you can try other fruits. Fresh or canned sliced pears work well. You can also use berries like blueberries or strawberries. Just keep in mind that cooking times may vary slightly. The cooked Peach Cobbler French Toast lasts about three days in the fridge. Store it in an airtight container to keep it fresh. When you reheat it, warm it in a skillet or microwave until hot. This helps keep the texture nice. For the full recipe, check the one provided above. Peach Cobbler French Toast is a delightful dish that brings joy to breakfast. We covered ingredients, preparation steps, and useful tips for cooking. I offered ideas for variations, storage, and answers to common questions. Embrace your creativity with this recipe. Try different fruits or spices for unique flavors. Enjoy the process and make it your own! Happy cooking!](https://goldendishy.com/wp-content/uploads/2025/06/19b86d0b-72ea-4091-b6de-feef30e599d4-768x768.webp)