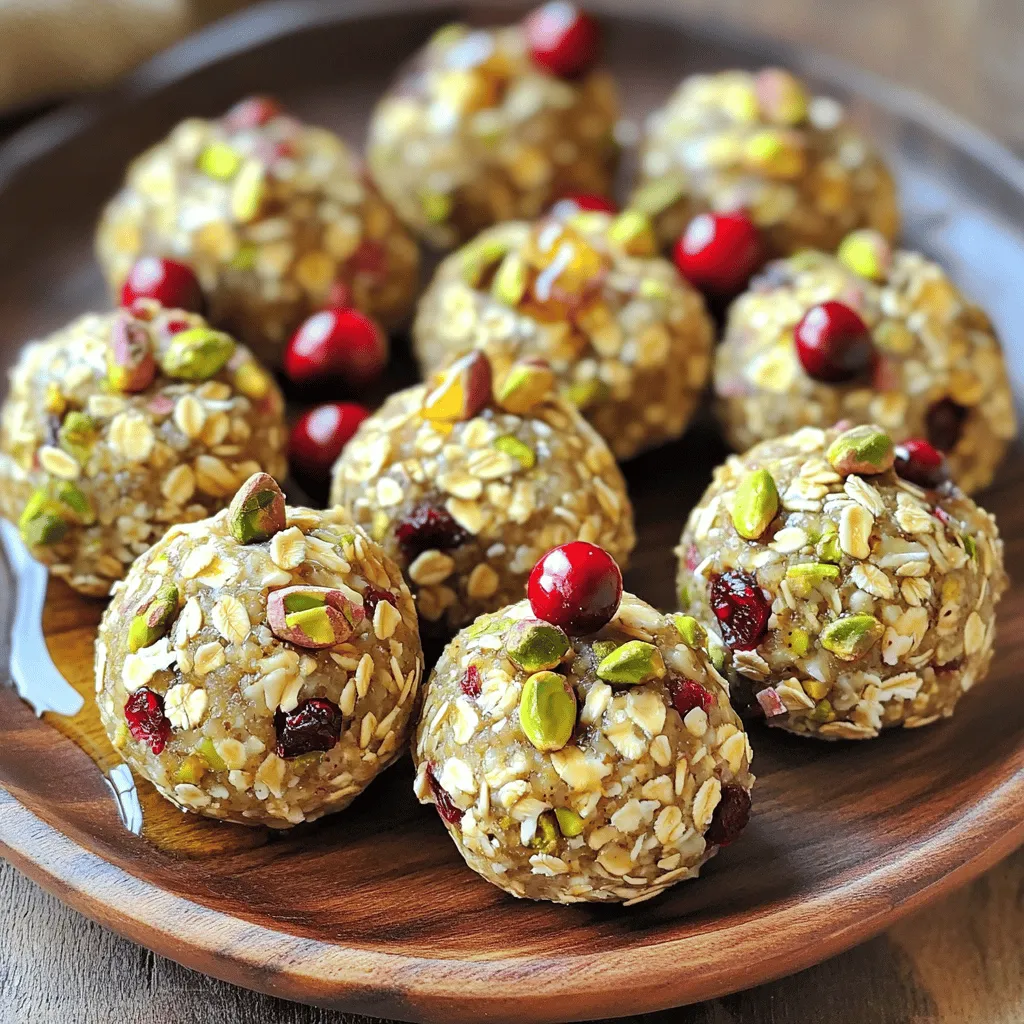
Pistachio Cranberry Energy Bites Nourishing Snack Treat

Are you looking for a tasty and healthy snack? Look no further! These Pistachio Cranberry Energy Bites pack a punch of flavor and nutrition. They are perfect for a quick pick-me-up or a post-workout treat. In this guide, I’ll show you how to make these bites with easy steps and simple ingredients. Get ready to enjoy a snack that satisfies your cravings and fuels your day!
Ingredients
List of Required Ingredients
To make these tasty Pistachio Cranberry Energy Bites, gather the following items:
– 1 cup rolled oats
– 1/2 cup unsalted pistachios, roughly chopped
– 1/2 cup dried cranberries, roughly chopped
– 1/2 cup natural almond butter (or any nut butter of your choice)
– 1/4 cup honey or maple syrup
– 1 tablespoon chia seeds
– 1 teaspoon pure vanilla extract
– A pinch of salt
Measurement and Preparation Tips
When measuring your ingredients, use standard measuring cups for accuracy. Chop the pistachios and cranberries into small pieces. This helps them mix well. For the nut butter, let it sit at room temperature. This will make it easier to mix. If you use honey, warm it slightly so it blends smoothly with other wet ingredients.
Ingredient Substitutions
You can switch out some ingredients based on your taste or dietary needs.
– Use any nut or seed butter if you prefer.
– Swap honey for agave syrup for a vegan option.
– If you need a nut-free version, use sunflower seed butter.
– You can replace cranberries with raisins or chopped dates.
These swaps keep the energy bites tasty and healthy!
Step-by-Step Instructions
Preparing the Dry Ingredients
Start with a large mixing bowl. Add 1 cup of rolled oats, 1/2 cup of roughly chopped pistachios, 1/2 cup of chopped dried cranberries, and 1 tablespoon of chia seeds. Mix these dry ingredients well. Make sure everything is evenly spread out. This step is key for great flavor in every bite.
Mixing the Wet Ingredients
In a separate bowl, combine 1/2 cup of natural almond butter, 1/4 cup of honey or maple syrup, and 1 teaspoon of pure vanilla extract. Add a pinch of salt for taste. Whisk these wet ingredients together until smooth. This mixture should be creamy and well blended.
Combining All Ingredients
Pour the wet mixture into the bowl with the dry ingredients. Stir everything together vigorously. You want to ensure all the dry ingredients are covered in the wet mix. Keep stirring until a sticky mixture forms. This is the base for your energy bites.
Now you are ready to shape your energy bites!
Tips & Tricks
Perfecting the Texture
For the best texture, balance is key. Use rolled oats for a chewy base. The chopped pistachios add crunch, while cranberries give a burst of sweetness. If the mixture feels too dry, add a splash of water or more nut butter. If it’s too wet, sprinkle in extra oats. This way, you get a perfect bite every time.
Rolling the Energy Bites
When rolling, make sure your hands are clean and slightly damp. This helps prevent the mixture from sticking. Take small portions, about one inch each, and roll them gently. If you want a little extra fun, roll the bites in shredded coconut or crushed nuts. This adds flavor and a nice look.
Serving Suggestions
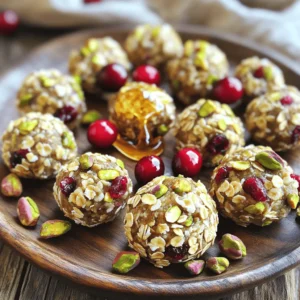
These energy bites are great for any time. Serve them as a snack or with breakfast. You can place them on a colorful plate or in a mason jar. For a special touch, add a few whole pistachios and cranberries around the bites. They make a beautiful display and taste amazing too!
Variations
Flavor Enhancements
You can easily change the flavor of your energy bites. For a chocolate twist, add mini chocolate chips. They blend well with the pistachios and cranberries. If you enjoy a spicy touch, mix in a dash of cinnamon or nutmeg. This adds warmth to each bite. Coconut flakes also make a great addition. They bring a tropical flair and a chewy texture.
Dietary Adjustments (Vegan, Gluten-Free)
To make these bites vegan, swap honey for maple syrup. Both sweeteners work well, but maple syrup keeps it plant-based. If you need a gluten-free option, use certified gluten-free oats. This keeps the recipe safe for those with gluten sensitivities. Remember to check other ingredients for hidden gluten sources.
Ingredient Swaps
You can swap ingredients based on what you have. Instead of almond butter, use peanut or sunflower seed butter. This keeps the bites creamy and rich. For cranberries, any dried fruit works! Try raisins, apricots, or even dates for a different taste. You can also mix nuts. If you don’t have pistachios, use walnuts or almonds. Each swap brings a new flavor and texture.
Storage Info
Best Practices for Storing
To keep your pistachio cranberry energy bites fresh, store them in an airtight container. This helps keep moisture out and flavor in. Place a piece of parchment paper between layers if you stack them. This prevents them from sticking together. Always store the bites in the fridge. They taste best when chilled!
Freezing Energy Bites
You can freeze energy bites for longer storage. First, place them on a baking sheet. Make sure they are not touching each other. Freeze them for about an hour. Once frozen, transfer them to a freezer-safe bag. Remove as much air as you can. They can last up to three months in the freezer. Just thaw them in the fridge before enjoying!
Shelf Life and Freshness Tips
These energy bites are great for a week in the fridge. After that, they may lose flavor. Always check for any signs of spoilage before eating. If they smell off or look strange, throw them away. When stored properly, they stay tasty and nutritious. Enjoy your snacks while they are fresh!
FAQs
How can I customize my Pistachio Cranberry Energy Bites?
You can easily change the flavors in your energy bites. Try adding different fruits like raisins or apricots. You can also switch the nut butter. Almond butter is great, but peanut or cashew butter works well too. Mix in some spices like cinnamon or cocoa powder for a twist. If you like crunch, add more nuts or seeds. Adjust the sweetness by using less honey or maple syrup. These simple tweaks let you make the bites fit your taste.
Can I use different nuts or seeds?
Yes, you can use any nuts or seeds you like. Almonds, walnuts, or pecans all add unique flavors. If you want a nut-free option, try sunflower seeds or pumpkin seeds. Each nut or seed brings its own taste and texture. Just remember to chop larger nuts so they mix well. The key is to keep the same total amount of nuts or seeds for the best texture.
Where can I find pre-made energy bites?
You can find pre-made energy bites at health food stores or online. Many brands offer various flavors and ingredients. Look for options that use natural sweeteners and whole foods. Reading the label helps you choose bites that fit your diet. If you want a quick snack without making them, buying pre-made is a good choice. Just keep in mind that homemade bites taste fresh and you control the ingredients!
In this blog post, we explored making Pistachio Cranberry Energy Bites. We reviewed the needed ingredients, proper measurement, and preparation tips. You learned step-by-step instructions to mix and combine all parts. I shared tips on perfecting texture and rolling the bites. We discussed variations for flavors and dietary needs, plus storage methods for longevity.
Remember, these bites are customizable and easy to make. I hope you feel ready to create your tasty snacks!
![- 2 cups shredded cooked chicken - 1 (8 oz) package of cream cheese - 1/2 cup buffalo sauce - 1/2 cup ranch dressing For buffalo chicken dip, the main ingredients create a creamy and rich base. Shredded cooked chicken gives it that hearty texture. You can use rotisserie chicken to save time. Cream cheese adds smoothness, while buffalo sauce brings the heat. Ranch dressing balances the flavors and adds a nice creaminess. - 1/2 cup crumbled blue cheese - 1 green onion for garnish - Tortilla chips or celery sticks for serving Optional ingredients enhance the dip. Crumbled blue cheese adds a bold taste that many love. It pairs well with the spicy buffalo flavor. A sprinkle of green onion on top looks great and adds freshness. For serving, I recommend crunchy tortilla chips or crisp celery sticks. They both complement the dip's rich and creamy texture. Always remember to adjust the buffalo sauce to match your spice preference. You can find the full recipe in the section above for more detailed steps! 1. First, preheat your oven to 350°F (175°C). This helps the dip cook evenly. 2. In a large bowl, combine the shredded chicken, cream cheese, buffalo sauce, and ranch dressing. Mix until smooth. 1. Now, gently fold in the shredded cheddar cheese and blue cheese, if you use it. This adds great flavor and creaminess. 2. Next, transfer the chicken mixture to a baking dish. Spread it evenly with a spatula. 3. Bake the dip for 20-25 minutes. Look for bubbling edges and a slightly golden top. 1. When your dip is done, take it out and garnish with sliced green onions. This adds freshness. 2. Serve it warm with tortilla chips or celery sticks. Enjoy this creamy and flavorful delight! For the full recipe, check out the details above. Adjusting buffalo sauce is key for your dip. If you love heat, add more buffalo sauce. If you prefer mild dishes, use less. Start small and taste as you go. You can always add more but can’t take it out. If you want a cream cheese alternative, try Greek yogurt. It gives a nice tang and cuts some fat. You can also use vegan cream cheese for a plant-based option. This keeps the dip creamy without dairy. To get the perfect crust, bake your dip until it’s bubbly and golden. This usually takes about 20-25 minutes at 350°F. You want the edges to have a light brown color. This shows the dip is ready and adds flavor. For a crispy top, use a broiler after baking. Set your oven to broil and watch closely. Just a few minutes under the broiler can give your dip a nice crunch. Be careful not to burn it! When serving at parties, focus on presentation. Put the dip in the center of a colorful platter. Surround it with chips and celery sticks. This makes it look inviting and fun. For drinks, consider pairing it with light beers or sparkling water. The lightness balances the richness of the dip. You can also serve it with a side of fresh veggies for a nice crunch. {{image_4}} You can make buffalo chicken dip healthier with just a few swaps. - Low-fat cream cheese options: Use low-fat cream cheese. It cuts fat and calories but keeps the creaminess. - Using Greek yogurt instead of ranch dressing: Greek yogurt adds a tangy taste and protein. It's a great way to lower calories while keeping it creamy. You might want to kick up the flavor in your dip. - Additions like diced jalapeños or hot peppers: These add heat and a fresh taste. Adjust to your spice level. - Incorporating other cheeses for unique flavors: Try mixing in mozzarella or gouda. Each cheese adds its own twist to the dip's flavor. Change how you serve your buffalo chicken dip for fun. - Buffalo chicken dip stuffed in peppers: Hollow out mini bell peppers and fill them with the dip. Bake until warm for a tasty bite. - Spinach and buffalo chicken dip combo: Mix in fresh spinach. It adds color and nutrition, making the dip even better. For the complete recipe, check out the [Full Recipe]. To keep buffalo chicken dip fresh, place it in an airtight container. This helps prevent it from drying out. Store the dip in the fridge for up to five days. You may notice the flavors deepen as it sits. Just be sure to cover it well to avoid any fridge odors. You can freeze buffalo chicken dip for longer storage. First, let the dip cool completely. Then, transfer it to a freezer-safe container. Press plastic wrap directly on the dip before sealing. It can last for up to three months in the freezer. When you're ready to enjoy it, thaw it in the fridge overnight. You have two great options to reheat buffalo chicken dip: the oven or microwave. If using the oven, preheat it to 350°F (175°C). Place the dip in an oven-safe dish and heat for about 20 minutes. Stir halfway through for even warming. If you choose the microwave, heat in 30-second intervals. This prevents hot spots and keeps the dip creamy. To maintain texture, avoid overheating. Let the dip sit for a minute after reheating. This helps the flavors come back together. Enjoy your dip warm with chips or celery sticks! Yes, you can make buffalo chicken dip ahead of time. To prepare in advance, follow these steps: - Mix the ingredients: Combine the shredded chicken, cream cheese, buffalo sauce, and ranch dressing. - Store it: Place the mixture in a baking dish, cover it with plastic wrap, and put it in the fridge. - Bake when ready: When you are ready to serve, take it out and bake it at 350°F for 20-25 minutes. This way, you save time and enjoy a warm dip at your gathering. If you want to swap ranch dressing, here are some great options: - Blue cheese dressing: This adds a tangy flavor that works well. - Greek yogurt: Use plain Greek yogurt for a healthier twist. - Caesar dressing: This offers a different but tasty flavor profile. Feel free to experiment with your favorite dressings! To kick up the spice level, try these ideas: - Extra buffalo sauce: Add more buffalo sauce to your mix. - Diced jalapeños: Mix in fresh or pickled jalapeños for heat. - Hot sauce: Drizzle hot sauce on top before serving for an extra kick. Adjust the spice to match your taste, and enjoy the heat! Buffalo chicken dip can be gluten-free, but check your ingredients. Here’s what to know: - Buffalo sauce: Most brands are gluten-free, but confirm by reading the label. - Ranch dressing: Look for gluten-free options if using store-bought. - Dipping options: Use gluten-free tortilla chips or fresh veggies for dipping. With careful choices, everyone can enjoy this dip! You now know how to make buffalo chicken dip from scratch. We covered key ingredients like chicken, cream cheese, and buffalo sauce. I shared step-by-step instructions to get delicious results. You learned tips for adjustments and variations to suit your taste. Remember, this dip is versatile; you can customize it for any gathering. Enjoy experimenting with flavors and serving styles. Your next snack night will be a hit!](https://goldendishy.com/wp-content/uploads/2025/07/99cdad4a-7337-4a60-a9b0-2f79e024797e-768x768.webp)