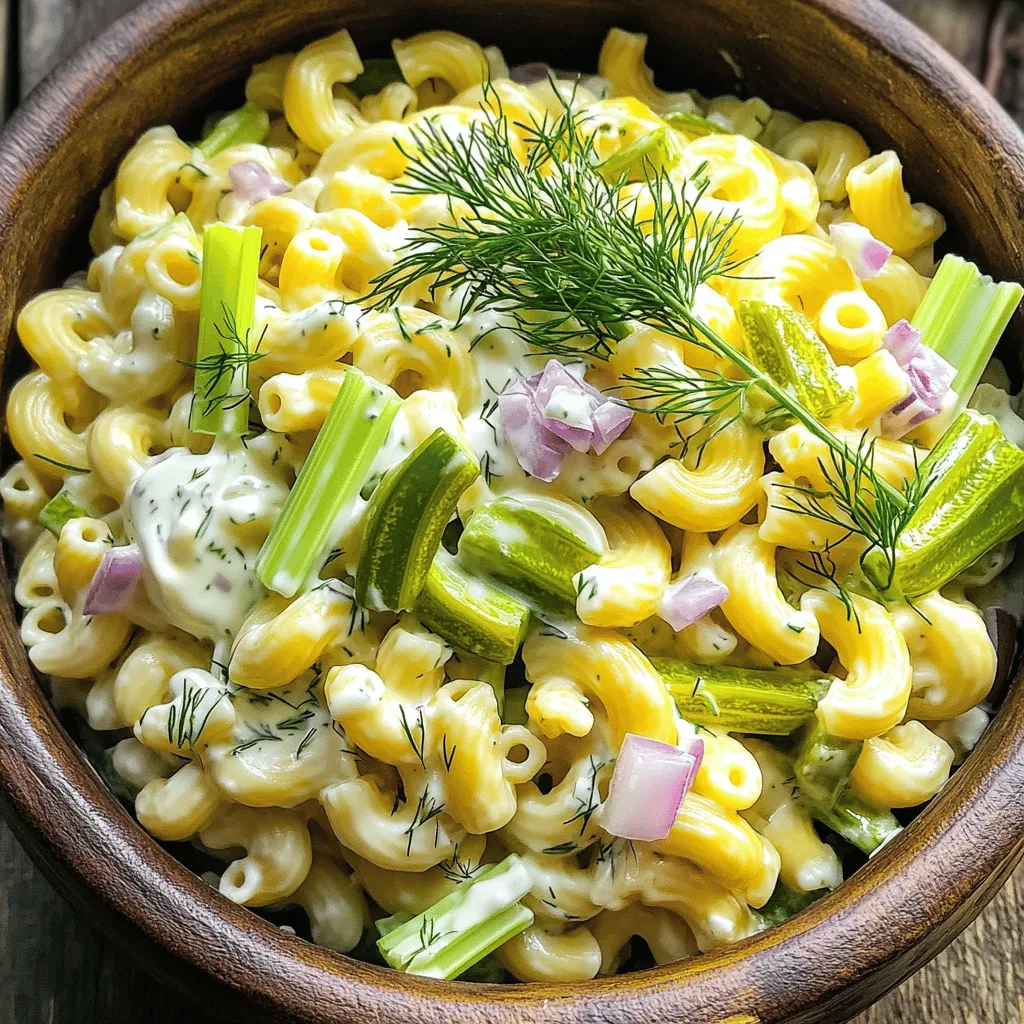
Creamy Dill Pickle Pasta Salad Fresh and Easy Recipe
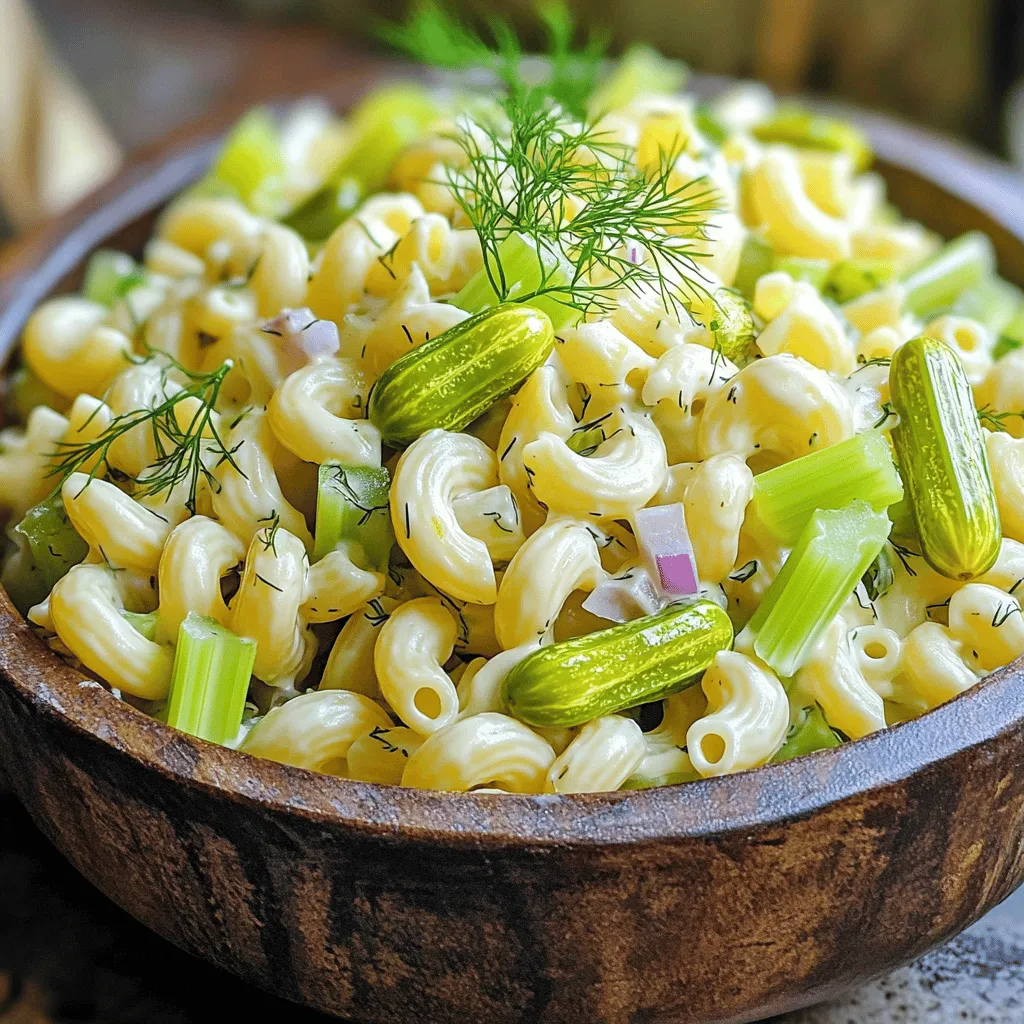
Looking for a refreshing side dish that’s quick and easy? I’m excited to share my Creamy Dill Pickle Pasta Salad recipe! This tasty salad combines zesty pickles, creamy dressing, and pasta for a delightful twist. With just a few simple steps, you’ll have a dish that’s perfect for summer picnics or weeknight dinners. Let’s dive into the ingredients and get started on this fun and flavorful recipe!
Ingredients
List of Ingredients
– 2 cups elbow macaroni
– 1 cup dill pickles, finely chopped
– 1/2 cup red onion, finely diced
– 1/2 cup celery, finely diced
– 1/2 cup mayonnaise
– 1/2 cup sour cream
– 2 tablespoons pickle juice (from the jar)
– 1 tablespoon Dijon mustard
– 1 teaspoon garlic powder
– 1 teaspoon onion powder
– Salt and freshly ground black pepper, to taste
– Fresh dill sprigs, for garnish
Quantity and Preparation Details
To start, you need two cups of elbow macaroni. This is the base of your pasta salad. Boil it until it is al dente and then cool it with cold water. Next, gather one cup of finely chopped dill pickles. This gives a great crunch and tang. You’ll also need half a cup each of red onion and celery, both diced finely. For the creamy dressing, you will use half a cup of mayonnaise and half a cup of sour cream. Two tablespoons of pickle juice add that perfect zing. One tablespoon of Dijon mustard brings in depth of flavor. Finally, add garlic powder and onion powder for extra taste. Don’t forget salt and pepper to season to your liking. Fresh dill sprigs will make a lovely garnish.
Substitutions for Ingredients
If you want to change things up, there are some easy swaps. You can use any small pasta shape instead of elbow macaroni. If you prefer, Greek yogurt can replace sour cream for a lighter option. You can also switch out the mayonnaise for an avocado spread. If you want more crunch, try adding bell peppers or carrots. For a kick, add chopped jalapeños. Use dill relish if you cannot find dill pickles. These substitutions keep the spirit of the dish while letting your taste shine through.
Step-by-Step Instructions
Cooking the Pasta
Start by boiling a large pot of salted water. Once it bubbles, add 2 cups of elbow macaroni. Cook the pasta for 7 to 10 minutes until it is tender but still firm. Drain the pasta in a colander and rinse it under cold water. This stops the cooking process and cools the macaroni. Set it aside to drain well.
Preparing the Dressing
Grab a large mixing bowl. In it, combine 1/2 cup of mayonnaise, 1/2 cup of sour cream, 2 tablespoons of pickle juice, and 1 tablespoon of Dijon mustard. Add 1 teaspoon of garlic powder and 1 teaspoon of onion powder. Season with salt and black pepper. Whisk these together until you have a smooth, creamy dressing.
Combining Ingredients
Now, it’s time to mix! Add the cooled elbow macaroni to your creamy dressing. Gently toss the macaroni until every piece is coated. Next, fold in 1 cup of finely chopped dill pickles, 1/2 cup of diced red onion, and 1/2 cup of diced celery. Ensure everything is mixed well without breaking the pasta. Taste the salad and adjust the seasoning if needed. Cover and chill it for at least 30 minutes. This helps the flavors blend. When ready to serve, garnish with fresh dill sprigs for a nice touch.
Tips & Tricks
Best Practices for Cooking Pasta
Cook pasta in a big pot of salted water. The salt helps flavor the pasta. Use a timer to avoid overcooking. I suggest cooking it until it is al dente. This means it should be firm when you bite into it. After cooking, drain the pasta and rinse it with cold water. This stops the cooking and cools the pasta down.
How to Adjust Seasoning
Taste your pasta salad before serving. You can add more salt, pepper, or pickle juice if needed. If it tastes dull, a bit more pickle juice can add zing. Always mix well after adding any seasoning. This helps ensure every bite is flavorful.
Making Ahead for Better Flavor
Make your creamy dill pickle pasta salad a few hours in advance. This allows the flavors to blend well. Cover it tightly and chill it in the fridge. It tastes best when it sits for at least 30 minutes. For maximum flavor, try to let it chill overnight. This will make your dish even more delicious.
Variations
Different Pasta Shapes
You can change the pasta shape for fun! The classic elbow macaroni works great. But you can try shells, rotini, or even penne. Each shape holds the creamy dressing well. Using different shapes can make the dish look unique too. Plus, it can add a fun twist to each bite!
Adding Proteins or Other Vegetables
Want to make it hearty? Try adding proteins. Cooked chicken or diced ham pairs nicely with the salad. You can also try tuna or chickpeas for a different taste. For veggies, add bell peppers, peas, or corn. These choices boost flavor and nutrition. Don’t be afraid to mix and match based on what you love!
Dressing Substitutes
Feel free to switch up the dressing. If you want a lighter option, use Greek yogurt instead of sour cream. You can also try a vinaigrette for a tangy twist. For extra flavor, add a dash of hot sauce or some fresh herbs. These swaps can make the recipe your own.
Storage Info
Refrigeration Guidelines
Store your creamy dill pickle pasta salad in an airtight container. This keeps it fresh. Place it in the fridge right after serving. The salad tastes even better after chilling.
Freezing Guidelines
I do not recommend freezing this pasta salad. The texture changes when thawed. The creamy dressing may separate and become watery. It’s best enjoyed fresh or refrigerated.
How Long will it Last?
In the fridge, this salad lasts about three to four days. Always check for signs of spoilage before serving. If it looks or smells off, toss it out. Enjoy it while it’s fresh for the best taste!
FAQs
Can I use gluten-free pasta?
Yes, you can use gluten-free pasta. Many brands offer great options. I suggest using a gluten-free elbow macaroni. It cooks well and holds the dressing nicely. Just follow the cooking instructions on the package. This way, everyone can enjoy the creamy dill pickle pasta salad.
How can I make it healthier?
You can make it healthier by adding fresh veggies. Try adding chopped bell peppers, cucumbers, or carrots. You can also use Greek yogurt instead of sour cream. This swap adds protein and reduces fat. Lastly, use less mayonnaise or a light version for fewer calories.
What to serve with creamy dill pickle pasta salad?
Creamy dill pickle pasta salad pairs well with grilled chicken or fish. You can also add it to a picnic plate with sandwiches. It complements burgers or hot dogs nicely. For a light meal, serve it alongside a fresh garden salad. Enjoy the mix of flavors!
This blog covered how to make creamy dill pickle pasta salad. We discussed the key ingredients, preparations, and substitutions. You learned step-by-step instructions for cooking and combining the pasta and dressing. We shared helpful tips for perfect seasoning and storage. You also found variations to try different pasta shapes or proteins.
With this knowledge, you can create a tasty pasta salad that suits your taste. Enjoy experimenting and making it your own!

![- 2 cans (15 oz each) chickpeas, thoroughly drained and rinsed - 2 tablespoons extra virgin olive oil - 1 tablespoon smoked paprika - 1 teaspoon cayenne pepper - 1 teaspoon garlic powder - 1 teaspoon onion powder - 1 teaspoon ground cumin - Salt, to taste - Fresh cilantro for garnish (optional) Chickpeas are the star of this recipe. They are high in protein and fiber, making them a healthy choice. Each can of chickpeas gives you a great base for a crispy snack. Now, let's break down the other ingredients. Extra virgin olive oil adds healthy fats, helping the spices stick. Smoked paprika gives a deep flavor, while cayenne pepper adds heat. Garlic and onion powders give a nice aroma and a touch of sweetness. Ground cumin brings an earthy taste that balances the spices. You can adjust the salt to your liking. Fresh cilantro is optional but adds a fresh touch. Chickpeas are packed with nutrients. One serving has about 120 calories. They provide around 6 grams of protein and 2 grams of fat. You also get about 20 grams of carbs and 5 grams of fiber. Chickpeas support heart health, help with digestion, and can aid in weight management. They are a smart choice for a snack or a meal. They fit well into many diets, too! For the full recipe, check out [Full Recipe]. Start by preheating your oven to 400°F (200°C). This step is key for making the chickpeas crispy. Use a baking sheet lined with parchment paper. This helps with easy cleanup and ensures the chickpeas do not stick. Next, rinse the chickpeas under cold water. Drain them well, then pat them dry with a clean paper towel. This step is very important. Removing moisture makes the chickpeas crispier when roasting. In a large bowl, mix the drained chickpeas with olive oil and spices. Use smoked paprika, cayenne pepper, garlic powder, onion powder, ground cumin, and a pinch of salt. Toss gently so every chickpea gets coated in the spice mix. Even coverage is vital for that great flavor. Spread the seasoned chickpeas on the baking sheet in a single layer. This helps them roast evenly. Place the sheet in the oven and roast for about 25-30 minutes. Shake the pan halfway through to promote even cooking. Watch them closely near the end to avoid burning. Once they are golden and crispy, take the chickpeas out. Let them cool on the baking sheet for a few minutes. They will continue to crisp up as they cool. For a fresh touch, sprinkle chopped cilantro on top before serving. Enjoy them as a snack or use them as a topping on salads. For the full recipe, check the ingredient list above. To make your spicy roasted chickpeas super crispy, dry them well. After draining, rinse them under cold water. Then, pat them dry with a paper towel. This step is vital! Any leftover moisture will make them soggy. Spread the chickpeas in a single layer on your baking sheet. This helps them cook evenly. If they overlap, they won’t get as crisp. Adjusting the spice levels is easy. If you want more heat, add more cayenne pepper. For less spice, reduce the amount or skip it. You can also experiment with other spices! Try adding chili powder or even a dash of curry powder for a fun twist. Taste the mix before roasting to find your perfect balance. Store any leftover roasted chickpeas in an airtight container. Keep them at room temperature for up to three days. If they get soft, re-crisp them in the oven for a few minutes. This restores their crunch. Enjoy them as a snack or toss them on salads. For the full recipe, check out the original source. {{image_4}} You can change the flavor of spicy roasted chickpeas easily. Try adding different spices or herbs. Here are some great ideas: - Cumin: Boost the earthy flavor. - Chili powder: Add more heat. - Turmeric: For a warm, golden color. - Herbs: Experiment with thyme or rosemary for fresh notes. For a sweet twist, mix in a little cinnamon and honey. Toss your roasted chickpeas with a bit of honey after cooking. The sweetness pairs well with spice. It creates a tasty snack that balances flavors. Spicy roasted chickpeas work well with many dishes. They are great as a snack on their own. You can also add them to salads or grain bowls for extra crunch. - Salads: Sprinkle them over leafy greens. They add texture and flavor. - Bowls: Use them in grain bowls for a hearty meal. - Snacking: Serve them in a bowl at parties for a fun treat. Feel free to mix them into soups for added richness. The crispy texture enhances warm dishes too. Get creative and enjoy these versatile little gems! For the full recipe, check the earlier section. To keep your spicy roasted chickpeas fresh, place them in an airtight container. This helps lock in their crunch. You can store them on the counter for up to three days. For longer storage, try the fridge, where they can last up to a week. However, they might lose some crispness in the fridge. If you want to save them for later, consider freezing them. In the freezer, they can last for about three months. Just remember to let them cool completely before storing. When you’re ready to enjoy leftovers, the best way to reheat them is in the oven. Preheat your oven to 375°F (190°C). Spread the chickpeas on a baking sheet in a single layer. Heat them for about 10 minutes. This method helps restore their crunch and flavor. You can also use an air fryer for quick reheating. Set it to 350°F (175°C) and heat for five to seven minutes. Both methods keep your chickpeas crispy and tasty! If you can't use chickpeas, try these options: - Canned white beans: They are creamy and mild in taste. - Edamame: These young soybeans add a nice crunch. - Lentils: Cooked lentils can work, but they won’t be as crunchy. - Roasted pumpkin seeds: They give a great crunch and are nutty. These alternatives are great for those with dietary restrictions or different tastes. Yes, you can easily adapt this recipe for an air fryer. Here’s how: - Preheat your air fryer to 400°F (200°C). - Follow the same steps to season your chickpeas. - Place them in the air fryer basket in a single layer. - Cook for about 15 to 20 minutes, shaking the basket halfway. This method gives you extra crispiness while saving time. The spice level of spicy roasted chickpeas is adjustable. The cayenne pepper in the recipe gives a kick, but you can change it. - For mild: Use less or skip the cayenne. - For extra spicy: Add more cayenne or include chili powder. Taste as you go to find your perfect heat! Yes, spicy roasted chickpeas are naturally gluten-free. Chickpeas do not contain gluten, making them a safe choice for those with gluten sensitivities. Always check your spice labels to ensure no gluten-containing ingredients are added. Enjoy these snacks worry-free! For the full recipe, visit the Spicy Roasted Chickpeas section. This blog post covered how to make spicy roasted chickpeas. We went through the ingredients, detailed the steps, and shared tips for perfecting your snack. Chickpeas are healthy, tasty, and easy to customize. You can adjust spices or enjoy them sweet. Whether you serve them in salads or as a snack, there are many ways to enjoy them. With proper storage, your leftovers will stay fresh. Get ready to impress with this simple recipe!](https://goldendishy.com/wp-content/uploads/2025/07/52a5824a-88a4-4b76-bbe8-61087731f54f-768x768.webp)
![- 6 large eggs - 1/2 cup milk - 1 cup mixed bell peppers, diced - 1/2 cup onion, diced - 1 cup fresh spinach, chopped - 1/2 cup shredded cheese - 1/2 teaspoon garlic powder - 1/2 teaspoon salt - 1/4 teaspoon black pepper - Optional add-ins Egg muffins are simple to make. You can mix and match your favorite ingredients. The basic recipe is a great start, but you can add other items too. Here are some optional add-ins to consider: - Cooked turkey sausage, crumbled - Diced ham - Zucchini, grated - Mushrooms, sliced When you pick your veggies, choose fresh ones. Fresh ingredients add more flavor and nutrients. You can use any cheese you like. Cheddar and mozzarella work well. Don't forget to season your mix! The garlic powder, salt, and pepper enhance the taste. - Muffin tin - Mixing bowl - Whisk These tools are key for making your egg muffins. A muffin tin helps shape them perfectly. A mixing bowl allows you to combine your ingredients easily. A whisk mixes the eggs and milk until smooth. These items make the process quick and fun. With the right tools, you can whip up a tasty breakfast in no time. For the full recipe, check the detailed instructions in the next section. - Preheat the oven to 350°F (175°C). - Grease the muffin tin with cooking spray or olive oil. - In a large bowl, whisk together eggs and milk until smooth. - Add diced bell peppers, onion, spinach, and shredded cheese. - Sprinkle in garlic powder, salt, and black pepper. - If you like, fold in cooked turkey sausage or ham. Stir until mixed well. - Carefully pour the mixture into muffin cups, filling each about 3/4 full. - Place the muffin tin in the oven and bake for 18-20 minutes. - The muffins are done when they puff up and feel firm. - To check doneness, insert a toothpick. If it comes out clean, they are ready. - Let the muffins cool in the tin for a few minutes. - Gently remove them by running a knife around the edges. - Serve warm or store in an airtight container in the fridge for up to 5 days. For the full recipe, visit the Sunny Morning Egg Muffins section. To bake your egg muffins perfectly, set your oven to 350°F (175°C). Bake for 18 to 20 minutes. The muffins should rise and be firm in the center. To check for doneness, use a toothpick. If it comes out clean, they are ready! Enjoy these muffins warm for the best taste. They pair well with fresh fruit or yogurt. For a fun touch, arrange them on a bright platter. You can add fresh herbs like parsley for color. Avoid overfilling the muffin tins; fill them only about 3/4 full. This helps them puff up nicely. Also, grease the muffin tin well. If you skip this step, the muffins may stick and break apart. {{image_4}} You can mix and match your favorite veggies and cheeses for these egg muffins. Try using: - Broccoli florets - Zucchini, diced - Mushrooms, sliced - Feta cheese - Goat cheese Adding spices can bring your muffins to life. Consider: - Paprika for warmth - Cumin for a twist - Fresh herbs like basil or oregano Making these muffins gluten-free is easy. Just ensure you check your ingredients, like the milk and any add-ins. Use gluten-free sausage or skip the meat entirely. For a dairy-free version, try these tips: - Use almond or oat milk instead of regular milk. - Choose dairy-free cheese or leave it out altogether. Using seasonal veggies makes your muffins fresh and tasty. In spring, add asparagus. In summer, toss in tomatoes and corn. Fall is perfect for butternut squash and kale. You can also create holiday-themed muffins. Think of adding: - Spinach and feta for a festive green touch in December. - Pumpkin puree and spices for a cozy autumn flavor. To keep your egg muffins fresh, store them in an airtight container. Place the muffins in the fridge within two hours of cooking. These muffins stay tasty for up to 5 days. If you want them to last longer, consider freezing them. To freeze your muffins, let them cool completely. Then, wrap each muffin in plastic wrap. Place the wrapped muffins in a freezer-safe bag or container. They can stay in the freezer for up to three months. When you're ready to enjoy, take one out and reheat it. You can use the microwave for about 30 seconds or the oven at 350°F for 10-15 minutes. This way, your muffins taste fresh and delicious every time! Yes, you can make these egg muffins ahead of time. They store well in the fridge for up to five days. Just cool them first and keep them in an airtight container. This way, you can grab a muffin for breakfast on busy mornings. If you need a milk substitute, you can use non-dairy milk. Almond milk or oat milk works great. You can also use water or chicken broth for a different flavor. Each option will still keep your muffins moist and tasty. Customization is easy! You can change the veggies, cheeses, or meats you use. Add mushrooms, zucchini, or kale for more greens. Try feta or pepper jack cheese for a flavor twist. You can even add herbs like dill or cilantro for extra taste. These muffins are perfect for meal prep. They are easy to make in bulk and freeze well. Just bake a big batch, cool them, and store in the freezer. Reheat them in the microwave or oven whenever you want a quick meal. To check if your muffins are done, insert a toothpick in the center. If it comes out clean, they are ready. The muffins should puff up and feel firm. If they jiggle too much, give them a few more minutes to bake. Sunny Morning Egg Muffins are easy and fun to make. They are perfect for busy mornings. The ingredients come together quickly, and you can customize them to fit your taste. Ingredients summary: - 6 large eggs - 1/2 cup milk - 1 cup mixed bell peppers, diced - 1/2 cup onion, diced - 1 cup fresh spinach, chopped - 1/2 cup shredded cheese - 1/2 teaspoon garlic powder - 1/2 teaspoon salt - 1/4 teaspoon black pepper - Optional: 1/4 cup cooked turkey sausage or diced ham Brief cooking process recap: 1. Preheat your oven to 350°F (175°C). 2. Whisk eggs and milk in a bowl. 3. Mix in diced veggies, cheese, and spices. 4. Fill greased muffin tins with the mixture. 5. Bake for 18-20 minutes until puffed and firm. 6. Cool slightly before removing from the tin. This recipe makes 12 muffins, perfect for meal prep or sharing. Enjoy them warm or store for later! For the full recipe, check the [Full Recipe]. This blog post shared how to make easy and tasty egg muffins. You learned about the ingredients, kitchen tools, and step-by-step instructions. We discussed tips for perfect muffins and explored fun variations. Don't forget about storage info for leftovers and answers to common questions. These muffins are great for any meal. They are simple to customize and perfect for any diet. Now, get cooking and enjoy your delicious egg muffins!](https://goldendishy.com/wp-content/uploads/2025/06/04b743eb-2b91-42b7-82a4-c7d87238309b-768x768.webp)