Rainbow Fruit Pizza Delightful and Easy Recipe

Are you ready to impress your friends and family with a fun twist on dessert? This Rainbow Fruit Pizza is not only eye-catching but also super easy to make! With a soft cookie base and fresh fruit toppings, it’s the perfect treat for any occasion. In this article, I’ll guide you through each step, from selecting the right ingredients to chilling it just right. Let’s dive into this colorful delight together!
Ingredients
List of Required Ingredients
– Pre-made or homemade sugar cookie dough
– Cream cheese and powdered sugar
– Fresh fruits for topping
– Optional ingredients for tanginess
Ingredient Notes
Choosing the best fruits makes your rainbow fruit pizza shine. Look for ripe, colorful options. Fresh strawberries, blueberries, and bananas work well. You can also use seasonal fruits like peaches or oranges for added flavor. If you want a twist, consider adding nuts or coconut flakes as toppings. These can give your pizza a nice crunch.
Tools and Equipment Needed
To make this dessert, gather these tools:
– Baking sheet and parchment paper
– Mixing bowls and spatula
– Electric mixer (optional)
These tools help you create the perfect base and frosting for your pizza. Using parchment paper makes removing the cookie easier after baking. An electric mixer can save time when blending the frosting, but a whisk works just as well. For the best results, ensure everything is clean and ready to go. If you follow these tips, your rainbow fruit pizza will be a hit.
Step-by-Step Instructions
Preparing the Cookie Base
Start by preheating your oven to 350°F (175°C). This temperature is perfect for baking. Next, line a baking sheet with parchment paper. This will stop the cookie from sticking. Now, take your sugar cookie dough. Roll it out on the parchment paper. Shape it into a large circle. Aim for about ½ inch in thickness.
Baking the Cookie
Bake the cookie base for about 10-12 minutes. Look for a lovely golden brown color. This shows that it’s done. Once baked, pull it from the oven. Let the cookie cool completely on the baking sheet. Cooling is key for spreading frosting later.
Making the Cream Cheese Frosting
In a mixing bowl, add softened cream cheese. Then, mix in the powdered sugar and vanilla extract. Use an electric mixer or whisk to blend until smooth. If you want a bit of tang, fold in some Greek yogurt. This adds a nice twist to the frosting.
Assembling the Rainbow Fruit Pizza
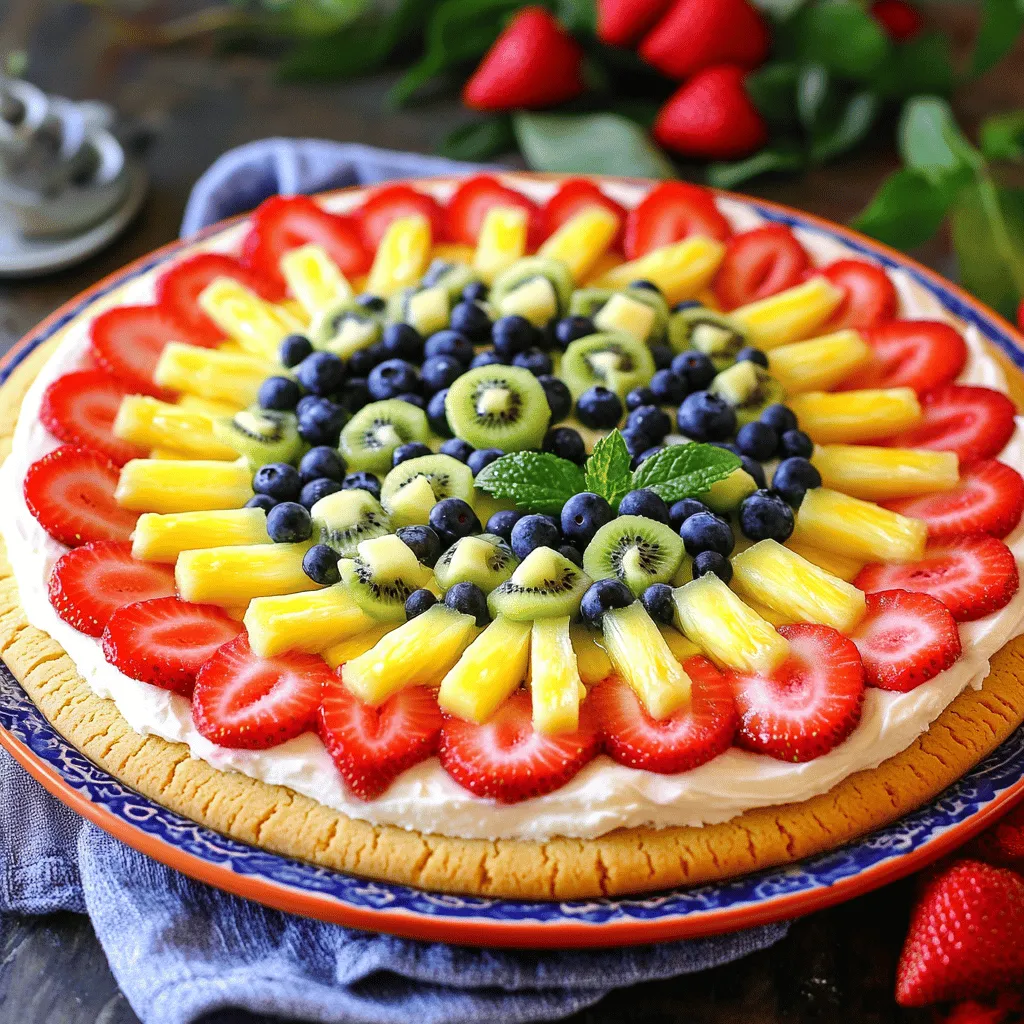
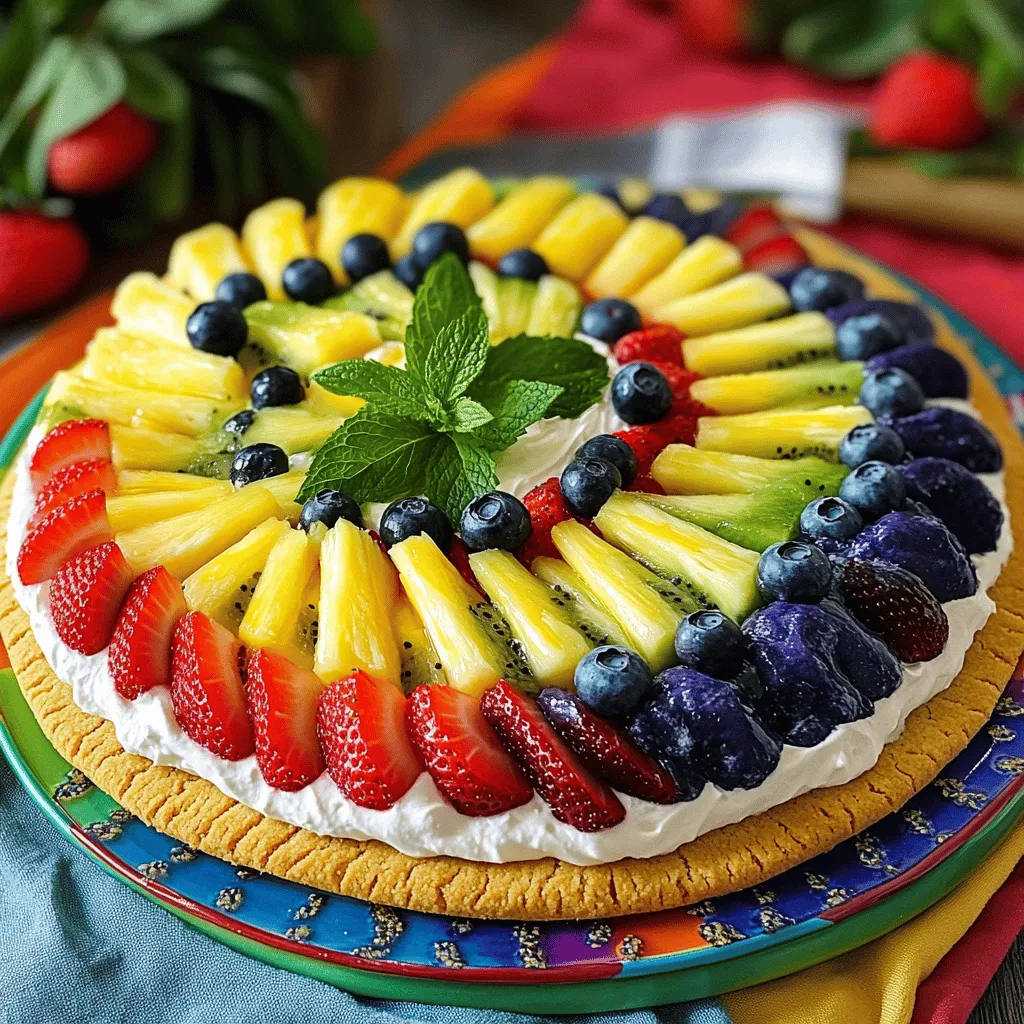
Once your cookie base has cooled, spread the cream cheese mixture on top. Use a spatula to make it even. Now, the fun begins! Arrange the fruits in a rainbow pattern. Start with kiwi on one end. Then add strawberries, blueberries, pineapple, and banana slices. This colorful display makes it eye-catching and fun!
Chilling and Serving
Chill the fruit pizza in the fridge for at least 30 minutes. This helps the frosting set up nicely. For serving, slice it into wedges. Place the slices on a colorful platter. Add a few fresh mint leaves for a bright touch. Your rainbow fruit pizza is now ready to impress!
Tips & Tricks
Perfecting Your Rainbow Fruit Pizza
To make your rainbow fruit pizza shine, arrange the fruits evenly. This way, each slice gets a colorful mix. Start with the kiwi at one end, then layer strawberries, blueberries, pineapple, and banana. This not only looks great but also tastes amazing.
For extra flavor, consider adding a splash of lemon juice to the yogurt. This brightens the taste and keeps fruits fresh. You can also sprinkle a bit of cinnamon on the cream cheese layer for warmth.
Common Mistakes to Avoid
One common mistake is overmixing the frosting. This can make it too runny. Mix just until smooth and creamy. Also, avoid baking the cookie for too long. If it gets dark brown, it may be too hard. Aim for a light golden color for the best texture.
Special Occasion Suggestions
For parties, use fun themes. You can make a holiday version with red and green fruits for Christmas. For summer, focus on bright, tropical fruits. Seasonal fruits are perfect, too. In spring, use strawberries and apricots. In fall, think about apples and pears.

Variations
Fruit Alternatives
You can use many fruits on your rainbow fruit pizza. Try seasonal fruits to mix it up. Here are some great options:
– Raspberries
– Blackberries
– Peaches
– Grapes
– Mangos
Each fruit brings its own taste and color. You can also play with flavors. For a tropical twist, use pineapple and mango. For a tart touch, add raspberries and kiwi. The choices are endless!
Dietary Adjustments
You can easily adapt this recipe for different diets. For a gluten-free option, use gluten-free cookie dough. Many brands offer tasty choices. For a dairy-free version, swap cream cheese for a dairy-free spread or cashew cream.
If you want a vegan-friendly pizza, choose a plant-based yogurt for the frosting and skip the cream cheese. Use fruits like bananas and strawberries for added sweetness. These swaps make it easy for everyone to enjoy!
Serving Size Adjustments
Need to serve more people? You can double the recipe for bigger gatherings. Just bake two cookie bases and layer them the same way.
For a fun twist, make mini fruit pizzas. Use small cookie cutters to shape individual bases. This way, everyone gets their own bite-sized treat! Kids love them, too!
Storage Info
How to Store Leftovers
To keep your rainbow fruit pizza fresh, use an airtight container. A glass or plastic container works well. Make sure the pizza is fully cooled before covering it. This step helps prevent sogginess. Place a piece of parchment paper between the pizza and the lid. This keeps moisture away from the fruit.
Freezing Tips
You can freeze the assembled fruit pizza for later enjoyment. Wrap it tightly in plastic wrap and then in aluminum foil. This double layer helps protect it from freezer burn. When you are ready to eat, move it to the fridge overnight to thaw. Avoid using a microwave, as it can make the fruits mushy.
Shelf Life
Rainbow fruit pizza lasts about 3-4 days in the fridge. After that, it may lose flavor and texture. Look for signs of spoilage, like a watery base or browning fruit. If the cream cheese layer smells sour, it’s time to toss it. Always trust your senses when it comes to food safety.
FAQs
Can I make the cookie base ahead of time?
Yes, you can make the cookie base ahead of time. After baking it, let it cool completely. Then, wrap it tightly in plastic wrap. Store it in the fridge for up to two days. This way, you can save time on the day you want to serve it.
What other toppings can I use on my fruit pizza?
You have many fun options for toppings! Here are a few ideas:
– Raspberries
– Blackberries
– Grapes, halved
– Peaches, sliced
– Mango, diced
– Pomegranate seeds
Feel free to mix and match to create your favorite flavor combo!
How do I prevent the fruit from browning?
To stop your fruit from browning, use these tips:
– Brush sliced apples or bananas with lemon juice.
– Keep cut fruits in cold water until you’re ready to use them.
– Store them in an airtight container.
These steps help keep your fruit vibrant and fresh!
Is there a healthier alternative to cream cheese?
Yes, you can swap cream cheese for Greek yogurt or cottage cheese. These options are lower in fat and add protein. If you want a sweeter taste, mix in a bit of honey. This makes a tasty and lighter topping!
Can I use frozen fruits instead of fresh?
Yes, you can use frozen fruits for your pizza. Just thaw and drain them first. This way, you avoid extra moisture on your cookie base. Be aware, though, that frozen fruits can be softer. They might not hold their shape as well as fresh fruits.
You learned how to make a delicious Rainbow Fruit Pizza. We covered all the key ingredients, tools, and step-by-step instructions. Don’t forget the tips on avoiding common mistakes and special occasion ideas. Remember, you can customize this treat with different fruits and dietary needs. With the right storage, leftovers can last and still taste great. This fun and colorful dessert is sure to impress anyone. Enjoy making it for yourself or to share with friends!


![To make Brown Butter Peach Muffins, gather these simple ingredients: - 1 cup unsalted butter - 1 ½ cups all-purpose flour - 1 teaspoon baking powder - ½ teaspoon baking soda - ½ teaspoon salt - 1 cup brown sugar, packed - 2 large eggs - 1 teaspoon vanilla extract - 1 cup ripe peaches, diced (fresh or canned, drained) - ½ teaspoon ground cinnamon - ½ cup chopped walnuts or pecans (optional) You can tweak this recipe based on your taste. Here are some ideas: - Fruits: Swap peaches for diced apples or blueberries. - Nuts: Use almonds or leave them out for nut-free muffins. - Sweeteners: Try coconut sugar instead of brown sugar for a different flavor. - Dairy-Free: Replace butter with coconut oil or vegan butter. Each muffin has about: - Calories: 220 - Fat: 10g - Carbohydrates: 30g - Protein: 3g - Fiber: 1g These muffins are a tasty treat! They are soft and flavorful, perfect for breakfast or snacks. If you want a detailed recipe, check the Full Recipe. Start by preheating your oven to 350°F (175°C). This temperature ensures even baking. While the oven warms up, prepare your muffin tin. You can use paper liners or grease each cup with cooking spray. This step helps the muffins release easily. Next, take a medium saucepan and melt the unsalted butter over medium heat. Stir often. Keep cooking until the butter turns a deep golden brown. This should take about 5-7 minutes. You’ll know it’s ready when you smell a nutty aroma. Once browned, remove the pan from the heat and let the butter cool for a bit. In a large mixing bowl, whisk together the following dry ingredients: - 1 ½ cups all-purpose flour - 1 teaspoon baking powder - ½ teaspoon baking soda - ½ teaspoon salt - ½ teaspoon ground cinnamon Make sure they are well blended. This mix gives the muffins their structure and flavor. In another bowl, combine the brown sugar and the cooled browned butter. Mix them until they blend well. Then, add in 2 large eggs, one at a time. Make sure each egg mixes in fully before adding the next. Finally, stir in 1 teaspoon of vanilla extract. This mix adds sweetness and depth. Now, slowly add your dry ingredients to the wet mixture. Gently stir until everything is just combined. Be careful not to overmix. This keeps the muffins light and fluffy. Using a spoon or cookie scoop, fill each muffin cup with the batter. Aim for about ¾ full. This allows space for the muffins to rise while baking. Place the muffin tin in your preheated oven. Bake for 18-22 minutes. Check for doneness by inserting a toothpick into the center of a muffin. If it comes out clean, your muffins are ready! Once done, let them cool in the tin for about 5 minutes. After that, transfer them to a wire rack to cool completely. For the Full Recipe, check the main article. To make your muffins light and fluffy, you need to focus on a few key steps. First, do not overmix your batter. Overmixing makes muffins dense. Stir the wet and dry ingredients until just combined. Second, make sure your baking powder and baking soda are fresh. Old leavening agents won't give your muffins the rise they need. Third, use room temperature eggs. This helps the batter mix evenly and rise well. Sometimes muffins don’t turn out as planned. Here are some quick fixes: - Muffins are too dense: This often happens from overmixing or too much flour. Measure your flour correctly, using a spoon to fill your measuring cup. - Muffins are too dry: This may be due to overbaking. Keep an eye on your muffins. Remove them when a toothpick comes out with a few moist crumbs, not clean. - Muffins do not rise: Check your leavening agents. Make sure they are fresh, or your muffins won’t rise well. Brown butter peach muffins are delicious on their own. For a special touch, serve them warm with whipped cream or ice cream. You can pair them with a drizzle of honey or a sprinkle of cinnamon sugar for added flavor. These muffins also go well with a cup of coffee or a glass of cold milk. For a light meal, enjoy them with fresh fruit or a yogurt parfait. For the full recipe, check the section above. {{image_4}} You can switch out the peaches for other fruits. Try diced apples for a crunchy twist. Ripe bananas add a sweet flavor. Berries like blueberries or raspberries work well too. Just remember to adjust the sugar based on the fruit's sweetness. For example, berries might need less sugar than peaches. Adding spices can boost your muffins' flavor. Ground cinnamon is a classic choice. You can also try nutmeg for warmth or ginger for a spicy kick. Vanilla extract adds richness, but almond extract gives a lovely twist. Start with half a teaspoon and adjust to your taste. If you need gluten-free muffins, swap all-purpose flour for a gluten-free blend. Make sure it’s a 1:1 ratio for best results. Some blends work well, but check for added ingredients. Adding a bit of xanthan gum can help bind the muffins together too. Enjoy your gluten-free treats without missing out on flavor! For the full recipe, you can refer to [Full Recipe]. To keep your brown butter peach muffins fresh, store them properly. Place them in an airtight container. This helps keep them moist and soft. You can leave them at room temperature for up to three days. If you have more muffins than you can eat, consider freezing some. For long-term storage, freezing is a great option. First, let the muffins cool completely. Wrap each muffin in plastic wrap. Then, place the wrapped muffins in a freezer-safe bag. This protects them from freezer burn. You can freeze the muffins for up to three months. When you're ready to eat one, just thaw it at room temperature. To enjoy your muffins warm, reheating is key. Preheat your oven to 350°F (175°C). Place the muffins on a baking sheet. Heat them for about 5-10 minutes. This will make them taste fresh again. You can also microwave a single muffin for about 15-20 seconds. Enjoy your warm treat! For the full recipe, check out the details above. You can check if your muffins are done by using a toothpick. Insert it into the center of a muffin. If it comes out clean, your muffins are ready. If it has wet batter on it, bake them a little longer. Also, the muffins should be golden brown on top. They will spring back slightly when touched. Yes, you can use frozen peaches in this recipe. Make sure to thaw them and drain any excess juice. This will help keep your muffins from being too wet. Chopping the peaches into smaller pieces works best. The flavor will still be great, and you can enjoy these muffins any time of year. If you don't have brown sugar, you can use white sugar. To mimic the flavor, mix in a bit of molasses. Use 1 cup of white sugar and add 1 tablespoon of molasses. This will give you a similar taste and moisture. You can also try coconut sugar as a healthier option. To make these muffins vegan, you can replace the eggs. Use 1/4 cup of unsweetened applesauce or a flax egg. To make a flax egg, mix 1 tablespoon of ground flaxseed with 2.5 tablespoons of water. Let it sit for a few minutes until it thickens. You can also use plant-based butter instead of regular butter. For the milk, almond or oat milk works well. Enjoy your vegan Brown Butter Peach Muffins! In this post, I covered the key ingredients for great muffins, along with optional swaps. I shared clear steps for making them from start to finish. Tips for fluffy texture and serving ideas were also included. You can even explore variations for added flavor or dietary needs. Remember, baking is fun! With the right techniques and ingredients, you can create tasty treats. Enjoy your muffin-making journey!](https://goldendishy.com/wp-content/uploads/2025/06/50b67b19-d2d9-4992-8745-9e9518e1dce5-768x768.webp)
![- 1 cup strawberries, hulled and sliced - 1 cup blueberries - 1 ripe mango, peeled and diced - 1 cup pineapple, diced - 1 banana, sliced The fruit selection is key. I enjoy using a mix of colors and flavors. Strawberries bring sweetness, while blueberries add a nice pop of tartness. The mango gives a tropical vibe, and pineapple adds a refreshing taste. The banana adds creaminess and helps balance the flavors. - 1/4 cup honey - 2 tablespoons freshly squeezed lime juice - Zest of 1 lime The dressing pulls everything together. I use honey for natural sweetness. Fresh lime juice brightens the dish, making it taste fresh. The lime zest adds an extra layer of flavor that's hard to resist. - Fresh mint leaves, for garnish Mint leaves add a beautiful touch. They not only look good but also give a nice hint of freshness. If you want to impress guests, sprinkle some mint on top before serving. Make sure to check out the Full Recipe for a detailed guide on how to combine these ingredients into a delicious Honey Lime Fruit Salad. To start, gather your fruits. Grab one cup of hulled and sliced strawberries, one cup of blueberries, one ripe mango peeled and diced, one cup of diced pineapple, and one sliced banana. In a large mixing bowl, combine all these fruits. Gently mix them to spread the flavors evenly. This step helps each fruit shine in the salad. Next, we make the dressing. In a separate bowl, add a quarter cup of honey, two tablespoons of freshly squeezed lime juice, and the zest of one lime. I like to whisk these together until the mixture is smooth. This dressing adds a sweet and zesty kick to the salad. Now, it's time to bring it all together. Drizzle the honey-lime dressing over your prepared fruits. Toss everything gently with a spatula or large spoon. Make sure each piece of fruit gets coated in the dressing. Let the salad sit for about ten minutes at room temperature. This resting time lets the flavors blend beautifully. Enjoy your fresh and colorful Honey Lime Fruit Salad! You can find the Full Recipe for details on preparation. To make a great Honey Lime Fruit Salad, choose ripe, seasonal fruits. Fresh fruits provide the best taste and texture. Look for strawberries with bright red color. Blueberries should be plump and firm. Pick mangoes that give slightly when you press them. Pineapples should smell sweet at the base. Bananas need to be ripe but not brown. When you select these fruits, you ensure a delightful salad. Let your salad rest for at least 10 minutes before serving. This short wait helps the flavors blend. The honey lime dressing seeps into the fruits. This makes each bite burst with flavor. The longer the salad sits, the better it tastes. You can prepare this ahead of time for easy serving. Presentation matters when serving this salad. You can use individual bowls for a personal touch. A large platter works well for gatherings. Arrange the fruits in a colorful pattern. Add lime wedges on the side for extra zest. A few fresh mint leaves on top make it look appealing. Your guests will love the bright colors and fresh taste. For the full recipe, check the instructions above. {{image_4}} You can easily change this fruit salad to suit your taste. Adding fruits like kiwi or grapes can make it even better. Kiwi adds a bright green color and a tangy taste. Grapes are sweet, crunchy, and add variety. Just chop them up and toss them in. Mix and match to create your dream fruit salad! For a fun tropical vibe, try adding shredded coconut or a splash of coconut juice. Shredded coconut gives a chewy texture and a hint of sweetness. Coconut juice can make the dressing even more refreshing. This twist takes your fruit salad to a whole new level. You’ll feel like you’re on a sunny beach with every bite! If you want a vegan option, use agave syrup instead of honey. Agave syrup is a great sweetener that works well in this recipe. It blends nicely with lime juice and keeps the salad tasty. This swap still gives you that sweet flavor without using honey. Enjoy your fruit salad without any worries! For the full recipe, check out the [Full Recipe]. Keep the salad in an airtight container in the fridge. This helps keep it fresh. Avoid letting the salad sit out for too long. If you plan to serve it later, store it right away. Consume within 1-2 days for best freshness. The fruits will start to lose their crispness after that. If you notice any browning, it’s time to toss it out. Always check for changes in smell or texture. Freezing fruit salad can change its texture. If you want to freeze it, use firm fruits like pineapple and mango. Avoid bananas, as they turn mushy. To freeze, place the salad in a freezer-safe container. When ready to eat, let it thaw in the fridge. You can also add fresh honey-lime dressing after defrosting for extra flavor. Yes, you can use frozen fruits in this salad. Frozen fruits can be a great option when fresh fruits are out of season. They are often picked at their peak and frozen right away, keeping their nutrients intact. However, frozen fruits can release more water as they thaw. This might make the salad a bit watery. To avoid this, let the frozen fruits thaw and drain excess liquid before mixing them in. Fresh fruits offer a crunchier texture and vibrant look, so choose based on your preference. No, this salad is not vegan due to honey. Honey comes from bees, making it an animal product. If you want a vegan option, you can easily replace honey with agave syrup or maple syrup. Both alternatives provide sweetness and work well with lime. The taste will differ slightly, but the salad will still be delicious. Just make sure to use the same amount of the substitute for the best flavor balance. This fruit salad is packed with vitamins and minerals. Here are some key benefits of its ingredients: - Strawberries: High in vitamin C and antioxidants, good for your skin. - Blueberries: Great for brain health, rich in fiber, and low in calories. - Mango: Full of vitamins A and C, supports eye health and boosts immunity. - Pineapple: Contains bromelain, which helps digestion and reduces inflammation. - Banana: A good source of potassium, great for heart health. Overall, this salad provides a mix of nutrients that can boost energy and support overall health. It’s a tasty way to enjoy fruits every day. For the full recipe, check out the details above. This blog post shared how to make a delicious Honey Lime Fruit Salad. I covered the best ingredients, including fresh fruits and a zesty dressing. You learned how to prepare everything step-by-step and found tips for picking juicy fruits. I also shared fun ways to adapt the salad to your taste. Finally, remember to store it properly to keep it fresh. Enjoy this vibrant mix and feel good about your healthy choice!](https://goldendishy.com/wp-content/uploads/2025/07/db0dca5e-aa0e-4365-a3c2-c9e5564148e0-768x768.webp)


