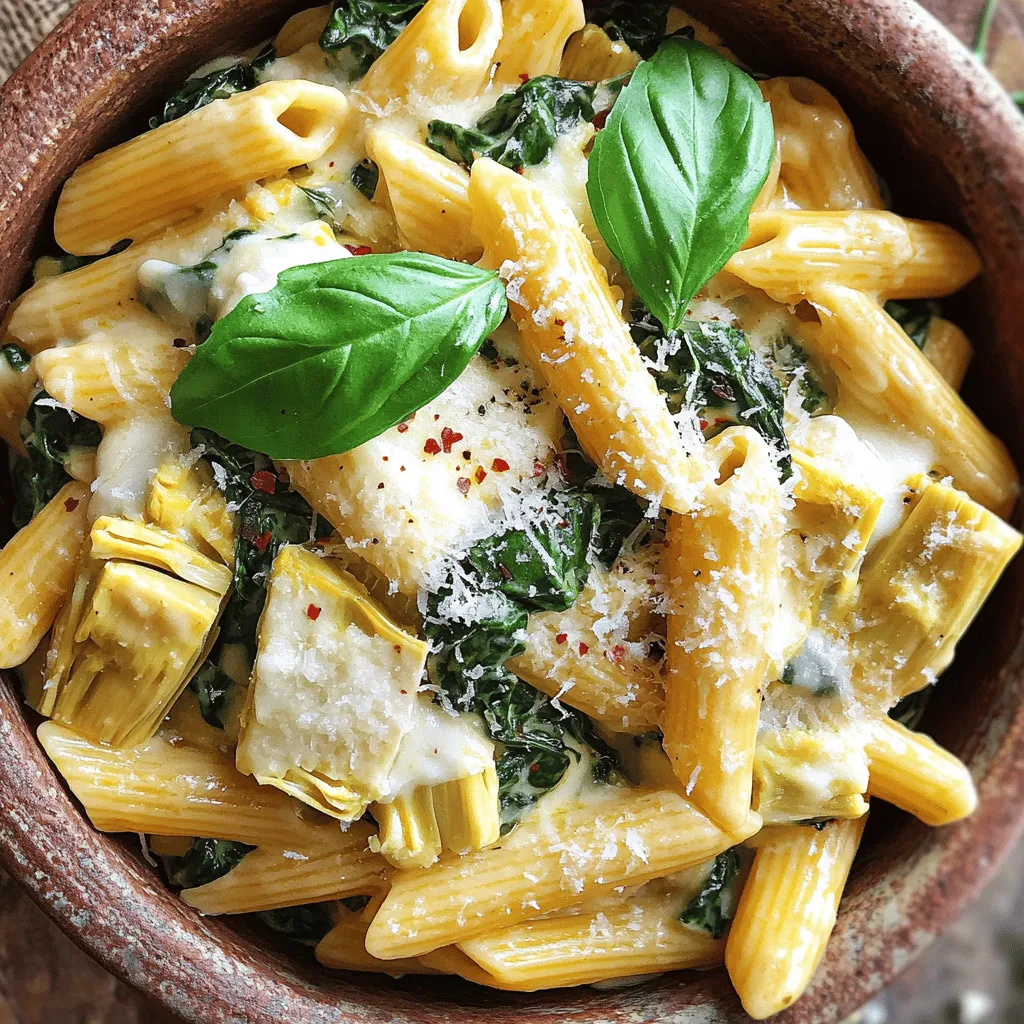
Cheesy Spinach Artichoke Pasta Flavorful Comfort Meal

Craving a cozy meal that’s both rich and tasty? You’ve come to the right place! My Cheesy Spinach Artichoke Pasta is the perfect comfort food to warm your heart and fill your belly. With simple ingredients and creamy cheese, this dish is easy to make and packed with flavor. Let’s dive into the steps and tips to create this delicious meal that will impress your family and friends!
Ingredients
Detailed Ingredient List
– Main ingredients:
– 8 oz (225g) pasta (penne or fusilli preferred)
– 1 cup fresh spinach, roughly chopped
– 1 cup artichoke hearts (canned or jarred), thoroughly drained and coarsely chopped
– Cheese selection:
– 1 cup cream cheese, softened to room temperature
– 1 cup shredded mozzarella cheese
– 1/2 cup grated Parmesan cheese
– Seasoning essentials:
– 2 cloves garlic, finely minced
– 1/2 teaspoon red pepper flakes (optional for heat)
– 1/2 teaspoon dried oregano
– 1/4 teaspoon freshly ground black pepper
– Salt to taste
– 1 tablespoon olive oil
– Optional garnishes and tweaks:
– Fresh basil leaves for garnish (optional but recommended)
Gather these ingredients to create a rich, creamy dish. Each item plays a key role in the flavor and texture of the pasta. The pasta provides a sturdy base, while the spinach and artichokes add freshness. The cheese selection brings creaminess and depth. Garlic and spices elevate the taste. Don’t skip the fresh basil; it adds a nice touch.
Step-by-Step Instructions
Cooking the Pasta
Start by filling a large pot with water. Bring it to a boil over high heat. Once boiling, add a generous amount of salt. This helps flavor the pasta. Add your pasta and cook according to the package instructions, usually around 8-10 minutes. I like to check it a minute early. You want it al dente, which means firm but not hard. When done, drain the pasta but save about 1/2 cup of the water. It will help later.
Sautéing Aromatics
Garlic is key in this dish. It adds a rich flavor that makes everything better. In the same pot, add olive oil and heat it over medium flame. When the oil shimmers, toss in minced garlic. Sauté for 1-2 minutes. Watch closely to avoid browning the garlic. You want it fragrant, not burnt.
Preparing the Cheesy Base
Now it’s time for the cheese! Lower the heat to low and add cream cheese to the pot. Stir continuously. Break it up as it heats until it becomes smooth. This step is crucial for a creamy sauce. Once smooth, add shredded mozzarella and grated Parmesan. Stir well until both cheeses melt in. If it’s too thick, drizzle in some reserved pasta water until you reach a creamy consistency.
Incorporating Vegetables
Now add the fresh spinach and artichoke hearts. Gently fold them into the cheese mixture. You may also add red pepper flakes and dried oregano at this point. Stir until the spinach wilts and combines with the cheese. This step balances flavors and adds nutrition.
Combining with Pasta
Once your cheese and veggie mix is ready, add the cooked pasta back into the pot. Toss gently to coat the pasta well. Make sure every piece is covered in that creamy sauce. This mixing allows the pasta to soak up all those tasty flavors.
Seasoning and Finishing Touches
Taste your pasta dish and adjust salt levels if needed. Once seasoned, let it rest off the heat for a minute. This resting time helps the sauce thicken a bit. Afterward, dish it out into bowls. You can garnish with fresh basil leaves for extra flavor if you like. Enjoy your rich, cheesy delight!
Tips & Tricks
Common Mistakes to Avoid
Cooking pasta can be tricky. Here are two common mistakes to watch out for:
– Overcooking pasta: This can ruin your dish. Always check the package for cooking time. Aim for al dente, which means firm to the bite. It helps the pasta hold its shape in the creamy sauce.
– Skipping the reserved pasta water: This water is liquid gold. It contains starch that helps thicken your sauce. Always save some before draining the pasta.
Best Cheese for Creamy Texture
Choosing the right cheese makes a big difference. Here are my top picks:
– Recommended brands and types: Cream cheese is key for smoothness. Use full-fat brands for the best taste. For mozzarella, pick low-moisture types. Grated Parmesan adds a sharp flavor.
– Dairy alternatives for a different twist: If you want a vegan option, use cashew cream and nutritional yeast. These can mimic the creaminess and flavor of cheese.
Expert Cooking Tips
Getting the flavors right is vital. Here are my expert tips:
– Using fresh vs. canned artichokes: Fresh artichokes offer a bright taste, but they take longer to prepare. Canned artichokes are convenient and save time. Just rinse them well before adding.
– Flavor enhancements with additional spices: Don’t be shy with spices! A pinch of nutmeg can add warmth. You can also try adding lemon zest for a fresh kick. Experiment and find what you love best.
Variations
Healthy Modifications
You can make Cheesy Spinach Artichoke Pasta lighter. First, try using whole grain or gluten-free pasta. Whole grain adds fiber, while gluten-free options cater to dietary needs. You can also reduce the cheese. This gives you a less rich dish. You still keep the flavor without the heaviness.
Changing Cheeses
Cheese is key to this dish’s taste. You can swap mozzarella for other cheeses. Try gouda for a smoky flavor or cheddar for sharpness. If you want a vegan option, use vegan cream cheese and a non-dairy mozzarella. This way, you can enjoy a delicious meal that fits your diet.
Adding Proteins
Want to boost protein? Add chicken, shrimp, or tofu. Cook chicken pieces until they are golden before mixing in. For shrimp, add them to the sauté pan until they turn pink. If using tofu, sauté until crispy. Adjust cooking times as needed. This way, your pasta becomes a filling meal.
Storage Info
Storing Leftovers
To keep your cheesy spinach artichoke pasta fresh, store it in the fridge. Use an airtight container to stop moisture and air from getting in. This helps keep the pasta creamy and tasty for up to three days. Make sure to let the pasta cool before sealing it. This way, the heat will not create steam that can turn it soggy.
Reheating Tips
When you reheat the pasta, you want to keep it creamy. The best way is to use the stovetop. Add a splash of milk or reserved pasta water to the pan. Heat it on low and stir until warm. If you use a microwave, heat it in short bursts. Stir in between to keep it from drying out. This method helps maintain its rich flavor and texture.
Freezing Guidelines
If you want to freeze the pasta, first let it cool down completely. Place it in a freezer-safe container, leaving some space at the top. This allows for expansion. Use it within three months for best flavor. To thaw, move it to the fridge overnight. Reheat it gently on the stovetop to keep it creamy. Avoid freezer burn by sealing it tightly and using it soon.
FAQs
How can I make Cheesy Spinach Artichoke Pasta gluten-free?
To make this dish gluten-free, choose gluten-free pasta. Many brands offer great options. Look for pasta made from rice, quinoa, or chickpeas. These alternatives cook well and taste good. Just follow the cooking instructions on the package. You will enjoy the same creamy sauce with your gluten-free pasta.
What can I do if the pasta is too thick?
If your pasta sauce is too thick, don’t worry. You can fix it easily. Add a little of the reserved pasta water. Start with a tablespoon and stir well. Keep adding until you reach your desired creamy texture. The water helps to loosen the sauce without losing flavor.
Can I prepare this dish in advance?
Yes, you can make Cheesy Spinach Artichoke Pasta ahead of time. Cook the pasta and sauce separately for best results. Store them in airtight containers in the fridge. When you’re ready to eat, just reheat and combine them. This method keeps your pasta from getting mushy.
What should I serve with Cheesy Spinach Artichoke Pasta?
This pasta pairs well with many side dishes. A simple green salad adds freshness. You can also serve garlic bread for extra flavor. For a heartier option, try steamed vegetables or roasted asparagus. These sides balance the richness of the pasta beautifully.
In this post, we explored the steps to make Cheesy Spinach Artichoke Pasta. We covered key ingredients, including pasta, spinach, cheese, and seasoning. I provided clear cooking instructions, common mistakes to avoid, and tips for variations and storage.
For a creamy, flavorful dish, focus on quality ingredients. Experiment with different cheeses and protein options for variety. Enjoy your cooking and the delicious meal ahead!
![- 1 can (15 oz) black beans, drained and rinsed - 1/2 cup cooked quinoa, cooled - 1/2 cup breadcrumbs (gluten-free option available) - 1 small red onion, finely diced - 2 cloves garlic, minced - 1 small jalapeño, minced (seeds removed for less heat) - 1 tablespoon chili powder - 1 teaspoon ground cumin - 1/2 teaspoon smoked paprika - Sea salt and black pepper, to taste - 2 tablespoons fresh cilantro, finely chopped - 1 large egg (or for a vegan option, mix 1 tablespoon ground flaxseed with 2.5 tablespoons water) - Olive oil for frying To make these spicy black bean burgers, choose fresh ingredients when you can. Fresh veggies add great flavor and crunch. However, pantry staples like canned black beans and quinoa work well too. When picking black beans, look for those with a firm texture. Check the can for any damage. Good beans should have a clean label with no added preservatives. For a gluten-free option, look for gluten-free breadcrumbs at your store. They are easy to find and useful in many dishes. You can also use oats or crushed corn chips if needed. This recipe is not just tasty but also easy to prepare. It allows you to explore new flavors while making a healthy meal. For the full recipe, check the instructions provided above. 1. Mashing black beans for ideal texture: Start with a large bowl. Use a fork or potato masher to mash the black beans. Aim for a mix of smooth and chunky. This gives your burger a great texture. 2. Mixing all ingredients thoroughly: After mashing, add the cooked quinoa, breadcrumbs, diced onion, minced garlic, chopped jalapeño, chili powder, cumin, smoked paprika, salt, pepper, and cilantro. Mix everything well. You want each bite to have a burst of flavor. 3. Tips for shaping patties consistently: To shape patties, wet your hands slightly. This helps the mixture stick less. Form about four to six patties, depending on your size preference. Make them even in thickness for even cooking. 1. Heating the skillet correctly: Pour a good drizzle of olive oil into a non-stick skillet. Heat it on medium. Wait until the oil shimmers before adding patties. This step is key for crispiness. 2. Cooking times for achieving crispy patties: Cook each patty for 5 to 6 minutes. Check for a golden brown color before flipping. This ensures a nice crust forms. 3. How to avoid breakage while flipping: Use a spatula to gently lift each patty. Flip them carefully to keep them intact. If they feel too soft, let them cook a bit longer. To get the right texture, add ingredients in the right order. Start with the black beans. Mash them well, but leave some chunks. This gives your burger a nice bite. Next, mix in the quinoa and breadcrumbs. These help bind your burger. If you want a firmer burger, add more breadcrumbs. For a softer burger, reduce them. Use olive oil for frying. It adds great flavor and helps the patties crisp up nicely. Spice up your burgers with extra spices. Consider adding cayenne for heat or oregano for earthiness. You can make a homemade spicy mayo. Mix mayo with hot sauce and lime juice. This makes a great dip too! Pair your burgers with tasty sides. Sweet potato fries or a fresh salad work well. These add color and flavor to your meal. For the full recipe, check out [Full Recipe]. {{image_4}} You can easily change this recipe to suit your taste. Here are a few ideas: - Different Beans or Grains: If you want a twist, try using kidney beans or chickpeas. You can also swap quinoa for brown rice or oats. Each option brings a unique flavor and texture. - Adding Cheese: For a creamy touch, mix in some cheese. Cheddar or pepper jack adds great flavor. If you prefer a vegan option, use vegan cheese or nutritional yeast. Both will give a cheesy taste without dairy. - Adjusting Spice Levels: Want it milder? Skip the jalapeño or use less chili powder. If you love heat, double the spices or add hot sauce. Make it just right for you. Take your spicy black bean burgers to the next level with these fun ideas: - Unique Toppings: Try avocado slices, pickled onions, or spicy slaw. Fresh herbs like cilantro or basil add a bright touch too. Experiment and find your favorite combo! - Suggested Sides: Pair your burgers with sweet potato fries, a crisp salad, or coleslaw. These sides add crunch and flavor to your meal. - Creative Presentation: Stack your burger high with colorful veggies. Serve it on a wooden board for a rustic look. Use fun plates to make your dish pop. Your guests will love it! For the full recipe, check out the [Full Recipe]. After enjoying your spicy black bean burgers, store leftovers in the fridge. Place cooked patties in an airtight container. They stay fresh for about three to four days. For uncooked patties, wrap them tightly in plastic wrap or place them in a freezer-safe bag. This way, you can freeze them for up to three months. To reheat, heat a skillet over medium heat. Add a little olive oil and cook the patties for about five minutes on each side. This will keep them crispy. You can also use an oven. Preheat it to 350°F (175°C) and bake for about 10-15 minutes. Cooked spicy black bean burgers last for up to four days in the fridge. If you freeze them, they can last for about three months. Look for signs of spoilage, like an off smell or a change in color. If the burgers feel slimy or dry, it's best to throw them away. Always trust your senses to keep your food safe! Can I make these burgers ahead of time? Yes, you can make these spicy black bean burgers ahead of time. Shape the patties and store them in the fridge for up to a day. This saves time on busy nights. You can also freeze them for up to three months. Just make sure to separate them with parchment paper. Are spicy black bean burgers gluten-free? Yes, they can be gluten-free! Use gluten-free breadcrumbs instead of regular ones. Many brands offer tasty options that work well in this recipe. Always check the label for hidden gluten. What can I use as a binder if I can’t use eggs? If you can’t use eggs, try a flax egg. Mix 1 tablespoon of ground flaxseed with 2.5 tablespoons of water. Let it sit for about five minutes until it thickens. This works great to hold the burger together. How can I make these burgers spicier? To add more heat, include extra jalapeños or use a spicier pepper like serrano. You can also add hot sauce or cayenne pepper to the mixture. Experiment to find your perfect spice level! Can I cook these on a grill instead? Absolutely! Grilling adds a nice smoky flavor. Preheat your grill and lightly oil the grates. Cook the patties for about 5-6 minutes on each side, just like in a skillet. What are the best buns to use for black bean burgers? I recommend whole wheat or brioche buns for great flavor. Lettuce wraps are an option too for a low-carb meal. Choose what fits your taste and diet best! Tips for meal prepping these burgers for the week. Make a large batch of patties and store them in the fridge or freezer. You can reheat them quickly for lunch or dinner. Pair with fresh toppings for a nice meal. Having these ready to go makes weeknight cooking easier! You learned how to make delicious black bean burgers. We covered key ingredients, step-by-step instructions, and great tips. Remember to choose fresh ingredients for the best flavor. Mix your beans well to get the right texture. Don’t forget to try different variations and toppings to suit your taste. Proper storage will help you enjoy leftovers later. With these tips, you can impress anyone at your next meal. Enjoy creating your perfect black bean burger!](https://goldendishy.com/wp-content/uploads/2025/06/68a5a06a-1097-44cf-8076-380ecc54e2d9-768x768.webp)