
Baked Teriyaki Tofu Savory and Simple Recipe
![For this tasty dish, you need the following main ingredients: - 1 block (15 oz) firm tofu, pressed and cut into 1-inch cubes - ½ cup soy sauce (or tamari for a gluten-free option) - ¼ cup pure maple syrup - 2 tablespoons rice vinegar - 2 tablespoons sesame oil - 3 cloves garlic, finely minced - 1 tablespoon freshly grated ginger - 2 tablespoons cornstarch - 1 tablespoon sesame seeds (for garnish) - 3 green onions, thinly sliced (for garnish) These ingredients create a savory sauce that brings the tofu to life. Firm tofu works best because it absorbs flavors well and holds its shape during baking. The soy sauce adds saltiness, while maple syrup gives a hint of sweetness. Garlic and ginger provide warmth and depth to the dish. You can add a few optional ingredients to boost the flavor even more: - 1 tablespoon sriracha or chili paste for heat - 1 tablespoon mirin for extra sweetness - 1 teaspoon sesame oil for richer flavor These options allow you to customize the dish to your taste. If you like a little heat, sriracha will spice things up. Mirin adds a sweet and tangy note that pairs well with the other flavors. If you have dietary restrictions, here are some great substitutes: - Use tempeh instead of tofu for more protein and a firmer texture - Coconut aminos can replace soy sauce for a soy-free option - Use agave syrup instead of maple syrup for a different sweetness These substitutes keep the dish delicious while catering to different diets. Tempeh offers a nutty flavor and is packed with protein. Coconut aminos give a similar taste without soy. Agave syrup is a simple way to adjust sweetness levels. For more details, check the Full Recipe. First, you need to prepare the tofu. Start with one block of firm tofu. Press it between two plates to remove excess water. This step is key for better texture. After pressing, cut the tofu into 1-inch cubes. This size helps it cook evenly. Next, let’s make the teriyaki sauce. In a medium bowl, mix together the following ingredients: - ½ cup soy sauce (or tamari) - ¼ cup pure maple syrup - 2 tablespoons rice vinegar - 2 tablespoons sesame oil - 3 cloves garlic, finely minced - 1 tablespoon freshly grated ginger Whisk these ingredients until smooth. This sauce adds rich flavor to the tofu. Now, it’s time to bake the tofu. Preheat your oven to 400°F (200°C). Line a baking sheet with parchment paper. This prevents sticking. Place the cubed tofu in a bowl and sprinkle with 2 tablespoons of cornstarch. Gently toss until each piece is coated. Spread the tofu on the baking sheet in a single layer. Drizzle half of the teriyaki sauce over the tofu. Bake for 25-30 minutes. Halfway through, turn the tofu cubes for even cooking. After baking, pour the remaining teriyaki sauce over the tofu. Toss gently to coat. Return the tofu to the oven for another 5-10 minutes. This step caramelizes the sauce, making it sticky and flavorful. Once baked, remove the tofu from the oven. Finish by sprinkling sesame seeds and sliced green onions on top. This adds color and crunch. Enjoy your tasty baked teriyaki tofu! For the complete recipe, check out the Full Recipe. To get crispy tofu, press it well. Remove as much moisture as you can. After cutting it, coat each cube in cornstarch. This step is key for that crunch. Bake at 400°F for 25-30 minutes. Flip the tofu halfway through for even cooking. The golden brown color means it is ready. Use fresh garlic and ginger for the best taste. These ingredients boost the teriyaki sauce’s flavor. Let your tofu soak in the sauce for a bit. This helps it absorb all those yummy flavors. Drizzle some sauce just before the end of baking. It adds a sticky glaze that is hard to resist. Don’t skip pressing the tofu. It will turn out soggy if you do. Avoid using too much sauce too soon. This can make your tofu mushy instead of crispy. Make sure to coat each piece evenly with cornstarch. If you don’t, some cubes may not get crispy. For the best results, follow the [Full Recipe]. {{image_4}} You can make your baked teriyaki tofu even more colorful and tasty by adding vegetables. Carrots, bell peppers, and broccoli work well. Just chop them into bite-sized pieces. Toss them with the tofu before baking. This step adds nutrients and makes the dish pop with color. If you want to switch up the protein, try using tempeh or seitan instead of tofu. Both options absorb flavors well and have great textures. Tempeh is nutty and has a firm bite. Seitan mimics meat and is very chewy. These choices keep the meal exciting and cater to different tastes. To keep this dish gluten-free, use tamari instead of soy sauce. Tamari is a great choice and tastes the same. For a nut-free option, skip the sesame oil and use olive oil instead. This way, you can enjoy the dish while sticking to your dietary needs. For the full recipe, check the earlier section. To keep your baked teriyaki tofu fresh, store it in an airtight container. Let the tofu cool down first. It can last in the fridge for up to four days. If you notice any moisture, use a paper towel to absorb it before sealing the container. This helps keep the tofu from getting soggy. When you are ready to enjoy leftovers, the best way to reheat the tofu is in the oven. Preheat your oven to 350°F (175°C). Spread the tofu on a baking sheet and cover it with foil. Heat for about 10-15 minutes. This method helps restore some crispiness. You can also microwave it for quicker results. Just remember to cover it with a damp paper towel to keep it moist. Yes, you can freeze baked teriyaki tofu! Start by letting it cool completely. Place the tofu in a freezer bag, removing as much air as possible. It can stay frozen for up to three months. When you’re ready to eat, thaw it in the fridge overnight. Then, reheat as mentioned above. Enjoy your flavorful tofu anytime! Tofu is done when it turns golden brown and crispy. You should bake it for 25 to 30 minutes. Halfway through, turn the tofu cubes for even cooking. It should feel firm to the touch and have a nice texture. Once you see a beautiful caramel color, it's ready to enjoy! Yes, you can! Try soy sauce with honey or maple syrup. A sweet chili sauce works well too. For a spicy kick, use sriracha mixed with soy. Each sauce will give a new flavor twist to your baked tofu. Feel free to explore and find what you love! Baked teriyaki tofu pairs well with steamed rice or quinoa. You can also serve it with stir-fried vegetables for a colorful plate. A fresh salad adds crunch and balance. For a complete meal, add some pickled veggies on the side. This dish is versatile and fits many sides! In this guide, we explored how to make baked teriyaki tofu. We discussed key ingredients, step-by-step prep, and tips for crispiness. You learned about tasty variations and storage tips. Always remember, cooking is fun and easy. With the right ingredients and methods, you can make delicious meals. Enjoy your kitchen journey with baked teriyaki tofu. Happy cooking!](https://goldendishy.com/wp-content/uploads/2025/07/16dcdce2-c600-4865-9aa6-5e182bb228ee.webp)
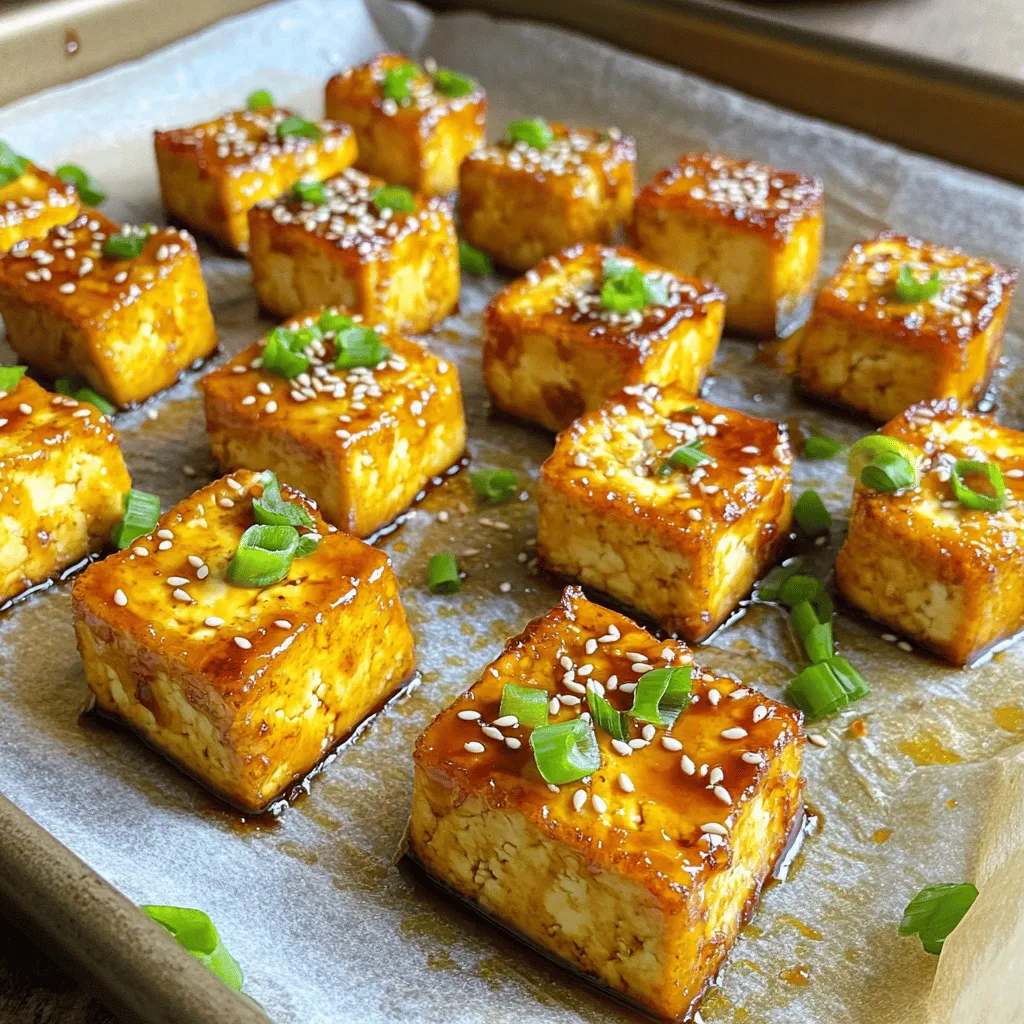
Looking for a delicious and easy plant-based meal? Baked Teriyaki Tofu is just that! You can enjoy a crispy, savory dish bursting with flavor. In this simple recipe, I’ll walk you through each step, from prepping the tofu to making a tasty teriyaki sauce. Plus, you’ll find tips for a perfect bake, plus variations to suit every diet. Let’s dive in and bring this tasty dish to your table!
Ingredients
Main Ingredients for Baked Teriyaki Tofu
For this tasty dish, you need the following main ingredients:
– 1 block (15 oz) firm tofu, pressed and cut into 1-inch cubes
– ½ cup soy sauce (or tamari for a gluten-free option)
– ¼ cup pure maple syrup
– 2 tablespoons rice vinegar
– 2 tablespoons sesame oil
– 3 cloves garlic, finely minced
– 1 tablespoon freshly grated ginger
– 2 tablespoons cornstarch
– 1 tablespoon sesame seeds (for garnish)
– 3 green onions, thinly sliced (for garnish)
These ingredients create a savory sauce that brings the tofu to life. Firm tofu works best because it absorbs flavors well and holds its shape during baking. The soy sauce adds saltiness, while maple syrup gives a hint of sweetness. Garlic and ginger provide warmth and depth to the dish.
Optional Ingredients to Enhance Flavor
You can add a few optional ingredients to boost the flavor even more:
– 1 tablespoon sriracha or chili paste for heat
– 1 tablespoon mirin for extra sweetness
– 1 teaspoon sesame oil for richer flavor
These options allow you to customize the dish to your taste. If you like a little heat, sriracha will spice things up. Mirin adds a sweet and tangy note that pairs well with the other flavors.
Substitutes for Dietary Needs
If you have dietary restrictions, here are some great substitutes:
– Use tempeh instead of tofu for more protein and a firmer texture
– Coconut aminos can replace soy sauce for a soy-free option
– Use agave syrup instead of maple syrup for a different sweetness
These substitutes keep the dish delicious while catering to different diets. Tempeh offers a nutty flavor and is packed with protein. Coconut aminos give a similar taste without soy. Agave syrup is a simple way to adjust sweetness levels.
Step-by-Step Instructions
Prepping the Tofu
First, you need to prepare the tofu. Start with one block of firm tofu. Press it between two plates to remove excess water. This step is key for better texture. After pressing, cut the tofu into 1-inch cubes. This size helps it cook evenly.
Making the Teriyaki Sauce
Next, let’s make the teriyaki sauce. In a medium bowl, mix together the following ingredients:
– ½ cup soy sauce (or tamari)
– ¼ cup pure maple syrup
– 2 tablespoons rice vinegar
– 2 tablespoons sesame oil
– 3 cloves garlic, finely minced
– 1 tablespoon freshly grated ginger
Whisk these ingredients until smooth. This sauce adds rich flavor to the tofu.
Baking and Finishing Touches
Now, it’s time to bake the tofu. Preheat your oven to 400°F (200°C). Line a baking sheet with parchment paper. This prevents sticking. Place the cubed tofu in a bowl and sprinkle with 2 tablespoons of cornstarch. Gently toss until each piece is coated. Spread the tofu on the baking sheet in a single layer. Drizzle half of the teriyaki sauce over the tofu.
Bake for 25-30 minutes. Halfway through, turn the tofu cubes for even cooking. After baking, pour the remaining teriyaki sauce over the tofu. Toss gently to coat. Return the tofu to the oven for another 5-10 minutes. This step caramelizes the sauce, making it sticky and flavorful.
Once baked, remove the tofu from the oven. Finish by sprinkling sesame seeds and sliced green onions on top. This adds color and crunch. Enjoy your tasty baked teriyaki tofu!
Tips & Tricks
Achieving the Perfect Crispiness
To get crispy tofu, press it well. Remove as much moisture as you can. After cutting it, coat each cube in cornstarch. This step is key for that crunch. Bake at 400°F for 25-30 minutes. Flip the tofu halfway through for even cooking. The golden brown color means it is ready.
Best Practices for Flavor Enhancement
Use fresh garlic and ginger for the best taste. These ingredients boost the teriyaki sauce’s flavor. Let your tofu soak in the sauce for a bit. This helps it absorb all those yummy flavors. Drizzle some sauce just before the end of baking. It adds a sticky glaze that is hard to resist.
Common Mistakes to Avoid
Don’t skip pressing the tofu. It will turn out soggy if you do. Avoid using too much sauce too soon. This can make your tofu mushy instead of crispy. Make sure to coat each piece evenly with cornstarch. If you don’t, some cubes may not get crispy.
Variations
Adding Vegetables to the Recipe
You can make your baked teriyaki tofu even more colorful and tasty by adding vegetables. Carrots, bell peppers, and broccoli work well. Just chop them into bite-sized pieces. Toss them with the tofu before baking. This step adds nutrients and makes the dish pop with color.
Protein Alternatives for Different Diets
If you want to switch up the protein, try using tempeh or seitan instead of tofu. Both options absorb flavors well and have great textures. Tempeh is nutty and has a firm bite. Seitan mimics meat and is very chewy. These choices keep the meal exciting and cater to different tastes.
Gluten-Free and Vegan Modifications
To keep this dish gluten-free, use tamari instead of soy sauce. Tamari is a great choice and tastes the same. For a nut-free option, skip the sesame oil and use olive oil instead. This way, you can enjoy the dish while sticking to your dietary needs.
Storage Info
How to Properly Store Leftovers
To keep your baked teriyaki tofu fresh, store it in an airtight container. Let the tofu cool down first. It can last in the fridge for up to four days. If you notice any moisture, use a paper towel to absorb it before sealing the container. This helps keep the tofu from getting soggy.
Reheating Tips for Best Results
When you are ready to enjoy leftovers, the best way to reheat the tofu is in the oven. Preheat your oven to 350°F (175°C). Spread the tofu on a baking sheet and cover it with foil. Heat for about 10-15 minutes. This method helps restore some crispiness. You can also microwave it for quicker results. Just remember to cover it with a damp paper towel to keep it moist.
Freezing Baked Teriyaki Tofu
Yes, you can freeze baked teriyaki tofu! Start by letting it cool completely. Place the tofu in a freezer bag, removing as much air as possible. It can stay frozen for up to three months. When you’re ready to eat, thaw it in the fridge overnight. Then, reheat as mentioned above. Enjoy your flavorful tofu anytime!
FAQs
How do I know when the tofu is done baking?
Tofu is done when it turns golden brown and crispy. You should bake it for 25 to 30 minutes. Halfway through, turn the tofu cubes for even cooking. It should feel firm to the touch and have a nice texture. Once you see a beautiful caramel color, it’s ready to enjoy!
Can I use other sauces instead of teriyaki?
Yes, you can! Try soy sauce with honey or maple syrup. A sweet chili sauce works well too. For a spicy kick, use sriracha mixed with soy. Each sauce will give a new flavor twist to your baked tofu. Feel free to explore and find what you love!
What can I serve with baked teriyaki tofu?
Baked teriyaki tofu pairs well with steamed rice or quinoa. You can also serve it with stir-fried vegetables for a colorful plate. A fresh salad adds crunch and balance. For a complete meal, add some pickled veggies on the side. This dish is versatile and fits many sides!
In this guide, we explored how to make baked teriyaki tofu. We discussed key ingredients, step-by-step prep, and tips for crispiness. You learned about tasty variations and storage tips.
Always remember, cooking is fun and easy. With the right ingredients and methods, you can make delicious meals. Enjoy your kitchen journey with baked teriyaki tofu. Happy cooking!
![For this tasty dish, you need the following main ingredients: - 1 block (15 oz) firm tofu, pressed and cut into 1-inch cubes - ½ cup soy sauce (or tamari for a gluten-free option) - ¼ cup pure maple syrup - 2 tablespoons rice vinegar - 2 tablespoons sesame oil - 3 cloves garlic, finely minced - 1 tablespoon freshly grated ginger - 2 tablespoons cornstarch - 1 tablespoon sesame seeds (for garnish) - 3 green onions, thinly sliced (for garnish) These ingredients create a savory sauce that brings the tofu to life. Firm tofu works best because it absorbs flavors well and holds its shape during baking. The soy sauce adds saltiness, while maple syrup gives a hint of sweetness. Garlic and ginger provide warmth and depth to the dish. You can add a few optional ingredients to boost the flavor even more: - 1 tablespoon sriracha or chili paste for heat - 1 tablespoon mirin for extra sweetness - 1 teaspoon sesame oil for richer flavor These options allow you to customize the dish to your taste. If you like a little heat, sriracha will spice things up. Mirin adds a sweet and tangy note that pairs well with the other flavors. If you have dietary restrictions, here are some great substitutes: - Use tempeh instead of tofu for more protein and a firmer texture - Coconut aminos can replace soy sauce for a soy-free option - Use agave syrup instead of maple syrup for a different sweetness These substitutes keep the dish delicious while catering to different diets. Tempeh offers a nutty flavor and is packed with protein. Coconut aminos give a similar taste without soy. Agave syrup is a simple way to adjust sweetness levels. For more details, check the Full Recipe. First, you need to prepare the tofu. Start with one block of firm tofu. Press it between two plates to remove excess water. This step is key for better texture. After pressing, cut the tofu into 1-inch cubes. This size helps it cook evenly. Next, let’s make the teriyaki sauce. In a medium bowl, mix together the following ingredients: - ½ cup soy sauce (or tamari) - ¼ cup pure maple syrup - 2 tablespoons rice vinegar - 2 tablespoons sesame oil - 3 cloves garlic, finely minced - 1 tablespoon freshly grated ginger Whisk these ingredients until smooth. This sauce adds rich flavor to the tofu. Now, it’s time to bake the tofu. Preheat your oven to 400°F (200°C). Line a baking sheet with parchment paper. This prevents sticking. Place the cubed tofu in a bowl and sprinkle with 2 tablespoons of cornstarch. Gently toss until each piece is coated. Spread the tofu on the baking sheet in a single layer. Drizzle half of the teriyaki sauce over the tofu. Bake for 25-30 minutes. Halfway through, turn the tofu cubes for even cooking. After baking, pour the remaining teriyaki sauce over the tofu. Toss gently to coat. Return the tofu to the oven for another 5-10 minutes. This step caramelizes the sauce, making it sticky and flavorful. Once baked, remove the tofu from the oven. Finish by sprinkling sesame seeds and sliced green onions on top. This adds color and crunch. Enjoy your tasty baked teriyaki tofu! For the complete recipe, check out the Full Recipe. To get crispy tofu, press it well. Remove as much moisture as you can. After cutting it, coat each cube in cornstarch. This step is key for that crunch. Bake at 400°F for 25-30 minutes. Flip the tofu halfway through for even cooking. The golden brown color means it is ready. Use fresh garlic and ginger for the best taste. These ingredients boost the teriyaki sauce’s flavor. Let your tofu soak in the sauce for a bit. This helps it absorb all those yummy flavors. Drizzle some sauce just before the end of baking. It adds a sticky glaze that is hard to resist. Don’t skip pressing the tofu. It will turn out soggy if you do. Avoid using too much sauce too soon. This can make your tofu mushy instead of crispy. Make sure to coat each piece evenly with cornstarch. If you don’t, some cubes may not get crispy. For the best results, follow the [Full Recipe]. {{image_4}} You can make your baked teriyaki tofu even more colorful and tasty by adding vegetables. Carrots, bell peppers, and broccoli work well. Just chop them into bite-sized pieces. Toss them with the tofu before baking. This step adds nutrients and makes the dish pop with color. If you want to switch up the protein, try using tempeh or seitan instead of tofu. Both options absorb flavors well and have great textures. Tempeh is nutty and has a firm bite. Seitan mimics meat and is very chewy. These choices keep the meal exciting and cater to different tastes. To keep this dish gluten-free, use tamari instead of soy sauce. Tamari is a great choice and tastes the same. For a nut-free option, skip the sesame oil and use olive oil instead. This way, you can enjoy the dish while sticking to your dietary needs. For the full recipe, check the earlier section. To keep your baked teriyaki tofu fresh, store it in an airtight container. Let the tofu cool down first. It can last in the fridge for up to four days. If you notice any moisture, use a paper towel to absorb it before sealing the container. This helps keep the tofu from getting soggy. When you are ready to enjoy leftovers, the best way to reheat the tofu is in the oven. Preheat your oven to 350°F (175°C). Spread the tofu on a baking sheet and cover it with foil. Heat for about 10-15 minutes. This method helps restore some crispiness. You can also microwave it for quicker results. Just remember to cover it with a damp paper towel to keep it moist. Yes, you can freeze baked teriyaki tofu! Start by letting it cool completely. Place the tofu in a freezer bag, removing as much air as possible. It can stay frozen for up to three months. When you’re ready to eat, thaw it in the fridge overnight. Then, reheat as mentioned above. Enjoy your flavorful tofu anytime! Tofu is done when it turns golden brown and crispy. You should bake it for 25 to 30 minutes. Halfway through, turn the tofu cubes for even cooking. It should feel firm to the touch and have a nice texture. Once you see a beautiful caramel color, it's ready to enjoy! Yes, you can! Try soy sauce with honey or maple syrup. A sweet chili sauce works well too. For a spicy kick, use sriracha mixed with soy. Each sauce will give a new flavor twist to your baked tofu. Feel free to explore and find what you love! Baked teriyaki tofu pairs well with steamed rice or quinoa. You can also serve it with stir-fried vegetables for a colorful plate. A fresh salad adds crunch and balance. For a complete meal, add some pickled veggies on the side. This dish is versatile and fits many sides! In this guide, we explored how to make baked teriyaki tofu. We discussed key ingredients, step-by-step prep, and tips for crispiness. You learned about tasty variations and storage tips. Always remember, cooking is fun and easy. With the right ingredients and methods, you can make delicious meals. Enjoy your kitchen journey with baked teriyaki tofu. Happy cooking!](https://goldendishy.com/wp-content/uploads/2025/07/16dcdce2-c600-4865-9aa6-5e182bb228ee-300x300.webp)
![For this tasty dish, gather the following main ingredients: - 4 boneless, skinless chicken breasts - 1 cup dill pickle juice (for marinating) - 1 cup ranch dressing - 1 cup breadcrumbs (Italian or panko) - 1 cup grated Parmesan cheese - 1 cup marinara sauce - 1 cup shredded mozzarella cheese These ingredients make the base of your chicken parmesan. The chicken stays juicy from the pickle juice, and the ranch dressing adds a creamy flavor. Next, you will need these seasonings: - 1 tablespoon olive oil - 1 teaspoon garlic powder - 1 teaspoon Italian seasoning - Salt and pepper to taste These seasonings give your chicken a great taste. The garlic powder and Italian seasoning work together to create a cozy flavor. The salt and pepper help balance everything. For a more colorful dish, consider these garnishes: - Fresh parsley for garnish (optional) You can also serve your chicken with sides like: - Pasta - Fresh green salad These sides add color and texture to your meal. They keep things fresh and light. For the complete cooking steps, check out the Full Recipe. To start, take 4 boneless, skinless chicken breasts. Place them in a resealable plastic bag. Pour 1 cup of dill pickle juice over the chicken. Make sure they are fully submerged. Seal the bag tight. Put it in the fridge and let it marinate for at least 1 hour. If you want a stronger taste, let it sit for up to 4 hours. Next, preheat your oven to 400°F (200°C). In a shallow dish, mix 1 cup of breadcrumbs, 1 cup of grated Parmesan cheese, 1 teaspoon of garlic powder, and 1 teaspoon of Italian seasoning. Add a pinch of salt and pepper to taste. Stir these dry ingredients well. This mix gives the chicken a tasty and crunchy coat. After marinating, take the chicken out and pat it dry with paper towels. Dip each piece into 1 cup of ranch dressing, coating both sides well. Then, dredge the chicken in the breadcrumb mix. Press lightly to ensure it sticks. In a large, oven-safe skillet, heat 1 tablespoon of olive oil over medium heat. Once it shines, add the coated chicken breasts. Sear each side for about 3-4 minutes. They should turn a nice golden brown. After searing, pour 1 cup of marinara sauce over the chicken. Make sure each piece is covered. Then, sprinkle 1 cup of shredded mozzarella cheese on top. This adds a gooey touch. Now, transfer the skillet to your preheated oven. Bake for 20-25 minutes. Ensure the chicken reaches an internal temperature of 165°F (75°C). The cheese should be melted and slightly golden brown. Once done, take the skillet out and let it cool for a few minutes. If you like, sprinkle fresh parsley on top for a burst of color and flavor. Serve it up and enjoy the delicious blend of flavors in your pickle ranch chicken parmesan. For the full recipe, check the earlier sections! To get the best crust on your chicken, start with dry chicken. After marinating, pat the chicken dry with paper towels. This helps the coating stick well. Next, dip the chicken in ranch dressing. Make sure to coat both sides. Then, dredge it in the breadcrumb mix. Press down lightly to pack on that flavor. For extra crunch, you can double-coat the chicken. Just repeat the ranch and breadcrumbs steps. If you have leftovers, store them in an airtight container. This keeps the chicken fresh. Place the chicken in the fridge and eat it within three days. To reheat, use an oven or air fryer. This way, you keep that crispy texture. Avoid the microwave, as it can make the coating soggy. To boost flavor, try adding spices to your breadcrumb mix. A pinch of cayenne pepper adds heat. You might even try smoked paprika for a smoky taste. Another option is to mix in some chopped herbs. Fresh basil or oregano can really brighten up the dish. Don't forget to drizzle some extra ranch on top just before serving. These small changes can make your Pickle Ranch Chicken Parmesan even more tasty! For complete cooking steps and ingredient details, check the [Full Recipe]. {{image_4}} You can easily adapt this recipe for various diets. Here are some ideas: - Gluten-Free: Use gluten-free breadcrumbs or crushed cornflakes. - Dairy-Free: Substitute the ranch dressing with a dairy-free version. Try coconut yogurt or a cashew-based alternative. - Low-Carb: Replace breadcrumbs with crushed nuts or pork rinds for a crunchy topping. Want to boost flavors? Consider these add-ins: - Spices: Add cayenne pepper for heat or smoked paprika for depth. - Herbs: Mix in fresh basil or oregano to the marinara for freshness. - Veggies: Layer sliced bell peppers or mushrooms under the cheese for added taste and texture. Not in the mood to bake? Try these methods instead: - Air Fryer: Cook at 375°F (190°C) for about 15-18 minutes, flipping halfway. - Grill: Grill the marinated chicken on medium heat for 5-7 minutes per side. Add the sauce and cheese in the last few minutes to melt. - Slow Cooker: Cook on low for 4-6 hours with sauce and cheese on top for a tender dish. These variations make the recipe fit your lifestyle. Enjoy customizing your Pickle Ranch Chicken Parmesan! For the full details, check the Full Recipe. To keep your Pickle Ranch Chicken Parmesan fresh, store it in an airtight container. Let the chicken cool to room temperature first. Once cooled, transfer it to the container and seal tightly. It can last in the fridge for 3 to 4 days. To keep flavors intact, try to use it up within that time. When it's time to enjoy leftovers, preheat your oven to 350°F (175°C). Place the chicken in an oven-safe dish. Cover it with foil to prevent drying out. Heat for about 15 to 20 minutes, or until it's warmed through. You can also reheat in the microwave, but the oven keeps the chicken crispy. If you want to save some for later, freezing is a great option. Wrap each chicken breast tightly in plastic wrap and then in foil. This helps prevent freezer burn. You can freeze it for up to 3 months. To reheat, thaw in the fridge overnight, then follow the reheating instructions. Enjoy your meal anytime! You should marinate the chicken for at least 1 hour. This helps the meat soak up the pickle juice. For even more flavor, try marinating for up to 4 hours. This longer time allows the tangy taste to infuse deeper. Yes, you can prepare this dish ahead of time. Marinate the chicken and coat it as directed. Then, store it in the fridge for up to 24 hours before baking. When ready, just bake it as per the recipe. There are many tasty sides that go well with Pickle Ranch Chicken Parmesan. Here are some ideas: - Garlic bread - Pasta with marinara sauce - A fresh green salad - Roasted vegetables - Mashed potatoes Feel free to mix and match to find your favorite pairings! For the full recipe, check out the earlier section. We've covered how to make Pickle Ranch Chicken Parmesan. We discussed key ingredients, step-by-step instructions, and helpful tips. You learned about storage and variations to fit your taste. Remember, this dish is fun and easy to customize. Enjoy exploring new flavors and methods in your cooking. With practice, you'll master this recipe and impress others. Ready to make your own? Now, it’s your turn to get creative in the kitchen!](https://goldendishy.com/wp-content/uploads/2025/07/3835c891-434d-4cb2-bcdb-f0268378baad-768x768.webp)

![To make a Spicy Chickpea Buddha Bowl, you need the following main ingredients: - 1 can (15 oz) chickpeas, drained and rinsed - 2 tablespoons olive oil - 1 tablespoon smoked paprika - 1 teaspoon ground cumin - 1/2 teaspoon cayenne pepper (adjust for spiciness) - Salt and black pepper, to taste - 1 medium sweet potato, peeled and diced - 1 cup quinoa, rinsed - 2 cups vegetable broth (or water) - 1 cup fresh spinach, roughly chopped - 1/2 cup cherry tomatoes, halved - 1 ripe avocado, sliced - 1/4 cup tahini - 2 tablespoons fresh lemon juice - Fresh cilantro leaves for garnish These ingredients blend well to give you a burst of flavor. The chickpeas add protein, while the sweet potato brings sweetness. Quinoa provides a hearty base, and the veggies add freshness. You can enhance your bowl with these optional toppings: - Feta cheese, crumbled - Pumpkin seeds or sunflower seeds - Fresh herbs like parsley or basil - Sliced radishes for crunch - Hot sauce for extra heat These toppings let you customize each bowl. They add flavor, texture, and nutrition. This Buddha bowl offers great health perks: - Chickpeas are high in protein and fiber. - Sweet potatoes are rich in vitamins A and C. - Quinoa is a complete protein and gluten-free. - Spinach packs iron and antioxidants. - Avocado provides healthy fats for heart health. Together, these ingredients create a balanced meal. You get energy, nutrients, and delicious flavors. For the full recipe, click here: [Full Recipe]. Start by preheating your oven to 400°F (200°C). In a bowl, mix the drained chickpeas with olive oil, smoked paprika, ground cumin, cayenne pepper, salt, and black pepper. Toss until every chickpea gets the spice mix. Spread them out on a baking sheet in a single layer. Roast them for 20-25 minutes. Shake the pan halfway through to make sure they cook evenly. While the chickpeas roast, take a separate baking sheet for the sweet potatoes. Toss the diced sweet potato in olive oil. Season with salt and black pepper. Place the sweet potatoes in the oven alongside the chickpeas. Roast for about 25-30 minutes. Stir them once to help them caramelize and soften. Next, rinse the quinoa under cold water. In a medium pot, combine the rinsed quinoa with vegetable broth or water. Bring it to a boil on high heat. Once it boils, lower the heat, cover the pot, and let it simmer for 15 minutes. When done, the quinoa should be fluffy and all the liquid absorbed. Remove it from heat and let it sit for 5 minutes. Fluff it gently with a fork. For the tahini dressing, whisk together tahini, fresh lemon juice, and a few tablespoons of water in a small bowl. Keep whisking until smooth. Adjust the water to make it drizzle easily. Season with salt to taste. To assemble, take a serving bowl and add a generous scoop of fluffy quinoa as the base. Next, layer on the roasted sweet potatoes, crispy chickpeas, chopped spinach, halved cherry tomatoes, and slices of avocado. Make it colorful for a beautiful presentation! Drizzle your tahini dressing over the assembled bowls. Let it cascade down the ingredients for a lovely effect. Top it off with fresh cilantro leaves. Serve right away and enjoy the vibrant flavors of this wholesome meal! For the full recipe, check out the detailed instructions above. You can make this bowl your own. Try different grains like brown rice or farro. Add more veggies like bell peppers or carrots for color and crunch. If you love heat, add jalapeños or chili flakes. You can swap chickpeas for black beans for a different taste. Enjoy your personal twist on this spicy chickpea Buddha bowl. The cooking time can change based on your oven. If your oven runs hot, check the chickpeas and sweet potatoes early. You want them crispy but not burnt. If you prefer softer veggies, roast them longer. Just keep an eye on them to avoid overcooking. Adjusting the time helps you get the best texture. Serve this bowl warm for the best taste. Pair it with a crisp green salad for balance. You can also add a dollop of yogurt or a sprinkle of feta cheese for creaminess. This bowl is perfect for meal prep. Just store each element separately. When ready to eat, combine them for a quick, healthy meal. You can find the full recipe here: [Full Recipe]. {{image_4}} This dish is naturally vegan and gluten-free. Chickpeas, quinoa, and veggies make it great for all. You don’t need to change the recipe to fit these diets. Just enjoy! You can switch out chickpeas for black beans or lentils. Try brown rice instead of quinoa. Sweet potatoes can be replaced with butternut squash. Each swap brings a new flavor. Use seasonal veggies for freshness. In spring, add asparagus or peas. In summer, use zucchini or bell peppers. In fall, try roasted Brussels sprouts or pumpkin. In winter, root veggies shine. These changes keep your Buddha bowl exciting. Check the full recipe for more ideas. To keep your Spicy Chickpea Buddha Bowl fresh, place leftovers in an airtight container. Make sure it cools to room temperature before sealing. Store it in the fridge for up to three days. The flavors will meld, making it even tastier the next day! When you're ready to enjoy your leftovers, you can reheat them in a few ways. The microwave works well for quick meals. Heat in short bursts, stirring in between. If you prefer, you can also use a skillet over medium heat. Add a splash of water to keep it moist while you warm it up. If you want to save some for later, freezing is a great option. Place the chickpeas and sweet potatoes in a freezer-safe bag. Keep the quinoa and fresh veggies separate. They freeze best when stored this way. You can freeze the chickpeas and sweet potatoes for up to three months. Just thaw in the fridge overnight before reheating. Enjoy your meal anytime, even when you're busy! For the full recipe, check out [Full Recipe]. Chickpeas are packed with protein and fiber. They help you feel full longer. They also contain essential vitamins and minerals. Eating chickpeas can boost heart health and aid digestion. They may help regulate blood sugar levels too. Plus, they are versatile and fit in many dishes. Yes, you can make parts of the Spicy Chickpea Buddha Bowl ahead of time. You can roast the chickpeas and sweet potatoes a day before. Store them in airtight containers in the fridge. You can also cook the quinoa in advance. Just reheat it when you are ready to assemble the bowl. If you don’t have tahini, try using almond butter or sunflower seed butter. You can also make a quick dressing with yogurt or avocado. Each option brings a unique flavor to the bowl. Feel free to experiment and find what you like best! To change the spice level, adjust the cayenne pepper amount in the recipe. If you prefer it milder, use less or skip it entirely. For more heat, add extra cayenne or some hot sauce. Taste as you go to find your perfect balance. Absolutely! You can include any veggies you love. Roasted broccoli, bell peppers, or zucchini work well. Fresh ingredients like cucumber or radishes add crunch. Mix and match to create your ideal bowl. The more colors, the better it looks and tastes! The Spicy Chickpea Buddha Bowl packs flavor and nutrition. We explored key ingredients, step-by-step prep, and tips for easy customizations. You can adjust the heat, swap ingredients, or even try new seasonal veggies. In the end, this meal is fun to make and eat. It supports your health and keeps well, too. Dive into your own bowl and enjoy the amazing taste and benefits!](https://goldendishy.com/wp-content/uploads/2025/06/fbd17ced-051b-409f-8c76-69a7b070695a-768x768.webp)
![- 2 boneless, skinless chicken breasts - 1 teaspoon garlic powder - 1 teaspoon smoked paprika - 1 teaspoon dried oregano - Salt and freshly ground black pepper to taste - 1 tablespoon extra-virgin olive oil - 1 cup cooked quinoa or couscous - 1 cucumber, finely diced - 1 cup cherry tomatoes, halved - 1/2 red onion, paper-thin sliced - 1 cup creamy Greek yogurt - 2 tablespoons fresh dill, finely chopped - 1 tablespoon fresh lemon juice - Crisp lettuce leaves for serving - Medium-sized mixing bowl - Grill or grill pan - Spatula or tongs - Knife and cutting board - Serving bowls This simple list of ingredients and tools sets you up for a tasty meal. You can find the full recipe to guide you through each step. Start by making a simple rub. In a bowl, mix garlic powder, smoked paprika, dried oregano, salt, and pepper. Add olive oil to this mix. Rub it all over the chicken breasts. Make sure they are well-coated. For the best taste, let the chicken marinate for at least 30 minutes. If you have time, let it sit in the fridge overnight. This will make the chicken super tasty. While the chicken marinates, let’s make the tzatziki sauce. In a clean bowl, combine Greek yogurt, finely diced cucumber, chopped dill, and lemon juice. Stir well until everything blends nicely. Add a pinch of salt and pepper to taste. Set this aside. Letting it sit helps the flavors come together. Preheat your grill or grill pan to medium heat. Once it’s hot, place the marinated chicken breasts on the grill. Cook them for about 5-6 minutes on each side. You want the chicken to reach an internal temperature of 165°F (75°C). After grilling, take the chicken off the heat. Let it rest for about 5 minutes. This helps keep it juicy. After resting, slice the chicken into bite-sized pieces. Grab your serving bowls and start building your dish. Begin with a layer of cooked quinoa or couscous at the bottom. This will be the base of your bowl. Next, add the grilled chicken pieces on top of the quinoa. Then, layer on the diced cucumber, halved cherry tomatoes, and thinly sliced red onion. This adds a pop of color and flavor. Finally, drizzle the tzatziki sauce generously over everything. This brings a creamy contrast. If you like, add a handful of crisp lettuce leaves on top. This gives an extra crunch. Serve your Chicken Tzatziki Bowls in bright plates. It makes the dish look inviting. For a final touch, sprinkle some fresh dill on top and add a lemon wedge for extra zest. Enjoy your meal! To grill chicken that is juicy and flavorful, follow these tips: - Marinate Well: Use the spice rub with garlic powder, smoked paprika, and oregano. Let the chicken sit for at least 30 minutes. For best results, marinate overnight. - Use Medium Heat: Preheat your grill to a medium setting. This helps cook the chicken evenly without burning it. - Check Temperature: Use a meat thermometer to ensure the chicken reaches 165°F (75°C). This keeps it safe to eat. - Rest the Chicken: After grilling, let the chicken rest for 5 minutes. This keeps the juices inside. You can make tzatziki in different ways to suit your taste: - Add Spice: Mix in a pinch of cayenne or red pepper flakes for heat. - Use Different Herbs: Swap dill with mint or parsley for a fresh twist. - Try Other Veggies: Add grated carrots or chopped bell peppers for extra crunch. Presentation makes your Chicken Tzatziki Bowls shine. Here are some ideas: - Choose Colorful Bowls: Use deep plates to highlight the bright ingredients. - Layer Thoughtfully: Start with quinoa or couscous, then add chicken, veggies, and a drizzle of tzatziki. - Garnish: Add a sprinkle of fresh dill or a lemon wedge for a burst of color. These tips will help you create a delicious and beautiful meal that impresses everyone. For the complete recipe, check [Full Recipe]. {{image_4}} If you want a vegetarian twist, try using tofu or chickpeas. Tofu absorbs flavors well. Press and marinate it like the chicken. Cut it into cubes and grill or sauté until golden. Chickpeas also work great. Use canned or cooked chickpeas. Toss them in the same spices and roast in the oven. Both options are rich in protein and add a nice texture. You can swap grains in your Chicken Tzatziki Bowls for variety. Quinoa is high in protein and gluten-free. Couscous cooks quickly and is light on your stomach. Brown rice is hearty and adds fiber. Each grain brings a unique taste and texture. Try different grains each time for a fun twist! Add more fresh veggies to your bowl for color and crunch. Sliced bell peppers bring sweetness and crunch. Shredded carrots add a bright pop and extra nutrition. You can also use radishes for a peppery kick. Mix and match your favorites! This makes each bowl unique, fresh, and delicious. For the full recipe, check out the complete guide. After enjoying your Chicken Tzatziki Bowls, store leftovers in airtight containers. This keeps the chicken juicy and the veggies fresh. Place the chicken and veggies in one container. Store the tzatziki sauce in another. This helps prevent sogginess. You can keep the leftovers in the fridge for up to three days. To reheat the chicken, use a microwave or a skillet. If using a microwave, cover the chicken with a damp paper towel. This keeps moisture in and prevents it from drying out. Heat it for 30 seconds, check, and repeat if needed. If using a skillet, heat on low. Add a splash of water to keep it juicy. Cook until warmed through, about 3-4 minutes. Store your tzatziki sauce in a sealed container in the fridge. It stays fresh for about four days. If you notice extra water on top, just drain it off. Stir the sauce well before using it again. This keeps all the flavors mixed and tasty. For longer storage, you can freeze tzatziki in ice cube trays. Once frozen, transfer the cubes to a freezer bag. This way, you can enjoy it later in your Chicken Tzatziki Bowls or other dishes. If you don't have Greek yogurt, you can use regular yogurt. You can also try sour cream. Both will give a creamy texture, but they may taste a bit different. For a dairy-free option, use coconut yogurt or a blended cashew cream. These options keep the dish rich and tasty. You can marinate the chicken for at least 30 minutes. For better flavor, marinate it overnight. This gives the spices time to soak in. The longer, the better! Just keep it in the fridge to stay safe. Yes, you can make this dish ahead of time. Prepare the chicken and tzatziki sauce a day before. Store them in separate containers in the fridge. When you're ready to eat, just grill the chicken and assemble your bowls. It saves time and tastes fresh! Chicken Tzatziki Bowls taste great with various sides. Try a simple Greek salad with tomatoes and olives. Pita bread with hummus is also a good match. You can add roasted veggies or a light soup for extra flavor and nutrition. Yes, this dish is gluten-free if you use quinoa. Couscous is not gluten-free, so skip it if needed. Always check the labels on your ingredients to be sure. Enjoy this tasty meal without worry! This blog post covered how to make tasty Chicken Tzatziki Bowls. We explored essential ingredients, step-by-step instructions, and helpful tips. I shared fun variations, storage info, and answers to common questions. Now, you can impress your friends with this easy dish. Enjoy the fresh flavors and simple steps. With practice, you’ll make perfect bowls every time. Dive in and have fun in the kitchen!](https://goldendishy.com/wp-content/uploads/2025/06/3644d9ce-b609-47a4-b270-daf6d08e9407-768x768.webp)