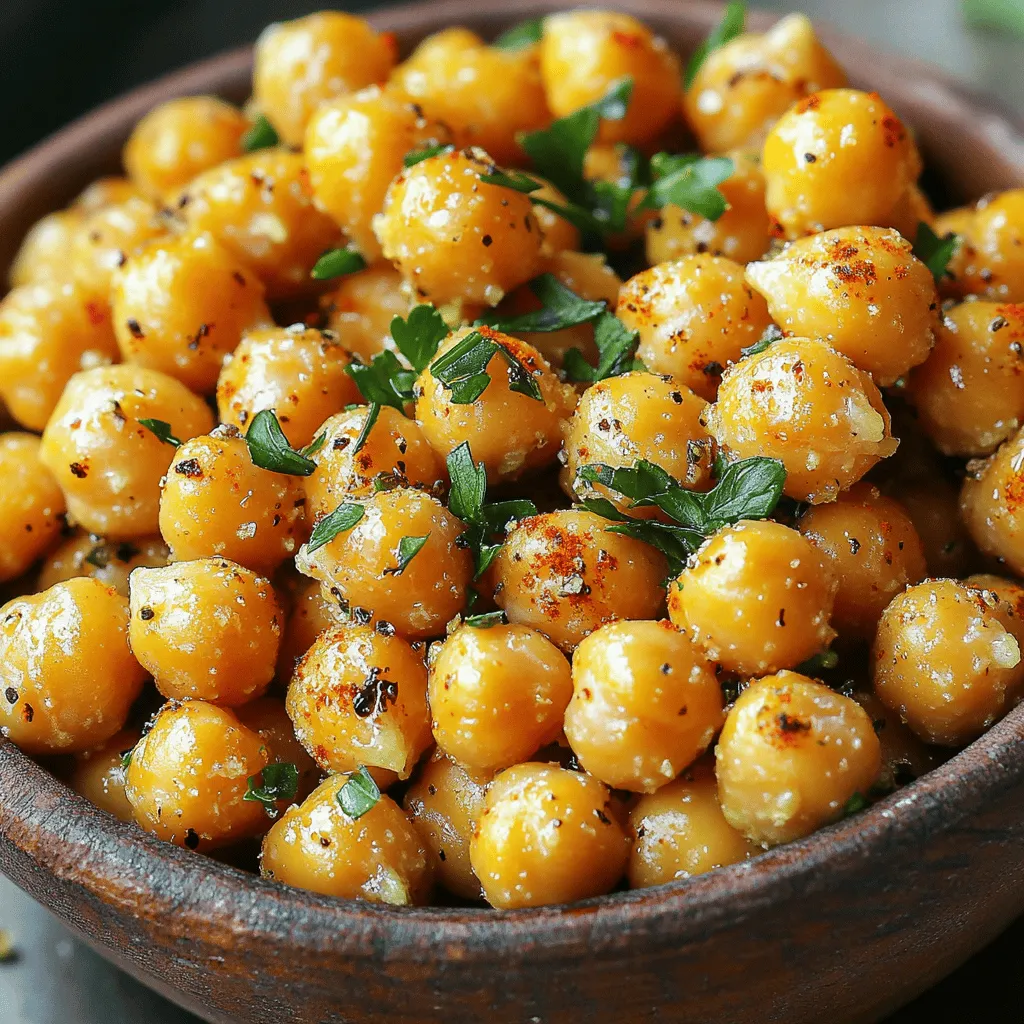
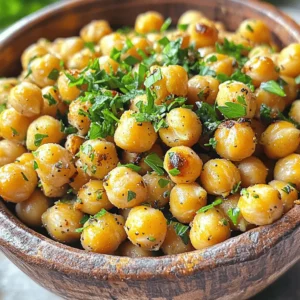
Garlic Herb Roasted Chickpeas Flavorful Snack Delight
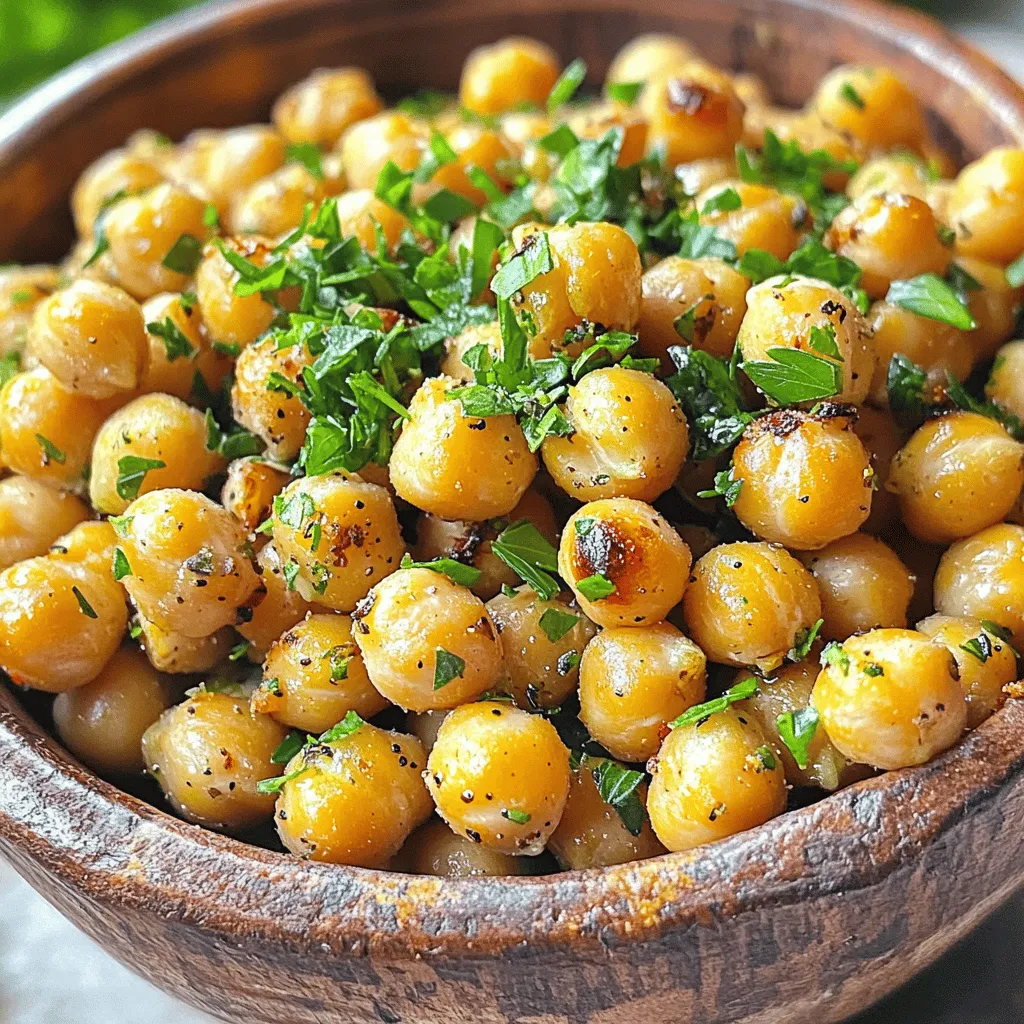
Are you craving a snack that’s both tasty and healthy? Look no further! In this article, I’ll show you how to make Garlic Herb Roasted Chickpeas, a flavorful delight that’s easy to whip up. With just a few simple ingredients and a few steps, you’ll create a snack that’s crunchy, savory, and satisfying. Let’s dive into this guilt-free treat that will have your taste buds dancing!
Ingredients
Required Ingredients
– 2 cans (15 oz each) of chickpeas, thoroughly drained and rinsed
– 3 tablespoons of high-quality olive oil
– 4 cloves of garlic, finely minced
– 1 teaspoon of dried oregano
– 1 teaspoon of dried thyme
– 1 teaspoon of smoked paprika
– 1/2 teaspoon of sea salt
– 1/4 teaspoon of freshly ground black pepper
– Fresh parsley, finely chopped (for garnish)
To start, you need chickpeas. They are the star of this dish! Canned chickpeas work best for quick prep. Rinse them well to ensure they are clean. The garlic gives a lovely depth of flavor. Use fresh cloves for the best taste. Olive oil helps the seasonings stick and adds richness.
Next, you have your seasonings. Dried oregano and thyme bring a nice herbal note. Smoked paprika adds a hint of smokiness, which is delightful. Salt and pepper are essential; they enhance all the flavors.
Finally, fresh parsley adds color and a fresh taste. It’s perfect for garnishing your dish.
Optional Ingredients
– Additional spices for flavor variations
– Alternative oils for roasting
You can mix things up with extra spices. Try chili powder for a kick. Or add cumin for warmth. If you want a different oil, avocado oil or coconut oil works well too.Enjoy experimenting with flavors!
Step-by-Step Instructions
Preparation Steps
1. Start by preheating your oven to 400°F (200°C). This makes sure the heat is just right for roasting.
2. Grab two cans of chickpeas. Drain and rinse them well. This helps remove excess salt and makes them healthier.
3. Spread the chickpeas on a clean towel. Pat them dry gently. The drier they are, the crispier they will be!
Mixing and Seasoning
1. In a large bowl, add the chickpeas. Pour in three tablespoons of olive oil.
2. Next, add minced garlic, oregano, thyme, smoked paprika, salt, and pepper.
3. Stir everything well. You want each chickpea to be coated in the tasty mix. This step is key to great flavor!
Roasting Process
1. Now, spread the chickpeas evenly on a baking sheet lined with parchment paper. Don’t overcrowd them; they need space to get crispy.
2. Place the baking sheet in your oven. Roast them for 25-30 minutes.
3. Halfway through, take them out and stir. This helps them brown evenly. Keep an eye on them! You want them golden, not burnt.
4. Once they look perfect, take them out and let them cool. They will get even crispier as they cool down.
5. Finally, serve them in a bowl and garnish with chopped parsley for a fresh touch. Enjoy your healthy, tasty snack!
Tips & Tricks
Achieving Crispiness
To get crispy chickpeas, start by drying them well. After rinsing, spread them on a towel. Pat them down gently. The drier they are, the better they will roast. This step is key to avoid soggy snacks.
Oven temperature is also important. Set your oven to 400°F (200°C). This high heat helps to crisp up the chickpeas. Don’t skip the stirring halfway through cooking. It ensures even browning and crispiness.
Flavor Enhancement
Want to boost the flavor? Consider adding spices like cumin or chili powder. These spices can give your chickpeas a nice kick. You can also try curry powder for a different taste.
Adjusting seasoning is easy. Taste the mixture before roasting. If you want it saltier or spicier, add more. Mix well to ensure every chickpea is coated. This way, each bite is full of flavor.
Variations
Flavor Profiles
To make Garlic Herb Roasted Chickpeas even more exciting, consider some fun flavor twists.
– Mediterranean-inspired additions: Add lemon zest and a sprinkle of feta cheese for a bright taste. You can also toss in chopped olives or sun-dried tomatoes for a savory kick. The mix of herbs like basil or rosemary can deepen the flavor too.
– Spicy enhancements for heat lovers: If you love heat, add cayenne pepper or chili powder. Toss in some crushed red pepper flakes for a fiery bite. You can also blend in a touch of hot sauce before roasting for a zesty punch.
Serving Suggestions
Now, let’s explore how to enjoy your roasted chickpeas.
– Ideas for snack pairings: Serve the chickpeas with a yogurt dip or hummus for a tasty snack. They also pair well with fresh veggies like carrots and cucumbers. Try them on a cheese board alongside crackers and fruit for a fun treat.
– Ways to use roasted chickpeas in meals: Sprinkle them on salads for extra crunch and flavor. Add them to soups for texture and protein. You can also mix them into grain bowls or use them as a topping for roasted vegetables. These chickpeas add a delightful crunch and loads of flavor to any dish.
Storage Info
Proper Storage Techniques
To keep your garlic herb roasted chickpeas fresh and crispy, use an airtight container. Glass jars or resealable bags work well. Make sure to store them at room temperature. Avoid putting them in the fridge. Cold air makes them soft.
For best results, store them away from light and moisture. A cool, dry place is ideal. This helps keep the crunch intact.
Shelf Life
These roasted chickpeas are best enjoyed within a week. After that, they may lose their crunch. To check if they are still good, look for signs like a stale smell or a soft texture. If they feel chewy, it’s time to toss them out.
For longer storage, you can freeze them. Just remember to let them thaw at room temperature before enjoying.
FAQs
How to make Garlic Herb Roasted Chickpeas more flavorful?
To boost the flavor, add extra spices. Consider using cayenne for heat or lemon zest for brightness. You can also mix in nutritional yeast for a cheesy taste. Fresh herbs like rosemary or basil can make a big difference too. Experimenting with flavors keeps it fun!
Can I use dried chickpeas instead of canned?
Yes, you can use dried chickpeas. Start by soaking them overnight in water. This helps soften them. After soaking, boil them until tender. This process takes longer than canned chickpeas, but it allows for better texture and taste.
What are the health benefits of eating chickpeas?
Chickpeas are packed with protein and fiber. They help you stay full longer. They also support heart health due to their fiber content. Chickpeas are rich in vitamins and minerals, which are great for your body. Adding them to your diet can boost overall health.
How can I adjust this recipe for dietary restrictions?
To make this recipe gluten-free, ensure your spices are certified gluten-free. For a vegan version, this recipe already fits! If you need to avoid oil, you can use vegetable broth instead of olive oil. Just be sure to monitor the roasting time for best results.
Roasting chickpeas is simple and fun. Start with chickpeas, olive oil, and your favorite spices. Follow the steps to dry, season, and roast them perfectly. Use tips to enhance flavor and ensure crispiness. Explore different variations to keep things exciting. Store properly to enjoy later.
In conclusion, roasted chickpeas are a tasty, healthy snack. Experiment with flavors and share them with friends. With this guide, you can enjoy the perfect crunchy treat any time.
![- 1 lb Brussels sprouts, cleaned and halved - 3 tablespoons extra virgin olive oil - 4 cloves garlic, finely minced - 1/2 cup freshly grated Parmesan cheese - Zest of 1 lemon - 1/2 teaspoon red pepper flakes (optional for heat) - Fresh parsley for garnish - Sea salt and freshly cracked black pepper When I make Garlic Parmesan Brussels sprouts, I always start with the basics. Fresh Brussels sprouts are key. I buy about a pound and clean them well. Halving them helps them cook evenly and adds texture. Next, I add extra virgin olive oil. It coats the sprouts and gives them a rich flavor. I use about three tablespoons. Garlic is a must. Four cloves of finely minced garlic bring a great kick to the dish. Parmesan cheese is what makes these sprouts shine. I use half a cup of freshly grated cheese. The cheese melts and creates a tasty crust when roasted. For extra brightness, I often add zest from one lemon. It lifts the flavors and adds a fresh note. If you like heat, a half teaspoon of red pepper flakes gives the dish a spicy kick. Lastly, I season with sea salt and freshly cracked black pepper. These simple seasonings enhance the flavor without overpowering it. Don't forget to garnish with fresh parsley for a pop of color. This combination of ingredients makes a flavorful side dish that everyone will love. For the full recipe, check out the details above. - Preheat oven to 400°F (200°C). - Prepare a baking sheet with parchment paper. First, you want to make your oven hot. This helps cook the Brussels sprouts fast. The parchment paper makes cleanup simple and helps them roast better. - Mix Brussels sprouts with olive oil, garlic, and seasonings. Take your cleaned and halved Brussels sprouts and put them in a big bowl. Add the olive oil, minced garlic, sea salt, and black pepper. Toss everything together. Make sure each sprout gets coated nicely. This mix gives them great flavor. - Spread Brussels sprouts on the baking sheet. - Roast for 20 minutes, stirring halfway through. Now, spread the Brussels sprouts out on the baking sheet. Keep them in a single layer to roast evenly. Set the timer for 20 minutes, but remember to stir them halfway. This helps them get golden and crispy all over. - Add Parmesan cheese and return to oven for additional 5-7 minutes. - Garnish with parsley before serving. After roasting, take them out and sprinkle the grated Parmesan cheese on top. You can also add lemon zest and red pepper flakes if you like some heat. Put them back in the oven for 5-7 minutes. This melts the cheese and makes it bubbly. Once done, take them out and garnish with parsley. Serve them warm for the best taste. For the full details, check the Full Recipe. To get great Brussels sprouts, keep them in a single layer. This helps them cook evenly. If you crowd them, they will steam instead of roast. Stir them halfway through cooking. This ensures every side gets that nice, crispy brown. Want to brighten the dish? Add lemon zest before serving. It gives a fresh taste that pairs well with the savory flavors. You can also try different cheeses. Parmesan is great, but Pecorino Romano adds a nice twist. One common mistake is overcrowding the baking sheet. This leads to uneven cooking. Also, watch your cooking time. Undercooking makes them tough, while overcooking turns them mushy. Follow the recipe closely for the best results. For the full recipe, check out the details above. {{image_4}} To switch up the taste, try using different cheeses. Pecorino Romano adds a salty, sharp flavor. It brings a new twist to the dish. If you want a vegan option, use nutritional yeast. It gives a cheesy flavor without dairy. Plus, it's packed with nutrients! Adding protein can make your dish heartier. Toss in crispy bacon or pancetta for a savory touch. Their rich flavor pairs well with the sprouts. You can also add cooked chicken pieces. This makes the dish more filling and satisfying. For a vegetarian option, substitute the cheese with vegan alternatives. There are many great cheese substitutes that melt well. Use plant-based oil for roasting instead of olive oil. This keeps the dish fully vegan while still being delicious. For the full recipe, check out Garlic Parmesan Brussels Sprouts Delight! Store your Garlic Parmesan Brussels Sprouts in an airtight container. Refrigerating them helps keep their flavor fresh. They are best eaten within 3-5 days for optimal taste and texture. To restore crispiness, reheat the sprouts in the oven. Set your oven to 350°F (175°C) and bake for about 10-15 minutes. If you're in a hurry, you can use the microwave. However, be aware that the texture may suffer a bit. You can freeze Brussels sprouts before roasting for long-term storage. This way, they maintain their flavor. To reheat, simply thaw them first, then roast as per the [Full Recipe]. This will help you enjoy them fresh and tasty! To make your Brussels sprouts crispy, follow these tips: - Use high heat: Roasting at 400°F (200°C) gives the best results. - Spread them out: Place Brussels sprouts in a single layer on your baking sheet. - Don’t overcrowd: Give them room to breathe, which helps them roast better. - Toss halfway: Stir them at the halfway point of roasting for even browning. - Add cheese last: Sprinkle Parmesan cheese towards the end of the cooking time so it melts but does not burn. Yes, you can prepare Brussels sprouts in advance. Here’s how: - Clean and cut: Clean and halve the Brussels sprouts the day before. - Store properly: Keep them in an airtight container in the fridge. - Roast fresh: When ready to eat, toss them with oil and seasonings, and roast right before serving. Garlic Parmesan Brussels sprouts go well with many dishes. Here are a few: - Roasted chicken: The savory flavors complement crispy chicken well. - Grilled steak: The rich flavors of steak pair nicely with the sprouts. - Pasta dishes: They add a fresh, crunchy element to creamy pastas. Yes, Brussels sprouts are very healthy! They are: - Low in calories: Great for weight management. - High in fiber: Good for digestion. - Rich in vitamins: They provide vitamin C, vitamin K, and folate. Plus, they have antioxidants that help your body fight disease. Yes, you can use frozen Brussels sprouts. Here are some tips: - Thaw first: Thaw them completely before cooking for even roasting. - Pat dry: Remove moisture with a paper towel to help them crisp up. - Adjust cooking time: You may need to roast them a bit longer to achieve the same crispiness. For the full recipe, check out Garlic Parmesan Brussels Sprouts Delight. Garlic Parmesan Brussels sprouts are simple to make and full of flavor. We covered essential ingredients like fresh Brussels sprouts, olive oil, and cheese. You learned step-by-step how to prepare, toss, and roast them. Plus, I shared tips for perfecting your dish and variations to keep it exciting. Remember, the key to great Brussels sprouts is even cooking and the right flavors. Take your time to enjoy this healthy side dish. You’ll love the taste and how easy it is to make!](https://goldendishy.com/wp-content/uploads/2025/05/a403e98b-d04b-46c1-bd99-9a315ef16e11-768x768.webp)
![- Ripe mango, diced - Ripe avocados, diced - Small red onion, finely chopped - Medium red bell pepper, finely diced - Jalapeño peppers, deseeded and minced Fresh produce is key for a bright flavor. I love the sweet, juicy mango and creamy avocado. Choose ripe mangoes for the best taste. They should feel soft, but not mushy. Avocados should also yield slightly when pressed. This gives the salsa a smooth texture. - Fresh cilantro leaves, chopped - Juice of fresh limes - Salt and freshly cracked black pepper - Optional: Honey for sweetness Cilantro adds a fresh kick. Lime juice brightens the mix. Salt and pepper bring out all the flavors. Honey is a fun twist. It balances the heat from the jalapeños. Adjust the salt and pepper to match your taste. - Suggested amounts for a balanced flavor - Importance of using ripe ingredients Use equal amounts of mango and avocado for balance. A small onion and bell pepper add crunch. Adjust jalapeños based on your spice level. Ripe ingredients really make a difference. They enhance the taste and texture of the salsa. Remember, fresh is always best! For the full recipe, check out the complete guide. Gather your ingredients first. You will need: - 1 ripe mango, diced into small cubes - 2 ripe avocados, diced into small cubes - 1 small red onion, finely chopped - 1 medium red bell pepper, finely diced - 1-2 jalapeño peppers, deseeded and minced - 1/4 cup fresh cilantro leaves, chopped - Juice of 2 limes - Salt and freshly cracked black pepper, to taste - Optional: 1 teaspoon honey You’ll want a sharp knife for dicing and a cutting board. A large mixing bowl is also essential for combining everything. Start by placing the diced mango and avocado into the bowl. Next, add the chopped red onion and diced red bell pepper. Use a large spoon to mix gently. Be careful not to mash the avocado. When you add the minced jalapeño, adjust the amount for your spice level. Add the cilantro leaves, then squeeze fresh lime juice over the mix. Season with salt and pepper, and if you like, stir in honey for a touch of sweetness. Gently toss the ingredients together until well combined. This keeps the avocado pieces intact and makes for a prettier salsa. Letting the salsa sit is key. This helps the flavors blend together nicely. I recommend letting it sit for at least 10 minutes at room temperature. During this time, the lime juice and salt work their magic, enhancing the overall taste. Enjoy this fresh delight with your favorite chips or as a topping on grilled dishes. For the full recipe, check out the details above. How do you choose ripe mangoes and avocados? Look for soft spots. A ripe mango gives slightly when pressed. The skin should be a mix of green and yellow. For avocados, check the skin color. It should be dark green or black. Gently squeeze; it should feel soft but not mushy. Fresh herbs and vegetables make your salsa shine. Look for bright colors and firm textures. Cilantro should smell fresh and green. Bell peppers should be smooth and shiny. Avoid any with brown spots or wrinkles. How can you keep avocados intact? Use a sharp knife for cutting. Dice them gently. Avoid stirring too hard when mixing. Use a large spoon to gently fold the salsa. For tossing the salsa, you want to be careful. Start by mixing the firmer ingredients first. Then, add the avocados and mango last. This way, you avoid mashing them. How can you adjust spice levels with jalapeños? Start with one jalapeño. Taste before adding more. If you want it spicier, add more minced peppers. Remember, you can always add spice, but you can't take it away! To balance sweetness, you can add honey or other sweeteners. A teaspoon of honey works wonders. It brings out the fruit flavors without being too sweet. You can also try agave syrup or maple syrup for a twist. For the full recipe, check out the details above. Enjoy your Mango Avocado Salsa! {{image_4}} You can make mango avocado salsa even more exciting. Adding fruits like pineapple or peach gives it a sweet twist. The juicy sweetness of pineapple pairs well with mango. Try diced peaches for a softer sweetness. These fruits bring unique flavors that brighten up the dish. Herbs can also change the taste. Instead of cilantro, try mint or parsley. Mint adds a fresh and cool taste. Parsley gives a mild flavor that still pops. Experimenting with herbs can transform your salsa. Making this salsa vegan or gluten-free is easy. The recipe is already plant-based, so you’re set. You can also adjust the ingredients based on what you have. If you don't have lime, use lemon juice instead. Missing jalapeños? Just leave them out or use a milder pepper. If you want to make it creamier, try adding black beans. They add protein and texture without changing the flavor much. This way, you can enjoy a nutritious dish that fits your needs. Mango avocado salsa pairs great with tacos or grilled dishes. Spoon it over fish or chicken for a fresh burst of flavor. You can also serve it with crispy tortilla chips for dipping. Get creative! Use the salsa in salads for an extra kick. It can work as a topping for baked potatoes too. The fresh flavors make any meal feel special. For the full recipe, check out the [Full Recipe]. To keep your Mango Avocado Salsa fresh, use an airtight container. Glass or plastic containers work well. Make sure to fill the container to the top. This minimizes air and keeps it fresher longer. To prevent browning of the avocado, squeeze extra lime juice over the salsa. The acidity helps slow down oxidation. Mango Avocado Salsa lasts about 2-3 days in the fridge. Always check for signs of spoilage. If you see browning, it's still okay. But if it smells sour or looks mushy, it's time to toss it. Fresh salsa is best enjoyed right away! You can freeze Mango Avocado Salsa, but the texture may change. Freezing can make the avocado mushy when thawed. If you decide to freeze it, use a freezer-safe container. Leave some space at the top for expansion. When ready to use, thaw it in the fridge overnight. Stir well before serving to mix the flavors. Store your Mango Avocado Salsa in an airtight container. This keeps it fresh. Place it in the fridge right after making it. Use it within two days for the best taste. To slow browning, add lime juice on top before sealing. Yes, you can make it ahead, but it is best fresh. If you want to prepare it early, chop the mango and avocado just before serving. This keeps the salsa vibrant and tasty. If you can't find mango, try peach or pineapple for sweetness. For avocado, use mashed banana or even silken tofu for creaminess. The flavors change, but the salsa stays delicious. To change the spice level, use fewer jalapeños. You can also remove the seeds and ribs of the peppers. For more heat, add more jalapeños or a pinch of cayenne. Taste as you go to get it just right. Yes, it is great for meal prep! You can add it to salads, tacos, or grilled meats. Just remember to store it properly. Enjoying this salsa adds flavor and fun to your meals! For the full recipe, check out the previous section. Mango Avocado Salsa is a fresh and vibrant dish. We discussed the best ingredients, like ripe mangoes and avocados, and how to combine them. I shared tips for mixing, storing, and serving, plus fun variations to try. In the end, enjoy creating your salsa! Fresh flavors and fun twists await you. Dive in and savor every bite.](https://goldendishy.com/wp-content/uploads/2025/06/5eda548a-8636-40c4-8fce-ece2351eafc8-768x768.webp)