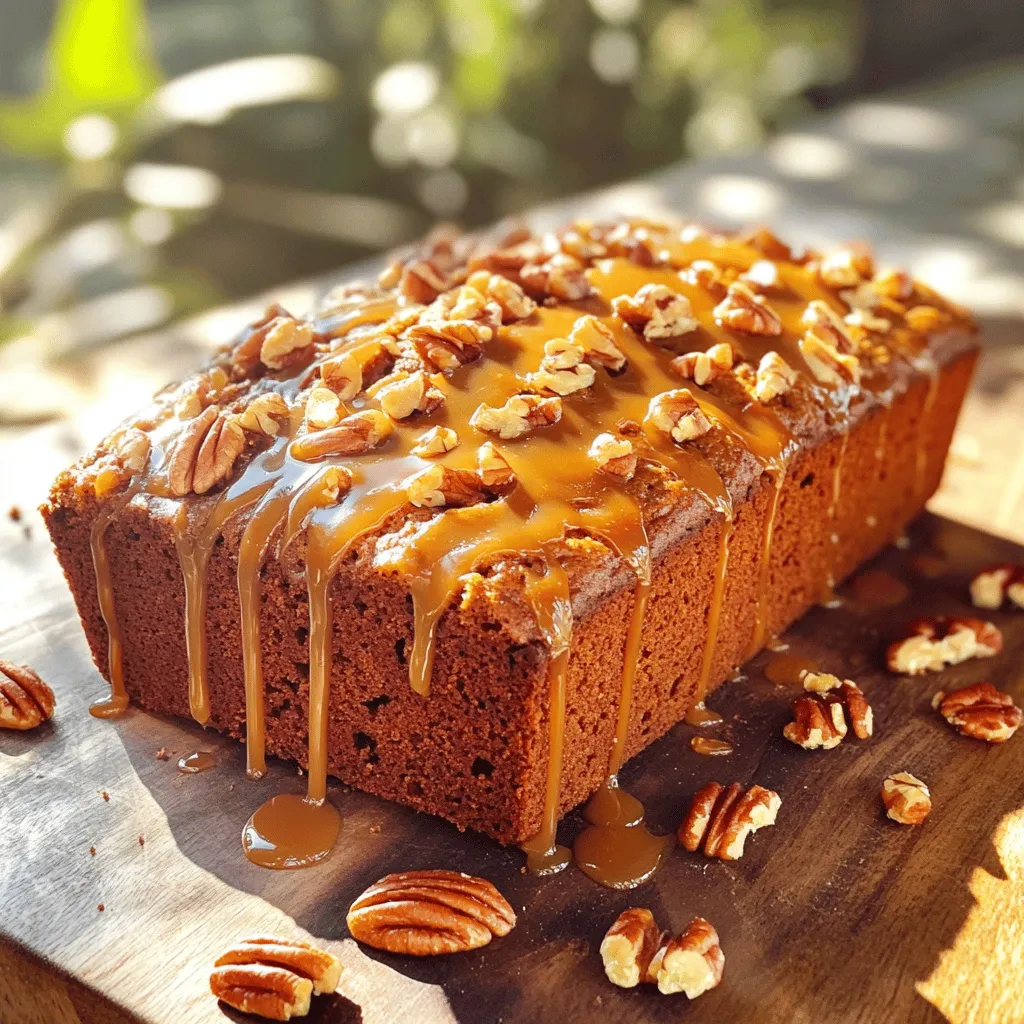
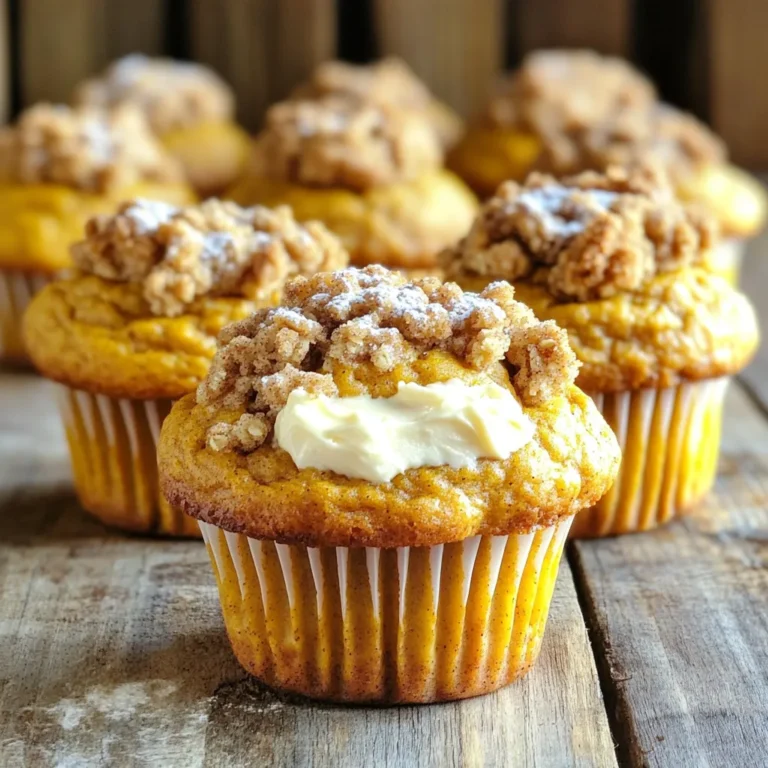
Caramel Pecan Pumpkin Bread Irresistible Fall Treat
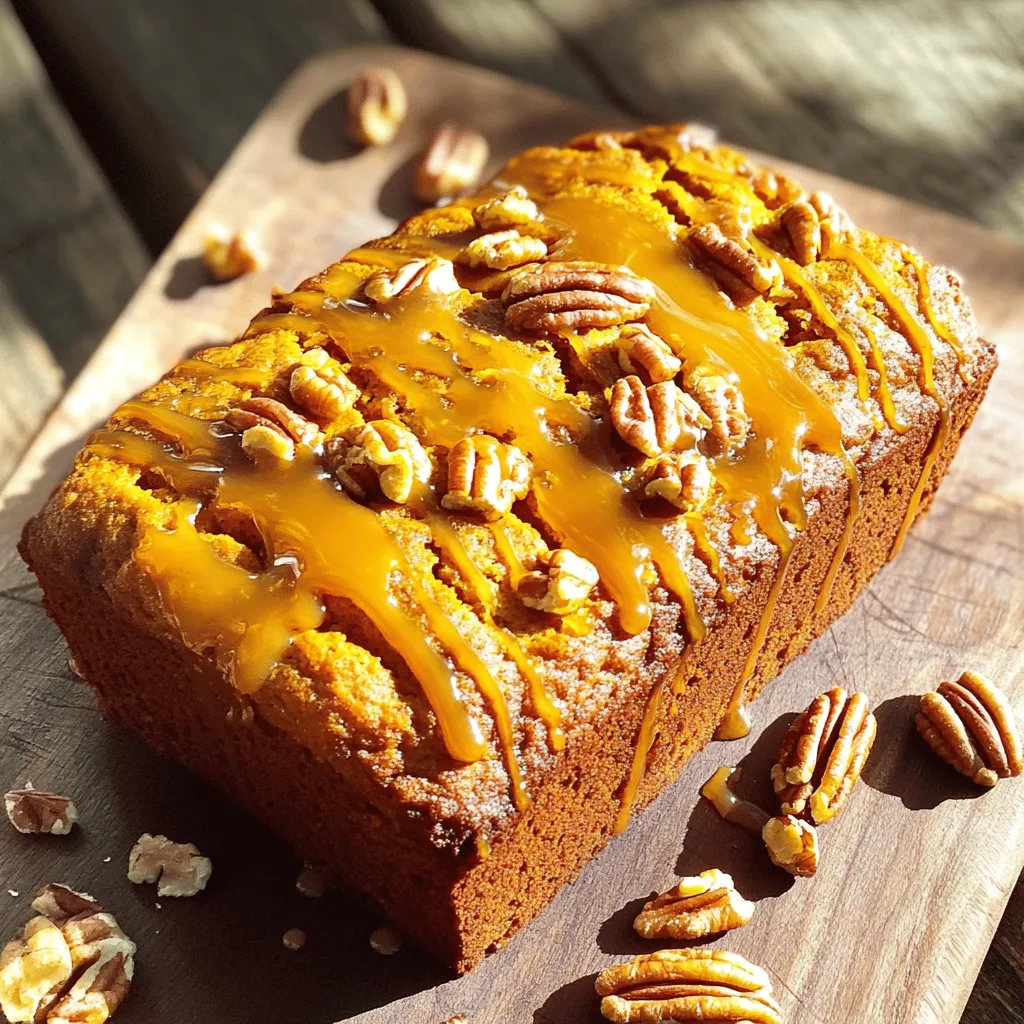
Fall is here, and so is the craving for warm, cozy treats! If you love the flavors of pumpkin, pecans, and caramel, you’re in for a delightful surprise. This Caramel Pecan Pumpkin Bread is not just a recipe; it’s a hug in loaf form. I will guide you through each step to create this irresistible fall treat, perfect for sharing or savoring all on your own. Let’s get started on baking something amazing!
Ingredients
List of Ingredients
– 1 cup pumpkin puree
– 1/2 cup unsalted butter, melted
– 1 cup packed brown sugar
– 1/2 cup granulated sugar
– 2 large eggs, at room temperature
– 1/4 cup whole milk
– 1 teaspoon pure vanilla extract
– 2 cups all-purpose flour
– 1 teaspoon baking soda
– 1 teaspoon baking powder
– 1 teaspoon ground cinnamon
– 1/2 teaspoon ground nutmeg
– 1/2 teaspoon salt
– 1 cup chopped pecans, toasted
– 1/2 cup caramel sauce
Measurement Guide
You might want to change the amounts of these ingredients. To make a larger batch, just double everything. For a smaller loaf, cut the amounts in half. Adjusting these measurements allows you to make the perfect size for your needs.
Where to Source Ingredients
Fresh pumpkin puree is best for flavor. You can find it at local farmers’ markets in the fall. Canned pumpkin puree is a good option too, as it is convenient and ready to use. If you can’t find unsalted butter, you can use salted butter but reduce the salt in the recipe. For a nut-free version, just leave out the pecans or use seeds. Enjoy the process of sourcing these ingredients, and remember that fresh is always best!
Step-by-Step Instructions
Preparing the Oven and Loaf Pan
First, preheat your oven to 350°F (175°C). This ensures even cooking. While the oven heats, take your 9×5-inch loaf pan. Grease it lightly with unsalted butter or cooking spray. Then, sprinkle a little flour inside. This step stops the bread from sticking after baking, making it easy to remove.
Mixing Wet Ingredients
In a large bowl, mix the pumpkin puree, melted butter, brown sugar, and granulated sugar. Use a whisk or hand mixer to blend until smooth. This mixture should be velvety. Add the eggs, one at a time, beating well after each. Then, stir in whole milk and vanilla extract. The result should be creamy and well-combined.
Incorporating Dry Ingredients
In another bowl, whisk together the all-purpose flour, baking soda, baking powder, ground cinnamon, ground nutmeg, and salt. Sifting helps break up lumps and mixes everything evenly. When adding this dry mix to the wet ingredients, do it in small batches. Fold gently with a spatula to avoid overmixing. A few lumps are okay; they will bake out.
Adding Pecans and Caramel
Next, fold in the chopped pecans. This adds a nice crunch. Make sure they spread evenly in the batter. For the caramel, pour half of the batter into the prepared pan. Drizzle 1/4 cup of caramel sauce over this layer. Then, add the rest of the batter. Finish by drizzling the remaining caramel and swirling it with a knife. This creates a beautiful marbled effect.
Baking and Cooling
Place the loaf pan in your preheated oven. Bake for 55-65 minutes. To check if it’s done, insert a toothpick into the center. If it comes out clean, it’s ready. Once baked, let it cool in the pan for 10 minutes. This helps prevent sogginess. After that, transfer the bread to a wire rack to cool completely before slicing.
Tips & Tricks
Baking Tips for Success
– Optimal oven rack positioning: Place your rack in the center. This helps the bread bake evenly. Too high or too low causes uneven heat.
– Why room temperature ingredients matter: Using room temperature eggs and milk helps the batter mix well. This creates a smooth texture. Cold ingredients can lead to lumps.
Serving Suggestions
– Pairing ideas with beverages: Enjoy this bread with hot coffee or spiced tea. The flavors blend well. For a festive touch, try it with apple cider.
– Creative ways to serve leftovers: You can toast slices for extra crispiness. Top them with cream cheese or whipped cream for a treat.
Troubleshooting Common Issues
– What to do if your bread is too dense: If it feels heavy, you may have overmixed. Next time, mix gently until just combined.
– Fixing an overly dry bread: To add moisture, brush slices with milk or butter. You can serve it with caramel sauce to enhance flavor.
Variations
Nut-Free and Dairy-Free Options
If you want a nut-free bread, swap out the pecans for pumpkin seeds. They add crunch without the nuts. For a dairy-free option, use coconut oil or a plant-based butter. You can also replace whole milk with almond or oat milk. These swaps keep the bread delicious and moist.
Flavor Variations
You can make this bread your own by adding chocolate chips. They melt and mix well with the pumpkin. You might also try adding spices like ginger or cloves for warmth. If you like more crunch, use walnuts or hazelnuts instead of pecans. This way, you can create new tastes each time.
Seasonal Twists
For holidays, think about adding cranberries or chopped apples. They give a fresh twist and add tartness. You can also sprinkle in some orange zest for a bright flavor. These seasonal twists make your bread festive and fun.
Storage Info
How to Store Leftover Bread
To keep your Caramel Pecan Pumpkin Bread fresh, store it in an airtight container. This keeps the bread moist for a few days. If you want to enjoy it later, freezing is your best bet. Slice the bread first, then wrap each piece in plastic wrap. Place the wrapped slices in a freezer bag. This way, you can take out just what you need.
Reheating Best Practices
Reheating the bread can be tricky. You don’t want it to dry out. The best method is to use the oven. Preheat it to 350°F (175°C). Place the bread on a baking sheet and cover it with foil. Heat for about 10-15 minutes. You can also use a microwave. Just heat for 10-15 seconds at a time. This keeps the bread soft and warm.
Shelf Life
At room temperature, the bread lasts about 3-5 days. Keep it in a cool, dry place. If you store it in the fridge, it will last about a week. Make sure to keep it wrapped well. Freezing extends its life to about 3 months. Just remember to thaw it in the fridge overnight before reheating. Enjoy your delicious bread anytime!
FAQs
What is the best way to serve Caramel Pecan Pumpkin Bread?
I love to serve this bread warm. Slice it thick for the best taste. You can add a scoop of vanilla ice cream on top. A dollop of whipped cream also works great. For a crunchy touch, sprinkle more toasted pecans over the top. This extra crunch contrasts nicely with the soft bread.
Can I use fresh pumpkin instead of canned?
Yes, you can use fresh pumpkin. Fresh pumpkin gives a unique taste. It also has more nutrients. However, preparing fresh pumpkin takes time. You must peel and cook it before using. Canned pumpkin is quick and easy. It’s also consistent in flavor and texture. So, both options work well depending on your time and preference.
How do I know when my pumpkin bread is done?
To check if your bread is done, use a toothpick. Insert it into the center of the loaf. If it comes out clean, your bread is ready. You can also look for a golden-brown top. The edges should pull away from the pan slightly. These signs mean the bread is perfectly baked.
Can I make this recipe gluten-free?
You can make this recipe gluten-free by using special flour. Look for a gluten-free all-purpose flour blend. This blend usually works well in most recipes. Make sure it includes xanthan gum for the right texture. You may need to adjust the baking time slightly. Check for doneness as you bake.
In this article, we explored a delicious Caramel Pecan Pumpkin Bread recipe. We covered the key ingredients, provided step-by-step instructions, and shared tips for success. You now know how to modify the recipe for dietary needs and store leftovers properly.
Pumpkin bread is enjoyable year-round, and it can be uniquely yours. With the right techniques and ingredients, you can create a treat everyone will love. Happy baking!


![To make healthy peanut butter oat bars, you need a few key items: - 2 cups rolled oats - 1/2 cup natural peanut butter - 1/4 cup honey or maple syrup - 1/4 cup unsweetened applesauce - 1/2 cup mixed nuts (almonds, walnuts, cashews), roughly chopped - 1/4 cup dark chocolate chips (optional) - 1/2 teaspoon ground cinnamon - 1/4 teaspoon sea salt These ingredients work together to create a tasty and nutritious snack. The oats provide fiber, while the peanut butter adds protein and healthy fats. Honey or maple syrup gives sweetness, and applesauce keeps the bars moist. You can easily change your bars by adding extra flavors or textures. Here are some fun options: - Dried fruits (like cranberries or raisins) - Seeds (like chia or flaxseed) - Protein powder for an extra boost - Coconut flakes for added flavor Feel free to mix and match these add-ins to suit your taste. These oat bars pack a nutritious punch. Here’s a quick look at what you’ll get: - Calories: About 150 per bar - Protein: Around 5g, thanks to the peanut butter and nuts - Fiber: Approximately 3g from the oats and nuts - Healthy Fats: Includes unsaturated fats from the peanut butter and nuts These bars not only taste great but also fuel your body. With their balanced nutrition, they make a perfect snack or breakfast option. For the complete recipe, check the Full Recipe link. Start by preheating your oven to 350°F (175°C). This step ensures even baking. Next, grab an 8x8-inch baking pan. Line it with parchment paper, letting some paper hang over the edges. This makes it easy to lift the bars out later. In a large mixing bowl, combine 2 cups of rolled oats, 1/2 teaspoon of ground cinnamon, and 1/4 teaspoon of sea salt. Stir well until the dry ingredients are mixed evenly. This mix creates a solid base for your bars. In a separate bowl, blend together 1/2 cup of natural peanut butter, 1/4 cup of honey or maple syrup, and 1/4 cup of unsweetened applesauce. Mix vigorously until the mixture is smooth. Pour this wet mixture into the bowl with the dry ingredients. Stir thoroughly, ensuring all the oats are coated. Now, it’s time for the fun part! Fold in 1/2 cup of roughly chopped mixed nuts and 1/4 cup of dark chocolate chips, if you want a sweet touch. Make sure to distribute these extras evenly throughout the batter. Spoon the mixture into your prepared baking pan. Use a spatula or your hands to press the mixture down firmly. This ensures the bars hold their shape while baking. Bake in the preheated oven for 20-25 minutes. Look for a lovely golden brown color on the edges. Once done, remove the pan from the oven. Let it cool for about 10 minutes. Use the parchment paper to lift the bars from the pan and place them on a wire rack. Allow them to cool completely before cutting into your desired size. You can store any leftovers in an airtight container to keep them fresh. Enjoy these tasty treats as a snack or a quick breakfast! For the complete recipe, see the Full Recipe section. To get the best texture for your peanut butter oat bars, use rolled oats. They stay chewy and hold together well. If you want a softer bar, add a bit more applesauce. For crunch, add more nuts. Press the mixture firmly into the pan. This helps the bars hold their shape when baked. Store your bars in an airtight container. This keeps them fresh and moist. You can also layer parchment paper between bars to prevent sticking. If you want to keep them longer, freeze them. They freeze well for up to three months. Just wrap them tightly in plastic wrap before placing them in a freezer bag. These bars make a great snack or breakfast. Cut them into small squares for easy grabbing. Pair them with yogurt or fruit for a balanced meal. You can also drizzle some honey on top for added sweetness. Feel free to explore the [Full Recipe] for more ideas on how to enjoy these delicious treats! {{image_4}} You can change up the nuts in your oat bars. Use almonds, walnuts, or cashews. If you like seeds, try adding pumpkin seeds or sunflower seeds. These options add crunch and healthy fats. Mix and match to find your favorite combination. If you want a different sweet taste, try maple syrup instead of honey. You can also use agave nectar for a milder flavor. For a low-calorie option, consider stevia or monk fruit sweetener. Each sweetener changes the taste just a little. Adding fruits and spices can make your bars pop with flavor. Try mashed bananas or dried fruits like cranberries or apricots. For spices, add a pinch of nutmeg or ginger for warmth. You can even fold in some cocoa powder for a chocolatey twist. These small changes can make your bars exciting and unique. To keep your healthy peanut butter oat bars fresh, store them in an airtight container. This helps to lock in moisture and flavor. You can keep them at room temperature for up to a week. If you want them to last longer, consider refrigerating them. The cool air helps maintain their taste and texture. Freezing is a great way to extend the life of your oat bars. Wrap each bar tightly in plastic wrap. Then place them in a freezer-safe bag or container. You can freeze the bars for up to three months. When you're ready to enjoy them, just take out a bar and let it thaw on the counter. If you prefer warm bars, you can reheat them. Simply place a bar in the microwave for about 15-20 seconds. This warms them up nicely and brings back their fresh-baked taste. If you stored them in the fridge, let them sit at room temperature for a few minutes before warming to avoid cold centers. For more details, check out the Full Recipe. Yes, you can swap peanut butter for almond, cashew, or sunbutter. Each nut butter brings its own flavor. Almond butter gives a creamy texture, while cashew butter is milder. Sunbutter is a great option for nut allergies. Just make sure to choose a natural nut butter without added sugars or oils. These oat bars last about one week at room temperature. Keep them in an airtight container. For longer storage, they can stay fresh in the fridge for about two weeks. If you want to enjoy them later, freeze the bars. They can last up to three months in the freezer. Just thaw them when you are ready to eat. Yes, this recipe is gluten-free if you use certified gluten-free oats. Most rolled oats are naturally gluten-free. However, some brands may process oats with gluten-containing grains. Always check the label before buying. This way, you can enjoy your oat bars without worry. Yes, you can skip added sugars. Use ripe bananas instead of honey or maple syrup. Applesauce also adds natural sweetness. You can add a bit more applesauce if you want a sweeter taste. This keeps the oat bars healthy and tasty without extra sugar. You now have a complete guide to making healthy peanut butter oat bars. We covered essential ingredients and fun add-ins to suit your taste. Step-by-step instructions ensure your bars come out perfectly every time. I shared tips for the best texture and storage methods to keep them fresh. You can also explore different variations for added flavor. These oat bars are easy to make, fun to customize, and nutritious. Enjoy your delicious, homemade snacks!](https://goldendishy.com/wp-content/uploads/2025/07/83a658d4-f414-4ba0-9f79-92aafa211a05-768x768.webp)