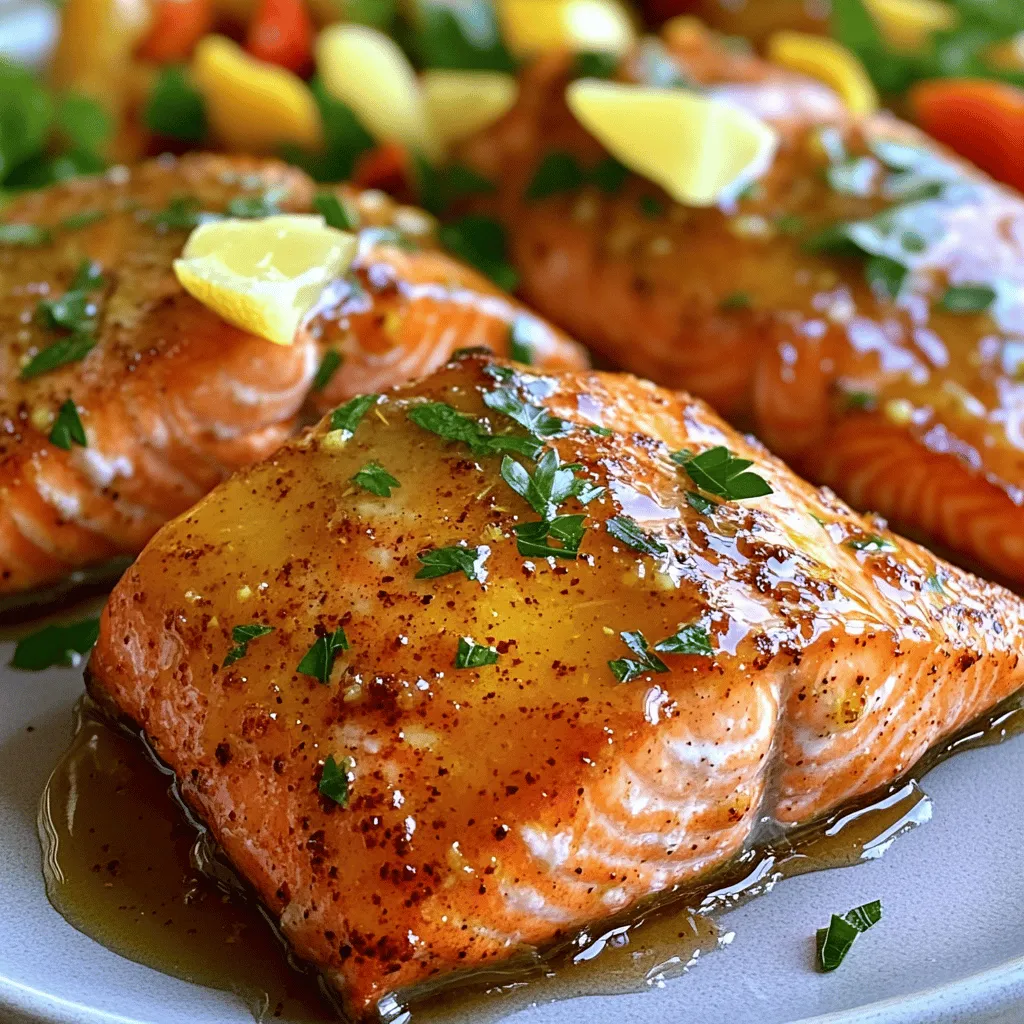
Cajun Honey Butter Salmon Flavorful and Simple Recipe

Are you ready to taste a dish that bursts with flavor and is easy to make? Cajun Honey Butter Salmon combines spicy Cajun seasoning with sweet, rich honey butter for a meal you won’t forget. It’s quick to prepare and packed with mouth-watering goodness. With just a few simple steps, you’ll impress everyone at the dinner table. Let’s dive into this delicious recipe and get cooking!
Ingredients
List of Ingredients
To make Cajun Honey Butter Salmon, gather these items:
– 4 salmon fillets (approximately 6 ounces each)
– 3 tablespoons unsalted butter
– 2 tablespoons honey
– 1 tablespoon Cajun seasoning
– 1 teaspoon garlic powder
– 1 teaspoon smoked paprika
– Salt and pepper to taste
– 1 tablespoon fresh lemon juice (about half a lemon)
– Fresh parsley, finely chopped (for garnish, optional)
Required Tools and Equipment
Here’s what you need to prepare this dish:
– Oven
– Baking sheet
– Parchment paper
– Small saucepan
– Paper towels
– Measuring spoons
– Knife and cutting board
– Spatula or tongs
Measurement Conversions
If you need to convert measurements, here are some quick tips:
– 1 tablespoon = 3 teaspoons
– 1 cup = 8 ounces
– 1 pound = 16 ounces
Using these ingredients, tools, and conversions will help you create a delicious Cajun Honey Butter Salmon.
Step-by-Step Instructions
Prep the Oven and Baking Sheet
First, preheat your oven to 375°F (190°C). This step warms your oven for even cooking. While it heats, grab a baking sheet. Line it with parchment paper to make clean-up easy later.
Make the Cajun Honey Butter Sauce
Next, melt 3 tablespoons of unsalted butter in a small saucepan over low heat. Once melted, add 2 tablespoons of honey, 1 tablespoon of Cajun seasoning, 1 teaspoon of garlic powder, and 1 teaspoon of smoked paprika. Stir them until mixed well and fragrant. Take the saucepan off the heat and let the sauce cool a bit.
Season and Prepare the Salmon Fillets
Now, take 4 salmon fillets and pat them dry with a paper towel. This helps them sear better. Season both sides with salt and pepper. Make sure to coat them evenly for the best flavor. Place the fillets skin-side down on your prepared baking sheet. Pour the Cajun honey butter mixture over each fillet, covering them well. Remember to save about 1 tablespoon of the sauce for later.
Bake and Finish the Salmon
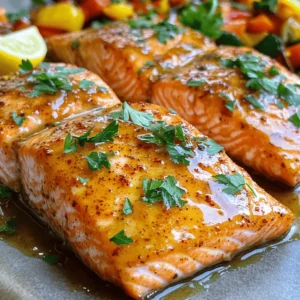
Bake the salmon in your preheated oven for 12-15 minutes. It’s ready when it flakes easily with a fork and is opaque in the middle. When you take it out, drizzle the reserved Cajun honey butter over the top. Squeeze fresh lemon juice on each fillet to brighten the taste. If you like, sprinkle some chopped parsley on top before serving.
This step-by-step approach makes cooking Cajun honey butter salmon simple and fun.
Tips & Tricks
How to Achieve Perfectly Cooked Salmon
To cook salmon just right, start with fresh fillets. Fresh fish shines in flavor and texture. Make sure to pat the fillets dry before cooking. This step helps achieve a nice crust. Preheat your oven to 375°F (190°C) for even cooking. Bake the salmon for 12-15 minutes. Check it with a fork; it should flake easily. The center should look opaque. If you have a meat thermometer, aim for 145°F (63°C). This temperature ensures your salmon is safe to eat.
Recommended Garnishes and Accompaniments
Garnishing your dish adds flair and flavor. Fresh parsley is a great choice. It gives a pop of color and taste. Lemon wedges are another excellent option. They add brightness and acidity. Serve your salmon with sautéed seasonal veggies for balance. It can be green beans, asparagus, or zucchini. A side of rice or mashed potatoes complements the dish well. For a light touch, a crisp salad goes nicely, too. Each adds a different texture and taste.
Common Mistakes to Avoid
One common mistake is overcooking the salmon. Keep an eye on the cooking time. It can dry out quickly. Another mistake is skipping the seasoning. Generously season both sides with salt and pepper. This step enhances the natural flavors. Avoid using too much Cajun seasoning. It packs a punch, so use it wisely. Lastly, don’t forget to let the salmon rest after baking. This step helps lock in juices for a tender bite. Following these tips will help you create a delicious meal.

Variations
Spicy Cajun Honey Butter Salmon
You can spice things up with more heat. Add extra Cajun seasoning for a kick. Try using cayenne pepper or chili flakes. Mix these into the honey butter sauce before pouring it over the salmon. This will give your dish a bold flavor. You can also serve it with a side of spicy coleslaw. The coolness of the slaw will balance the heat.
Grilled Cajun Honey Butter Salmon
Grilling adds a smoky flavor. To make grilled Cajun honey butter salmon, prepare the sauce as usual. Instead of baking, heat your grill to medium-high. Oil the grill grates lightly to prevent sticking. Place the salmon skin-side down on the grill. Cook for about 6-8 minutes on each side. Brush with the Cajun honey butter while grilling. Remove the salmon when it flakes easily. This method gives you great grill marks and a nice char.
Alternative Seasoning Options
If you want a different taste, try other seasonings. Lemon pepper or Italian herbs can change the flavor profile. For a sweet twist, use brown sugar instead of honey. This creates a caramelized crust on the salmon. You can even mix in some ginger for a zesty kick. Experiment with what you love. Each variation can lead to a unique dish.
Storage Info
How to Store Leftover Salmon
To store leftover salmon, place it in an airtight container. You want to keep it fresh. Make sure to cover the salmon tightly with plastic wrap or foil before putting it in the container. This helps prevent drying out. Salmon can last in the fridge for up to three days. Always check for any off smells before eating.
Reheating Instructions
When reheating salmon, make sure to do it gently. You can use the oven or a microwave. To use the oven, preheat it to 275°F (135°C). Place the salmon on a baking sheet. Cover it with foil to keep it moist. Heat for about 15 minutes. If using a microwave, place the salmon on a microwave-safe plate. Cover it with a damp paper towel. Heat in short bursts of 30 seconds until warm. This keeps the salmon juicy.
Freezing Tips
Freezing salmon is a great way to save it for later. First, ensure it’s cooled to room temperature. Wrap each fillet tightly in plastic wrap. Then, place it in a freezer bag. Try to remove as much air as possible. Label the bag with the date. Frozen salmon can last up to three months. When you’re ready to eat it, thaw it overnight in the fridge.
FAQs
What is Cajun seasoning?
Cajun seasoning is a mix of spices from Louisiana. It often includes paprika, garlic powder, onion powder, and cayenne pepper. This blend gives dishes a warm and spicy flavor. You can buy it or make your own. Just mix equal parts of the spices listed above. It adds a kick to any meal.
Can I use frozen salmon for this recipe?
Yes, you can use frozen salmon. Just make sure to thaw it first. Place the salmon in the fridge overnight or run it under cold water. After thawing, pat it dry with a paper towel. This step helps the Cajun honey butter stick better.
How can I tell when salmon is fully cooked?
To check if salmon is done, look for two signs. First, the fish should flake easily with a fork. Second, it should look opaque in the center. The internal temperature should reach 145°F (63°C). Use a meat thermometer for the best results.
What can I serve with Cajun Honey Butter Salmon?
Cajun Honey Butter Salmon pairs well with many sides. Here are some tasty options:
– Steamed green beans
– Roasted asparagus
– Garlic mashed potatoes
– Quinoa with herbs
– A fresh garden salad
These sides balance the rich flavor of the salmon.
In this blog post, we covered how to make Cajun Honey Butter Salmon. We discussed the key ingredients, tools, and measurements needed. You learned step-by-step instructions for baking this tasty dish. Tips helped you avoid common mistakes and achieve perfection. We explored variations like spicy and grilled salmon. Finally, we provided storage info and answered common questions.
Cooking doesn’t have to be hard! Just follow these steps, and enjoy great salmon.


. Start by gathering all your ingredients. You will need chicken, garlic, lemon juice, and spices. If you use wooden skewers, soak them in water for at least 30 minutes. This step helps keep them from burning on the grill. In a large bowl, mix the minced garlic, lemon juice, lemon zest, olive oil, smoked paprika, cayenne pepper, ground cumin, salt, and pepper. Whisk these together until they blend well. Then add the chicken cubes. Make sure each piece is coated in the marinade. Cover the bowl and place it in the fridge. Let it marinate for at least 1 hour, or longer if you have time. This will add great flavor to the chicken. Preheat your grill to medium-high heat. If you use a grill pan, heat it over medium on the stove. Once your chicken has marinated, thread the pieces onto the skewers. Leave a small space between each piece. This helps the chicken cook evenly. Grill the skewers for about 10 to 12 minutes. Turn them often to get nice grill marks. Check that the chicken reaches an internal temperature of 165°F (75°C). After grilling, let the skewers rest for a few minutes. This keeps the juices inside. Finally, garnish with fresh parsley before serving. This adds a nice touch to your dish. For the full recipe, check the instructions above. To get the best flavor, use fresh ingredients. Fresh garlic and lemon juice give a bright taste. When mixing the marinade, let the spices blend well. They create a rich flavor. Don't rush the marinating. Allow at least one hour, or better yet, overnight. This soaking time lets the chicken absorb all those tasty flavors. Adjust the cayenne pepper based on your spice level. This way, you can make the dish mild or fiery to fit your taste. One common mistake is not soaking wooden skewers. If you skip this step, they can burn on the grill. Always soak them for at least thirty minutes. Another mistake is overcrowding the skewers. Leave some space between the chicken pieces. This helps them cook evenly. Also, don't rush the resting time after grilling. Letting them rest keeps the juices inside, making the chicken juicy. To make your skewers look great, use a large serving platter. Arrange the skewers neatly. Add fresh lemon wedges around them for color. A sprinkle of chopped parsley on top makes it more inviting. For an extra treat, serve with a yogurt dip or tzatziki. This adds creaminess and coolness to the spicy flavors. These simple steps can elevate your dish and impress your guests. For the complete guide on making these skewers, check the Full Recipe. {{image_4}} You can swap chicken for other proteins. Try shrimp for a quick cook. Beef or pork also works well. Just adjust your cooking time to avoid overcooking. Fish, like salmon, can add a rich flavor. Each protein brings its own taste. For a vegetarian version, use firm tofu. It soaks up flavors well. You can also try mushrooms for a meaty texture. Bell peppers, zucchini, and cherry tomatoes make colorful additions. For a vegan option, skip the chicken and keep the marinade. Mix things up with different marinades. Try adding soy sauce or ginger for an Asian twist. A spicy chili paste can add heat. For a Mediterranean flair, use herbs like oregano and thyme. Experiment with what you like for new tastes. For the full recipe, check out the details above. After enjoying your spicy lemon garlic chicken skewers, let any leftovers cool down. Place them in an airtight container. Store them in the fridge for up to three days. This keeps the chicken fresh and tasty for later meals. To reheat the chicken skewers, preheat your oven to 350°F (175°C). Place the skewers on a baking sheet. Heat for about 10-15 minutes or until they are warm. You can also use a microwave. Heat them on medium power for 1-2 minutes. This way, the chicken stays juicy and delicious. If you want to save the skewers for later, freezing is a great option! Wrap each skewer in plastic wrap or aluminum foil. Place them in a freezer-safe bag. They can last up to three months in the freezer. When you are ready to eat them, thaw them in the fridge overnight. Then, reheat as mentioned above for a tasty meal. For the full recipe, check out the link! You should marinate chicken for at least 1 hour. For the best taste, let it sit overnight. This longer time allows the flavors to soak in well. The garlic and lemon will really shine through. Just remember, the longer the chicken sits in the marinade, the more flavorful it becomes. Yes, you can cook these skewers in the oven. Preheat your oven to 400°F (200°C). Line a baking sheet with foil for easy cleanup. Place the skewers on the sheet and bake for about 15-20 minutes. Make sure to turn them halfway through for even cooking. Check that the chicken reaches 165°F (75°C) inside. These skewers go great with many side dishes. Here are some tasty options: - Grilled vegetables like bell peppers and zucchini - A fresh green salad with lemon vinaigrette - Rice or quinoa to soak up the juices - Garlic bread for a crunchy contrast Each of these sides will add a nice balance to the meal. To change the spice level, simply adjust the cayenne pepper. For less heat, use half a teaspoon or skip it. If you want more spice, add an extra teaspoon. You can also use spicy marinades or hot sauce for extra kick. Always taste as you go, so you can find your perfect level of heat. For the full recipe, check the earlier section. Enjoy cooking! You learned how to make Spicy Lemon Garlic Chicken Skewers. We covered the main ingredients, marinade, and garnishes. I provided step-by-step instructions for grilling. You also got tips for perfect flavor and common mistakes to avoid. There are variations, like using different proteins and marinades. Lastly, I shared storage info and answered key FAQs. Try these skewers for your next cookout. Enjoy the bold flavors and easy prep!](https://goldendishy.com/wp-content/uploads/2025/06/b1f94ef8-81fb-4621-8ae2-1513b5b656e4-768x768.webp)
![For this tasty dish, you need some key items: - 2 medium eggplants, sliced into ¼-inch rounds - 1 teaspoon salt (for sweating the eggplant) - 1 cup all-purpose flour - 3 large eggs, beaten - 2 cups breadcrumbs (whole wheat adds a nutty touch) - 3 cups marinara sauce (store-bought or homemade) - 2 cups shredded mozzarella cheese - 1 cup grated Parmesan cheese - 2 tablespoons fresh basil, chopped (plus extra for garnish) - 1 teaspoon garlic powder - Olive oil for frying These ingredients form the heart of your eggplant parmesan. The eggplant brings a rich texture, while the cheeses add creaminess. Besides the main ingredients, consider these seasonings: - Fresh basil adds a fragrant touch. - Oregano gives a hint of earthiness. - Red pepper flakes can add some heat. These seasonings will elevate your dish. Feel free to experiment! If you want to mix it up, try these cheese alternatives: - Provolone for a different flavor. - Goat cheese for creaminess and tang. - Vegan cheese for a plant-based version. These options can change the taste while keeping it delicious. Feel free to swap cheeses based on your preference! For the full recipe, check out the detailed instructions. Start with the eggplant. Slice it into ¼-inch rounds. Sprinkle salt on the slices. This helps to draw out moisture and bitterness. Put the slices in a colander for about 30 minutes. After that, rinse them under cold water. Use paper towels to pat them dry. Now, let’s set up your breading station. You need three shallow dishes. Fill one with flour, the second with beaten eggs, and the third with breadcrumbs mixed with garlic powder. Organizing these dishes makes the breading easy. It’s time to bread the eggplant. Take a slice and coat it in flour first. Shake off any extra flour. Next, dip it into the eggs. Make sure it is fully covered. After that, roll it in the breadcrumb mix until it is well-coated. Place the breaded slices on a plate. Heat olive oil in a large skillet over medium heat. You want enough oil to cover the bottom of the pan. Fry the eggplant slices in batches. Cook each side until golden brown, which takes about 3-4 minutes. Once cooked, put them on a paper towel-lined plate to drain any excess oil. To assemble, spread a thin layer of marinara sauce in a large baking dish. Layer half of the fried eggplant slices on the sauce. Sprinkle a third of the mozzarella and half of the Parmesan cheese on top. Add another layer of marinara sauce. Repeat these layers with the remaining eggplant, mozzarella, and Parmesan. Don’t forget the chopped basil between the layers. Cover the dish with aluminum foil. Place it in your preheated oven at 375°F (190°C). Bake for about 25 minutes. After that, carefully remove the foil. Bake uncovered for another 15 minutes. This will make the top bubbly and golden brown. Let the dish cool for a few minutes before slicing. Serve it hot and garnish with fresh basil. Enjoy your cheesy eggplant delight. For the full recipe, check out the details above. To get the best flavor, start with fresh eggplants. Look for shiny, firm ones. Salt helps to draw out moisture and bitterness. After sweating the eggplant, rinse it well. This step makes your dish taste better. Use a good marinara sauce. Homemade sauce adds depth, but store-bought works too. Mixing cheeses also boosts flavor. Try a blend of mozzarella and Parmesan for a creamy texture. One common mistake is skipping the sweating step. This can lead to a soggy dish. Also, don’t rush the frying process. Cook eggplant slices until they are golden brown. If you overcrowd the pan, they won’t fry evenly. Another pitfall is not letting the dish rest after baking. Allow it to cool for a few minutes. This helps the layers set nicely. Serve your Easy Eggplant Parmesan hot from the oven. Garnish with fresh basil for a pop of color. A side salad complements this dish well. You can also serve it with crusty bread. For a twist, pair it with a light red wine. This adds a nice touch to your meal. If you want leftovers, try layering it in a sandwich for lunch the next day. Enjoy your cheesy eggplant delight! {{image_4}} You can make Easy Eggplant Parmesan even more veggie-friendly. Try adding layers of sautéed mushrooms or spinach. Both add flavor and nutrients. You can also swap out eggplant for zucchini or butternut squash. These alternatives taste great and keep the dish fresh and exciting. If you need a gluten-free version, use gluten-free breadcrumbs. You can also use crushed rice cereal or ground almonds. These options still give that crunchy texture without the gluten. Just ensure your marinara sauce is gluten-free, too. Get creative with your toppings! You can add roasted red peppers or artichoke hearts for extra flavor. For a spicy kick, sprinkle some red pepper flakes on top before baking. If you love herbs, consider adding fresh oregano or thyme. These small changes can make a big difference in taste. For the full recipe, check out the [Full Recipe]. To keep your Easy Eggplant Parmesan fresh, let it cool first. Then, transfer it to an airtight container. You can store it in the fridge for up to three days. If you have many leftovers, consider dividing them into smaller portions. This way, you can easily grab a serving when you're hungry. When it's time to enjoy your leftovers, reheating properly is key. For the best results, use the oven. Preheat it to 350°F (175°C). Place the eggplant in an oven-safe dish. Cover it with foil to keep it moist. Heat for about 20 minutes or until it's hot. You can also microwave it, but the oven gives a better texture. If you want to save your Easy Eggplant Parmesan for later, freezing is a great option. First, let it cool completely. Then, wrap it tightly in plastic wrap and foil. This helps prevent freezer burn. You can freeze it for up to three months. When ready to eat, thaw it overnight in the fridge before reheating. Enjoy your delicious meal anytime! You can use crushed crackers or ground oats instead of breadcrumbs. Both options add a nice crunch. If you want a gluten-free choice, use almond flour or gluten-free breadcrumbs. These alternatives work well and keep the dish tasty. Yes, you can prepare this dish a day ahead. Just follow the recipe steps but stop before baking. Cover the dish and store it in the fridge. When you are ready, bake it straight from the fridge. This saves time and still tastes great! The eggplant is cooked when it is soft and golden brown. If you press it gently, it should feel tender. Look for a bubbly top with a nice golden color. This means it’s ready to serve and enjoy! Absolutely! You can mix cheeses like provolone or fontina for added flavor. If you want it to be creamier, try adding ricotta. Just remember to balance the flavors to keep it delicious. For the best taste, use a blend of cheeses. This blog post covered the key ingredients and steps for easy eggplant parmesan. You learned about preparation, seasoning, and cooking methods. I shared tips to avoid common mistakes and offered serving suggestions. We discussed variations for different diets and how to store leftovers. Eggplant parmesan is simple and delicious. You can customize it to fit your taste. Enjoy making this dish with confidence!](https://goldendishy.com/wp-content/uploads/2025/06/85579090-c8c1-4217-8fdf-70085deda6dc-768x768.webp)

![To make Avocado Lime Crema Tacos, you need some fresh and simple ingredients. Here’s what you will need: - Fresh produce: - 2 ripe avocados - 1 cup cherry tomatoes, halved - 1 cup shredded red cabbage - 1/2 cup fresh cilantro leaves, roughly chopped - Pantry staples: - 8 small corn tortillas - 1/2 cup Greek yogurt - 2 tablespoons fresh lime juice - Zest of 1 lime - 1 clove garlic, finely minced - 1/4 teaspoon ground cumin - Sea salt, to taste - Optional toppings: - Sliced jalapeños - Radish slices - Crumbled feta cheese When you gather these ingredients, aim for ripe avocados. They will make your crema smooth and creamy. Fresh cilantro adds a burst of flavor to the tacos. You can also adjust the optional toppings based on your taste. If you want more heat, add jalapeños. For a crunchy touch, sprinkle some radish slices. You can find the full recipe in the article for detailed steps. Enjoy the fresh tastes of these tacos! To start, grab your food processor. Add the ripe avocados, Greek yogurt, fresh lime juice, lime zest, minced garlic, ground cumin, and a pinch of sea salt. Blend it all together until smooth and creamy. If it seems too thick, add a bit more lime juice. Taste it and adjust the salt or lime juice to your liking. A little extra zing can really elevate the flavor! Use a non-stick skillet for this step. Heat it over medium heat. Toast each corn tortilla for about 30 seconds on one side. Flip it and toast for another 30 seconds. The tortillas should feel warm and soft. Once done, stack them and wrap them in a clean kitchen towel to keep them warm. This keeps them from getting dry. Now, take a warm tortilla and spread a generous dollop of your avocado lime crema right in the center. Next, add a handful of shredded red cabbage for crunch. Layer on some halved cherry tomatoes for a fresh bite. Finally, sprinkle chopped fresh cilantro on top for a burst of flavor. For a fun twist, try adding some sliced jalapeños for heat, radish slices for crunch, or crumbled feta cheese for a savory touch. Serve your tacos right away. Enjoy them while they are fresh and bursting with flavor! Remember, you can find the full recipe [here]. You can switch up the base in your crema. Try sour cream or Greek yogurt for a tangy twist. If you want a dairy-free option, use silken tofu or cashew cream. For extra flavor, add herbs like cilantro or dill. You can also mix in spices such as smoked paprika or chipotle for a smoky kick. To balance flavors, add a mix of textures. Use crunchy cabbage, juicy tomatoes, and creamy crema. These layers make each bite exciting. To avoid tearing the tortillas, warm them first. Heat them in a skillet for about 30 seconds on each side. This softens them, making them easier to fold without breaking. Pair your tacos with simple sides. A fresh salad or rice works well. You might also enjoy them with a light drink like agua fresca or sparkling water. For garnishes, lime wedges and extra cilantro make your tacos look vibrant and fresh. These touches enhance both taste and presentation. For the Full Recipe, refer to the earlier section. {{image_4}} For a tasty vegetarian or vegan taco, swap Greek yogurt for cashew cream or coconut yogurt. Both options keep the creamy texture and flavor. You can also add black beans or roasted chickpeas for protein. These legumes add a nice texture and a mild flavor. Toss in some grilled zucchini or bell peppers for extra color and taste. Fresh herbs like mint or basil can bring a surprise twist. If you want to add protein, consider grilled chicken or shrimp. Marinate chicken in lime juice, garlic, and cumin for at least 30 minutes before grilling. For shrimp, a quick toss with olive oil and lime juice works well. Both options cook fast, making them easy to prepare. You could also try seared steak or fish for a heartier bite. Just remember to let the meat rest before slicing to keep it juicy. Tacos can take on many flavors based on where you are. In Mexico, you might find tacos with carne asada, topped with fresh cilantro and onions. In California, fish tacos with mango salsa are popular. Seasonal ingredients can also add a fresh touch. In summer, add sweet corn or peaches. In fall, roasted butternut squash or cranberries can provide a warm, cozy vibe. Each variation opens a new door to flavor! For full recipe details, check out the [Full Recipe]. You can store leftover tacos in different ways. If you have assembled tacos, wrap them in foil or plastic wrap. This keeps them fresh for a short time. Unassembled tacos store better. Keep the tortillas, crema, and toppings separate. Use airtight containers for each. This helps keep everything fresh. - Assembled Tacos: Wrap well in foil or plastic wrap. - Unassembled Tacos: Store tortillas, crema, and toppings in airtight containers. Store everything in the fridge. Consume within two days for best taste. To reheat tortillas, use a skillet. Heat it on medium for a few minutes. Place the tortilla for about 15 seconds on each side. This warms them without losing their texture. For the crema, avoid reheating. Instead, store it in the fridge. Use it cold or at room temperature. This keeps the fresh flavor. - Tortilla Method: Heat on medium in a skillet for 15 seconds per side. - Crema Storage: Keep it cold or at room temperature. These simple steps ensure your Avocado Lime Crema Tacos stay delicious! You can add heat with sliced jalapeños. Place them on top of the crema. For more heat, use hot sauce. A few drops can spice things up without being too much. Try different hot sauces to find your favorite flavor. This small change can make your tacos zing! Yes, you can make the crema ahead of time. Store it in an airtight container in the fridge. It stays fresh for about two days. To keep the color bright, add a little extra lime juice. Stir before using to bring back its smooth texture. If you can't find corn tortillas, use flour tortillas instead. They are soft and easy to fold. You can also use lettuce leaves for a low-carb option. For gluten-free diets, look for rice or almond flour tortillas. Each option gives a unique taste to your tacos. Yes, this recipe is great for meal prep. You can prepare the crema and store it in the fridge. Warm the tortillas before serving. Assemble the tacos just before eating to keep everything fresh. This way, you have tasty meals ready for the week with little effort. For the full recipe, check out the details above! In this article, we explored how to make tasty Avocado Lime Crema Tacos. We covered the essential ingredients, step-by-step instructions, and helpful tips for perfecting your taco assembly. You can easily customize your crema and taco fillings to suit your taste. Remember, you can prepare these tacos in advance and store leftovers for later enjoyment. Embrace these ideas to make your taco nights fun and delicious! With a little practice, you’ll impress family and friends with your new skills. Enjoy every bite!](https://goldendishy.com/wp-content/uploads/2025/07/f06e457d-602e-41ec-b362-5499d4ba2f55-768x768.webp)
![- Bell Peppers: I like using large bell peppers. You can choose any color you like: red, yellow, or green. They all taste great! Make sure they are firm and fresh. Each pepper should hold the stuffing well. - Ground Chicken and Dairy: Ground chicken adds a light flavor. It cooks quickly and blends well with other ingredients. Pair it with shredded cheddar cheese for a creamy touch. The cheese melts beautifully, making the dish extra yummy. - Enhancing Ingredients: I always add cooked rice to the mix. It gives the dish a nice texture. Black beans are great too; they add protein and fiber. Corn brings sweetness and color. Together, these ingredients create a hearty filling. - Essential Spices: Be sure to use chili powder, ground cumin, garlic powder, and onion powder. These spices pack flavor into the filling. A sprinkle of salt and pepper brings everything together. - Optional Garnishes: Fresh cilantro adds a burst of flavor. It makes the dish look more vibrant. You can also use a dollop of sour cream for creaminess. - Recommended Sides: Serve the stuffed peppers with a simple salad. A side of rice or quinoa pairs well too. You can also add some tortilla chips for crunch. - Display Ideas: For a beautiful presentation, place each stuffed pepper on a plate. Drizzle a bit of olive oil on top for shine. Add some chopped cilantro for color. This makes the meal look as good as it tastes! For the complete recipe, check out the Full Recipe. 1. Preheat your oven to 375°F (190°C). This step is key for even cooking. 2. Grab four large bell peppers. Cut off the tops and remove the seeds. Rinse the insides to clean them well. 3. Lightly coat the outside of each pepper with olive oil. Stand them upright in a 9x13 inch baking dish. 1. Heat a skillet over medium heat. Add 1 pound of ground chicken to the pan. 2. Cook the chicken for 5-7 minutes. Stir and break it apart until it turns brown. 3. Once cooked, mix in 1 cup of cooked rice, 1 cup of rinsed black beans, and 1 cup of corn. 4. Add 3/4 cup of shredded cheddar cheese, 1 teaspoon of chili powder, 1 teaspoon of cumin, 1 teaspoon of garlic powder, and 1/2 teaspoon of onion powder. Season with salt and pepper to taste. Stir for 2-3 minutes. 1. Generously fill each bell pepper with the chicken and cheese mixture. Pack it well. 2. Sprinkle the remaining 1/4 cup of cheese on top of the stuffed peppers. 3. Cover the dish with aluminum foil to trap steam. Bake in the preheated oven for 30 minutes. 4. After 30 minutes, remove the foil. Continue baking for 10-15 minutes, until the cheese is bubbly and golden. 5. Check if the peppers are tender by piercing them with a fork. 6. Allow them to cool for a few minutes after baking. Optionally, garnish with fresh cilantro for extra flavor. For the complete recipe, check out the [Full Recipe]. What are common mistakes to avoid? One mistake is overcooking the chicken. Cook it just until it's brown. If you use too much salt, it can ruin the flavor. Taste your mixture before stuffing the peppers. How can you ensure even cooking? Make sure all your peppers are the same size. This will help them cook at the same rate. Cover them with foil for part of the baking time. This keeps the heat in and helps them cook through. What are some suggestions for adding extra flavor? Try adding diced tomatoes or jalapeños for a kick. You can also mix in some spices like paprika or cayenne pepper. Fresh herbs like parsley or basil can brighten the dish. What are some ingredient swaps for dietary preferences? For a lower-carb option, replace rice with cauliflower rice. Use ground turkey or tofu for a different protein. You can also swap cheddar cheese for a dairy-free cheese for a vegan option. What cooking methods can you use? You can air fry the stuffed peppers for a crispy texture. Just set the air fryer to 375°F and cook them for about 15-20 minutes. Grilling is another fun method. Just wrap the peppers in foil and place them on the grill. How do you maintain moisture in stuffed peppers? Add a splash of chicken broth to the bottom of the baking dish. This creates steam as they cook. Avoid overstuffing the peppers; too much filling can lead to dryness. For the full recipe, check out the recipe section above. {{image_4}} You can change the ground chicken in your stuffed peppers. Use ground turkey or beef instead. These meats add different flavors and textures. If you want a vegetarian option, try using quinoa or lentils. These ingredients pack a protein punch and keep the dish hearty. For a vegan twist, use a mix of beans and mushrooms. They add a nice texture and flavor. You can also use tofu crumbles, which absorb spices well. This makes your meal rich and filling while keeping it plant-based. You can spice up your stuffed peppers with different flavors. Why not try a Mexican twist? Add taco seasoning or jalapeños for heat. A dash of lime juice brightens the dish. If you love Italian flavors, mix in some Italian herbs like oregano or basil. You could also add marinara sauce to the filling. This creates a rich and comforting taste. Want a twist? Try adding olives, capers, or feta cheese. These ingredients bring unique textures and flavors. They turn a simple meal into something exciting. For those needing gluten-free meals, this recipe is easy to adapt. Use rice instead of breadcrumbs for filling. Always check labels on canned items like beans and corn. They should be gluten-free. If you follow a low-carb diet, you can swap rice for cauliflower rice. This keeps the dish light and low in carbs. You can also skip the beans to reduce carbs even more. These variations help everyone enjoy this tasty meal. No matter your diet, you can find a way to enjoy chicken and cheese stuffed peppers. After you make your chicken and cheese stuffed peppers, let them cool down. This helps keep them fresh. Store them in an airtight container. They will stay good in the fridge for about 3 to 4 days. If you have leftovers, try to eat them within this time. To reheat, place them in the oven or microwave until warm. If you want to keep your stuffed peppers for a longer time, freezing is a great option. First, let them cool completely. Wrap each pepper tightly with plastic wrap. Then, put them in a freezer bag or container. This helps avoid freezer burn. They can last up to 3 months in the freezer. When you're ready to eat, take them out and thaw in the fridge overnight. Reheat them in the oven at 375°F until hot. This will keep the flavors and textures intact. Meal prepping can save time on busy weeknights. You can prepare the filling ahead of time. Cook the chicken and mix in the rice, beans, and spices. Store this mixture in the fridge for 2 to 3 days. When you're ready, stuff the peppers and bake them. For batch cooking, consider making a double recipe. Freeze half for later. This way, you have a tasty meal ready whenever you need it. How do you know when stuffed peppers are done? You can tell when stuffed peppers are done by checking the peppers and cheese. The peppers should be tender and the cheese melted and bubbly. If you pierce a pepper with a fork, it should feel soft but not mushy. Can you prepare them in advance? Yes, you can prepare stuffed peppers in advance. Just stuff them and store them in the fridge. Bake them when you're ready to eat. This makes for a quick and easy family meal. Can I use frozen peppers? Yes, you can use frozen peppers. Just thaw them before stuffing. They may cook faster, so keep an eye on them while baking. What to do if I don't have certain ingredients? If you lack certain ingredients, feel free to swap them out. For example, use quinoa instead of rice or a different type of cheese. Get creative based on what you have! Can stuffed peppers be made on the stovetop? Yes, you can make stuffed peppers on the stovetop. Just steam them in a skillet with a little water. Cover with a lid and cook until tender. How to adjust heating times for different ovens? Oven temperatures can vary. If your oven runs hot, check the peppers a few minutes early. If it runs cool, you may need to add a few extra minutes. Always trust your instincts! We covered the best way to make stuffed peppers. You learned about key ingredients like bell peppers, ground chicken, and spices. You also discovered tips for cooking and storing them. There are many ways to adjust the recipe for different diets and tastes. Incorporating these ideas will make your dish delicious. Get creative with flavors and toppings. With practice, you'll master this easy meal for any occasion. Enjoy your cooking journey!](https://goldendishy.com/wp-content/uploads/2025/06/69b5c483-258e-4498-8701-d043fb5fc497-768x768.webp)