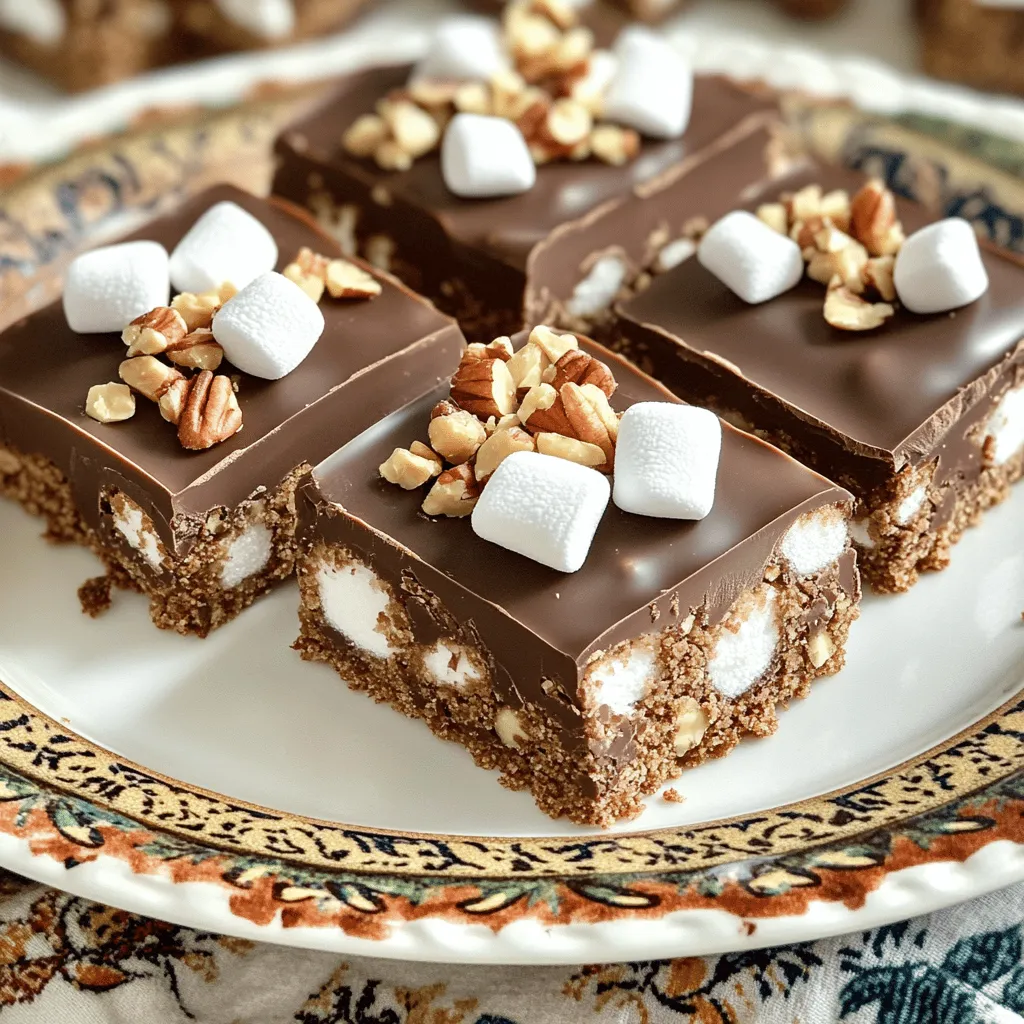
Chocolate Marshmallow Rocky Road Delightful Treat

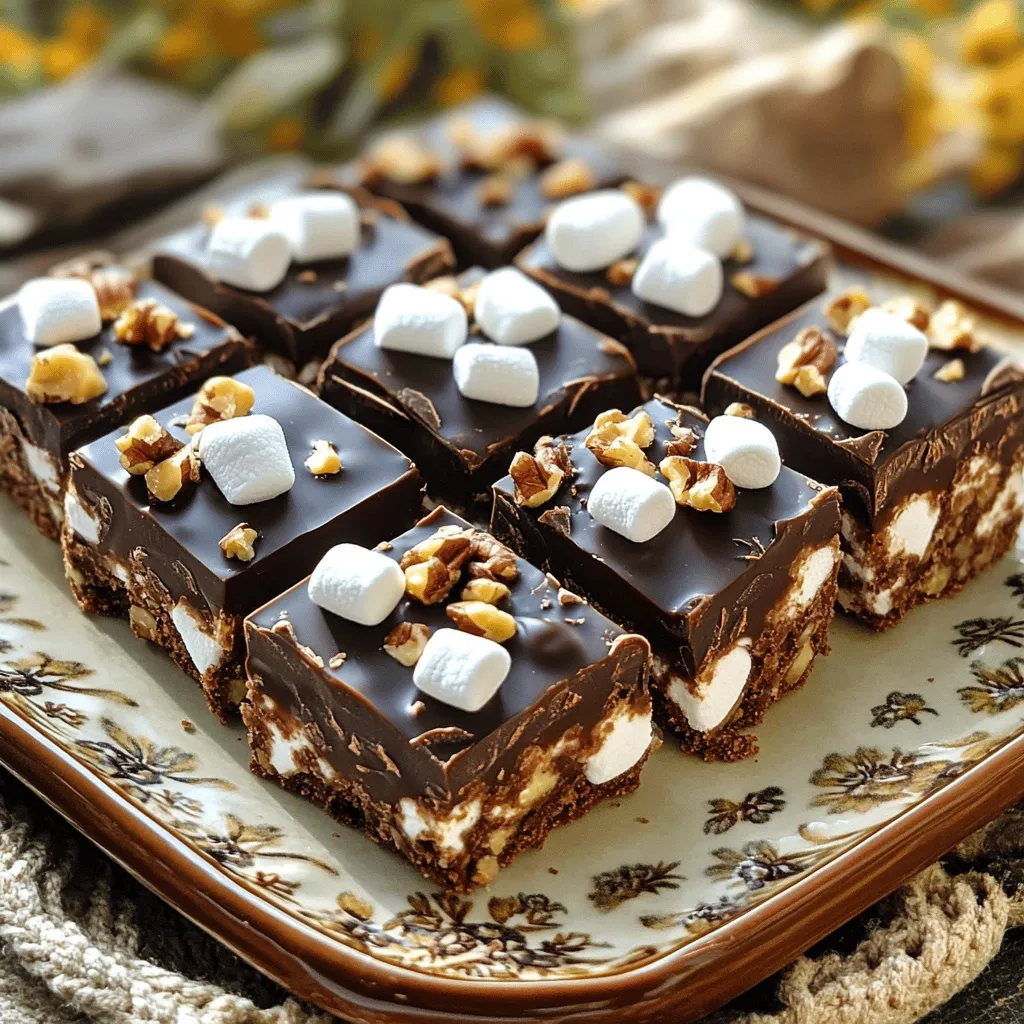
If you love sweet treats, then you need to try Chocolate Marshmallow Rocky Road. This delightful dessert is a fun mix of chocolate, marshmallows, and crunchy nuts. It’s easy to make and perfect for sharing. In this post, I’ll guide you through all the steps, tips, and variations for creating your tasty treat. So grab your ingredients, and let’s get started on this delicious journey!It combines rich chocolate with fluffy marshmallows. This recipe is easy and perfect for sharing.
List of Ingredients
Here’s what you need:
– 200g dark chocolate, finely chopped
– 100g milk chocolate, finely chopped
– 100g unsalted butter, cubed
– 150g digestive biscuits, crushed into small pieces
– 100g mini marshmallows
– 50g nuts (walnuts or almonds), roughly chopped
– 2 tablespoons golden syrup or honey
– A pinch of sea salt
Essential Tools Needed
You will need these tools:
– A 9-inch square baking pan
– Parchment paper
– Microwave-safe bowl
– Spatula
– Mixing bowl
– Sharp knife for cutting
With these ingredients and tools, you can create a delightful treat that everyone will love!
Step-by-Step Instructions
Preparation of Baking Pan
Start by greasing a 9-inch square baking pan with butter. Line the bottom and sides with parchment paper. Let some paper hang over the edges. This makes it easy to lift out the rocky road later.
Melting Chocolate Mixture
In a microwave-safe bowl, add the dark chocolate, milk chocolate, and cubed butter. Heat this mixture in the microwave for 20 seconds at a time. Stir after each burst. Keep doing this until it melts smoothly. It usually takes about 1-2 minutes.
Mixing Dry Ingredients
In a large bowl, mix the crushed digestive biscuits, mini marshmallows, and chopped nuts. Make sure everything is evenly spread out. This helps every bite taste great.
Combining Ingredients
Pour the melted chocolate mixture over the dry ingredients. Use a spatula to fold everything together. Make sure each piece of biscuit and marshmallow is coated in chocolate.
Setting the Rocky Road
Add a pinch of sea salt to the mix. Stir gently to blend. Spoon the chocolate mixture into the lined pan. Spread it evenly and press down lightly. Cover the pan and put it in the fridge for 2-3 hours. Wait until it feels firm.
Once set, lift the rocky road using the parchment paper. Place it on a cutting board and cut it into squares or bars. Enjoy your chocolate marshmallow rocky road delight!
Tips & Tricks
Ensuring Smooth Chocolate Melting
To melt chocolate well, use a microwave-safe bowl. Combine dark chocolate, milk chocolate, and butter in this bowl. Heat it in short bursts of 20 seconds. Stir well after each burst. This keeps the chocolate from burning. Usually, it takes 1-2 minutes. If your chocolate looks shiny and smooth, you did it right!
How to Perfectly Mix Ingredients
When mixing, add the melted chocolate to the dry ingredients. Use a spatula to gently fold everything together. This method helps coat all the pieces evenly. It’s important to mix thoroughly but gently. We want to keep the marshmallows fluffy. If you mix too hard, they might break!
Common Mistakes to Avoid
One common mistake is overheating the chocolate. If it gets too hot, it can seize up. Always melt it slowly. Another mistake is not pressing the mixture into the pan firmly. If you don’t compact it well, the squares may fall apart. Lastly, don’t skip the pinch of sea salt. It brings out the chocolate’s rich flavor.

Variations
Different Chocolate Types
You can change the chocolate to fit your taste. Use all dark chocolate for a richer flavor. If you like sweetness, use more milk chocolate. You can even try white chocolate for a creamy twist. Mixing different types gives your rocky road a unique taste.
Adding Flavor Enhancements
Boost the flavor by adding some extracts. A splash of vanilla or almond extract adds depth. You can also mix in a bit of espresso powder for a coffee kick. For a fun twist, try some orange zest for a fresh aroma. These small changes make your treat even more special.
Alternative Nuts or Add-Ins
Switch up the nuts for a different crunch. Try cashews, pecans, or even peanuts. Each nut brings its own flavor and texture. You can also add dried fruits like cherries or cranberries for a sweet surprise. If you want extra fun, toss in some candy pieces or crushed cookies. These variations keep your rocky road exciting and tasty.
Storage Info
How to Store Leftovers
To store your chocolate marshmallow rocky road, let it cool completely first. Once it’s cool, cut it into squares. Place them in a single layer in an airtight container. If you have many squares, you can add parchment paper between layers to prevent sticking.
Best Containers for Storage
The best containers for storage are glass or plastic airtight containers. These keep the rocky road fresh and tasty. You can also use resealable plastic bags. Just make sure to squeeze out the air before sealing.
Shelf Life of Chocolate Marshmallow Rocky Road
When stored properly, chocolate marshmallow rocky road stays fresh for about one week at room temperature. If you place it in the fridge, it can last for two weeks. For longer storage, you can freeze it, which extends its life to about three months. Just remember to wrap each piece well to prevent freezer burn. For the best taste, enjoy it fresh!
FAQs
Can I freeze Chocolate Marshmallow Rocky Road?
Yes, you can freeze chocolate marshmallow rocky road. Wrap it tightly in plastic wrap. Then place it in an airtight container. It will stay fresh for up to three months. When ready to eat, thaw it in the fridge overnight. This keeps the texture nice.
What can I substitute for digestive biscuits?
You can use graham crackers or shortbread cookies. They both work well in this recipe. If you want gluten-free, try crushed gluten-free cookies. The flavor may change a bit, but it will still taste great.
How do I make it vegan or dairy-free?
To make it vegan, swap the butter for a plant-based option. Use dark chocolate that is dairy-free. Make sure the marshmallows are vegan too. Many brands offer vegan marshmallows now. This way, you can enjoy all the flavors without dairy.
How long does it take to set?
It takes about 2 to 3 hours to set in the fridge. Make sure it is firm to the touch before you cut it. If you want to speed it up, you can place it in the freezer for about an hour. Just remember to watch it closely.
Can I add more marshmallows?
Absolutely! You can add more mini marshmallows if you want. Just make sure to mix them in evenly. This adds a fun texture and makes it even more delicious. Feel free to get creative with your mix!
This blog post covered how to make Chocolate Marshmallow Rocky Road. We looked at ingredients, tools, and step-by-step instructions. You learned tips for smooth melting and mixing, plus common mistakes to avoid. Variations let you customize flavors and ingredients. We also discussed storage for leftovers and answered FAQs.
Now, you have the tools to create a delicious treat. Enjoy making it your own!


![- 2 cups fresh blueberries, rinsed and drained - 2 cups ripe peaches, diced (approximately 3 medium-sized peaches) - 1 tablespoon freshly squeezed lemon juice - 1/2 cup granulated sugar (adjust based on your sweetness preference) - 1 tablespoon cornstarch - 1 teaspoon pure vanilla extract - 1 1/2 cups rolled oats - 1 cup all-purpose flour - 1/2 cup packed brown sugar - 1/2 teaspoon baking powder - 1/4 teaspoon fine salt - 1/2 cup unsalted butter, melted and slightly cooled - 1 teaspoon ground cinnamon (optional, for added warmth) These simple ingredients create a tasty balance of sweet and tart flavors. The fresh blueberries and ripe peaches shine in each bite. You can change the sugar to fit your taste. I often add a bit more if the fruit is not very sweet. I love using oats for texture; they give a nice chewiness. This recipe is so flexible. You can swap out fruit or adjust flavors based on what you have at home. For example, try adding a pinch of nutmeg for a warm spice twist. This recipe takes only 15 minutes to prepare. It bakes in about 30 to 35 minutes. You will get about 12 bars from this batch, perfect for sharing with friends or family. If you want the full recipe, check the section below. - Preheat your oven to 350°F (175°C). - Grease a 9x13-inch baking dish or line it with parchment paper. - In a medium mixing bowl, combine 2 cups of fresh blueberries, 2 cups of diced peaches, 1 tablespoon of lemon juice, 1/2 cup of granulated sugar, 1 tablespoon of cornstarch, and 1 teaspoon of vanilla extract. - Gently mix the ingredients until the fruit is coated. Let it sit for a few minutes to enhance the flavor. - In a large mixing bowl, whisk together 1 1/2 cups of rolled oats, 1 cup of all-purpose flour, 1/2 cup of brown sugar, 1/2 teaspoon of baking powder, 1/4 teaspoon of salt, and 1 teaspoon of cinnamon if desired. - This mixture will give your bars that perfect crumb texture. - Pour 1/2 cup of melted butter into the dry mixture and stir until it looks like coarse crumbs. - Reserve about 1 cup of this crumb mixture for later. - Press the remaining crumb mixture into the bottom of your greased dish to form the crust. - Spread the fruit mixture evenly over the crust, then sprinkle the reserved crumbs on top. - Bake in your preheated oven for about 30-35 minutes. - Look for golden brown color and bubbling filling to know it's done. - Once baked, let the bars cool on a wire rack for 15-20 minutes before slicing into squares. - This cooling time helps the bars set well for easy serving. Enjoy making these Blueberry Peach Crumble Bars with the [Full Recipe]. - Check for doneness by ensuring the filling is bubbling and the top is golden brown. - Letting the bars cool completely aids in easier slicing. This step prevents squishing the filling and keeps the layers intact. - Use frozen blueberries or peaches if fresh ones are unavailable. Frozen fruit works well and saves time. - Substitute brown sugar with coconut sugar for a healthier option. Coconut sugar adds a nice depth to the flavor. - Serve warm or at room temperature. This allows the flavors to shine. - Pair with vanilla ice cream or whipped cream. This adds a creamy texture that balances the tartness of the fruit. For an extra touch, garnish with fresh blueberries or peach slices. You can find the Full Recipe above for detailed instructions on making these delightful bars! {{image_4}} You can mix things up with different fruits. For a fresh twist, switch blueberries and peaches for raspberries and apples. The tartness of raspberries pairs well with sweet apples. You can also try plums or cherries. Both add their unique flavors and keep the bars fun and exciting. Want to make these bars gluten-free? No problem! Just replace all-purpose flour with a gluten-free flour blend. Many good mixes are available at stores. Also, ensure that your oats are certified gluten-free. This small change lets everyone enjoy this tasty dessert. For a vegan version, swap unsalted butter for coconut oil or vegan butter. Both options work well and keep the bars rich and tasty. If your recipe includes eggs, you can use flax eggs instead. To make a flax egg, mix one tablespoon of ground flaxseed with two and a half tablespoons of water. Let it sit for five minutes. This creates a great egg substitute that still binds everything together. Store your Blueberry Peach Crumble Bars in an airtight container. They stay fresh at room temperature for up to 3 days. This makes them great for quick snacks or dessert. To keep them longer, refrigerate the bars. They will stay fresh for up to a week. For even longer storage, you can freeze the bars. Wrap them tightly in plastic wrap or aluminum foil. They can be frozen for up to 3 months. When you're ready to enjoy your frozen bars, reheating is easy. Simply pop them in the microwave for a few seconds. You can also warm them in the oven at 350°F (175°C). This brings back their delicious taste and texture. For the full recipe and tips, check out the detailed instructions above. Enjoy your tasty treat! Yes, you can make these bars a day in advance. Just store them in the fridge. This helps the flavors blend nicely. Look for bubbling filling and a golden brown topping. This shows they are ready to eat. Yes, you can add chopped nuts like almonds or walnuts. They give the bars extra crunch and flavor. I love pairing them with a scoop of ice cream or yogurt. It makes a delicious treat. Store them in an airtight container at room temperature. You can also refrigerate them for up to a week. - Blueberry Peach Crumble Bars 🫐 To make these delicious Blueberry Peach Crumble Bars, you need simple, fresh ingredients. Here’s what you will need: - 2 cups fresh blueberries, rinsed and drained - 2 cups ripe peaches, diced (approximately 3 medium-sized peaches) - 1 tablespoon freshly squeezed lemon juice - 1/2 cup granulated sugar (adjust based on your sweetness preference) - 1 tablespoon cornstarch - 1 teaspoon pure vanilla extract - 1 1/2 cups rolled oats - 1 cup all-purpose flour - 1/2 cup packed brown sugar - 1/2 teaspoon baking powder - 1/4 teaspoon fine salt - 1/2 cup unsalted butter, melted and slightly cooled - 1 teaspoon ground cinnamon (optional, for added warmth) These ingredients come together to create a wonderful balance of sweet and tart flavors. The fresh blueberries and peaches mix well with the lemon juice. This adds a nice zing to the bars. The sugar and cornstarch help create a thick, juicy filling. The crumble topping is a blend of oats, flour, and sugars. It gives the bars a crunchy texture that pairs perfectly with the soft fruit layer. The butter adds richness, while the cinnamon gives a warm, cozy vibe to each bite. If you want to try this recipe, check the Full Recipe for step-by-step instructions. You'll love making and sharing these bars! These Blueberry Peach Crumble Bars are easy to make and full of flavor. You learned about the key ingredients, simple steps, and different variations. Remember, you can swap fruits or adjust sweetness to fit your taste. Store leftovers in a container for later. Enjoy these bars warm or with ice cream for a tasty treat. Happy baking!](https://goldendishy.com/wp-content/uploads/2025/06/77e155cd-d820-4acd-a50c-b849e6ba2e1e-768x768.webp)