Pickle Ranch Chicken Stuffed Peppers Delightful Dish
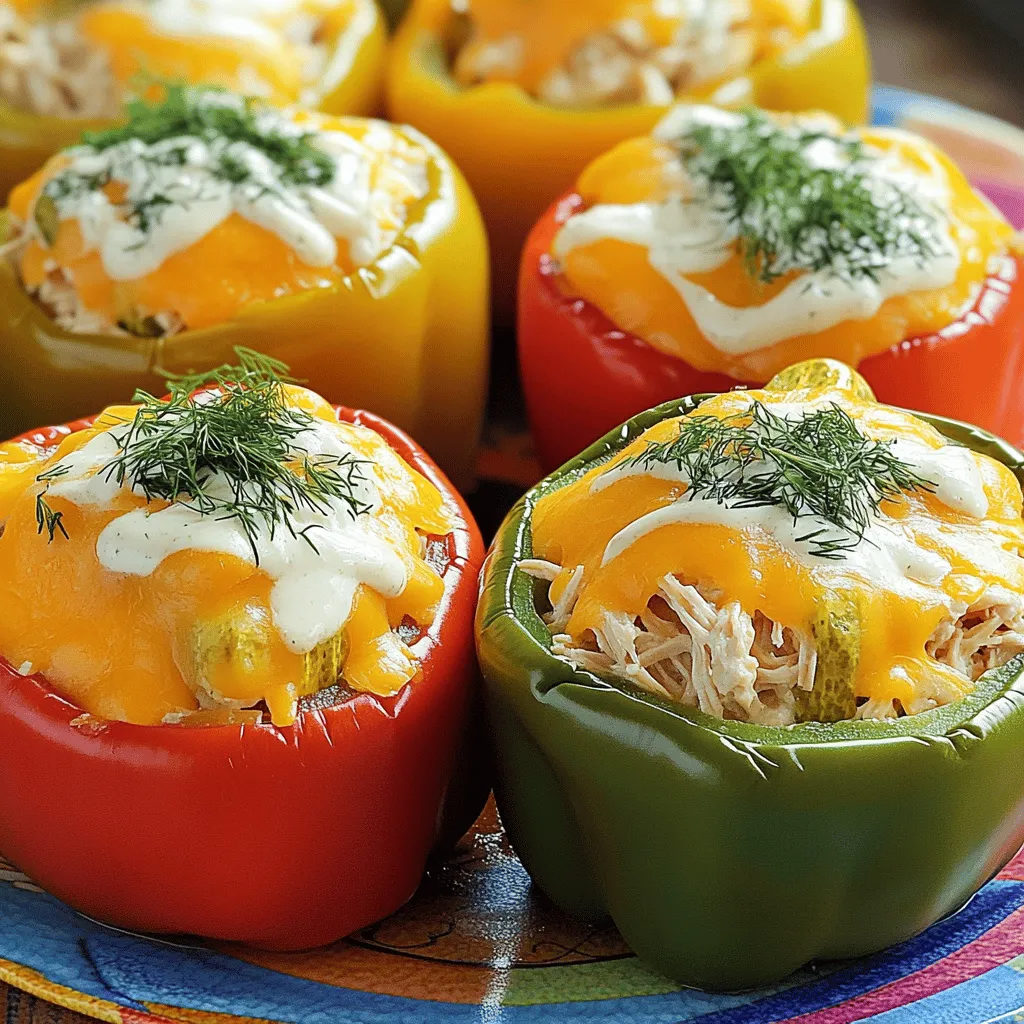
Are you ready to elevate your weeknight dinners? These Pickle Ranch Chicken Stuffed Peppers are a flavorful twist on a classic dish. Packed with chicken, cream cheese, and dill pickles, they bring a zesty punch to every bite. Easy to make and customizable, these stuffed peppers are perfect for a quick meal or a fun family gathering. Let’s dive into this delightful dish that will impress your taste buds!
Ingredients
List of Ingredients
– 4 large bell peppers (red, yellow, green, or orange)
– 2 cups cooked shredded chicken
– 1/2 cup dill pickles, finely chopped
– 1/2 cup cream cheese, softened
– 1/4 cup ranch dressing
– 1 cup shredded cheddar cheese (divided)
– 1/4 teaspoon garlic powder
– 1/4 teaspoon onion powder
– Salt and pepper, to taste
– Fresh dill for garnish
These ingredients make a tasty meal. I love using fresh bell peppers for color and crunch. You can use chicken from a rotisserie for ease. The cream cheese adds a nice creaminess to the filling. Dill pickles bring a tangy bite that surprises the taste buds.
Suggested Variations
– Try turkey or tofu as protein options.
– Substitute mozzarella or pepper jack cheese for a twist.
– For heat, add jalapeños or hot sauce to the filling.
Feel free to mix and match these ideas! You can create your own version of Pickle Ranch Chicken Stuffed Peppers.
Step-by-Step Instructions
Preparation Steps
– Preheat the oven to 375°F (190°C).
– Prepare the bell peppers by cutting the tops off and removing the seeds.
Start by preheating your oven. This step helps the peppers cook evenly. While the oven warms up, choose four large bell peppers. You can pick any color you like: red, yellow, green, or orange. Cut off the tops of the peppers carefully. Make sure to remove all the seeds and white membranes inside. This keeps the filling from getting bitter. Stand the peppers up in a baking dish. They should fit snugly to avoid tipping over.
Mixing the Filling
– Combine chicken, pickles, cream cheese, ranch dressing, cheddar, and seasonings.
In a large mixing bowl, add two cups of cooked shredded chicken. You can use rotisserie chicken for ease. Next, finely chop half a cup of dill pickles and add them to the bowl. Then, add half a cup of softened cream cheese. Pour in a quarter cup of ranch dressing. This adds great flavor! Next, add half of the shredded cheddar cheese, one-fourth teaspoon of garlic powder, one-fourth teaspoon of onion powder, and salt and pepper to taste. Mix all the ingredients until you get a creamy and well-blended filling.
Stuffing and Baking
– Fill peppers with the mixture.
– Cover and bake for 25 minutes; remove foil and bake for an additional 10-15 minutes.
Now it’s time to stuff the peppers! Use a spoon to fill each hollowed pepper with the creamy mixture. Pack the filling tightly so each bite is full of flavor. After that, sprinkle the remaining shredded cheddar cheese on top of each pepper. This will create a cheesy crust when baked. Cover your baking dish with aluminum foil. This keeps the peppers moist while they bake. Place the dish in the oven and bake for 25 minutes. After that, remove the foil and bake for another 10-15 minutes. Watch for the cheese to melt and turn golden brown. Enjoy the delicious aroma wafting through your kitchen!
Tips & Tricks
Perfecting the Recipe
– Tips for shredding chicken easily: Use a fork to pull apart cooked chicken. Rotisserie chicken works well and saves time. You can also use two forks for better control. If you chill the chicken first, it shreds easier.
– Ensuring even cooking: Cut the tops off the peppers evenly. Remove all seeds and membranes. This helps them cook well. Pack the filling tightly into each pepper for better flavor. Make sure they stand upright in the baking dish.
Cooking Techniques
– How to properly stuff peppers for maximum flavor: Fill each pepper generously with the chicken mixture. Press down lightly to pack it in. This helps the flavors mix well as they bake. Leaving a little space at the top allows cheese to melt nicely.
– Baking tips for achieving a golden crust: Bake covered with foil for the first part. This keeps the filling moist. Remove the foil for the last 10-15 minutes. This allows the cheese to melt and brown, giving you that golden crust.
Serving Suggestions
– Creative plating ideas: Place stuffed peppers on a colorful plate. Drizzle extra ranch dressing on top for a fun touch. Scatter some chopped pickles around the peppers for added color and crunch.
– Pairing recommendations (sides and drinks): Serve with a simple green salad for freshness. You can also pair it with crispy potato wedges or garlic bread. For drinks, try a light lemonade or iced tea to balance the meal.

Variations
Fun Flavor Additions
You can make Pickle Ranch Chicken Stuffed Peppers even more fun. Try using different dressings like blue cheese or Caesar. Each one gives a unique taste. You can also mix up the cheese. Creamy mozzarella or spicy pepper jack can change the flavor a lot.
Adding vegetables can boost taste and nutrition. Consider onions for sweetness or corn for a bit of crunch. You could even add some diced tomatoes for extra flavor. These fun additions will make your dish stand out.
Dietary Adjustments
If you want a low-carb version, try using zucchini or eggplant instead of bell peppers. These vegetables make great substitutes and taste delicious. Just slice them in half and scoop out a bit of the center. This keeps the filling intact.
For those who follow a vegan or dairy-free diet, you can easily adapt this recipe. Use plant-based chicken and vegan cream cheese. You can replace ranch dressing with a vegan version too. These tweaks will still give you a tasty dish without the animal products.
Seasonal Twists
Embrace the seasons by using fresh ingredients. In summer, add ripe tomatoes and fresh basil. This gives a bright flavor that shines. In fall, consider using roasted butternut squash or pumpkin. They add warmth and sweetness to each bite. Using seasonal ingredients keeps your dish fresh and exciting.
Storage Info
How to Store Leftovers
To keep your Pickle Ranch Chicken Stuffed Peppers fresh, store them properly. If you plan to eat them soon, place them in the fridge. Use airtight containers to keep them safe. This method keeps them tasty for up to four days. If you want to save them for longer, use the freezer. Wrap each pepper in plastic wrap, then place them in a freezer-safe container. This way, they can last for about three months.
Reheating Instructions
When you want to enjoy your stuffed peppers again, reheating is key. The best way is to use the oven. Preheat it to 350°F (175°C). Place the stuffed peppers in a baking dish and cover them with foil. Bake for about 20 minutes. This keeps the peppers warm and the cheese melty. You can also microwave them. Put a pepper on a microwave-safe plate and cover it. Heat for two to three minutes, checking every minute. This method is quick but may not keep the texture as nice. To enjoy the best flavor, you might consider adding a sprinkle of fresh cheese before reheating.
FAQs
Common Questions
Can I use frozen chicken?
Yes, you can use frozen chicken. Just make sure to fully cook it first. I recommend using a slow cooker or pressure cooker to make this easy.
How long will the stuffed peppers last?
Stuffed peppers will last about 3 to 5 days in the fridge. Keep them in an airtight container to maintain freshness.
Cooking-Related Queries
Can I prepare the filling ahead of time?
Absolutely! You can mix the filling a day before. Just store it in the fridge. It saves time and makes cooking easier.
What is the best way to cut peppers for stuffing?
To cut peppers, first, slice off the top. Remove seeds and membranes. This makes it easy to fill them with the tasty mixture.
Nutritional Information
Caloric content per serving
Each serving has around 400 calories. This can vary based on the cheese and chicken used.
These stuffed peppers are easy and fun to make. We covered the ingredients, steps, and tips to help you succeed. You can mix up flavors with different proteins, cheeses, and more. Don’t hesitate to get creative with your own twists. Store any leftovers properly for future meals. Enjoy your delicious creation! You’ll impress everyone with your cooking skills.
![- 1 cup stone-ground grits - 4 cups water or chicken broth - 1 pound shrimp, peeled and deveined The star of this dish is the stone-ground grits. They give a rich and creamy base. Use water or broth for cooking to add more flavor. I recommend chicken broth for a savory kick. For the shrimp, choose fresh or frozen. Just make sure they are peeled and deveined. - 4 slices of smoked gouda cheese - 1 teaspoon smoked paprika - 1/2 teaspoon cayenne pepper (adjust based on your spice preference) Smoked gouda brings a unique taste that pairs well with shrimp. You can also try other cheeses, like cheddar. For spices, smoked paprika adds depth, and cayenne gives a nice kick. Adjust the cayenne to suit your heat preference. - 3 cloves garlic, minced - 1 small yellow onion, finely chopped - 1 red bell pepper, diced - 3 tablespoons unsalted butter, divided - 1 tablespoon olive oil - Salt and black pepper, to taste - 2 green onions, chopped (for garnish) - Fresh parsley, chopped (for garnish) Fresh vegetables like onion, bell pepper, and garlic add great flavor. They also give the dish a lovely texture. Use unsalted butter and olive oil for cooking. Finally, top it all with green onions and parsley for color. These garnishes brighten the dish and add freshness. For the complete recipe, check out the Full Recipe section. 1. In a large pot, bring 4 cups of water or chicken broth to a rolling boil. 2. Slowly whisk in 1 cup of stone-ground grits to avoid lumps. 3. Once mixed, reduce the heat to low. 4. Let the grits simmer, stirring occasionally, until thick and creamy, about 20-25 minutes. 5. If the grits get too thick, stir in more water or broth to reach your desired texture. 1. While the grits cook, heat 1 tablespoon of olive oil and 1 tablespoon of butter in a large skillet over medium heat. 2. Add 1 small yellow onion, 1 red bell pepper, and 3 cloves of minced garlic. 3. Sauté for about 5 minutes until the veggies are tender and fragrant. 4. Next, add 1 pound of shrimp to the skillet. 5. Season with 1 teaspoon of smoked paprika, 1/2 teaspoon of cayenne pepper, and a pinch of salt and black pepper. 6. Cook until the shrimp turn pink and opaque, about 3-4 minutes. 1. Reduce heat to low. Pour in 1/2 cup of heavy cream. 2. Add 4 slices of smoked gouda cheese and stir until melted. 3. Taste and adjust seasoning if needed, then remove from heat. 4. To serve, ladle the creamy grits into bowls. 5. Top each bowl with the shrimp mixture. 6. For a finishing touch, add a pat of remaining butter on top. 7. Garnish with chopped green onions and fresh parsley for color and flavor. For the complete recipe, check the [Full Recipe]. To make grits creamy, you need the right consistency. Start with a good ratio of liquid to grits. If your grits are too thick, add more water or broth. Stir often to keep them smooth and prevent lumps. Use a whisk for the best results. This method helps blend the grits well with the liquid. Cooking shrimp well makes a big difference. Sauté them quickly over medium heat. This keeps them juicy and tender. Adjust the spice level by adding more cayenne if you like heat. For a milder dish, cut back on the cayenne. You can also try adding lemon juice for a bright flavor. A great dish looks as good as it tastes. Garnish your shrimp and grits with chopped green onions and fresh parsley. This adds color and freshness. Serve the dish in rustic bowls to enhance the comfort feel. For extra flair, add a lemon wedge on the side. It gives a nice pop of flavor and makes the meal inviting. {{image_4}} You can switch to cauliflower grits for a lighter option. Cauliflower grits are low in carbs and packed with nutrients. Simply steam or boil cauliflower, then blend until smooth. You can mix in some cheese for flavor. For shrimp, consider using smaller shrimp or even shrimp alternatives. Shrimp can be high in calories, so choose lower-calorie fish or plant-based options. This keeps the dish tasty without the extra calories. Adding different cheeses can take your dish to a new level. Try cheddar for a sharp kick, or parmesan for a nutty flavor. Each cheese brings its own unique taste. You can also spice things up by incorporating different spices. Add garlic powder for depth, or Cajun seasoning for a kick. Experimenting with spices lets you find the flavor you love the most. Cajun-style shrimp and grits are a fun way to mix things up. Use andouille sausage and a spicy blend of seasonings. This adds a bold kick and deep flavor to the dish. Traditional Southern touches can make your meal more authentic. Use local ingredients or add a sprinkle of Old Bay seasoning. This pays homage to the classic Southern roots of this comfort food. To store shrimp and grits, let them cool first. Place leftovers in an airtight container. Keep them in the fridge for up to three days. Make sure to separate the shrimp and grits if you can. This helps keep the texture nice. When you’re ready to enjoy leftovers, use gentle heat. You can microwave them, but add a splash of water or broth. This keeps the grits creamy. Stir often and heat until warm. You can also reheat on the stove over low heat. Just add a little liquid and stir. Yes, you can freeze shrimp and grits! However, the texture may change. To freeze, let the dish cool completely. Then, use a freezer-safe container. Store for up to three months. When you’re ready to eat, thaw in the fridge overnight. Reheat on the stove with a splash of broth or water for best results. I recommend using fresh shrimp if you can find it. Fresh shrimp has a sweet taste and firm texture. If fresh shrimp is not available, frozen shrimp also works. Just ensure it is peeled and deveined. Thaw the shrimp in the fridge overnight for the best results. Yes, you can spice up your shrimp and grits! Add cayenne pepper for heat. You can also mix in hot sauce or diced jalapeños. Start with a little and taste as you go. This way, you control how spicy it gets. You can make shrimp and grits vegetarian easily. Swap shrimp for sautéed mushrooms or roasted cauliflower. Use vegetable broth instead of chicken broth. For creaminess, you can use coconut milk or a plant-based cream. This keeps the dish rich and delicious without the shrimp. For the full recipe, check out the Savory Shrimp & Grits Delight. Shrimp and grits are a dish filled with rich flavors and textures. We explored the main ingredients, like stone-ground grits and shrimp, and how spices and cheeses enhance the taste. I provided step-by-step cooking instructions, tips for creamy grits, and serving ideas. We also looked at healthy variations and how to store leftovers. Now, you can make this dish your own. Try new ingredients or adjust the spices to fit your taste. Enjoy your cooking journey!](https://goldendishy.com/wp-content/uploads/2025/06/edb6efca-056a-45fa-9dae-09e61936659d-768x768.webp)
![- 1 lb boneless, skinless chicken breast - Soy sauce, honey, rice vinegar, sesame oil - Fresh garlic and ginger The main stars of this dish are the chicken and the sauce. Start with 1 pound of boneless, skinless chicken breast. Cut it into 1-inch cubes for even cooking. You’ll also need soy sauce for that salty umami flavor. Honey adds sweetness, while rice vinegar gives a nice tang. Don't forget the sesame oil, which adds a rich, nutty taste. Fresh garlic and ginger bring a wonderful aroma and flavor to the mix. - Red and green bell peppers - Zucchini - Scallions and sesame seeds for garnish Adding vegetables makes your skewers colorful and tasty. Use red and green bell peppers cut into 1-inch squares. They add crunch and sweetness. Sliced zucchini rounds are great for texture and taste. For garnish, sprinkle chopped scallions and sesame seeds on top. They add a nice pop of flavor and look pretty, too. - Wooden skewers or metal skewers - Cornstarch for sauce thickening You will need skewers to hold all the goodness together. If you choose wooden skewers, soak them in water for about 30 minutes. This helps prevent burning on the grill. Metal skewers are a great option too. For the teriyaki sauce, you will use cornstarch mixed with water to make it thick and glossy. This will give your chicken a beautiful glaze. For the full recipe, check the section above on how to bring these ingredients together into a delightful dish. To start, gather your marinade ingredients. In a bowl, mix the soy sauce, honey, rice vinegar, sesame oil, minced garlic, and grated ginger. Whisk until everything blends well. Add the chicken breast cubes, making sure they are well coated. Cover the bowl with plastic wrap. Place it in the fridge for at least 30 minutes. For a stronger flavor, marinate for up to 2 hours. This step is key to juicy, flavorful chicken. If you use wooden skewers, soak them in water for at least 30 minutes. This helps stop them from burning. While the skewers soak, preheat your grill or grill pan to medium-high heat. A hot grill will give your skewers those perfect grill marks and lock in the flavors. After marinating, take the chicken out of the fridge. Start threading the marinated chicken onto the skewers. Alternate with pieces of red and green bell peppers and zucchini slices. Leave small gaps between each piece for even cooking. Now, place the skewers on the hot grill. Grill them for about 10 to 12 minutes. Turn them occasionally to ensure even cooking. The chicken should reach an internal temperature of 165°F. You’ll know they are done when they have beautiful grill marks and smell amazing. For the best flavor, marinate the chicken for at least 30 minutes. If you have time, let it soak for up to 2 hours. This longer marinating time helps the chicken absorb all the tasty flavors. To boost the flavor even more, add a splash of orange juice or sprinkle some chili flakes into the marinade. These small changes can make a big difference. To get those nice grill marks, preheat your grill to medium-high heat. Once you place the skewers on, resist the urge to move them around too much. Let them cook for about 10-12 minutes. Flip them only when they lift easily from the grill. To know if the chicken is done, use a meat thermometer. The safe internal temperature for chicken is 165°F. This ensures your skewers are juicy and safe to eat. When serving your Chicken Teriyaki Skewers, make it look nice! Arrange them on a platter, maybe on a bed of fresh lettuce. You can also serve them with a small bowl of extra teriyaki sauce for dipping. For sides, consider steamed rice or a fresh salad. The colors of the skewers and the sides will create a beautiful meal. This makes it more fun to eat and share! {{image_4}} You can switch up the protein in your skewers. Shrimp works great, too. Just remember to cook shrimp for only 4-6 minutes. Tofu is another good choice. Use firm tofu and press it first to remove extra water. Then, cut it into cubes. Tofu takes about the same time as chicken to cook. For a plant-based twist, try a marinade with soy sauce, maple syrup, and garlic. It will give you great flavor without meat. You can make vegetable-only skewers with bell peppers, zucchini, mushrooms, and cherry tomatoes. These cook quickly and taste amazing on the grill. You can make your skewers even better with spices. Adding chili flakes or smoked paprika gives a nice kick. You can also try different sauces like peanut or hoisin sauce. Mix in veggies like onions or asparagus for more color and taste. These small changes can make your Chicken Teriyaki Skewers unique and fun. For the full recipe, check out the detailed instructions above. When you have leftover chicken teriyaki skewers, store them properly. Place the skewers in an airtight container. This helps keep them fresh. Refrigerate them within two hours of cooking. It’s best to eat them within three days. Use glass or plastic containers with tight lids. These containers prevent air from getting in. You can also wrap them in aluminum foil. Just make sure they are sealed well. This keeps your skewers moist and tasty. To reheat your skewers, use an oven or a stovetop. Both methods keep the chicken juicy. If using an oven, set it to 350°F. Place the skewers on a baking sheet. Heat for about 10 minutes. For stovetop reheating, use a non-stick pan. Add a splash of water to the pan. Cover it with a lid. This helps steam the skewers and keeps them moist. Avoid reheating them in the microwave. Microwaves can make the chicken dry. Instead, always check the internal temperature. It should reach 165°F for safe eating. If you want to freeze the chicken skewers, do it right after cooking. Let them cool completely first. Wrap each skewer in plastic wrap. Then place them in a freezer bag. This helps prevent freezer burn. To thaw, move the skewers to the fridge a day before you want to eat them. This keeps them safe and tasty. If you need to thaw them faster, use the microwave on the defrost setting. But make sure to cook them right away after. For the best results, enjoy your chicken teriyaki skewers fresh. But if you follow these steps, leftovers can still taste great! For the full recipe, check it out [Full Recipe]. To check if your Chicken Teriyaki Skewers are done, use a meat thermometer. The chicken should reach an internal temperature of 165°F (75°C). This step is key for food safety. If you don't have a thermometer, make sure the juice runs clear when you cut the chicken. No pink should show. Yes, you can make the teriyaki sauce ahead of time. Mix the ingredients and store it in the fridge. This makes your meal prep easier. You can also make a larger batch and freeze it. Just thaw it before use. This way, your meal cooks faster. Chicken Teriyaki Skewers pair well with many side dishes. You might try steamed rice or quinoa for a filling option. A fresh salad adds a nice crunch. You can also serve them with grilled vegetables for a colorful plate. These sides will enhance the flavors and balance the meal. Chicken Teriyaki skewers are easy and fun to make. You learned about key ingredients like chicken, vegetables, and sauce. I shared step-by-step instructions for marinating, preparing, and grilling. You also saw tips for perfecting your dish and some tasty variations. In the end, you can enjoy these skewers any way you like. With proper storage and reheating, leftovers can be just as delicious. I hope this guide helps you create a tasty meal that you will love!](https://goldendishy.com/wp-content/uploads/2025/07/34476f9e-f69f-487d-af01-da0dcfe0a0e7-768x768.webp)