Peach Cobbler Overnight Oats Simple and Tasty Recipe

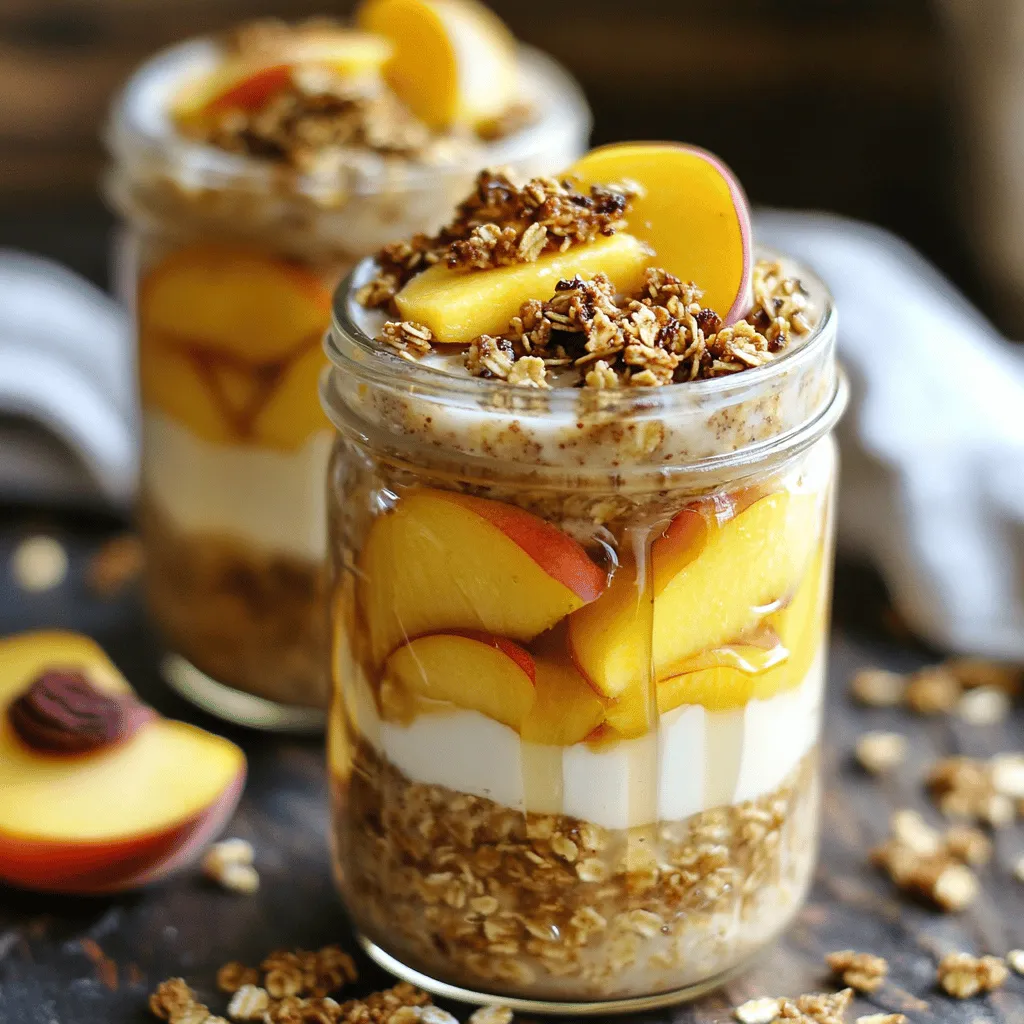
Start your morning right with Peach Cobbler Overnight Oats! This simple and tasty recipe combines the sweet flavor of ripe peaches with creamy oats. You’ll get all the comfort of peach cobbler in a quick breakfast. Plus, it’s easy to make and packed with nutrition. Whether you need a busy morning meal or a satisfying snack, these oats will delight your taste buds. Let’s dive in and make your mornings delicious!
Ingredients
Essential Ingredients
– 1 cup rolled oats
– 1 ½ cups almond milk (or your preferred milk variety)
– 1 medium ripe peach, diced
– 1 tablespoon maple syrup (adjust based on your sweetness preference)
– 1 teaspoon pure vanilla extract
– ½ teaspoon ground cinnamon
– ¼ teaspoon freshly grated nutmeg
– 1 tablespoon chia seeds (optional for additional texture)
– ¼ cup Greek yogurt (optional, for added creaminess)
– Fresh peach slices and crunchy granola for topping
The key to great Peach Cobbler Overnight Oats is using fresh and tasty ingredients. Start with rolled oats. They soak up the liquid and get soft overnight. Almond milk gives it a nice flavor, but you can use any milk you like. A ripe peach adds sweetness and a juicy bite. I love to add maple syrup for a touch of sweetness, but you can adjust this if you prefer.
Don’t forget spices! Vanilla extract, cinnamon, and nutmeg bring out the peach flavor. Chia seeds add a fun texture, but they are optional. Greek yogurt makes the oats creamier and richer. Finally, top your oats with fresh peach slices and crunchy granola for a lovely finish.
Optional Nutritional Additions
– Alternatives for milk (soy, oat, etc.)
– Sweetener options (honey, agave nectar)
If you want to try something different, swap almond milk for soy or oat milk. You can also use honey or agave nectar as a sweetener instead of maple syrup. This makes the recipe more fun and personal to your taste.
Dietary Considerations
– Dairy-free substitutions
– Gluten-free oats
For those who need dairy-free options, skip the Greek yogurt or use a dairy-free yogurt. Ensure your oats are labeled gluten-free if that’s a concern. These small changes help make this dish suitable for everyone!Enjoy your Peach Cobbler Overnight Oats!
Step-by-Step Instructions
Preparation Steps
– In a large bowl, combine 1 cup of rolled oats and 1 ½ cups of almond milk.
– Mix in 1 tablespoon of maple syrup, 1 teaspoon of vanilla extract, ½ teaspoon of ground cinnamon, and ¼ teaspoon of nutmeg.
– Fold in 1 medium ripe peach, diced. Reserve a few peach pieces for later.
Assembling Overnight Oats
– Divide the mixture evenly into two or three mason jars.
– Seal the jars tightly to keep them fresh in the fridge.
Serving Suggestions
– The next morning, stir the oats well before serving.
– If you want a thinner texture, add a splash of milk.
– Top with reserved peach slices and a sprinkle of granola for crunch.
Enjoy your Peach Cobbler Overnight Oats!
Tips & Tricks
Making the Perfect Oats
To get the best texture, adjust the soaking time. If you like your oats soft, let them sit overnight. For a firmer bite, soak them for about four to six hours. If you want creaminess, Greek yogurt works wonders. Fold it in gently after mixing your oats. This keeps the mix light and fluffy.
Storage Tips
For storing leftovers, use airtight containers or mason jars. This keeps your oats fresh for up to five days in the fridge. If you choose to reheat them, add a splash of almond milk. Warm them in the microwave for about 30 seconds. Stir and check if they need more time.
Presentation Suggestions
Layer your oats with peach slices for a pretty look. Start with oats, then add a layer of peaches. Repeat until the jar is full. For a fancy touch, top with a sprinkle of cinnamon or a drizzle of maple syrup. This simple step makes your breakfast look gourmet!

Variations
Flavor Combinations
You can switch up the flavors in your oats. Try adding nuts or seeds for a nice crunch. Walnuts or almonds work great. They add protein and healthy fats. You can also mix in other fruits. Ripe berries or diced apples pair well with peaches. Their sweetness and tartness create a tasty blend.
Dietary Adaptations
If you want to make these oats vegan, simply swap almond milk for a plant-based milk. You can also use maple syrup for sweetening, which is vegan-friendly. For low-sugar options, use a sugar substitute like stevia or erythritol. Adjust the amount to suit your taste.
Seasonal Variations
You can change the flavor based on the season. In fall, try pumpkin spice oats. Just add pumpkin puree and pumpkin spice to the mix. In summer, swap peaches for fresh berries or other seasonal fruits. This keeps your breakfast exciting all year long.
Storage Info
Recommended Storage Containers
I love using mason jars for storing overnight oats. They are easy to seal and look cute too. If you prefer, airtight containers also work well. Choose materials like glass or BPA-free plastic. These options help keep your oats fresh and tasty.
Shelf Life
You can store Peach Cobbler Overnight Oats in the fridge for up to five days. Check for signs that they have gone bad. If you see mold or a sour smell, it’s best to toss them out. Fresh oats should smell sweet and fruity.
Freezing Instructions
If you have leftovers, you can freeze them for quick breakfasts. Spoon the oats into freezer-safe containers. When you’re ready to eat, thaw them overnight in the fridge. To reheat, just warm them in the microwave. Add a splash of milk to bring back the creaminess!
FAQs
Can I use steel-cut oats instead of rolled oats?
You can use steel-cut oats, but the texture will change. Steel-cut oats are chewier and firmer. They take longer to soak and may not absorb flavors as well as rolled oats. If you choose steel-cut oats, soak them overnight for a soft bite.
How long do overnight oats need to refrigerate?
Overnight oats should refrigerate for at least 4-6 hours. This lets the oats absorb the liquid. For best results, let them sit overnight. They will be ready when you wake up!
Can I make these oats vegan?
Yes, you can easily make these oats vegan. Swap Greek yogurt for coconut yogurt or any plant-based yogurt. Use maple syrup or agave for sweetness. Choose almond milk or any plant milk you enjoy.
What can I use instead of Greek yogurt?
If you want a creamy texture without Greek yogurt, try these options:
– Coconut yogurt
– Cashew cream
– Silken tofu blended until smooth
These alternatives will keep your oats rich and tasty.
This blog post covers how to make delicious overnight oats. You learned about the essential ingredients, with peaches and oats as key players. I shared tips for making the perfect batch and how to store or freeze leftovers. We also explored fun variations to keep your oats exciting.
Incorporating different fruits and flavors can turn a simple meal into a treat. Enjoy experimenting, and remember: healthy eating can be tasty too!


![- 1 cup cherries, pitted and chopped - 1 cup unsweetened applesauce - 1/2 cup peanut butter or almond butter - 1/2 cup honey or maple syrup - 1 teaspoon vanilla extract - 2 cups rolled oats - 1/2 cup chocolate protein powder - 1 teaspoon baking powder - 1/2 teaspoon baking soda - 1/4 teaspoon salt - 1/3 cup dark chocolate chips To make the best Cherry Chocolate Protein Muffins, you need fresh ingredients. Start with cherries. Choose ripe cherries for a sweet taste. Pitting and chopping them helps mix them into the batter easily. Next, use unsweetened applesauce. It adds moisture and replaces some fat. This keeps the muffins light and fluffy. If you prefer a nutty flavor, choose between peanut butter or almond butter. Both work well. For sweetness, you can pick honey or maple syrup. Each adds a unique flavor. Don’t forget the vanilla extract. It enhances the overall taste. Now, let’s talk about the dry ingredients. Rolled oats add texture and fiber. They also help bind the muffins. The chocolate protein powder is key for a protein boost. It makes these muffins a healthy snack. Add baking powder and baking soda for lift. This ensures your muffins rise well. Lastly, sprinkle in some salt to balance the sweetness. The dark chocolate chips are the fun part. They melt in the oven and create pockets of gooey chocolate. This makes every bite a treat! For the full recipe, check out the instructions in the next section. Enjoy every step of making these delicious muffins! 1. First, preheat your oven to 350°F (175°C). This step is key to baking muffins evenly. 2. Prepare your muffin tin by lining it with paper liners. You can also lightly grease each cup to help prevent sticking. 3. In a large mixing bowl, combine the unsweetened applesauce, your choice of nut butter, honey, and vanilla extract. Mix well with a whisk or spatula until smooth. 4. Now, it’s time to fold in the chopped cherries. Gently stir them into the wet mixture. Make sure they spread evenly throughout the batter. 5. In another bowl, whisk together the rolled oats, chocolate protein powder, baking powder, baking soda, and salt. This mix will give your muffins a nice rise. 6. Gradually add the dry mix to the wet mixture. Fold them together gently, being careful not to overmix. Overmixing can make your muffins tough. 7. Next, fold in the dark chocolate chips. Ensure they are well-distributed, so you get a chocolate burst in every bite. 8. Use a spoon or an ice cream scoop to pour the batter into the muffin tin. Fill each cup about 2/3 full to allow room for rising. 9. Bake the muffins in your preheated oven for 18-20 minutes. Check for doneness by inserting a toothpick into the center. If it comes out clean, they are ready! 10. Once baked, remove the muffins and let them cool in the tin for 5 minutes. Then, transfer them to a wire rack to cool completely. This step helps keep the texture light and fluffy. For the full recipe, check out the details above. Enjoy your delicious Cherry Chocolate Protein Muffins! To make the best Cherry Chocolate Protein Muffins, avoid overmixing the batter. Overmixing can lead to tough muffins. Mix just until the dry and wet ingredients combine. This keeps your muffins light and fluffy. Measuring ingredients accurately is also key. Use dry measuring cups for solids like oats and protein powder. For liquids, use a liquid measuring cup. This ensures you add the right amounts for great results. I love serving these muffins warm. They taste best right out of the oven. A light dusting of powdered sugar or a drizzle of melted dark chocolate adds a special touch. You can also pair them with Greek yogurt for extra protein and creaminess. For a balanced meal, enjoy these muffins with a side of fruit. Slices of banana or a handful of berries can brighten your plate and add freshness. These muffins are packed with health benefits. Protein powder offers a great source of protein. It helps build and repair muscles. This makes them perfect for post-workout snacks. Cherries are rich in antioxidants. They help fight inflammation and support heart health. Oats provide fiber, which is good for digestion. They also keep you feeling full longer, making these muffins a smart choice for any time of day. For the complete recipe, check out the [Full Recipe]. {{image_4}} You can make Cherry Chocolate Protein Muffins gluten-free by using certified gluten-free oats. Almond flour also works well here. For a vegan option, replace honey with maple syrup. Use a vegan protein powder to keep it plant-based. This way, everyone can enjoy these tasty muffins, no matter their diet. - Gluten-free: Use gluten-free oats and almond flour. - Vegan: Swap honey for maple syrup and use vegan protein powder. Spicing up your muffins can add a fun twist. Try adding 1 teaspoon of cinnamon or nutmeg to the mix. This small change can bring warmth and depth to the flavor. You might also want to mix in nuts or seeds. Chopped walnuts or sunflower seeds can add crunch and nutrition to your muffins. - Spices: Add 1 teaspoon of cinnamon or nutmeg. - Nuts or seeds: Incorporate chopped walnuts or sunflower seeds. You can customize these muffins with fruits that are in season. In summer, try adding blueberries or peaches. In fall, diced apples or pumpkin puree would be delightful. Different types of chocolate can also change the taste. Dark chocolate, milk chocolate, or even white chocolate can make the muffins exciting and unique. - Seasonal fruits: Use blueberries in summer or apples in fall. - Chocolate types: Experiment with dark, milk, or white chocolate. To keep your Cherry Chocolate Protein Muffins fresh, follow these simple steps: - Allow the muffins to cool completely before storage. - Use an airtight container to maintain moisture. - Place parchment paper between layers to avoid sticking. I find that glass containers work best because they help keep the muffins soft and fresh. Freezing muffins is a great way to enjoy them later. Here’s how to do it: - Allow the muffins to cool fully. - Wrap each muffin in plastic wrap or aluminum foil, then place them in a freezer bag. - Label the bag with the date for easy tracking. When you’re ready to eat, thaw the muffins by leaving them out at room temperature. For quicker results, pop them in the microwave for about 20 seconds. This method keeps them moist and tasty. Cherry Chocolate Protein Muffins can last: - At room temperature: 3 to 4 days in an airtight container. - In the fridge: 1 week if stored properly. This means you can enjoy these muffins without worry for several days! Remember to check for freshness before eating. Enjoy your delicious snacks! Can I make these muffins ahead of time? Yes, you can make these muffins ahead of time. They store well for a few days. Just make sure to keep them in an airtight container. You can also freeze them for longer storage. What can I use instead of protein powder? If you don't have protein powder, you can use ground oats or almond flour. This will change the texture a bit but keeps the muffins tasty. You might need to adjust the liquid in the recipe. How can I reduce sugar in the recipe? To cut down on sugar, use less honey or maple syrup. You can also swap in a sugar substitute like stevia. This will help keep the sweetness but lower the sugar content. Is it possible to use fresh cherries instead of frozen? Yes, fresh cherries work great too! Just chop them up and remove the pits. Fresh cherries can add a nice burst of flavor. They may make the muffins a bit moister, so keep an eye on baking time. What is the protein content per muffin? Each muffin has about 7 grams of protein. This comes mainly from the protein powder and nut butter. It makes a healthy snack or breakfast option. Are these muffins suitable for kids? Absolutely! These muffins are great for kids. They are tasty and packed with nutrients. Plus, the chocolate bits make them fun to eat. In this article, we explored how to make delicious Cherry Chocolate Protein Muffins. We covered ingredients, step-by-step instructions, and tips for perfecting the recipe. You learned how to store these muffins and adapt them for different diets. These muffins are not just tasty; they offer health benefits too. Experiment with flavors and enjoy them as snacks or meals. Now, grab your ingredients and start baking your own batch today!](https://goldendishy.com/wp-content/uploads/2025/07/bcf12119-4bc4-4824-810e-f617231ac2e7-768x768.webp)
![To make easy lemon bars, you need a few simple ingredients. Here’s what you’ll need: - 1 cup all-purpose flour - 1/2 cup powdered sugar (plus extra for dusting) - 1/4 teaspoon salt - 1/2 cup unsalted butter, melted - 2 large eggs - 1 cup granulated sugar - 1/4 cup freshly squeezed lemon juice - Zest of 1 fresh lemon - 1/2 teaspoon baking powder Each ingredient plays a key role in the flavor and texture. The flour gives structure, while the butter adds richness. The eggs help bind everything together. The lemon juice and zest bring that bright, zesty flavor. Using fresh lemon juice makes a big difference. It adds a vibrant taste that bottled juice can’t match. The powdered sugar gives the bars a sweet finish. Make sure to have some extra on hand for dusting. Gather these ingredients before you start. This will make the cooking process smooth and easy. For the full recipe, check out the complete guide to making these delicious lemon bars. 1. Preheat your oven to 350°F (175°C). This is important for even baking. 2. In a medium bowl, mix the flour, powdered sugar, and salt. Use a whisk to combine them well. 3. Pour the melted butter into the bowl. Mix it with a fork until it looks like clumpy dough. 4. Press this dough firmly into the bottom of an 8x8 inch baking dish. This will be your crust. 1. In a separate bowl, whisk together the eggs and granulated sugar. Beat them until smooth and slightly frothy. This takes about 1-2 minutes. 2. Next, add the lemon juice, lemon zest, and baking powder to the egg mixture. Stir until everything is mixed well. 1. Bake the crust in the preheated oven for about 15 minutes. It should turn a light golden brown. 2. Carefully pour the lemon filling over the hot crust. Return the dish to the oven. 3. Bake for an additional 20-25 minutes. The filling should be set and lightly browned when done. 4. Once baked, remove the dish from the oven and let it cool for at least 15 minutes. This helps the bars set up. 5. Transfer the bars to a wire rack to cool completely. Once cool, dust with powdered sugar and cut into squares. For the full recipe, check out the detailed instructions. Enjoy your refreshing lemon bars! - Use room temperature ingredients. This helps the batter mix well. - Fresh lemon juice boosts the taste. It brings out the bright, zesty flavor. When you use room temperature eggs and butter, they mix better. This helps create a smooth filling. Fresh lemon juice is key for a strong lemon flavor. Bottled juice can taste flat. - Dust your bars with powdered sugar. This adds a nice touch and looks pretty. - Garnish with lemon slices and mint leaves. They make your bars pop and look inviting. Once your lemon bars cool, dust them with sugar. Then, place lemon slices on top. Add a few mint leaves for color. This makes your dessert not just tasty but also beautiful. For the full recipe, check out the details above. {{image_4}} You can make these lemon bars even more exciting. One way is to add berries. Fresh blueberries or raspberries pair well with lemon. They add a pop of color and taste. Just fold in one cup of your chosen berries after mixing the lemon filling. Another fun idea is to infuse the bars with herbs. Basil or rosemary works great. Chop a few leaves finely and mix them in with the lemon juice. This adds a unique twist that surprises the taste buds. If you need gluten-free bars, don't worry! You can swap the all-purpose flour for a gluten-free blend. Look for a mix that includes rice flour and starches. This keeps the texture light and tasty. For those who follow a vegan diet, you can replace the eggs. Use flax eggs instead. To make one flax egg, mix one tablespoon of flaxseed meal with two and a half tablespoons of water. Let it sit for about five minutes until it gets thick. This works well in the lemon filling to keep it creamy. Check the [Full Recipe] for the main steps to create these delightful lemon bars. To keep your lemon bars fresh, store them in the refrigerator. - Wrap them well: Use plastic wrap or an airtight container. - Keep them chilled: This helps maintain their texture and flavor. If you want to save some for later, you can freeze lemon bars. - Cool completely: Let them cool fully before freezing. - Cut into squares: This makes it easy to grab one later. - Wrap in plastic: Use freezer-safe wrap to prevent freezer burn. - Place in a container: Use an airtight container for extra protection. Lemon bars stay fresh in the fridge for about one week. - Check for freshness: Look for any signs of mold or off smells. If they have been in the fridge too long, they may go bad. - Signs of spoilage: If they look discolored or smell sour, it’s time to toss them. - Texture changes: A slimy texture means they’re no longer good. Storing them right helps you enjoy their bright flavor longer! For the complete recipe, check out the Full Recipe. To make your lemon bars less tart, adjust the sugar and lemon juice. You can add more sugar to balance the tartness of the lemon juice. Try adding an extra 1/4 cup of sugar to the filling. If you want, you can also reduce the lemon juice. Use about 3 tablespoons instead of 1/4 cup. This way, you keep the lemon flavor while making it sweeter. You can use bottled lemon juice, but fresh is better. Bottled juice often lacks the bright flavor of fresh lemons. Fresh lemon juice also has a more vibrant acidity. This difference makes your bars taste much better. If you must use bottled juice, try to find one with no added sugar or preservatives. To cut lemon bars into neat squares, use a sharp knife. First, let the bars cool completely. This helps them set and makes cutting easier. Dip your knife in warm water before each cut. Wipe the knife clean between cuts for a smoother edge. For even squares, use a ruler or a guide to measure before cutting. These tips will help your bars look great on any plate. You learned how to make easy lemon bars from scratch. We covered essential ingredients, step-by-step instructions, and helpful tips for perfect results. Don’t forget to try variations, like adding fruits or herbs. Proper storage keeps your bars fresh longer. Enjoy your sweet and tangy treat! The fun lies in making them your own. Experiment. Share your creations with friends and family. Happy baking!](https://goldendishy.com/wp-content/uploads/2025/07/78212822-f759-45eb-b990-dd8ea93e2cb8-768x768.webp)

