
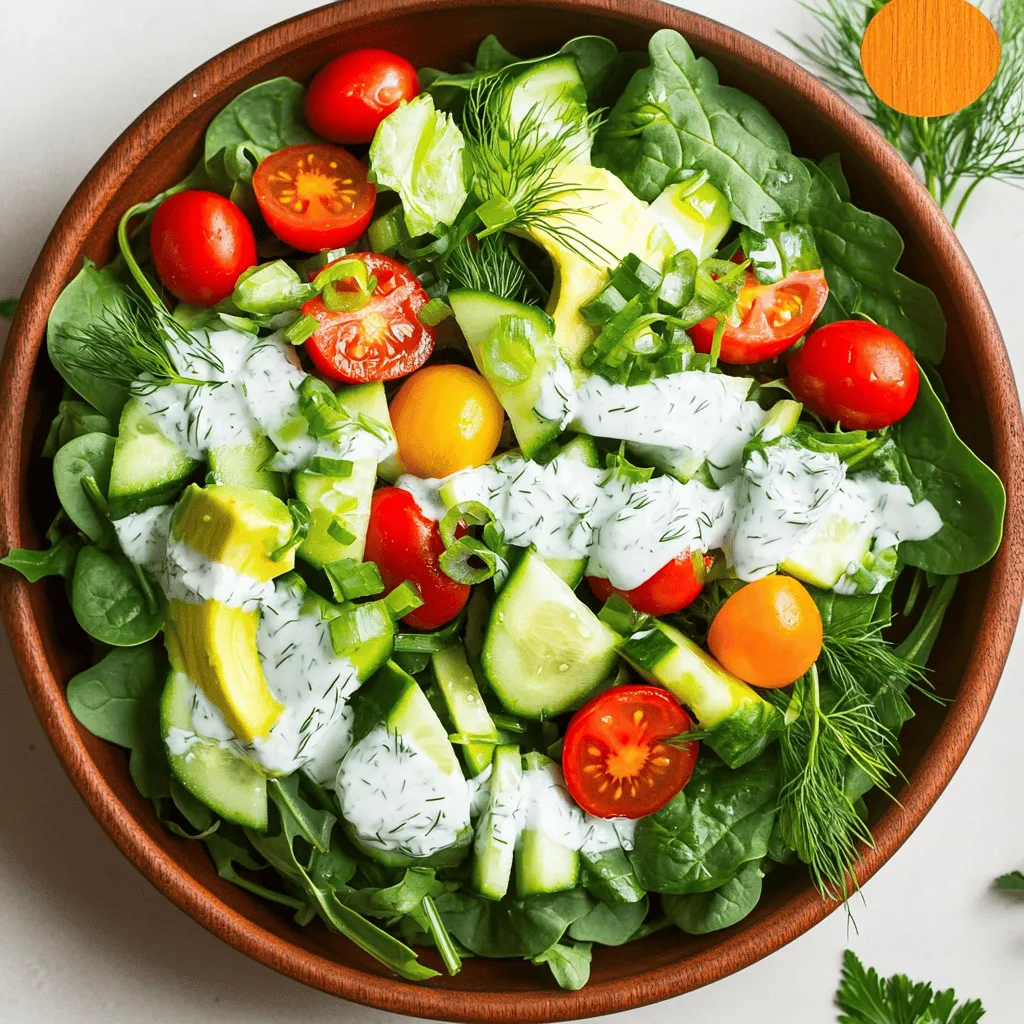
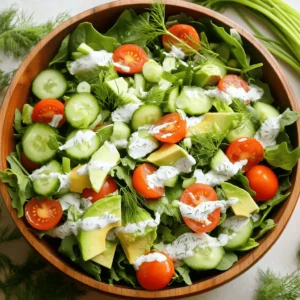
Simple Green Goddess Salad Vibrant and Fresh Delight

Are you ready to brighten up your meals with a wholesome twist? The Simple Green Goddess Salad is your ticket to vibrant, fresh flavors that excite your taste buds. Packed with crisp greens, ripe avocado, and a creamy dressing, this salad is not just a side dish—it’s a delightful feast. Get ready to learn how to create this easy, nutritious gem that’s perfect for any occasion! Let’s dive in!
Ingredients
Salad Components
– 4 cups of assorted salad greens (baby spinach, arugula, romaine)
– 1 cup of cucumber, finely diced
– 1 cup of cherry tomatoes, halved
– 1 ripe avocado, sliced
Dressing Ingredients
– 1/2 cup of Greek yogurt
– 2 tablespoons of fresh lemon juice
– 2 tablespoons of olive oil
– Sea salt and black pepper to taste
Optional Garnishes
– 1/2 cup green onions, thinly sliced
– 1/4 cup fresh parsley, coarsely chopped
– 1/4 cup fresh dill, coarsely chopped
The Simple Green Goddess Salad needs fresh and tasty ingredients. Start with the salad components. A mix of baby spinach, arugula, and romaine creates a vibrant base. The cucumber adds crunch, while cherry tomatoes give a hint of sweetness. Don’t forget the ripe avocado! Its creamy texture makes the salad rich and satisfying.
Next, let’s talk dressing. The Greek yogurt forms a creamy base. Fresh lemon juice adds a bright zing. Olive oil brings richness, while sea salt and black pepper enhance the flavors.
You can also add optional garnishes. Thinly sliced green onions give a mild onion taste. Fresh parsley and dill add a nice herbal touch. These little extras make the salad even more special.Enjoy every bite of this vibrant and fresh delight!
Step-by-Step Instructions
Preparing the Salad Base
Begin by mixing the assorted greens in a large mixing bowl. This creates a fresh and colorful base for your salad. Next, add diced cucumber and halved cherry tomatoes for texture. The cucumber adds a nice crunch, and the tomatoes bring sweetness.
Adding Creamy Elements
Now, layer sliced avocado on top of the salad. This adds a rich, creamy feel. Don’t forget to sprinkle with green onions. They give a mild onion flavor that really brightens the dish. In a separate bowl, prepare the dressing.
Combining Ingredients
Whisk together Greek yogurt, lemon juice, and olive oil in the bowl. This mixture should be smooth and creamy. Then, fold in the herbs like parsley and dill. This adds freshness. Combine this dressing with the salad and adjust the seasoning to your taste. You can also add sea salt and freshly cracked black pepper.Enjoy the colorful mix of flavors that make this salad a delightful choice!
Tips & Tricks
Serving Suggestions
Serve your salad right after mixing. This keeps all the flavors fresh and bright. A rustic wooden bowl adds charm. It makes the salad look even more inviting.
Dressing Consistency
You can change the thickness of the dressing. Add more yogurt for a creamier mix. If you want it tangier, squeeze in more lemon juice. Mixing in extra herbs can boost the flavor too.
Enjoying the Salad
This salad pairs well with grilled chicken or fish. It creates a complete and tasty meal. For added crunch, top it with nuts or seeds. They give the salad a nice texture and extra nutrition. Enjoy your fresh delight!
Variations
Protein Additions
You can easily boost your salad with protein. Add grilled chicken for a hearty touch. Shrimp also works well, giving the salad a nice, fresh flavor. If you prefer a plant-based option, toss in chickpeas for a great source of protein. Roasted nuts are another excellent choice. They add crunch and healthy fats, perfect for vegetarian diets.
Dietary Modifications
If you want to make this salad dairy-free, swap out Greek yogurt for a dairy-free alternative. Many great options exist, like coconut yogurt or almond yogurt. This change makes the salad creamy without the dairy. You can also mix in gluten-free grains like quinoa. This addition makes the salad heartier and adds more texture.
Flavor Enhancements
To take the taste to the next level, add different herbs. Basil or cilantro can give your salad a unique twist. These herbs add a fresh burst of flavor. You can also enhance the taste by adding citrus zest. Lemon or lime zest brings a bright, zesty kick that makes each bite exciting.
Storage Info
Refrigeration Tips
Store leftover salad in an airtight container for up to 24 hours. Keeping the dressing separate helps maintain the salad’s freshness. This way, your greens stay crisp and tasty for the next day.
Freezing Considerations
Avoid freezing the salad. The ingredients may become mushy when thawed. Instead, prepare the dressing in advance. Store it in the fridge for later use. This helps keep flavors bright when you’re ready to enjoy the salad again.
Best Practices
Add avocado just before serving. This step prevents browning and keeps your salad looking fresh. If the salad has been stored, re-toss it before serving. This ensures all flavors mix well again. Enjoy the vibrant and fresh delight of your Simple Green Goddess Salad!
FAQs
Can I prepare the salad in advance?
Yes, but store dressing separately to maintain freshness. This keeps the greens crisp and tasty. You can mix the salad base ahead of time. Just add the dressing right before serving.
What can I substitute for Greek yogurt?
You can use sour cream or a vegan yogurt alternative. Both options work well. They keep the creaminess of the dressing. Choose what fits your taste or diet.
How can I make this salad vegan?
Omit Greek yogurt and use a plant-based dressing instead. You can blend cashews or silken tofu to create a creamy texture. This keeps the salad rich while making it vegan-friendly.
What other greens can be used?
Mixed baby greens, kale, or spinach all work well. You can even mix in some collard greens for more flavor. Feel free to experiment with different greens to find your favorite blend.
How do I enhance the flavors?
Use fresh herbs and quality olive oil for a better taste. Fresh herbs add a burst of flavor. Quality olive oil makes the dressing smooth and rich. A squeeze of lemon juice also brightens every bite.
This salad combines fresh greens, creamy avocado, and a zesty dressing. You can enjoy it as a main dish or a side. Add your favorite proteins or grains to fit your diet. Remember to keep your dressing separate for the best taste. With these tips, your salad will always be a hit. Happy cooking!

![To make Cheesy Ranch Potatoes, you will need a few simple items. Gather these ingredients before you start cooking: - 2 pounds baby potatoes, halved - 1 cup shredded sharp cheddar cheese - ½ cup creamy sour cream - 1 packet ranch dressing mix (about 1 ounce) - 3 tablespoons extra virgin olive oil - 1 teaspoon garlic powder - 1 teaspoon onion powder - Salt and freshly ground black pepper to taste - 2 green onions, finely sliced (for garnish) Each ingredient plays a key role in creating that cheesy, ranch-flavored goodness. The baby potatoes serve as the base, providing a tender texture. Sharp cheddar cheese adds a rich, creamy taste. Sour cream brings a tangy flavor, while the ranch dressing mix ties everything together with its herby notes. The garlic and onion powders enhance the overall taste, making every bite delicious. Don't forget the green onions; they add a fresh crunch on top! For the complete recipe, check out the [Full Recipe]. - Preheat the oven to 400°F (200°C). This makes sure your potatoes cook evenly. - In a large bowl, mix the olive oil, ranch dressing mix, garlic powder, onion powder, salt, and pepper. Stir until well combined. - Add the halved baby potatoes to the bowl. Toss them until every piece is coated in the ranch mixture. This step adds great flavor. - Line a baking sheet with parchment paper. This helps with easy cleanup. - Spread the coated potatoes on the lined baking sheet in a single layer. This helps them roast evenly. - Roast the potatoes for 25-30 minutes. They should turn golden brown and be tender when pierced. - Take the baking sheet out of the oven and sprinkle cheddar cheese over the hot potatoes. - Return the baking sheet to the oven for 5-7 minutes. Wait until the cheese melts and bubbles. - Drizzle sour cream over the cheesy potatoes and top with sliced green onions. This adds a fresh touch. Check out the Full Recipe for more details! To make Cheesy Ranch Potatoes, start by preheating your oven to 400°F (200°C). This helps the potatoes roast evenly. Spread the potatoes out on a lined baking sheet. This ensures they cook well and get crispy. Check for doneness by piercing them with a fork. They should be tender and golden brown. To boost flavor, try adding herbs like parsley or dill. You can also mix in spices like paprika or cayenne for a kick. If you want a different cheese, use mozzarella or pepper jack. Each type brings a unique taste and texture to the dish. For serving, use a colorful bowl to show off the cheesy ranch potatoes. Add a sprinkle of extra cheddar on top for flair. You can also place whole green onion tops around the edge for a fresh look. These simple steps make your dish appealing and ready for guests. For the full recipe, follow the steps provided in the earlier sections. Enjoy your cooking! {{image_4}} You can make Cheesy Ranch Potatoes even more fun with simple swaps. - Using different types of cheese: Try mozzarella for a milder taste or pepper jack for a kick. You can even mix cheeses for a rich flavor. - Substituting Greek yogurt for sour cream: Greek yogurt gives you a nice tang and adds protein. It’s a healthier option that keeps your potatoes creamy. Change the flavor to keep things exciting. - Spicy ranch version: Add a teaspoon of cayenne pepper to the ranch mix. This will give your potatoes a nice heat. - Herb-infused options: Mix in dried herbs like thyme or rosemary. This adds a fresh taste that pairs well with the cheese. Making Cheesy Ranch Potatoes work for everyone is easy! - Vegan adaptations: Swap the cheese for a vegan cheese and use coconut yogurt. This keeps all the creamy goodness without dairy. - Gluten-free adjustments: Use a gluten-free ranch mix. Most ranch mixes are gluten-free, but always check the labels. Feel free to explore these variations to make this dish your own! For the full recipe, check out Cheesy Ranch Potatoes Delight. To keep your cheesy ranch potatoes fresh, store them in the fridge. Place them in an airtight container. They will last about 3 to 5 days. Make sure they cool completely before sealing. For longer storage, you can freeze them. Put the cooled potatoes in a freezer-safe bag. They can last up to 2 months in the freezer. To reheat your potatoes, the best method is using an oven. Preheat the oven to 350°F (175°C). Spread the potatoes on a baking sheet. Heat them for about 15 to 20 minutes. This will help keep the texture crispy. You can also use a microwave. Place the potatoes in a microwave-safe dish. Heat them in short bursts of 1 minute. Stir in between to ensure even heating. To keep flavor and texture, avoid reheating them too long. If they dry out, add a little bit of sour cream or cheese on top. These tips will help you enjoy the cheesy ranch potatoes just as much as the first time. You can tell the potatoes are done by checking a few signs. First, they should be golden brown and crispy on the outside. Second, when you poke them with a fork, they should feel soft inside. If the fork slides in easily, your potatoes are ready to enjoy! Yes, you can prepare Cheesy Ranch Potatoes ahead of time! Start by following the recipe steps, but stop before roasting. Cover the potatoes and store them in the fridge for up to 24 hours. When you’re ready to bake, simply add extra time in the oven if they are cold. This way, you can enjoy them fresh without much fuss. These cheesy potatoes pair well with many dishes. Serve them alongside grilled chicken or steak for a filling meal. They also go great with a fresh salad or steamed veggies. For a fun twist, try them with barbecue or as a side for tacos. The options are endless, making it easy to create a delicious meal. For the complete cooking steps, check out the Cheesy Ranch Potatoes Delight 🥔. In this blog post, we covered how to make Cheesy Ranch Potatoes. We started with the ingredients, then walked through easy steps to prepare and roast them. I shared helpful tips, variations, and storage info to keep your dish fresh. These potatoes are a tasty side for any meal. You can customize them to fit your taste. Enjoy making this dish, and let it add flavor to your table!](https://goldendishy.com/wp-content/uploads/2025/06/4f138a04-3393-4361-b7e8-8b602e29b2ef-768x768.webp)
. 1. Heat olive oil in a large skillet over medium heat. 2. Add finely chopped red onion to the skillet. 3. Sauté the onion for 2-3 minutes until it becomes soft. 4. Now, add diced red and green bell peppers to the skillet. 5. Cook for 3-4 minutes until the peppers soften. 6. Stir in corn kernels and black beans. 7. Season with ground cumin, smoked paprika, garlic powder, salt, and pepper. 8. Mix well and cook for 5 more minutes until hot. 1. Heat another skillet over medium heat. 2. Place a tortilla in the skillet and sprinkle ¼ cup of cheese on it. 3. Layer ½ cup of the veggie mixture over the cheese. 4. Top with another ¼ cup of cheese for extra flavor. 5. Fold the tortilla in half, covering the filling. 6. Cook for 3-4 minutes until golden brown on one side. 7. Flip the quesadilla gently using a spatula. 8. Cook for another 3-4 minutes until crispy and cheese melts. - Keep the heat at medium for a crispy texture. - Use a spatula to flip the quesadilla easily. - Check for doneness by ensuring both sides are golden brown. These simple steps make it easy to create loaded veggie quesadillas at home. For the full recipe, refer to the recipe section above. Enjoy the process! Choosing the right cheese is key. I love a mix of cheddar and mozzarella. This mix melts well and adds great flavor. You want the cheese to stretch and pull when you take a bite. Balancing spices and seasonings is also important. Start with the basics like salt and pepper. Then, add spices like cumin and smoked paprika. Adjust them to fit your taste. A little heat can come from red pepper flakes if you like it spicy. Day-to-day storage tips help keep your quesadillas fresh. Place leftovers in an airtight container. Keep them in the fridge for up to three days. You can also wrap them tightly in foil or plastic wrap. Reheating suggestions for best flavor include using the oven or skillet. For the oven, preheat to 350°F. Heat the quesadillas for about 10 minutes. In a skillet, cook them over medium heat. This method keeps them crispy and delicious. Plating ideas can make your meal pop. Arrange the quesadillas in a fan shape on a colorful plate. This makes them look fun and inviting. Adding colorful garnishes like fresh cilantro adds a nice touch. You can also sprinkle some diced tomatoes or avocado on top. These small changes make your meal look gourmet. Enjoy your loaded veggie quesadillas! For the full recipe, check out the Loaded Veggie Quesadillas 🥑 section. {{image_4}} You can make loaded veggie quesadillas even more fun. Here are some easy ideas. Want some extra protein? You can add grilled chicken or tofu. Just cook them first, then slice and add to your quesadilla mix. If you like seafood, try shrimp. Cook them quickly and toss them in for a tasty twist. Spices can change the game. Try different spices like chili powder or oregano. They add depth and warmth. You can also add sauces or marinades. A dash of hot sauce or a sprinkle of lime juice can elevate your quesadillas. Need gluten-free options? Use gluten-free tortillas. They work great and taste just as good. If you're vegan, swap out the cheese for a plant-based version. There are many tasty dairy-free cheeses out there that melt well. You can find the full recipe for loaded veggie quesadillas to get started on these variations. To keep your uncooked quesadillas fresh, wrap them tightly in plastic wrap. This keeps out moisture and air. You can also place them in an airtight container. If you want to freeze them, stack the quesadillas with parchment paper in between. This prevents them from sticking together. Uncooked quesadillas can stay in the freezer for up to three months. After cooking, let the quesadillas cool completely. Then, wrap them in foil or place them in a container. Store them in the fridge for up to four days. I find they taste best within the first two days. If you notice any odd smell or mold, it’s best to toss them. To reheat, use an oven or a skillet. For the oven, preheat to 350°F (175°C). Place the quesadilla on a baking sheet and heat for about 10 minutes. If using a skillet, add a little oil and heat over medium heat for about 3-4 minutes on each side. Leftover quesadillas can also become a fun breakfast. Chop them up and add them to scrambled eggs for a tasty twist. For more ideas, check out the Full Recipe. Making loaded veggie quesadillas is quick and easy. It takes about 10 minutes to prep. Cooking them takes around 15 minutes. In total, you can make them in about 25 minutes. This makes them a great choice for busy days or quick meals. Yes, you can prep loaded veggie quesadillas in advance. To do this, cook the veggie mixture and let it cool. Then, assemble the quesadillas but do not cook them. Store them in an airtight container in the fridge for up to two days. You can also freeze them for a month. When ready to eat, just cook them straight from the fridge or freezer. This makes meal prepping super easy! You can mix and match many veggies in quesadillas. Some great options include: - Spinach or kale for a green boost - Mushrooms for a savory taste - Zucchini or squash for extra texture - Jalapeños for a spicy kick - Tomatoes for freshness Feel free to get creative! Each veggie adds its own flavor and texture. You can make quesadillas that fit your taste perfectly. For more ideas, check out the Full Recipe. These loaded veggie quesadillas are fun and easy to make. We explored essential ingredients like black beans, bell peppers, and corn. I’ve shared tips for perfect texture, storing leftovers, and creative garnishes. Remember, you can customize them with protein or spices to suit your taste. In the end, these quesadillas are more than just food; they bring flavor and joy. Enjoy making them your own!](https://goldendishy.com/wp-content/uploads/2025/06/a7c52493-2108-4a2f-8f90-ee80e7df7b2a-768x768.webp)

. This link has all the details you need to make this tasty snack. We covered all the steps to make crispy sweet potato rounds. You learned the key ingredients, preparation, and baking tips. Remember to space the slices for crispiness and try different seasonings for variety. Store leftovers properly for the best flavor. If you have questions, refer to the FAQs for more help. Enjoy creating a delicious snack or side dish that impresses everyone!](https://goldendishy.com/wp-content/uploads/2025/06/bfac51d6-fd22-4fd5-a48f-0e12de6b57a8-768x768.webp)
![- 2 ripe peaches, diced - 2 ripe avocados, diced - 1 cup fresh arugula or a mix of your favorite greens - Fresh mint leaves, for garnish - 1/2 cup tangy feta cheese, crumbled - 1/4 cup pecans, coarsely chopped - 2 tablespoons creamy honey - 2 tablespoons freshly squeezed lemon juice - Salt and freshly cracked pepper, to taste To make this Peach and Avocado Salad, you need fresh, quality ingredients. Ripe peaches bring a sweet taste. Ripe avocados add creamy texture. Fresh arugula or mixed greens offer a nice crunch. Don't forget the fresh mint leaves for a pop of color and flavor. For additional flavor, add tangy feta cheese. It enhances the salad's taste. Pecans add a lovely crunch and nuttiness. Honey gives a hint of sweetness. Fresh lemon juice adds a zesty touch. Finally, season with salt and pepper to balance everything. This mix of flavors and textures creates a fresh and flavorful delight. For the complete recipe, you can check the [Full Recipe]. - First, dice the peaches and avocados. Aim for small, even pieces. This helps them blend well in the salad. - Next, layer the diced peaches and avocados in a large salad bowl. This forms a colorful base for the dish. - Now, gently fold in your choice of greens, like arugula or mixed greens. This adds a nice crunch and freshness. - Sprinkle the crumbled feta cheese and chopped pecans on top. They give a lovely salty flavor and texture contrast. - In a small bowl, whisk together the honey and fresh lemon juice. This dressing is simple but very tasty. - Drizzle the dressing over the salad. Toss gently to combine without smashing the avocado. - Finally, taste and season with salt and freshly cracked pepper. Adjust to make the flavors pop. You can find the complete instructions in the [Full Recipe]. To make the best peach and avocado salad, cut your fruits into similar sizes. This helps create a nice balance. When you toss the salad, do it gently. You want to mix it well but avoid mashing the ripe avocado. This keeps the salad light and fresh. Taste is key. Adjust the seasoning to fit your palate. You can also add a touch of honey for sweetness or fresh mint leaves for a burst of flavor. These small tweaks can take your salad to the next level. Serving matters. You can place the salad in individual bowls for a nice touch. Another idea is to arrange everything on a platter. A colorful display makes the salad look even more inviting. A drizzle of honey or a sprinkle of mint can add a lovely finish. For the full recipe, check out the detailed steps provided. {{image_4}} You can switch up the cheese and nuts in this salad for new flavors. Instead of feta, try goat cheese or blue cheese. Both add a rich taste that pairs well with peaches. For nuts, swap pecans for walnuts or almonds. Each nut gives its unique crunch and flavor. You can also change the greens. If you want a different taste, use spinach or kale. Both greens add a nice twist. Spinach brings a soft texture, while kale adds a bit of bite. Each option makes the salad fresh and fun to eat. The dressing plays a big role in this salad. If you want to try something different, use balsamic vinegar or olive oil instead of honey and lemon juice. Balsamic adds a sweet and tangy flavor, while olive oil brings a smooth, rich taste. You can also experiment with flavored vinegars. Try raspberry or apple cider vinegar for a new twist. These flavors will enhance the sweetness of the peaches. To make this salad a complete meal, add grilled chicken or shrimp. Both proteins add heartiness and pair well with the fruits. Grilled chicken offers a mild flavor, while shrimp brings a sweet touch. You can also mix in extra fruits like berries. Strawberries or blueberries add a burst of color and flavor. They make the salad even more vibrant and exciting. For the full recipe, check out the Peachy Avocado Delight 🥭🥗 section. To store leftovers, place the salad in an airtight container. This helps keep the salad fresh. Make sure to seal it well. Keep it in the refrigerator. It will stay good for about one day. The avocado may brown a bit, but it remains tasty. To help maintain freshness, you can add a squeeze of lemon. This slows down browning and keeps flavors bright. You cannot freeze this salad. Freezing will change the texture of the peaches and avocados. They may become mushy when thawed. Enjoy the salad fresh for the best taste and experience. You can enjoy leftovers cold straight from the fridge. The cool salad is refreshing on warm days. If you prefer it warm, gently reheat it. Use a pan over low heat. Heat just until warm, but avoid cooking it. This keeps the flavors intact and the ingredients from getting mushy. Enjoy every bite of your Peach and Avocado Salad! For the full recipe, check out the detailed instructions above. Yes, you can make this salad ahead of time. To keep it fresh, follow these steps: - Prep ingredients separately: Dice your peaches and avocados. Store them in separate containers. - Mix greens and toppings: Combine arugula, feta, and pecans in another bowl. - Make the dressing: Whisk together honey and lemon juice. Store in a small jar. When ready to serve, mix everything together for a fresh taste. This method helps prevent browning. This salad is both tasty and healthy. Here’s a quick look at its nutrition: - Calories: About 250 per serving - Protein: 5 grams - Fat: 18 grams - Carbohydrates: 22 grams - Fiber: 6 grams It offers a good mix of healthy fats from avocados and protein from feta. You can easily make this salad vegan. Here are some swaps: - Cheese: Replace feta with vegan cheese or omit it. - Honey: Use maple syrup or agave nectar instead of honey. These changes keep the salad creamy and sweet without dairy. This salad pairs well with many dishes. Here are a few ideas: - Grilled chicken or fish: Adds protein and complements the fruit. - Quinoa or rice: Serve as a side dish for a fuller meal. - Bruschetta: Offers a crunchy contrast to the salad's softness. These options create a balanced and satisfying meal. For the full recipe, check out Peachy Avocado Delight. This blog post detailed how to make a refreshing Peach and Avocado Salad. You learned about the best fresh ingredients, like ripe peaches and avocados, and useful tips for preparation and mixing. I shared ways to enhance flavor and present your salad beautifully, along with easy swaps and storage tips. In conclusion, this salad brightens any meal. Experiment with ingredients and enjoy fresh flavors. Make it your own!](https://goldendishy.com/wp-content/uploads/2025/06/36e1ff7f-d317-490a-9c34-18da7fd6bdcc-768x768.webp)