Zesty Quinoa Black Bean Salad Flavorful and Nutritious
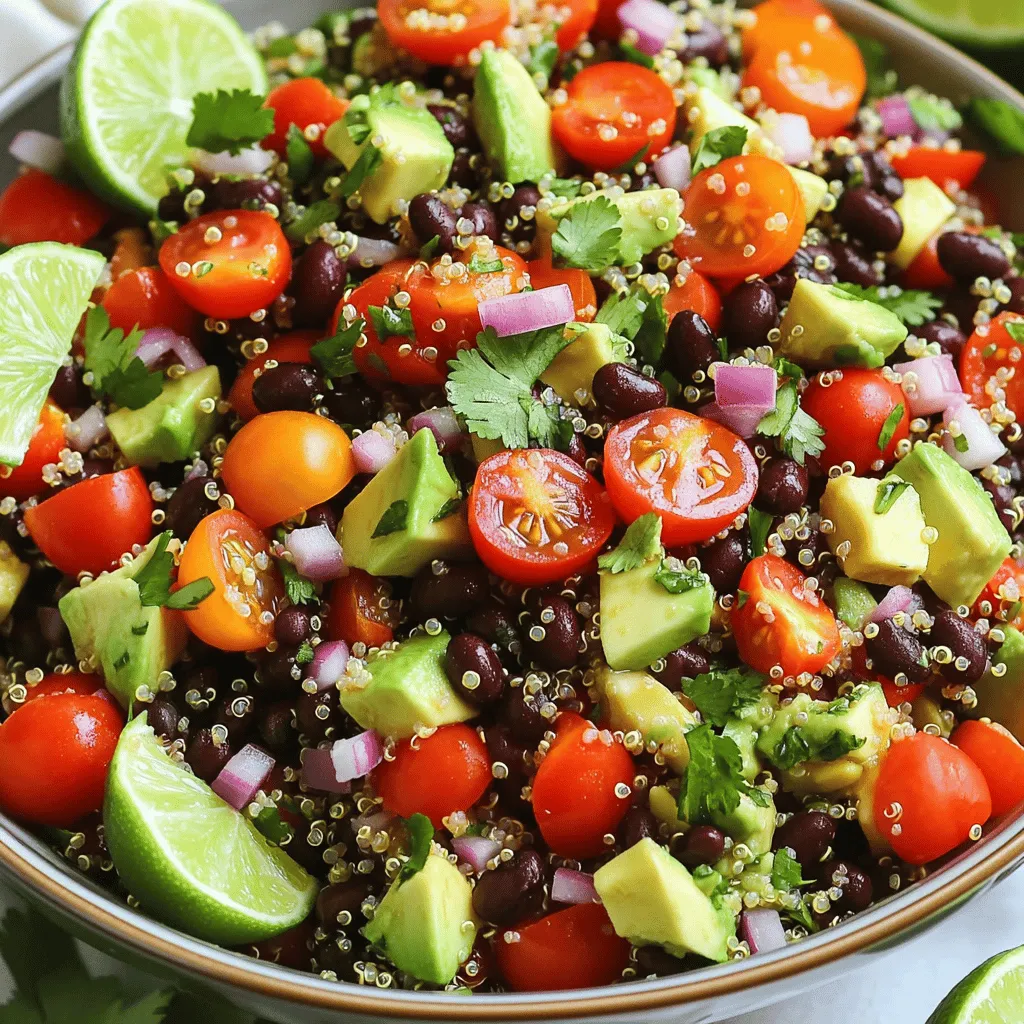
Looking for a tasty and healthy dish? Try my Zesty Quinoa Black Bean Salad! This salad is packed with flavor and nutrients, making it the perfect meal for any day. You can mix and match ingredients to suit your taste. In this post, I’ll walk you through the simple steps to create this vibrant dish, share helpful tips, and explore fun variations. Let’s get started on this delicious journey!
Ingredients
Main Ingredients List
This zesty quinoa black bean salad uses fresh, vibrant ingredients. Here’s what you need:
– 1 cup quinoa, thoroughly rinsed
– 2 cups vegetable broth (or water)
– 1 (15 oz) can black beans, drained and thoroughly rinsed
– 1 cup cherry tomatoes, halved
– 1 red bell pepper, diced into bite-sized pieces
– 1/4 cup red onion, finely chopped
– 1 ripe avocado, diced
– 1/4 cup fresh cilantro, finely chopped
– Juice of 1 lime (about 2 tablespoons)
– 2 tablespoons extra virgin olive oil
– 1 teaspoon ground cumin
– 1/2 teaspoon garlic powder
– Salt and freshly ground black pepper to taste
Optional Add-ins
Feel free to personalize your salad with these tasty options:
– Corn for a sweet crunch
– Jalapeños for some heat
– Feta cheese for a salty bite
– Chopped nuts for extra texture
Health Benefits of Ingredients
Each ingredient brings its own health perks:
– Quinoa is packed with protein and fiber. It helps keep you full.
– Black beans add more protein and are rich in iron. They support muscle health.
– Cherry tomatoes provide vitamins A and C, boosting your immune system.
– Red bell pepper is high in antioxidants and great for skin health.
– Avocado offers healthy fats, promoting heart health and satiety.
– Cilantro has detoxifying properties and adds fresh flavor.
– Lime juice helps with digestion and adds zing to the dish.
Using these ingredients creates a colorful dish that nourishes your body and delights your taste buds.Enjoy making this salad!
Step-by-Step Instructions
Cooking the Quinoa
First, grab a medium saucepan. Pour in 2 cups of vegetable broth or water. Heat it on medium-high until it boils. Add 1 cup of rinsed quinoa to the boiling broth. Stir it briefly. Then lower the heat to low. Cover the saucepan and let it simmer for 15 minutes. After 15 minutes, all the liquid should be absorbed. Remove the saucepan from heat but keep it covered. Let it sit for another 5 minutes. This step helps steam the quinoa. Finally, fluff it gently with a fork and set aside to cool slightly.
Preparing the Dressing
While the quinoa cooks, let’s whip up the dressing! In a small bowl, mix the juice of 1 lime, which is about 2 tablespoons, with 2 tablespoons of extra virgin olive oil. Add 1 teaspoon of ground cumin and 1/2 teaspoon of garlic powder. Season it with salt and freshly ground black pepper to taste. Whisk everything together until well blended. This dressing brings a zesty punch to your salad.
Combining Ingredients
In a large mixing bowl, combine the black beans, halved cherry tomatoes, diced red bell pepper, finely chopped red onion, and diced avocado. Gently mix these ingredients together. Be careful not to squish the avocado! Once the quinoa has cooled to just warm, add it to the bowl. Drizzle the dressing over the salad mix. Toss everything gently to coat the ingredients in the dressing. Finally, fold in 1/4 cup of finely chopped cilantro. Taste and adjust the seasoning as needed. Let the salad sit for about 10 minutes. This allows the flavors to blend beautifully before you serve it.
Tips & Tricks
Perfecting Quinoa Texture
To get the best texture for your quinoa, rinse it well. Rinsing removes bitter saponins. Use a fine mesh strainer for this task. I like to cook quinoa in vegetable broth. This adds flavor and depth. After it cooks, let it steam off the heat for five minutes. This step makes the quinoa fluffy and light.
Flavor Enhancements
You can boost the flavor of this salad easily. Try adding a pinch of cayenne pepper for heat. A splash of apple cider vinegar gives a nice zing. Fresh herbs like parsley or dill can also add a fresh twist. If you want creaminess, mix in some Greek yogurt. This adds a nice touch without overpowering the dish.
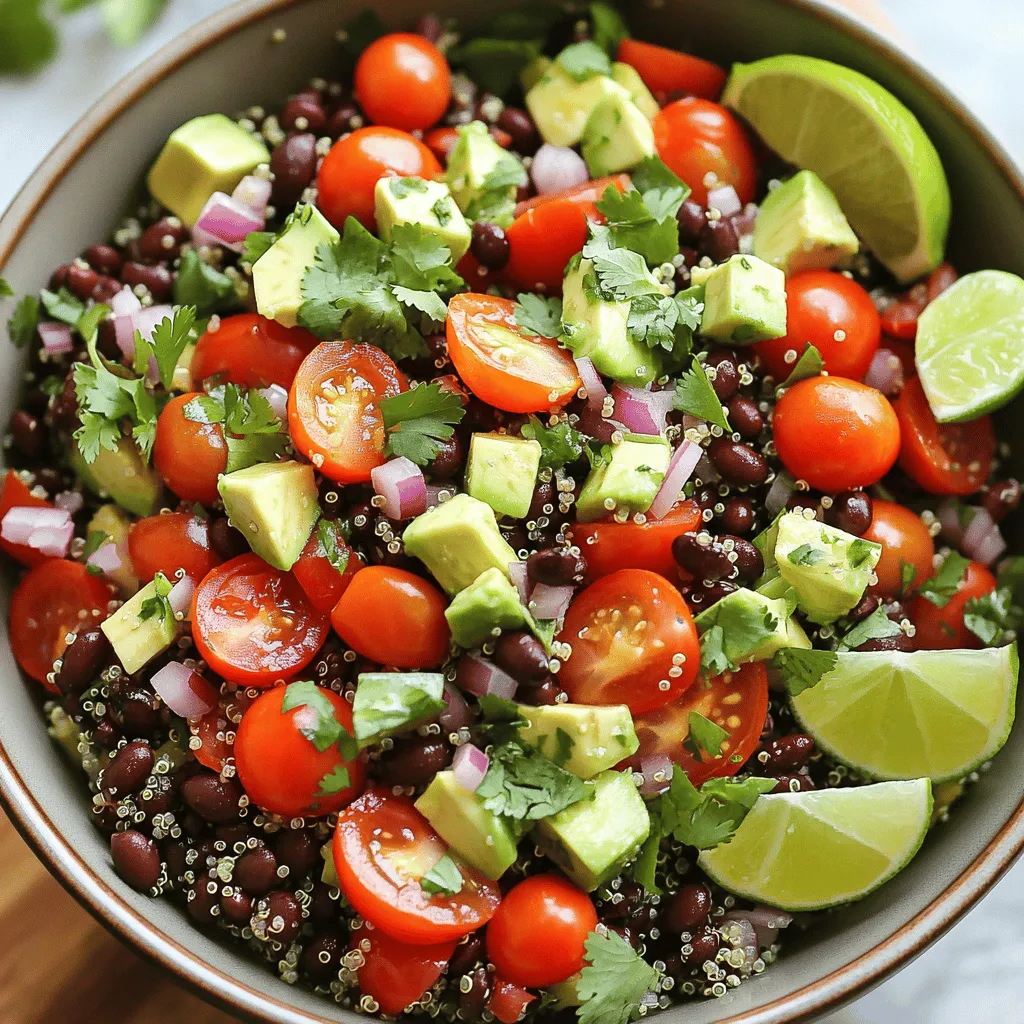
Serving Suggestions
When serving, make it look pretty. Use a colorful bowl to show off the salad. Garnish with extra cilantro and lime wedges. This adds a pop of color and freshness. You can serve it alone or with grilled chicken. It pairs well with tacos or as a side dish.
Variations
Protein Additions
You can boost the protein in your zesty quinoa black bean salad in many ways. Here are some tasty ideas:
– Grilled Chicken: Add diced grilled chicken for a hearty touch.
– Shrimp: Toss in sautéed shrimp for a seafood twist.
– Tofu: Cube and pan-fry tofu to keep it vegan while adding protein.
– Tempeh: Crumble tempeh into the salad for a nutty flavor.
These protein options make the salad more filling and satisfying.
Vegan Adaptations
The zesty quinoa black bean salad is already vegan-friendly. However, you can make it even more exciting with these additions:
– Nuts and Seeds: Sprinkle in sunflower seeds or pumpkin seeds for crunch.
– Nut Cheese: Use cashew cheese for a creamy texture without dairy.
– Plant-Based Dressing: Swap the olive oil with a nut-based dressing for a unique flavor.
These choices keep the dish fresh and vibrant while staying true to vegan values.
Seasonal Ingredient Swaps
You can change the salad based on what’s in season. Here are some easy swaps:
– Spring: Replace cherry tomatoes with fresh peas or asparagus.
– Summer: Use ripe peaches or corn for a sweet touch.
– Fall: Add roasted butternut squash for warmth and depth.
– Winter: Toss in shredded Brussels sprouts for a crunchy bite.
These swaps keep the salad lively and ensure you use fresh, local produce.
Storage Info
Refrigeration Guidelines
After making zesty quinoa black bean salad, store it in an airtight container. This keeps the salad fresh. Place it in the fridge within two hours of making it. The cold temperature helps maintain its flavor and texture. Enjoy it within three to five days for the best taste.
Freezing Tips
You can freeze this salad, but some ingredients may change in texture. To freeze, put the salad in a freezer-safe container. Leave some space at the top. This allows for expansion as it freezes. When ready to eat, thaw it in the fridge overnight. You may want to add fresh avocado and cilantro after thawing.
Shelf Life Recommendations
Zesty quinoa black bean salad stays tasty for a few days. If you notice any changes in smell or color, it’s best to throw it out. Always check for freshness before eating. Following these storage tips helps you enjoy this nutritious dish longer.
FAQs
How to make zesty quinoa black bean salad?
To make zesty quinoa black bean salad, start by cooking the quinoa. Use one cup of quinoa and two cups of vegetable broth. Bring the broth to a boil, then add the quinoa. Cook it on low heat for about 15 minutes. Let it sit for five minutes after cooking to fluff it up. In a large bowl, mix black beans, cherry tomatoes, red bell pepper, red onion, and avocado. Prepare the dressing with lime juice, olive oil, cumin, garlic powder, salt, and pepper. Combine everything and fold in cilantro. Let it rest for ten minutes to blend the flavors.
Can I use other beans?
Yes, you can use other beans. Chickpeas, kidney beans, or pinto beans work well. Just make sure they are cooked or canned and drained. Each type of bean adds its own taste and texture. This makes the salad unique. Feel free to mix and match your favorite beans for variety.
How do I make this salad spicier?
To spice up the salad, add fresh jalapeños or diced green chilies. You can also sprinkle in some cayenne pepper or red pepper flakes. If you want a zesty kick, try adding hot sauce or salsa to the dressing. Adjust the spice to suit your taste. Enjoy experimenting with different heat levels!
What can I serve with this salad?
Zesty quinoa black bean salad pairs nicely with grilled chicken or fish. You can also serve it alongside tacos or burritos for a complete meal. For a lighter option, enjoy it with tortilla chips or on a bed of lettuce. This salad is great for lunch or dinner and works well at potlucks too!
This blog post explored how to make a tasty quinoa black bean salad. We covered main ingredients, optional add-ins, and their health benefits. I shared easy cooking steps, tips for perfecting texture, and flavor boosts. You learned about variations and storage methods.
Quinoa salad is versatile and healthy. You can enjoy it in many ways. Now, it’s time to get cooking!

![To make this simple and tasty chicken and rice soup, gather these ingredients: - 2 boneless, skinless chicken breasts - 1 cup jasmine rice, thoroughly rinsed - 6 cups chicken broth (preferably low-sodium) - 2 carrots, peeled and diced - 2 stalks celery, chopped - 1 small onion, finely diced - 3 garlic cloves, minced - 1 teaspoon dried thyme - 1 bay leaf - 1 tablespoon extra virgin olive oil - Salt and freshly ground pepper, to taste - 1 cup frozen peas - Juice from 1 fresh lemon - Fresh parsley, roughly chopped (for garnish) Each serving of this chicken and rice soup is packed with nutrition. Here’s a quick look at what you get: - Calories: 300 - Protein: 25g - Carbohydrates: 40g - Fat: 6g - Fiber: 2g This soup is low in fat and rich in protein and carbs, making it a cozy choice for any meal. If you need to swap out some items, here are some ideas: - Chicken: Use shredded rotisserie chicken for a quick option. - Rice: Substitute with brown rice or quinoa for a different texture. - Broth: Vegetable broth works well for a lighter flavor. - Vegetables: Add bell peppers, corn, or spinach for extra nutrition. - Herbs: Fresh herbs like rosemary or dill can replace thyme for a new taste. These substitutions help you make this soup work for your pantry or dietary needs. Enjoy creating your version! Start by gathering your ingredients. You need chicken breasts, jasmine rice, broth, carrots, celery, onion, garlic, thyme, a bay leaf, olive oil, and peas. 1. Heat the olive oil: In a large pot, place the olive oil over medium heat. Wait until it shimmers. 2. Add the vegetables: Toss in the diced onion, carrots, and celery. Sauté these for about 5 minutes. You want them to soften and the onion to look clear. 3. Incorporate garlic: Stir in the minced garlic. Cook this for one minute. The smell should fill your kitchen. 1. Add chicken and broth: Place the chicken breasts into the pot. Pour in the chicken broth. Add thyme, bay leaf, salt, and pepper. 2. Bring to a boil: Turn up the heat until the mixture boils. Then, lower the heat to a gentle simmer. 3. Cook the chicken: Cover the pot and let it simmer for 15-20 minutes. Make sure the chicken cooks fully (165°F or 75°C inside). 1. Shred the chicken: Once cooked, remove the chicken and let it cool. Use two forks to shred it into smaller pieces. 2. Add rice: Stir in the rinsed jasmine rice into the pot. Cover it again and let it simmer for about 15 minutes. The rice should be tender. 3. Finish the soup: Return the shredded chicken to the pot. Add the frozen peas and lemon juice. Taste and adjust salt and pepper if needed. 4. Serve: Remember to take out the bay leaf. Serve hot in bowls. Top with fresh parsley for a nice touch. For the complete recipe, visit [Full Recipe]. To make your chicken and rice soup shine, focus on fresh ingredients. Start with quality chicken broth. Low-sodium broth gives you control over salt levels. Add fresh herbs like thyme and parsley for a bright taste. A splash of lemon juice at the end brightens the flavor too. You can also toss in some fresh garlic for depth. One big mistake is overcooking the chicken. Remove it from the pot once it reaches 165°F. Letting it simmer too long can make it dry. Another common error is not rinsing the rice. Rinsing removes excess starch, which helps keep the soup clear. Avoid adding too much water or broth. You want a nice balance of soup and rice. For a creamy texture, add a splash of heavy cream or coconut milk. Stir it in after you add the chicken back to the pot. You can also blend a portion of the soup. Use an immersion blender to create a creamy base while keeping some chunks intact. This mix gives you both texture and creaminess in every spoonful. Follow the [Full Recipe] for a step-by-step guide to making this comforting dish. {{image_4}} You can easily add veggies to your chicken and rice soup. Chopped carrots, celery, and peas work well. You can also try adding spinach, kale, or zucchini for more color and nutrition. These vegetables add flavor and make your soup more filling. Just toss them in during the last few minutes of cooking. This way, they will stay bright and fresh. If you like a kick, make a spicy version. Add diced jalapeños or red pepper flakes for heat. A splash of hot sauce or a spoonful of sriracha can also spice things up. Just keep in mind to adjust the salt. You want a balance of flavors. This spicy twist can warm you up on a cold day! Using a slow cooker makes this recipe even easier. Simply add all your ingredients into the slow cooker. Set it on low for 6-8 hours or high for 3-4 hours. This method allows all the flavors to blend beautifully. Plus, you can come home to a warm, tasty meal. Check out the Full Recipe for detailed steps and measurements. After you finish your chicken and rice soup, let it cool down. This helps keep the soup fresh. Transfer it to an airtight container. It will stay good in the fridge for 3 to 4 days. Make sure to label the container with the date. This way, you’ll know when to eat it. If you want to save some soup for later, freezing works great. First, let the soup cool completely. Then, pour it into freezer-safe bags or containers. Leave some space at the top for expansion. You can freeze it for up to 3 months. When you’re ready to eat, just thaw it overnight in the fridge. To reheat your soup, pour it into a pot. Heat it on medium-low heat. Stir it often to ensure it warms evenly. If the soup seems too thick, add a splash of broth or water. You can also microwave it in a safe bowl. Heat it in short intervals, stirring in between. This ensures every bite is warm and tasty. Enjoy your cozy meal! For the full recipe, check out the Cozy Chicken & Rice Delight section. Yes, you can use brown rice. Brown rice adds a nutty flavor and is more nutritious. However, it takes longer to cook. You should adjust the cooking time. Add brown rice early when you add the broth, and let it simmer for 40-45 minutes. This way, the rice becomes tender and blends well with the soup. To make the soup gluten-free, you need to check a few things. First, use a gluten-free chicken broth. Many brands offer gluten-free options. Also, make sure your rice is certified gluten-free. Jasmine rice is usually safe, but always check the label. By following these steps, your soup will be gluten-free and just as tasty. You can serve many tasty sides with your soup. Here are some great options: - A fresh green salad - Crusty bread or rolls - Garlic breadsticks - Steamed vegetables These sides will make your meal complete and satisfying. For more ideas, feel free to check the Full Recipe and explore different serving suggestions. We reviewed the key steps to make Chicken and Rice Soup, from choosing the right ingredients to cooking methods. You learned helpful tips to enhance flavor and avoid common mistakes. Variations and storage details ensure this dish suits your taste and convenience. Trust these insights to create a tasty soup every time. Enjoy warm bowls of nourishment that you made with care. Happy cooking!](https://goldendishy.com/wp-content/uploads/2025/06/7617fd4a-61d9-414c-8819-76abcb6635e5-768x768.webp)

![- 1 large head of cauliflower, cut into bite-sized florets - 1 cup shredded sharp cheddar cheese - 1/2 cup grated Parmesan cheese, divided - 1 cup heavy cream - 2 cloves garlic, finely minced - 1/2 teaspoon smoked paprika - 1/2 teaspoon freshly ground black pepper - 1 teaspoon salt, or to taste - 1/2 teaspoon onion powder - 1/4 cup seasoned breadcrumbs (optional, for added crunch) - Fresh parsley, chopped, for garnish The key to a great cheesy cauliflower bake lies in its simple yet flavorful ingredients. First, you need a large head of cauliflower. Cut it into bite-sized florets. This helps it cook evenly. Next, gather your cheeses. I love using sharp cheddar for its strong taste and Parmesan for a hint of nutty flavor. Heavy cream is a must for that rich, creamy texture. Don't forget the garlic! Mince two cloves finely for a burst of flavor. Seasoning is important, too. Smoked paprika adds warmth, while black pepper and onion powder enhance the dish. If you want a crunchy topping, use seasoned breadcrumbs. They give the bake a nice texture. Finally, finish with fresh parsley. It brings color and freshness. These ingredients come together to create a comforting dish that everyone will enjoy. Check out the Full Recipe for more details! - Preheat the oven to 375°F (190°C). - Boil the cauliflower florets. Start by preheating your oven. This step is key to getting that nice, golden top. While the oven heats, take a pot and fill it with water. Add a pinch of salt. Bring the water to a boil. Once boiling, add the cauliflower florets. Cook them for about 5 to 7 minutes. You want them tender but still a bit firm. Drain the cauliflower and set it aside. - Combine heavy cream, garlic, and spices in a saucepan. - Stir in shredded cheddar and Parmesan cheese until smooth. Now, let’s make the cheese sauce. In a medium saucepan, pour in the heavy cream. Add the minced garlic, salt, black pepper, smoked paprika, and onion powder. Heat it on medium. Stir this mix gently, keeping it warm but don’t let it boil. Once warm, slowly add the shredded cheddar and half of the grated Parmesan cheese. Stir until the cheese melts and the sauce is smooth and creamy. - Mix the cauliflower with the cheese sauce. - Transfer to a baking dish and top with breadcrumbs. In a large bowl, mix the cooked cauliflower with your cheese sauce. Make sure every floret gets coated with that cheesy goodness. Next, take a baking dish and lightly grease it. Pour the cauliflower mixture into the dish. Spread it evenly. If you want a crunchy topping, sprinkle the remaining grated Parmesan cheese and breadcrumbs on top. - Bake until golden brown and bubbly. - Garnish and serve. Place the baking dish in the preheated oven. Bake it for about 20 to 25 minutes. You want the top to be golden brown and bubbly. When it's done, take it out and let it cool for a few minutes. For a nice touch, sprinkle some freshly chopped parsley on top before serving. Enjoy your cheesy cauliflower bake! For the full recipe, refer to the earlier sections. To make the best cheesy cauliflower bake, cook the cauliflower just right. Boil it for about 5-7 minutes. You want it tender but still slightly firm. This helps keep the florets intact when you mix them with the cheese sauce. For the cheese sauce, ensure it is smooth. Stir the heavy cream and garlic over medium heat. Add the cheese slowly while stirring. This will help you avoid lumps. A smooth sauce coats the cauliflower evenly, giving it that creamy goodness. Don't be afraid to experiment with flavors. A little smoked paprika adds a nice touch. You can also try different cheeses. A mix of cheddar and Gruyère can elevate your dish. Using fresh herbs for garnish makes a big difference. Chopped parsley adds color and freshness. You can also use chives for an onion flavor boost. These small touches can turn a great dish into a memorable one. Think about what pairs well with cheesy cauliflower bake. It goes great with roasted chicken or grilled fish. You can also serve it with a crisp salad for added crunch. This dish is perfect for gatherings. Serve it at family dinners or potlucks. It is a great side dish for holidays too. Everyone loves a warm, cheesy treat! For the full recipe, check the instructions above. {{image_4}} You can make this dish lighter with a few easy swaps. - Low-fat cheese options: Try using part-skim mozzarella or low-fat cheddar. - Alternative non-dairy cream substitutes: Use almond milk or coconut cream for a dairy-free choice. These swaps keep the taste rich while cutting calories and fat. Want to spice it up? There are plenty of ways to add flavor. - Adding cooked bacon or sausage for extra protein: Crumbled crispy bacon brings a smoky touch. - Introducing vegetables like spinach or bell peppers: These add color and nutrients to your bake. Feel free to mix and match your favorite proteins and veggies for a unique dish. How you serve this dish can change the experience. - Individual ramekins for portion control: They make for a fun and fancy presentation. - Making it a main dish with protein additions: Pair it with chicken or fish for a complete meal. These options help you customize your cheesy cauliflower bake for any occasion. After enjoying your cheesy cauliflower bake, you might have some leftovers. To keep them fresh, place them in an airtight container. This helps lock in moisture and flavor. You can store the leftovers in the fridge for up to three days. When you’re ready to eat again, just scoop out what you need. Want to save some for later? Freezing is a great option. Cool the dish completely first. Then, transfer it to a freezer-safe container. Make sure to label it with the date. You can freeze it for up to three months. When you’re ready to enjoy it again, thaw it in the fridge overnight. For reheating, you can use the oven. Preheat it to 350°F (175°C). Cover the dish with foil to keep it moist. Bake for about 25-30 minutes, or until heated through. If you want a crispy top, remove the foil for the last 10 minutes. Enjoy your cheesy goodness! For the full recipe, click here [Full Recipe]. Yes, you can prepare cheesy cauliflower bake ahead of time. Start by cooking the cauliflower and making the cheese sauce. After mixing them together, place the dish in the fridge. Cover it tightly with plastic wrap or foil to keep it fresh. When ready to bake, remove it from the fridge. Bake it straight from the cold for about 10 minutes longer than the usual time. This way, you enjoy a warm, cheesy treat without a lot of last-minute work. Cheesy cauliflower bake pairs well with many dishes. Here are some great options: - Grilled chicken: The savory chicken complements the creamy bake. - Steak: A juicy steak adds richness to the meal. - Salad: A fresh garden salad balances the heaviness of the bake. - Roasted vegetables: Crisp, roasted veggies add color and flavor. These side dishes can make your meal feel complete and delicious. Yes! Cheesy cauliflower bake is perfect for vegetarians. It uses cauliflower, cheese, and cream, all plant-based. Just ensure that the cheese options are vegetarian-friendly. Many cheeses are made without animal rennet, making them suitable for vegetarian diets. This dish is a tasty way to enjoy a healthy meal while meeting dietary needs. To sum up, this blog covered how to make a delicious cheesy cauliflower bake. We talked about required ingredients, step-by-step instructions, and tips for great results. You learned about variations, healthy swaps, and how to store leftovers. This dish is not just tasty; it is easy to make and perfect for many meals. Try it yourself for a comforting treat that everyone will enjoy. Remember, the best part is making it your own by adding what you love!](https://goldendishy.com/wp-content/uploads/2025/06/4f60bbbb-6786-4607-99e4-9a4e6c15f60e-768x768.webp)
![- 1 pre-made pie crust - 2 medium zucchinis, grated - 2 cups fresh spinach, chopped - 1 small onion, finely chopped - 3 large eggs - 1 cup milk I love using a pre-made pie crust for this quiche. It saves time and effort. The zucchinis bring a fresh taste, while the spinach adds color and nutrients. Eggs and milk create a rich, creamy texture that binds everything together. - 1 teaspoon garlic powder - Salt and pepper to taste - 1 tablespoon olive oil Garlic powder gives this dish a warm flavor. I always add salt and pepper to enhance the taste. Olive oil is perfect for cooking the veggies and adds a nice depth of flavor. - 1 cup shredded mozzarella cheese - 1/2 cup grated Parmesan cheese Cheese is key for a tasty quiche. Mozzarella melts beautifully, while Parmesan adds a sharp, salty kick. Together, they create a delightful flavor mix that elevates your dish. Don't forget to check the full recipe for complete details! First, heat olive oil in a skillet over medium heat. Add the finely chopped onion. Sauté it for about 3-4 minutes until it turns soft and clear. Next, add the grated zucchini and chopped spinach. Stir often and cook for about 5 minutes. The veggies should become tender, and any extra water will cook off. I love adding garlic powder, salt, and pepper to boost the flavor. After cooking, take it off the heat and let it cool for a moment. In a large bowl, whisk together the eggs and milk until they blend smoothly. This is where the magic begins! Next, add in the shredded mozzarella and grated Parmesan cheese. Fold them in gently. This mixture will bring richness to your quiche. It’s important that the cheese mixes well but still keeps some texture. Now, pour the vegetable and egg mixture into the prepared pie crust. Spread it out evenly to help it cook well. Place the quiche in your preheated oven. Bake for 30-35 minutes. You’ll know it’s ready when the edges turn golden brown and a toothpick inserted in the center comes out clean. Let it cool for about 10 minutes before slicing. This resting time helps enhance the flavors. You can find the full recipe in the previous section for all these steps! To get the best texture for your quiche, you must control moisture. Zucchini has a lot of water, which can make your quiche soggy. To fix this, grate the zucchini and lightly salt it. Let it sit for 10 minutes, then squeeze out the excess liquid. This step is key to a firm quiche. The cooking time can vary based on your oven. I find that checking it a few minutes early helps. If the edges look golden and a toothpick comes out clean, it's ready! For more flavor, consider adding fresh herbs like thyme or basil. A pinch of red pepper flakes can add a nice kick. You can also play with spices, like paprika or onion powder. Each of these can change the taste in a fun way. Cheese is another way to boost flavor. While mozzarella and Parmesan are great, try using feta or goat cheese for a tangy twist. These types add both creaminess and a bit of zest to the dish. When serving your zucchini spinach quiche, aim for a bright plate. A colorful plate makes a dish look more appealing. Add fresh basil or parsley on top for an eye-catching touch. You can also serve it with a light salad drizzled with citrus vinaigrette. This adds freshness and balance. For a photo-worthy presentation, slice the quiche into neat pieces. Arrange them in a circle on the plate. This simple trick makes your dish look polished and ready for sharing. Don't forget to snap a picture before you dig in! For the complete recipe, check out the [Full Recipe]. {{image_4}} You can switch up the veggies in your quiche. Broccoli, bell peppers, or mushrooms work great. Each veggie brings its own taste and texture. You can also try seasonal additions. In spring, add asparagus, and in fall, use roasted squash. This keeps your quiche fresh and exciting. If you need a gluten-free quiche, use a gluten-free crust. Many stores sell these now, or you can make your own. If you make your crust, use almond flour or coconut flour for a nice texture. You may need to adjust the liquid in the filling. This helps keep the quiche moist and tasty. Making mini quiches is fun and easy. You can use a muffin tin for individual servings. Just pour the mixture into each cup and fill them about three-quarters full. Bake for about 20-25 minutes. Keep an eye on them to avoid burning. These mini quiches are perfect for snacks or brunch. You can even freeze them for later! Check out the Full Recipe for more details. To keep your quiche fresh, store it in an airtight container. This helps keep moisture out. It stays fresh in the fridge for up to three days. If you plan to eat it later, cover it tightly with plastic wrap or foil. You can freeze your quiche before or after baking. If freezing before baking, wrap it well. This way, you can bake it fresh later. For freezing after baking, let it cool completely first. Store it in an airtight container. It can last up to three months in the freezer. When ready to eat, thaw it in the fridge overnight. For the best taste, reheat your quiche in the oven. Set it to 350°F (175°C) and heat for about 15-20 minutes. This keeps the crust crispy. You can also use a microwave for quick heating. However, the crust may not stay as crunchy. Heat slices for about 1-2 minutes. Always check that it's hot in the middle before serving. You can tell the quiche is done by looking for a few key signs. The edges should be golden brown, and the center should be firm. If you gently shake the quiche, it should not jiggle. Another great way to check is with a toothpick. Insert it into the center of the quiche. If it comes out clean, your quiche is ready to enjoy. Yes, you can use frozen spinach in this recipe. However, it’s important to make a few adjustments. First, thaw the spinach completely and drain any excess water. This helps prevent the quiche from becoming too watery. You may also want to chop the spinach further after thawing. This ensures even distribution in your quiche. Zucchini spinach quiche pairs well with many side dishes. A simple green salad with a light vinaigrette works great. You can also serve it with roasted vegetables for added flavor. If you want something heartier, serve it alongside a bowl of creamy tomato soup. This combination makes for a balanced and tasty meal. This blog post covers how to make a tasty zucchini and spinach quiche. You learned about the main ingredients, like pre-made crust and eggs, plus the best seasonings. I shared step-by-step instructions for preparing and baking. You also got tips for perfecting texture and ideas for variations. Making this dish can be easy and fun. Enjoy experimenting with flavors and ingredients. Whether you serve it for breakfast or dinner, this quiche will impress. Get cooking and enjoy your delicious creation!](https://goldendishy.com/wp-content/uploads/2025/06/2284a9f2-dfec-450d-ba9a-23981f99d5f6-768x768.webp)
![To make Caprese Pasta with Balsamic Glaze, gather these key ingredients: - 12 oz pasta (fusilli or penne recommended) - 2 cups cherry tomatoes, halved - 1 cup fresh mozzarella balls (bocconcini), drained and patted dry - 1/2 cup fresh basil leaves, roughly torn - 1/4 cup extra virgin olive oil - 2 tablespoons balsamic glaze (store-bought or homemade) - 1 teaspoon garlic powder - Salt and freshly ground black pepper to taste Each ingredient plays a vital role. The pasta serves as the base. Cherry tomatoes add sweetness and color. Fresh mozzarella adds creaminess. Basil brings freshness, while balsamic glaze ties everything together with a sweet-tangy kick. You can enhance your dish with a few optional garnishes: - Freshly grated Parmesan cheese - Extra basil leaves for a pop of color - A drizzle of olive oil before serving These garnishes boost flavor and make your pasta look stunning. They add a gourmet touch that impresses everyone. Choosing high-quality ingredients makes a big difference. Here are some tips: - Use fresh pasta for a softer texture and richer flavor. - Select ripe cherry tomatoes for better sweetness. - Buy mozzarella balls packed in water for the best taste. - Pick fresh basil with vibrant green leaves. When you use quality ingredients, your Caprese Pasta will shine. Each bite will burst with flavor, making your meal truly special. For the full recipe, check the section above. Start by boiling a large pot of salted water. Once it reaches a rolling boil, add 12 ounces of pasta. I recommend using fusilli or penne for this dish. Cook the pasta according to the package instructions, usually around 8 to 10 minutes. You want it al dente, which means it should remain firm to the bite. After cooking, drain the pasta in a colander. Rinse it under cold water to stop the cooking process, then set it aside. In a small mixing bowl, combine 1/4 cup of extra virgin olive oil, 1 teaspoon of garlic powder, and salt and black pepper to taste. Whisk these ingredients together until they form a smooth mixture. This dressing adds flavor to your pasta and brings all the ingredients together. Set the dressing aside for now. In a large mixing bowl, add the drained pasta, 2 cups of halved cherry tomatoes, and 1 cup of fresh mozzarella balls. Use a spatula or wooden spoon to gently mix these ingredients together. Next, pour the prepared dressing over the pasta mix. Toss everything until all the ingredients are coated with the dressing. Then, gently fold in 1/2 cup of torn fresh basil leaves. Be careful not to bruise them. Just before serving, drizzle 2 tablespoons of balsamic glaze over the pasta. Toss the dish again for an even flavor. You can serve this pasta warm or chill it in the fridge for about 30 minutes for a cold salad. Enjoy your Caprese Pasta with Balsamic Glaze! For the complete recipe, check the Full Recipe section. To boost the flavors in your Caprese pasta, focus on fresh ingredients. The magic lies in ripe cherry tomatoes and creamy mozzarella. Use extra virgin olive oil for a rich taste. If you want a zesty kick, add a bit of lemon juice. It brightens the dish. Consider also using garlic powder for depth—just a teaspoon will do. Lastly, a sprinkle of salt and pepper can make all the difference. Cooking pasta to the right texture is key. Aim for al dente, which means it should be firm but cooked. Start with a large pot of salted boiling water. This helps flavor the pasta. Follow the package’s recommended cook time, usually about 8-10 minutes. Once cooked, drain it but do not rinse. Rinsing washes away the starch, which helps sauce cling to the pasta. A beautiful presentation makes any meal special. Use a large, shallow bowl for serving. This allows the colors to pop. Top your pasta with fresh basil leaves and a sprinkle of Parmesan cheese. You can drizzle a bit more balsamic glaze on top for that extra visual appeal. Serve it warm or chill it for a refreshing treat. Remember, we eat with our eyes first! For the full recipe, check out the Caprese Pasta Delight. {{image_4}} You can mix up this Caprese pasta recipe easily. Use different pasta shapes like spaghetti or farfalle for fun. Swap cherry tomatoes for sun-dried tomatoes if you want a bolder taste. You can also try adding grilled chicken or shrimp for protein. Instead of fresh mozzarella, use feta for a tangy twist. Seasonal ingredients can brighten this dish. In spring, add asparagus or peas for freshness. Summer is perfect for zucchini or bell peppers. In fall, consider roasted butternut squash for a sweet flavor. Winter calls for hearty greens like kale or spinach. These additions can enhance color and taste. You can make this dish fit many diets. To make it vegan, skip the mozzarella and use avocado or cashew cheese instead. For a gluten-free option, choose gluten-free pasta made from rice or quinoa. Adjust the dressing by using a vegan-friendly oil. This way, everyone can enjoy Caprese pasta. For the full recipe, check [Full Recipe]. To keep your Caprese pasta fresh, store it properly. Place any leftovers in an airtight container. This helps keep moisture in and prevents the pasta from drying out. If you have extra balsamic glaze, store it separately. This way, you can drizzle it on just before serving. When it's time to eat your leftovers, reheat the pasta gently. Use a microwave or a pan on low heat. If using the microwave, heat in short bursts to avoid overcooking. Add a splash of olive oil or a bit of water to keep it moist. Stir well to ensure even heat. Caprese pasta stays fresh for about 3 days in the fridge. After that, the flavors can fade. If you want to keep it longer, consider freezing it. But remember, the texture might change once it's thawed. Enjoy your delicious meal within those days for the best taste! To make balsamic glaze, start with balsamic vinegar. Pour one cup of vinegar into a small saucepan. Heat it over medium heat. Stir it often as it heats. Once it boils, reduce the heat. Let it simmer for about 15 to 20 minutes. The vinegar will reduce and thicken. You want it to coat the back of a spoon. Take it off the heat and let it cool. The glaze will thicken more as it cools. Yes, you can use many types of pasta. Fusilli and penne are great choices. You can also try rotini, farfalle, or spaghetti. Each type offers a unique texture. Choose what you like best. Just remember to cook it until it is al dente. Absolutely! Caprese pasta is great for meal prep. You can make it ahead of time. Store it in an airtight container in the fridge. It keeps well for up to three days. Just add the balsamic glaze right before serving. This will keep the flavors fresh. For the full recipe, check out the Caprese Pasta Delight section. This article covered key ingredients for Caprese pasta, how to cook it, and tips for flavor and texture. We also explored variations for different diets and seasonal tastes. Remember, quality ingredients make a big difference. Experiment with flavors and enjoy your meals. It’s all about making food that you love. Enjoy creating your perfect Caprese pasta!](https://goldendishy.com/wp-content/uploads/2025/05/8e484e0a-c503-4741-abc1-b7211b9a34a5-768x768.webp)