Fajita Veggie Sheet Pan Flavor Packed Delight
![To make your Fajita Veggie Sheet Pan, gather these simple and fresh ingredients: - Bell peppers (red, yellow, or green) - Zucchini - Red onion - Cherry tomatoes - Black beans - Olive oil - Spices and seasonings (chili powder, cumin, garlic powder, salt, pepper) - Fresh cilantro for garnish - Lime wedges for serving - Tortillas (corn or flour) These ingredients create a colorful and tasty dish. Using fresh veggies adds great flavor and texture. The spices make everything pop! You can adjust the veggies based on what you have or prefer. For example, you might try adding corn or mushrooms. Each change can lead to a new twist on this tasty recipe. This Fajita Veggie Sheet Pan really shows how simple ingredients can shine together. When you gather these items, you set the stage for a fun cooking adventure. Check out the Full Recipe for complete details on how to bring this delicious dish to life. 1. First, preheat your oven to 425°F (220°C). This helps the veggies cook just right. 2. Next, line a large sheet pan with parchment paper. This makes cleanup easy. 3. In a big mixing bowl, combine the sliced bell pepper, zucchini rounds, red onion wedges, halved cherry tomatoes, and rinsed black beans. 4. Drizzle 3 tablespoons of olive oil over the mixture. It helps the flavors blend. 5. Now, add 2 teaspoons of chili powder, 1 teaspoon of ground cumin, and 1 teaspoon of garlic powder. Don't forget a pinch of salt and black pepper. 6. Toss everything gently until each piece is well-coated with oil and spices. 1. Spread the veggie and bean mixture evenly on the prepared sheet pan. Make sure they are not crowded. 2. Place the pan in the preheated oven and roast for 20-25 minutes. Stir halfway through for even cooking. 3. The veggies should be tender and have slightly caramelized edges when done. 1. To warm the tortillas, you can use a skillet or microwave. Just a minute or two will do. 2. Fill each warm tortilla with the roasted fajita veggies. 3. Top with fresh cilantro and a drizzle of lime juice for extra flavor. 4. Serve the filled tortillas on a platter, garnished with lime wedges and extra cilantro for a beautiful display. For the complete recipe, check out the [Full Recipe]. To get the best from your fajita veggies, even cooking is key. Spread the veggies in a single layer on the sheet pan. This helps them roast well. Stir them halfway through cooking. This way, they brown nicely on all sides. Each oven runs a bit differently. You may need to adjust the cooking time. Keep an eye on the veggies. They should be tender and slightly charred. Want to kick up the flavor? Add more spices! A pinch of smoked paprika or cayenne pepper can work wonders. Fresh herbs like oregano or thyme also add depth. Don’t forget lime juice! A squeeze right before serving makes the dish pop. It gives a fresh, zesty flavor that brightens everything up. When serving, arrange the filled tortillas on a pretty platter. It makes the meal more inviting. Garnish with lime wedges and extra cilantro for color. You can also sprinkle some crumbled cheese on top. This adds a nice touch and looks great. A vibrant display makes your Fajita Veggie Sheet Pan Delight even more appetizing. {{image_4}} You can swap out veggies to suit your taste. Try adding mushrooms or sweet potatoes. Seasonal choices like asparagus or butternut squash work well, too. Think of what’s fresh at your local market. Broccoli and cauliflower also add great texture. Mix and match for a colorful plate. Want to make this dish heartier? Tofu or tempeh are great choices. Cube them and toss with your veggies. You can also add chickpeas for extra protein. They blend well with the spices. If you eat meat, grilled chicken or shrimp can elevate this dish. Just season them like your veggies for a tasty mix. Experimenting with spices can change your dish. For a mild flavor, stick with cumin and garlic. If you like heat, add cayenne or smoked paprika. Try a taco seasoning mix for a new twist. You could even toss in fresh herbs like cilantro or oregano. This will keep your fajita veggie sheet pan exciting each time! To keep your fajita veggies fresh, store them in an airtight container. Place the container in the fridge. This way, your flavors stay bright. Use leftover veggies within three to four days for best taste. For reheating, the oven is your best friend. Preheat it to 350°F (175°C). Spread the veggies on a baking sheet and heat for about 10 minutes. This restores texture and taste. You can also use the microwave, but the oven keeps them crisp. If you have extras, try adding them to a salad or a quesadilla for a tasty twist. To freeze the fajita veggie mix, let it cool first. Then, transfer it to a freezer-safe bag. Remove as much air as you can before sealing. This helps prevent freezer burn. When ready to use, move it to the fridge overnight to thaw. Reheat as mentioned above, and enjoy! It takes about 10 minutes to prep. Roasting in the oven takes 20-25 minutes. Altogether, you can enjoy this dish in about 30-35 minutes. Yes, you can easily swap veggies. Try adding mushrooms, asparagus, or even corn. Just make sure they cut evenly for even cooking. Absolutely! This dish is great for meal prep. You can store it in the fridge for up to four days. Just reheat portions as needed. Corn or flour tortillas are both great options. Corn tortillas give a nice crunch, while flour tortillas are soft and chewy. To spice things up, add more chili powder. You can also include fresh jalapeños or a splash of hot sauce. Experiment with heat to find your perfect level. You can prepare the veggies and seasoning ahead. Just store them in the fridge. When ready, roast them for a quick, fresh meal. For the full recipe, check out the details in the main article! This blog post covered how to make delicious fajita veggies on a sheet pan. We talked about the ingredients, preparation steps, and tips for perfect roasting. You learned about storing leftovers and customizing the recipe to fit your taste. In summary, this dish is both fun and easy to prepare. You can explore different veggies and spices, making it your own. Enjoy this tasty meal with friends or family, and remember, cooking should always bring joy!](https://goldendishy.com/wp-content/uploads/2025/07/261fee1c-f0d4-4ba8-a84d-53625610978f.webp)
Are you ready for a burst of flavor? This Fajita Veggie Sheet Pan recipe brings bold tastes right to your kitchen. You’ll mix colorful veggies like bell peppers and zucchini, tossed with hearty black beans and spices, all roasted to perfection. It’s simple, fun, and perfect for any meal. Join me as I guide you through every step of this delicious and easy dish that will please the whole family!
Ingredients
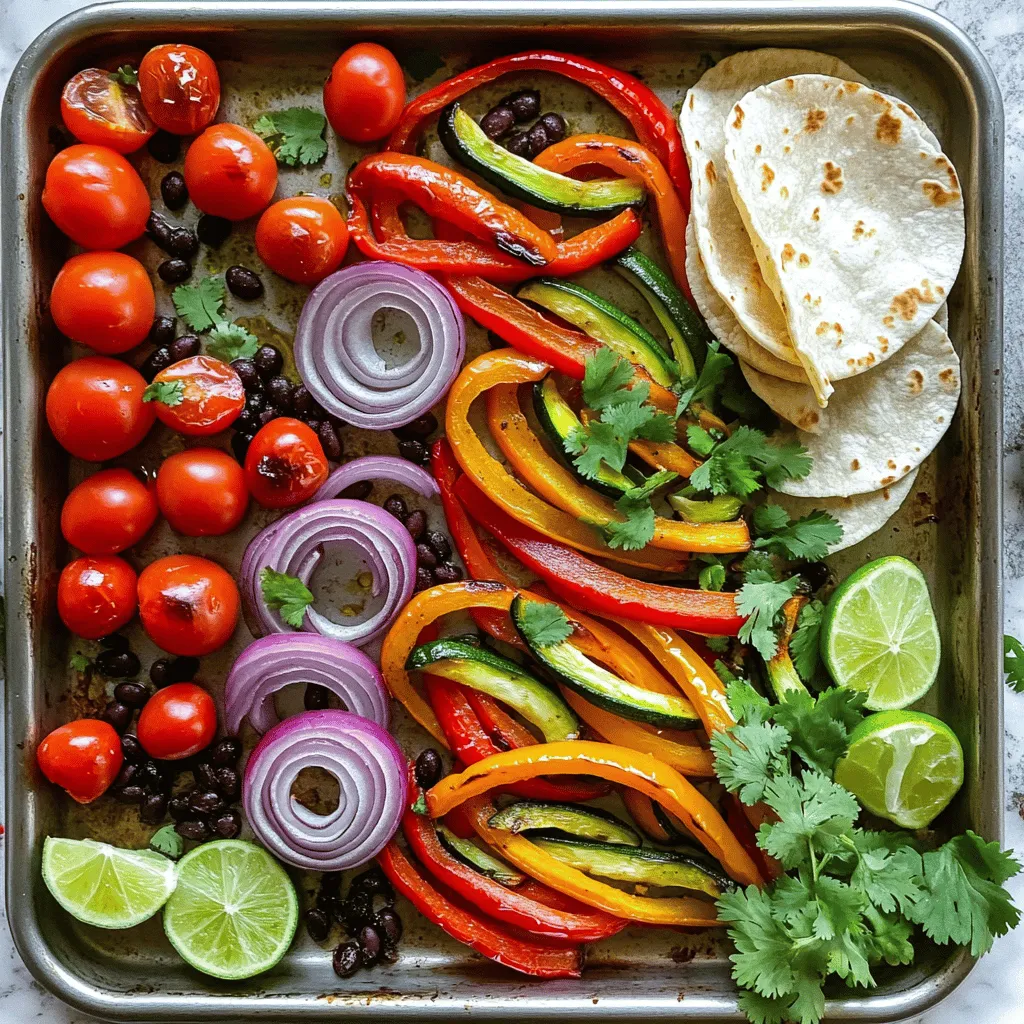
To make your Fajita Veggie Sheet Pan, gather these simple and fresh ingredients:
– Bell peppers (red, yellow, or green)
– Zucchini
– Red onion
– Cherry tomatoes
– Black beans
– Olive oil
– Spices and seasonings (chili powder, cumin, garlic powder, salt, pepper)
– Fresh cilantro for garnish
– Lime wedges for serving
– Tortillas (corn or flour)
These ingredients create a colorful and tasty dish. Using fresh veggies adds great flavor and texture. The spices make everything pop! You can adjust the veggies based on what you have or prefer. For example, you might try adding corn or mushrooms. Each change can lead to a new twist on this tasty recipe.
This Fajita Veggie Sheet Pan really shows how simple ingredients can shine together. When you gather these items, you set the stage for a fun cooking adventure.
Step-by-Step Instructions
Preparation Steps
1. First, preheat your oven to 425°F (220°C). This helps the veggies cook just right.
2. Next, line a large sheet pan with parchment paper. This makes cleanup easy.
3. In a big mixing bowl, combine the sliced bell pepper, zucchini rounds, red onion wedges, halved cherry tomatoes, and rinsed black beans.
4. Drizzle 3 tablespoons of olive oil over the mixture. It helps the flavors blend.
5. Now, add 2 teaspoons of chili powder, 1 teaspoon of ground cumin, and 1 teaspoon of garlic powder. Don’t forget a pinch of salt and black pepper.
6. Toss everything gently until each piece is well-coated with oil and spices.
Roasting Instructions
1. Spread the veggie and bean mixture evenly on the prepared sheet pan. Make sure they are not crowded.
2. Place the pan in the preheated oven and roast for 20-25 minutes. Stir halfway through for even cooking.
3. The veggies should be tender and have slightly caramelized edges when done.
Serving Suggestions
1. To warm the tortillas, you can use a skillet or microwave. Just a minute or two will do.
2. Fill each warm tortilla with the roasted fajita veggies.
3. Top with fresh cilantro and a drizzle of lime juice for extra flavor.
4. Serve the filled tortillas on a platter, garnished with lime wedges and extra cilantro for a beautiful display.
Tips & Tricks
How to Perfect Roasting
To get the best from your fajita veggies, even cooking is key. Spread the veggies in a single layer on the sheet pan. This helps them roast well. Stir them halfway through cooking. This way, they brown nicely on all sides. Each oven runs a bit differently. You may need to adjust the cooking time. Keep an eye on the veggies. They should be tender and slightly charred.
Flavor Enhancement Tips
Want to kick up the flavor? Add more spices! A pinch of smoked paprika or cayenne pepper can work wonders. Fresh herbs like oregano or thyme also add depth. Don’t forget lime juice! A squeeze right before serving makes the dish pop. It gives a fresh, zesty flavor that brightens everything up.
Presentation Tips
When serving, arrange the filled tortillas on a pretty platter. It makes the meal more inviting. Garnish with lime wedges and extra cilantro for color. You can also sprinkle some crumbled cheese on top. This adds a nice touch and looks great. A vibrant display makes your Fajita Veggie Sheet Pan Delight even more appetizing.
Variations
Alternative Vegetable Options
You can swap out veggies to suit your taste. Try adding mushrooms or sweet potatoes. Seasonal choices like asparagus or butternut squash work well, too. Think of what’s fresh at your local market. Broccoli and cauliflower also add great texture. Mix and match for a colorful plate.
Protein Additions
Want to make this dish heartier? Tofu or tempeh are great choices. Cube them and toss with your veggies. You can also add chickpeas for extra protein. They blend well with the spices. If you eat meat, grilled chicken or shrimp can elevate this dish. Just season them like your veggies for a tasty mix.
Spice Blend Variations
Experimenting with spices can change your dish. For a mild flavor, stick with cumin and garlic. If you like heat, add cayenne or smoked paprika. Try a taco seasoning mix for a new twist. You could even toss in fresh herbs like cilantro or oregano. This will keep your fajita veggie sheet pan exciting each time!
Storage Info
Storing Leftovers
To keep your fajita veggies fresh, store them in an airtight container. Place the container in the fridge. This way, your flavors stay bright. Use leftover veggies within three to four days for best taste.
Reheating Tips
For reheating, the oven is your best friend. Preheat it to 350°F (175°C). Spread the veggies on a baking sheet and heat for about 10 minutes. This restores texture and taste. You can also use the microwave, but the oven keeps them crisp. If you have extras, try adding them to a salad or a quesadilla for a tasty twist.
Freezing Instructions
To freeze the fajita veggie mix, let it cool first. Then, transfer it to a freezer-safe bag. Remove as much air as you can before sealing. This helps prevent freezer burn. When ready to use, move it to the fridge overnight to thaw. Reheat as mentioned above, and enjoy!
FAQs
How long does it take to prepare Fajita Veggie Sheet Pan?
It takes about 10 minutes to prep. Roasting in the oven takes 20-25 minutes. Altogether, you can enjoy this dish in about 30-35 minutes.
Can I customize the vegetables used in this recipe?
Yes, you can easily swap veggies. Try adding mushrooms, asparagus, or even corn. Just make sure they cut evenly for even cooking.
Is the Fajita Veggie Sheet Pan suitable for meal prep?
Absolutely! This dish is great for meal prep. You can store it in the fridge for up to four days. Just reheat portions as needed.
What are the best tortillas to use with this recipe?
Corn or flour tortillas are both great options. Corn tortillas give a nice crunch, while flour tortillas are soft and chewy.
How can I make this dish spicier?
To spice things up, add more chili powder. You can also include fresh jalapeños or a splash of hot sauce. Experiment with heat to find your perfect level.
Can I make this recipe ahead of time?
You can prepare the veggies and seasoning ahead. Just store them in the fridge. When ready, roast them for a quick, fresh meal.
This blog post covered how to make delicious fajita veggies on a sheet pan. We talked about the ingredients, preparation steps, and tips for perfect roasting. You learned about storing leftovers and customizing the recipe to fit your taste.
In summary, this dish is both fun and easy to prepare. You can explore different veggies and spices, making it your own. Enjoy this tasty meal with friends or family, and remember, cooking should always bring joy!
![To make your Fajita Veggie Sheet Pan, gather these simple and fresh ingredients: - Bell peppers (red, yellow, or green) - Zucchini - Red onion - Cherry tomatoes - Black beans - Olive oil - Spices and seasonings (chili powder, cumin, garlic powder, salt, pepper) - Fresh cilantro for garnish - Lime wedges for serving - Tortillas (corn or flour) These ingredients create a colorful and tasty dish. Using fresh veggies adds great flavor and texture. The spices make everything pop! You can adjust the veggies based on what you have or prefer. For example, you might try adding corn or mushrooms. Each change can lead to a new twist on this tasty recipe. This Fajita Veggie Sheet Pan really shows how simple ingredients can shine together. When you gather these items, you set the stage for a fun cooking adventure. Check out the Full Recipe for complete details on how to bring this delicious dish to life. 1. First, preheat your oven to 425°F (220°C). This helps the veggies cook just right. 2. Next, line a large sheet pan with parchment paper. This makes cleanup easy. 3. In a big mixing bowl, combine the sliced bell pepper, zucchini rounds, red onion wedges, halved cherry tomatoes, and rinsed black beans. 4. Drizzle 3 tablespoons of olive oil over the mixture. It helps the flavors blend. 5. Now, add 2 teaspoons of chili powder, 1 teaspoon of ground cumin, and 1 teaspoon of garlic powder. Don't forget a pinch of salt and black pepper. 6. Toss everything gently until each piece is well-coated with oil and spices. 1. Spread the veggie and bean mixture evenly on the prepared sheet pan. Make sure they are not crowded. 2. Place the pan in the preheated oven and roast for 20-25 minutes. Stir halfway through for even cooking. 3. The veggies should be tender and have slightly caramelized edges when done. 1. To warm the tortillas, you can use a skillet or microwave. Just a minute or two will do. 2. Fill each warm tortilla with the roasted fajita veggies. 3. Top with fresh cilantro and a drizzle of lime juice for extra flavor. 4. Serve the filled tortillas on a platter, garnished with lime wedges and extra cilantro for a beautiful display. For the complete recipe, check out the [Full Recipe]. To get the best from your fajita veggies, even cooking is key. Spread the veggies in a single layer on the sheet pan. This helps them roast well. Stir them halfway through cooking. This way, they brown nicely on all sides. Each oven runs a bit differently. You may need to adjust the cooking time. Keep an eye on the veggies. They should be tender and slightly charred. Want to kick up the flavor? Add more spices! A pinch of smoked paprika or cayenne pepper can work wonders. Fresh herbs like oregano or thyme also add depth. Don’t forget lime juice! A squeeze right before serving makes the dish pop. It gives a fresh, zesty flavor that brightens everything up. When serving, arrange the filled tortillas on a pretty platter. It makes the meal more inviting. Garnish with lime wedges and extra cilantro for color. You can also sprinkle some crumbled cheese on top. This adds a nice touch and looks great. A vibrant display makes your Fajita Veggie Sheet Pan Delight even more appetizing. {{image_4}} You can swap out veggies to suit your taste. Try adding mushrooms or sweet potatoes. Seasonal choices like asparagus or butternut squash work well, too. Think of what’s fresh at your local market. Broccoli and cauliflower also add great texture. Mix and match for a colorful plate. Want to make this dish heartier? Tofu or tempeh are great choices. Cube them and toss with your veggies. You can also add chickpeas for extra protein. They blend well with the spices. If you eat meat, grilled chicken or shrimp can elevate this dish. Just season them like your veggies for a tasty mix. Experimenting with spices can change your dish. For a mild flavor, stick with cumin and garlic. If you like heat, add cayenne or smoked paprika. Try a taco seasoning mix for a new twist. You could even toss in fresh herbs like cilantro or oregano. This will keep your fajita veggie sheet pan exciting each time! To keep your fajita veggies fresh, store them in an airtight container. Place the container in the fridge. This way, your flavors stay bright. Use leftover veggies within three to four days for best taste. For reheating, the oven is your best friend. Preheat it to 350°F (175°C). Spread the veggies on a baking sheet and heat for about 10 minutes. This restores texture and taste. You can also use the microwave, but the oven keeps them crisp. If you have extras, try adding them to a salad or a quesadilla for a tasty twist. To freeze the fajita veggie mix, let it cool first. Then, transfer it to a freezer-safe bag. Remove as much air as you can before sealing. This helps prevent freezer burn. When ready to use, move it to the fridge overnight to thaw. Reheat as mentioned above, and enjoy! It takes about 10 minutes to prep. Roasting in the oven takes 20-25 minutes. Altogether, you can enjoy this dish in about 30-35 minutes. Yes, you can easily swap veggies. Try adding mushrooms, asparagus, or even corn. Just make sure they cut evenly for even cooking. Absolutely! This dish is great for meal prep. You can store it in the fridge for up to four days. Just reheat portions as needed. Corn or flour tortillas are both great options. Corn tortillas give a nice crunch, while flour tortillas are soft and chewy. To spice things up, add more chili powder. You can also include fresh jalapeños or a splash of hot sauce. Experiment with heat to find your perfect level. You can prepare the veggies and seasoning ahead. Just store them in the fridge. When ready, roast them for a quick, fresh meal. For the full recipe, check out the details in the main article! This blog post covered how to make delicious fajita veggies on a sheet pan. We talked about the ingredients, preparation steps, and tips for perfect roasting. You learned about storing leftovers and customizing the recipe to fit your taste. In summary, this dish is both fun and easy to prepare. You can explore different veggies and spices, making it your own. Enjoy this tasty meal with friends or family, and remember, cooking should always bring joy!](https://goldendishy.com/wp-content/uploads/2025/07/261fee1c-f0d4-4ba8-a84d-53625610978f-300x300.webp)



. To start, you need to mash the chickpeas. Use a fork or a potato masher. Mash until you have a chunky texture. You want to leave some whole chickpeas. This gives your sandwich a nice bite and texture. Next, add the tahini, lemon juice, and Dijon mustard to the chickpeas. Mix everything well. You should have a creamy base. Now, chop the red onion, celery, and grate the carrot. Fold these veggies into the chickpeas. The crunch from the veggies adds great flavor and color to your salad. Now it's time to season your chickpea mixture. Add salt and black pepper to taste. Adjust the flavors to your liking. If you want more tang, add lemon juice. If you prefer creaminess, add more tahini. For the bread, lightly toast it if you want a crunch. Spread a generous amount of the chickpea salad on two slices of bread. Add a few crisp lettuce leaves on top. If you like, add thin slices of tomatoes and cucumbers. Place the other slices of bread on top. Cut each sandwich in half for easy eating. You can serve them right away or wrap them in parchment paper for later. For a nice touch, arrange the sandwiches on a wooden board or plate. Enjoy this fresh and flavorful meal! For the complete recipe, check the Full Recipe above. To prepare chickpeas, start with rinsing and draining. Use a fine mesh strainer for this task. Rinsing removes excess sodium from canned chickpeas. Draining helps avoid excess water that can make your salad soggy. You want the chickpeas dry but not overly crushed. Adjusting seasoning is key for a tasty salad. Start with salt and pepper. Taste your mixture before serving. Add more lemon juice for brightness. If you want creaminess, add more tahini. These simple changes can enhance the dish. Make your meal look nice with a few easy tips. Use a rustic wooden board or a bright plate. This adds charm to your presentation. Garnish with fresh dill on top of the sandwich. Serve with colorful veggie sticks on the side. It makes for an eye-catching and healthy display. For the full recipe, check the section above. {{image_4}} You can change up the chickpeas in this sandwich. Try using black beans or lentils instead. Both options give a different taste and texture. For extra creaminess, swap tahini with vegan mayonnaise. This will make the mix smooth and rich. You can even blend both for a unique flavor. Herbs and spices can change the taste of your sandwich. Instead of dill, use parsley or cilantro for a fresh kick. You can also add garlic powder or smoked paprika for depth. For a spicy twist, throw in some chopped jalapeños or a dash of hot sauce. These additions can bring a fun zing to your meal. When it comes to bread, you have many choices. Whole grain bread is great, but you can also use gluten-free options. Try wraps made from rice or corn for a lighter touch. This makes for a fun, portable meal. Each bread type changes the sandwich's feel, so choose what you love! To keep leftovers fresh, store your chickpea salad in an airtight container. Make sure to refrigerate it right away. This helps keep the flavors intact for up to three days. When ready to eat, just give it a good stir. You can enjoy it cold or make a fresh sandwich. If you want to store the chickpea salad for longer, freezing is a great option. Place the chickpea salad mixture in a freezer-safe container. Leave some space at the top to allow for expansion. It will stay good for about three months. When you're ready to eat it, let it thaw in the fridge overnight. To refresh your sandwich after storage, you can add a bit of olive oil or lemon juice. This helps bring back the moisture and flavor. If you want, you can toast the bread again for a crunchy bite. This simple step makes your sandwich taste fresh and delicious again. Enjoy your meal! To make this sandwich gluten-free, choose gluten-free bread. Many stores offer great options. Look for brands made from rice or almond flour. You can also try lettuce wraps instead of bread. This keeps it fresh and light too! Yes, you can. Make the chickpea salad a day ahead. Store it in an airtight container in the fridge. It stays good for about three days. Just remember to add fresh toppings right before serving for best flavor. Chickpeas are packed with protein and fiber. They help keep you full and satisfied. This sandwich is low in fat and high in vitamins. The veggies add crunch and nutrients. Tahini brings in healthy fats and flavor. Overall, this sandwich is a tasty way to eat healthy! This blog covered how to make a tasty chickpea salad sandwich. We explored main ingredients, step-by-step instructions, and storage tips. You learned how to adjust flavors and choose the right bread. Remember, you can customize the recipe with different herbs or legumes. Enjoy this easy meal any day! It’s healthy, quick, and delicious. I hope you try it soon. Your taste buds will thank you!](https://goldendishy.com/wp-content/uploads/2025/06/7c039c45-1f39-49ec-9b48-b25c6f87980b-768x768.webp)
