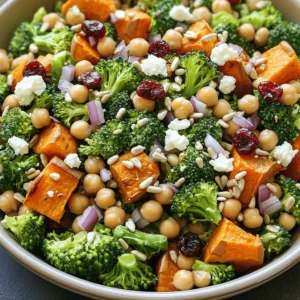
Sweet Potato Broccoli Salad Fresh and Flavorful Dish

Looking for a fresh and tasty salad that packs a punch? My Sweet Potato Broccoli Salad is just that! With vibrant colors and a mix of flavors, it’s easy to make and oh-so-satisfying. You’ll love the hearty sweet potatoes, crunchy broccoli, and a delicious dressing. Perfect for meal prep or a lunch idea, let’s dive into how to bring this flavorful dish to your table!
Ingredients
Main Ingredients
– 2 medium sweet potatoes, peeled and cut into 1-inch cubes
– 4 cups fresh broccoli florets
– 1 cup canned chickpeas, thoroughly drained and rinsed
– 1/2 red onion, finely diced
– 1/2 cup dried cranberries
– 1/4 cup feta cheese, crumbled (optional)
– 1/4 cup sunflower seeds
Dressing Ingredients
– 3 tablespoons extra-virgin olive oil
– 2 tablespoons apple cider vinegar
– 1 tablespoon pure maple syrup
– 1 teaspoon Dijon mustard
– Salt and freshly ground black pepper to taste
Gathering your ingredients is the first step towards a great salad. Sweet potatoes bring natural sweetness and a creamy texture. Broccoli adds crunch and a bright color. Chickpeas provide protein and heartiness. Red onion gives a mild bite, while dried cranberries offer a little tartness. Feta cheese adds creaminess, but it’s optional. Sunflower seeds give a nice crunch and extra flavor.
Next, for the dressing, you’ll use extra-virgin olive oil for richness. Apple cider vinegar adds tang, while maple syrup balances with sweetness. Dijon mustard gives depth, and salt plus pepper tie everything together. This mix will dress your salad perfectly.
Step-by-Step Instructions
Preparing the Ingredients
Roasting the sweet potatoes
Start by preheating your oven to 400°F (200°C). In a bowl, toss 2 medium sweet potatoes, peeled and cut into 1-inch cubes, with olive oil, salt, and pepper. Spread the cubes on a baking sheet. Roast them for 25-30 minutes. Flip them halfway for even cooking. You want them tender and slightly caramelized.
Blanching the broccoli
While the sweet potatoes roast, prepare the broccoli. Boil a pot of water. Add 4 cups of fresh broccoli florets and blanch for 2-3 minutes. You want them bright green and tender-crisp. Drain the broccoli and place it in ice water. This stops the cooking and keeps the color. After a couple of minutes, drain it again and set aside.
Assembling the Salad
Combining the main ingredients
In a large mixing bowl, combine the roasted sweet potatoes, blanched broccoli, 1 cup of drained and rinsed canned chickpeas, 1/2 finely diced red onion, 1/2 cup of dried cranberries, and 1/4 cup of sunflower seeds. Mix gently to combine all the ingredients well.
Making the salad dressing
In a small bowl, whisk together 3 tablespoons of extra-virgin olive oil, 2 tablespoons of apple cider vinegar, 1 tablespoon of pure maple syrup, and 1 teaspoon of Dijon mustard. Add a pinch of salt and pepper to taste. Feel free to adjust the seasoning to your liking.
Final Touches
Tossing and serving tips
Drizzle the dressing over the mixed salad. Toss gently but thoroughly to coat everything. If you like, add 1/4 cup of crumbled feta cheese for extra creaminess. Serve the salad in a large bowl or on individual plates. For a pop of color, garnish with extra sunflower seeds and cranberries. This salad tastes great chilled or at room temperature.
Tips & Tricks
Perfecting the Roasting
To achieve caramelized sweet potatoes, start by cutting them into even 1-inch cubes. This helps them cook uniformly. Toss the cubes in olive oil, salt, and pepper. Spread them out on a baking sheet and roast at 400°F (200°C). Bake for 25-30 minutes, flipping halfway through. You want them to be soft and golden brown. The caramelization brings out the sweet flavor.
Enhancing Flavor
To elevate the taste, add fresh herbs like parsley or cilantro. You can also sprinkle spices such as cumin or paprika. These add warmth and depth. Try adding lemon zest for a bright twist. You can mix and match based on what you enjoy, making the dish your own.
Serving Suggestions
This salad pairs well with grilled chicken or fish for a complete meal. It also works as a side to a hearty main dish. Consider serving it with quinoa or brown rice for added texture. The salad is great on its own, too. It’s versatile and fits any occasion.

Variations
Ingredient Swaps
You can change up the vegetables in this salad. Try using cauliflower instead of broccoli. You can also add bell peppers for a sweet crunch. Carrots or zucchini work great too. If you want more protein, add black beans or edamame. Nuts like almonds or walnuts can replace sunflower seeds. Each swap gives a new taste and texture.
Dietary Adjustments
Making this salad vegan is easy. Just skip the feta cheese or use a plant-based option. For gluten-free needs, check your dressing ingredients. All the main items are gluten-free, so you’re good to go. You can also add quinoa for a hearty touch. It’s a great way to make it filling and healthy.
Seasonal Variations
Change the salad with the seasons. In spring, add fresh peas and asparagus. In summer, toss in cherry tomatoes and corn. Fall is perfect for roasted Brussels sprouts instead of broccoli. Winter can bring kale for a hearty bite. Adjusting the ingredients keeps the dish fresh and exciting all year.
Storage Info
Short-Term Storage
To keep your sweet potato broccoli salad fresh, store it in the fridge. Place leftovers in an airtight container. This helps prevent moisture loss. You can enjoy the salad for up to three days. If you notice the salad is starting to dry out, add a splash of dressing to revive it.
Long-Term Storage
If you want to save the salad for later, freezing is a great option. However, I recommend freezing only the sweet potatoes and broccoli. The chickpeas and other ingredients may not freeze well. To freeze, place the sweet potatoes and broccoli in a freezer-safe bag. Remove as much air as possible. This helps prevent freezer burn. You can store it in the freezer for up to three months.
Reheating Guidelines
When you’re ready to enjoy your salad again, proper reheating is key. You can microwave the sweet potatoes and broccoli on low heat. Stir every 30 seconds to keep them from getting mushy. If you want a crisp texture, consider roasting the vegetables in the oven. This will help regain some of their original flavor and crunch. Always check that the salad is heated through before serving.
FAQs
What can I substitute for chickpeas?
You can use other proteins in your salad. Good options include:
– Canned black beans
– Cooked lentils
– Edamame
– Grilled chicken
– Tofu
Each option adds flavor and protein. Choose what you like best.
Can I make this salad ahead of time?
Yes, you can prepare this salad in advance. Here are some tips:
– Roast the sweet potatoes and chill them.
– Blanch the broccoli and cool it quickly.
– Store all ingredients separately.
– Mix everything together just before serving.
This keeps everything fresh and tasty.
How do I know when sweet potatoes are done roasting?
Look for these signs of perfect roasting:
– They should be tender when pierced with a fork.
– The edges should be slightly caramelized.
– A golden-brown color adds to the flavor.
These signs mean your sweet potatoes are ready to enjoy!
This blog post shared a recipe for a tasty salad, highlighting fresh ingredients like sweet potatoes and chickpeas. I walked you through the easy steps to prepare and assemble the dish, plus tips to make it even better. You can swap ingredients based on your tastes or diet, ensuring it fits any meal. Remember, proper storage keeps it fresh, and reheating maintains flavor. Enjoy making this vibrant salad that packs a nutritious punch!
![For the best peach avocado salsa, gather these fresh ingredients: - 2 ripe peaches, diced - 2 ripe avocados, peeled and diced - 1/2 medium red onion, finely chopped - 1 small jalapeño pepper, minced - 1/4 cup fresh cilantro leaves - Juice from 2 fresh limes - 1 tablespoon honey (optional) - Salt and freshly cracked black pepper Each ingredient brings its own flavor. Ripe peaches add sweetness, while avocados give creaminess. Red onion adds a sharp bite, and jalapeño provides heat. Cilantro brightens everything up, and lime juice gives freshness. Honey is optional, but it can enhance the sweetness if desired. This mix creates a vibrant salsa perfect for any occasion. When selecting your peaches, choose ones that yield slightly to pressure. They should be fragrant and free from bruises. For avocados, look for ones that are dark and firm but not rock hard. Freshness in these ingredients is key to a tasty dip. You can find the full recipe at the end of this section. Enjoy making this salsa! To make this peach avocado salsa, follow these simple steps. Each step brings you closer to a fresh and tasty dip. - Combine diced peaches and avocados Start by adding the diced peaches and avocados to a medium bowl. Use a spatula to mix them gently. Be careful not to mash the avocados. You want nice chunks for the perfect texture. - Add red onion and jalapeño Next, sprinkle in the finely chopped red onion and minced jalapeño. Mix them in lightly. This adds crunch and a little heat to the salsa. - Fold in cilantro gently Now, add the freshly chopped cilantro. Fold it into the mixture carefully. This keeps the avocados and peaches intact while adding a fresh flavor. - Squeeze lime juice and add honey Squeeze the juice from the limes over the salsa. This brightens the flavors. If you'd like a touch of sweetness, drizzle in the honey. Mix gently to coat everything evenly. - Season with salt and pepper Taste your salsa and season with salt and freshly cracked black pepper. Adjust according to your preference. Toss everything gently to combine the seasonings. - Let sit for flavor development For the best taste, let your salsa sit at room temperature for about 10 minutes. This allows the flavors to blend well together. If you want to see the full recipe, check out the [Full Recipe]. Enjoy making this vibrant, fresh dip! Choosing ripe peaches and avocados is key to a great salsa. Look for peaches that yield slightly to pressure. They should smell sweet and juicy. For avocados, pick ones that feel soft but not mushy. This ensures a creamy texture in your dip. Adjusting heat levels with jalapeño is easy. For less heat, remove the seeds and inner ribs. This part holds most of the spice. If you like it spicy, leave some seeds in. Start with a small amount and add more as needed. Enhancing sweetness with honey can balance the flavors. If your peaches aren't as sweet as you'd like, a tablespoon of honey works wonders. Mix it in gently so you don’t mash the fruit. This extra touch can make your salsa shine. Best pairings for your salsa include chips, grilled chicken, or fish. Tortilla chips add a nice crunch. For a healthy twist, serve it with grilled chicken or fish. The mild flavors of the salsa complement these dishes well. Presentation tips can help impress your guests. Serve the salsa in a rustic bowl. Top it with extra cilantro leaves for a fresh look. A colorful spread makes your table inviting and fun. You can even add lime wedges on the side for a pop of color. For the full recipe, check out the Peach Avocado Salsa section above. {{image_4}} You can get creative with your salsa by switching up ingredients. - Using mango instead of peaches: Mango adds a sweet twist. It gives a tropical flair to your salsa. Simply replace diced peaches with diced mango in equal amounts. - Adding diced bell peppers for crunch: For extra texture, you can add bell peppers. Diced red, yellow, or green peppers work well. They will add a nice crunch and color to your dish. - Incorporating garlic for additional flavor: If you love garlic, try adding a clove of minced garlic. It enhances the flavor profile and gives your salsa a savory kick. Making simple changes can fit different diets. - Making it vegan-friendly: This salsa is already vegan! Use natural sweeteners like agave instead of honey for a completely plant-based option. - Gluten-free serving options: All ingredients are gluten-free. Serve with gluten-free tortilla chips or fresh veggies. This makes it a great snack for everyone. For more details on making this delicious dip, check out the Full Recipe. To keep your peach avocado salsa fresh, place it in an airtight container. This helps prevent air exposure. It is best to refrigerate it right away. The cool temperature slows down spoilage. You can store it in the fridge for 2 to 3 days. After that, the avocados may brown and change in texture. If you notice browning, you can mix in a bit of lime juice to refresh it. Freezing salsa can be a great way to save extra. To freeze it effectively, put the salsa in a freezer-safe bag. Make sure to remove as much air as possible. This helps prevent freezer burn. You can freeze it for up to 3 months. When you want to use it, take it out and thaw in the fridge overnight. Once thawed, the texture may change slightly. It's still safe to eat and can be used in cooked dishes, like tacos or soups. For the best taste, try to use thawed salsa within a week. Peach avocado salsa shines with many dishes. It pairs wonderfully with tortilla chips, making it a great snack. You can also use it to top grilled chicken or fish for a fresh twist. It adds a burst of flavor to tacos or quesadillas too. This salsa can elevate any summer barbecue or picnic, making your meal feel bright and fun. Homemade peach avocado salsa stays fresh in the fridge for about three days. Store it in an airtight container to keep it from browning. After this time, the flavors may fade, and the texture can change. Always check for any off smells before eating. If it looks or smells funny, it’s best to toss it. Yes, you can easily adjust the spice in your salsa. If you want it milder, remove the seeds from the jalapeño. You can also skip the jalapeño entirely for a sweet salsa. For more heat, add extra minced jalapeño or even some crushed red pepper. Taste as you go to find your perfect balance. Making Peach Avocado Salsa is simple and fun. We covered fresh ingredients, step-by-step prep, and useful tips. Plus, we explored tasty variations and smart storage options. This salsa enhances any dish, from chips to seafood. Remember, you can change ingredients to match your taste. Enjoy sharing this bright, flavorful mix at your next meal. With a few tweaks, your salsa can shine every time.](https://goldendishy.com/wp-content/uploads/2025/06/096320e8-25bc-4efd-9183-2f1d952cbb9e-768x768.webp)
![- 4 medium-sized beets - 4 cups mixed greens - 1/2 cup goat cheese - 1/4 cup walnuts - 1/4 cup dried cranberries or pomegranate seeds - 1/4 cup extra virgin olive oil - 2 tablespoons balsamic vinegar - 1 teaspoon honey - Salt and pepper - Fresh parsley for garnish The ingredients in this salad make it a real treat. The beets bring a sweet earthiness. They roast beautifully, turning soft and tender. Mixed greens add a fresh crunch. Goat cheese offers creamy tanginess. Walnuts give a nice crunch and healthy fats. Dried cranberries or pomegranate seeds add a pop of sweetness. This salad is not just tasty; it is also healthy. Each serving has about: - Calories: 350 - Fats: 25g - Proteins: 8g - Carbohydrates: 30g By using wholesome ingredients, you create a dish that nourishes as well as delights. This salad contains common allergens: - Dairy (goat cheese) - Nuts (walnuts) Always check for allergies before serving. You can easily swap goat cheese and walnuts for alternatives if needed. To start, heat your oven to 400°F (200°C). Wrap each beet in aluminum foil. Make sure they are sealed tight so they steam well. Place the wrapped beets on a baking sheet. This will catch any drips. Roast the beets for about 45 minutes to 1 hour. They should be tender when pierced with a fork. Once done, take them out and let them cool. When they are cool enough, peel off the skins. You might want to wear gloves to keep your hands clean. For the dressing, gather these ingredients: - 1/4 cup extra virgin olive oil - 2 tablespoons balsamic vinegar - 1 teaspoon honey - Salt and pepper to taste In a small bowl, whisk the olive oil, balsamic vinegar, honey, and a pinch of salt and pepper. Taste it to see if you like the balance of flavors. Adjust the seasoning if needed. This dressing will add a nice tangy kick to your salad. Now it's time to put everything together. Slice the cooled beets into wedges or rounds. In a large bowl, combine the mixed greens, sliced beets, toasted walnuts, and dried cranberries or pomegranate seeds. Toss them gently to mix evenly. Drizzle some of the dressing over the salad and toss again, so all ingredients are coated. For presentation, transfer the salad to a nice serving platter or divide it into individual plates. Crumble the goat cheese over the top for a creamy texture. Drizzle a bit more dressing over the cheese. If you like, add fresh parsley for color and flavor. Follow the [Full Recipe] for detailed steps and measurements. Remember, a beautiful salad is always a joy to eat! Choosing the right beets Select firm, smooth beets. Look for small to medium sizes, as they roast better. Avoid any that feel soft or have spots. How to tell when beets are done Beets are ready when a fork easily pierces them. Depending on size, this takes 45 minutes to 1 hour at 400°F. Let them cool before peeling. Substitutions for balsamic vinegar If you want a twist, use red wine vinegar or apple cider vinegar. Both add a tasty zing without losing the salad's charm. Adding herbs to the dressing Fresh herbs like thyme or basil brighten the dressing. Chop them finely and mix in for added flavor. A little goes a long way. Ideal accompaniments This salad pairs well with crusty bread or a light soup. These sides enhance the meal without overpowering the main dish. Pairing with proteins for a meal Add grilled chicken or shrimp for a hearty option. If you're vegetarian, consider roasted chickpeas or tofu. Both options make it filling and delicious. For the full recipe, check out the [Full Recipe]. {{image_4}} You can make your salad heartier by adding proteins. Grilled chicken or shrimp works well. Simply cook the protein and slice it. Top your salad with it for extra flavor. If you want a vegetarian option, use tofu. Cube the tofu and sauté it until golden. This adds protein and a nice texture. Incorporating seasonal fruits or veggies can elevate your salad. In spring, try fresh strawberries or asparagus. In the fall, add diced apples or roasted squash. These ingredients not only taste great but also add color. Consider swapping nuts for crunch. Almonds, pecans, or sunflower seeds are all tasty options. For a vegan version, simply replace goat cheese. Use cashew cream or a vegan cheese. These alternatives still give you that creamy texture. You can also experiment with dressings. A lemon vinaigrette or tahini dressing adds a new twist. Both options keep the salad fresh while staying plant-based. For the full recipe, check out the complete guide above! To store leftovers, place the salad in an airtight container. This keeps it fresh and prevents the greens from wilting. You can add a paper towel to absorb excess moisture. Store it in the fridge for up to three days. Keep the dressing separate until serving. This helps maintain the salad's crunch. You cannot freeze the whole salad. Freezing changes the texture of the greens, making them mushy. However, you can freeze roasted beets. Place them in a freezer-safe bag and squeeze out the air. They will stay fresh for about three months. Thaw them in the fridge before using. Beets last about one to two weeks in the fridge. Keep them unpeeled in a cool, dark place. Mixed greens should be used within five days for best taste. Goat cheese stays fresh for about one week once opened. Keep it tightly wrapped to avoid drying out. Roasting beets is simple and rewarding. Here’s how: 1. Preheat your oven to 400°F (200°C). 2. Scrub each beet clean and trim off the tops and bottoms. 3. Wrap each beet in aluminum foil. This keeps them moist. 4. Place the wrapped beets on a baking sheet. 5. Roast for 45 minutes to 1 hour. They are done when a fork easily pierces them. 6. Let them cool, then peel off the skins. Wear gloves to avoid staining your hands. Roasting beets brings out their natural sweetness. It makes them tender and full of flavor. You can use them in salads, sandwiches, or as a side dish. You can get a head start on this salad! Here are some tips: - Roast the beets a day early. Store them in the fridge. They will stay fresh. - Prepare the dressing ahead of time. Keep it in a jar. Shake before use. - Wash and dry the mixed greens. Store them in a container with a paper towel to absorb moisture. Assemble the salad just before serving. This keeps it crisp and fresh. If you need an alternative to goat cheese, here are some creamy options: - Feta cheese adds a salty flavor and crumbly texture. - Cream cheese is soft and rich, perfect for spreading. - Ricotta cheese is light and fluffy, giving a mild taste. These substitutes work well in the salad. Choose one that you like best! For the full recipe, check out the Roasted Beet and Goat Cheese Salad. This blog shared a tasty beet salad recipe, from ingredients to storage tips. You learned how to roast beets and mix a great dressing. I also provided variations to suit different diets, plus storage advice. Keep experimenting with ingredients and enjoy the colorful flavors. Simple changes can make each meal unique. This salad is not just healthy; it's fun and versatile. Enjoy your cooking journey and impress your family and friends with this easy dish!](https://goldendishy.com/wp-content/uploads/2025/06/47a93f65-23b8-4270-bc0e-899490eb93a9-768x768.webp)
![- 1 pound fresh okra - 2 tablespoons extra virgin olive oil - 1 teaspoon garlic powder - 1 teaspoon smoked paprika - 1/2 teaspoon ground cumin - 1/2 teaspoon salt - 1/4 teaspoon freshly ground black pepper - 1/4 teaspoon cayenne pepper (optional) - 2 tablespoons freshly grated Parmesan cheese (optional) Gathering the right ingredients is key to making crispy garlic okra chips. Fresh okra offers a unique taste and great texture. When you pick out okra, look for bright green pods that are firm and smooth. The olive oil serves as the base for your spices. It helps to crisp the okra and adds a rich flavor. Garlic powder brings a punch of taste without any hassle. Smoked paprika adds depth and a slight smokiness, which pairs well with the okra. Ground cumin gives the chips an earthy note. Salt and pepper enhance all the flavors, while cayenne pepper adds a spicy kick if you want it. Finally, Parmesan cheese can add richness, making the chips even more delicious. - Calories per serving: About 120 calories - Key vitamins and minerals: High in vitamins A and C, magnesium, and fiber - Health benefits of okra: Okra is low in calories and packed with nutrients. It supports digestion, boosts heart health, and provides antioxidants. Eating crispy garlic okra chips is not just tasty; it's also good for you. Enjoy this snack guilt-free while getting your nutrition. For the full recipe, check out the [Full Recipe] section! 1. Preheat your oven to 425°F (220°C). This step helps the okra get crispy. 2. Line a large baking sheet with parchment paper. This prevents sticking and makes cleanup easy. 3. Trim the ends of the okra pods, cutting off just the stem. 4. Cut the okra into halves or thirds. Aim for even sizes so they cook well. 1. In a large bowl, mix the extra virgin olive oil, garlic powder, smoked paprika, ground cumin, salt, black pepper, and optional cayenne pepper. Stir until you have a smooth paste. 2. Add the cut okra to the bowl. Toss gently but well. Make sure each piece gets coated with the paste. 1. Spread the okra in a single layer on the baking sheet. Don’t overcrowd the pan. This will keep them crispy. 2. Bake in the preheated oven for 20-25 minutes. Flip the chips halfway through to brown them evenly. 3. If you want to add Parmesan cheese, sprinkle it on during the last 5 minutes. This makes a tasty cheesy crust. 4. Once golden brown and crispy, take the baking sheet out of the oven. Let the okra cool slightly before serving for the best crunch. You can find the full recipe above to guide you through this process. To make crispy garlic okra chips, cut the okra evenly. This helps all pieces cook the same. Aim for pieces that are about the same size. When they are even, they will brown nicely. Also, avoid overcrowding the baking sheet. If you put too many pieces on one pan, they will steam instead of crisp. Spread them out and use two sheets if needed. Using fresh ingredients makes a big difference. Fresh okra has a better taste and texture. Also, feel free to adjust the spices. If you love garlic, add more garlic powder. For a kick, increase the cayenne pepper. Taste the mixture as you go. This way, you can make the flavor just right for you. Pair these chips with dips for extra flavor. A creamy ranch or spicy aioli works well. You can also serve them with salsa for a fresh twist. For presentation, use a bright bowl. Garnish with parsley or lime slices for a pop of color. This makes your dish look even more appetizing. Enjoy your crispy garlic okra chips as a fun snack or side dish. Check out the Full Recipe for more details! {{image_4}} You can easily change the taste of your okra chips. For spicy garlic okra chips, add cayenne pepper or chili powder. This will give them a nice kick. You might also try mixing in some smoked paprika for a deeper flavor. If you prefer fresh herbs, add chopped rosemary or thyme. These herb-infused options brighten the dish and add a lovely aroma. If you’re looking for vegan alternatives, skip the cheese. The chips will still taste great without it. You can also use nutritional yeast for a cheesy flavor. For gluten-free options, you’re in luck! This recipe is naturally gluten-free. Just ensure that any additional spices used are also gluten-free. Crispy okra chips are not just for snacking. Use them in salads for extra crunch. They can also be a fun topping on soups. Try mixing them into a grain bowl for added flavor. You can even crush them and use them as a crispy coating for chicken or fish. The possibilities are endless! Check out the Full Recipe for more details on how to make these tasty snacks. To keep your crispy garlic okra chips fresh, store them in airtight containers. This method helps keep moisture out and maintains that delightful crunch. When stored properly, they can last for about 3-5 days at room temperature. For best results, place them in a cool, dark spot in your kitchen. If you live in a warm climate or want to make them last longer, consider storing them in the refrigerator. This will help retain their flavor and texture for about a week. Just remember to let them cool completely before sealing them up. Want to enjoy okra chips later? You can freeze them! First, let the chips cool fully. Then, place them in a single layer on a baking sheet and pop them in the freezer for a few hours. Once frozen, transfer them to a freezer-safe bag. This way, you can enjoy them anytime. When you’re ready to eat your frozen okra chips, don’t thaw them. Just bake them straight from the freezer at 425°F (220°C) for about 10-15 minutes. This will help them regain their crispy texture. For the best flavor, eat your crispy garlic okra chips within the first couple of days. They taste freshest right after baking. If you notice any signs of spoilage, like an off smell or a soft texture, it’s best to toss them. Keeping an eye on your snacks ensures you always enjoy them at their best! To make Crispy Garlic Okra Chips, start with fresh okra. Preheat your oven to 425°F. Wash and dry your okra. Cut the okra into halves or thirds. In a bowl, mix olive oil, garlic powder, smoked paprika, cumin, salt, black pepper, and optional cayenne pepper. Toss the cut okra in this mix until well coated. Spread the okra on a baking sheet. Bake for 20-25 minutes, flipping halfway. Enjoy a tasty snack! For the full recipe, check the section above. Yes, you can use frozen okra, but it may change the texture. Frozen okra tends to be softer after cooking. This means your chips may not be as crisp. If you use frozen okra, thaw it first and pat it dry. This helps reduce moisture. For best results, fresh okra gives the best crunch. You can find pre-made garlic okra chips at many grocery stores. Look in the snack aisle or natural food sections. Brands like Southern Style and Veggie Chips offer tasty options. You can also check online retailers like Amazon or health-focused sites. Always read labels for the best flavor and quality. To add spice to your chips, try these tips: - Add more cayenne pepper for heat. - Mix in chili powder or red pepper flakes. - Use spicy seasoning blends like Cajun or taco seasoning. - Experiment with fresh jalapeños for a bold twist. These changes will give your chips a fiery kick! This blog covered the fun and tasty world of crispy okra. You learned about the ingredients, from fresh okra to spices, and how they bring flavor. The step-by-step guide made cooking easy and clear. Our tips will help you achieve the best crunch and taste. You can even try different flavors and modify the recipe to fit your diet. Remember to store your okra properly for the best taste. Now, it's time to enjoy your crispy okra chips, whether as a snack or a side dish!](https://goldendishy.com/wp-content/uploads/2025/07/49c08959-fe34-4929-8f55-872212e9bd7e-768x768.webp)