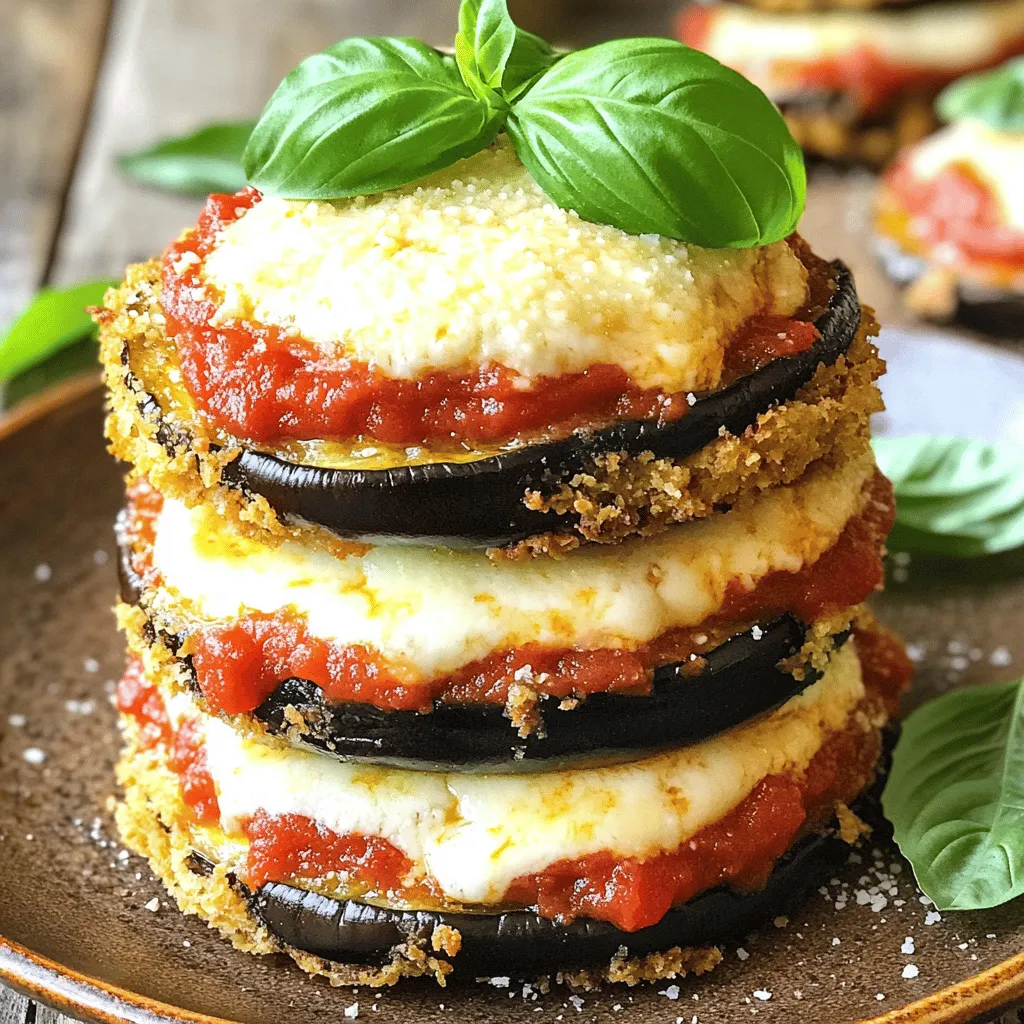
Eggplant Parmesan Stacks Flavorful and Simple Recipe
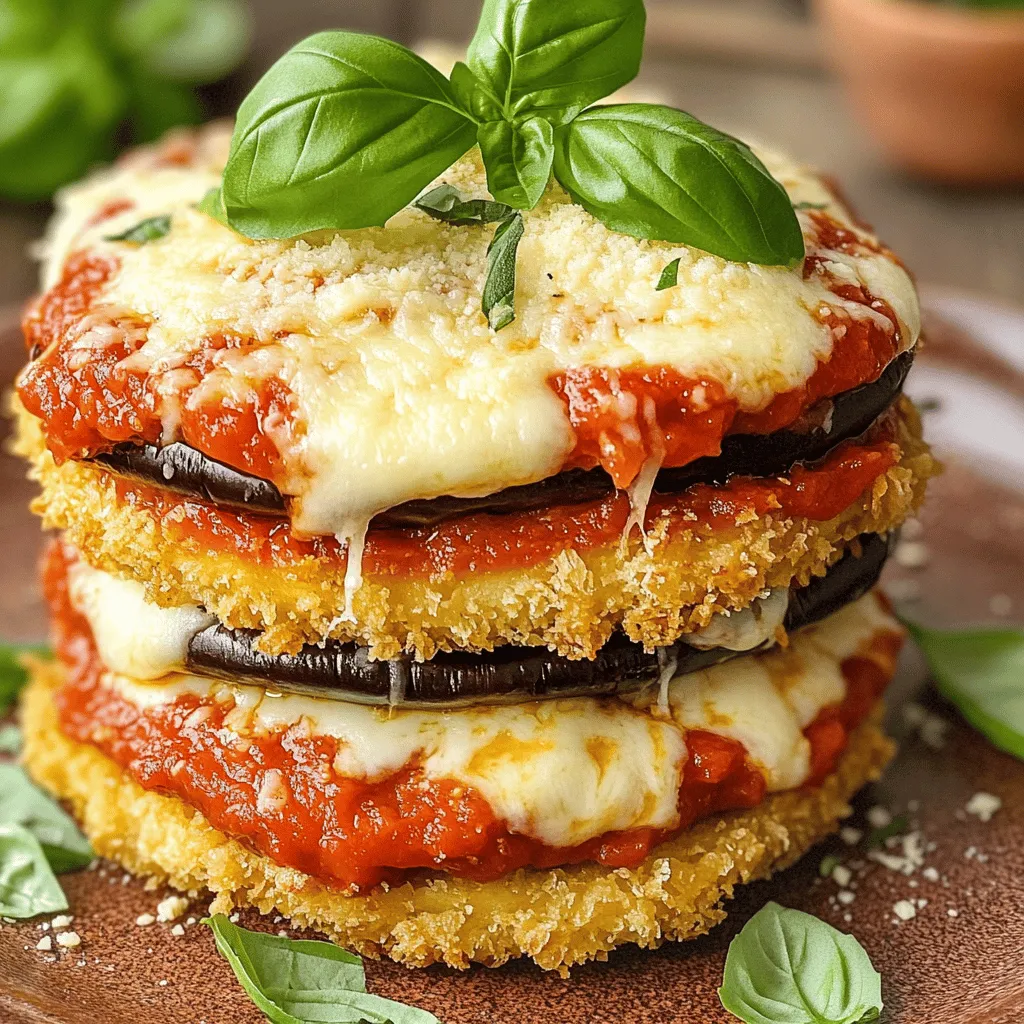
Get ready to impress your taste buds with Eggplant Parmesan Stacks! This simple and flavorful recipe brings hearty layers of eggplant, cheese, and sauce together. Whether you’re a kitchen novice or a seasoned cook, you’ll find joy in making this delicious dish. I’ll guide you through every step, from selecting the right ingredients to tips for perfecting your stacks. Let’s dive into the world of Eggplant Parmesan!
Ingredients
Essential Ingredients for Eggplant Parmesan Stacks
To make delicious Eggplant Parmesan Stacks, you need these main ingredients:
– 2 medium eggplants, sliced into 1/2-inch thick rounds
– 1 cup all-purpose flour
– 3 large eggs, beaten until smooth
– 2 cups breadcrumbs (preferably panko for enhanced crunchiness)
– 3 cups marinara sauce, divided
– 2 cups shredded mozzarella cheese
– 1 cup grated Parmesan cheese
– 1 tablespoon dried oregano
– 1 teaspoon garlic powder
– Fresh basil leaves for garnish
– Salt and freshly ground pepper to taste
– Olive oil, sufficient for frying
Each ingredient plays a key role. The eggplants provide a rich, meaty base. The cheeses melt beautifully, creating a creamy layer. The marinara sauce adds tang and moisture.
Optional Ingredients for Enhanced Flavor
You can enhance the flavor of your Eggplant Parmesan Stacks with these optional ingredients:
– Fresh herbs like thyme or parsley for added freshness
– Red pepper flakes for a spicy kick
– Sliced mushrooms for extra texture
– Zucchini or bell peppers for more veggies
Using optional ingredients can help you make this dish your own. Feel free to experiment and adjust flavors based on your taste.
Common Substitutions and Additions
If you don’t have all the ingredients at hand, here are some common substitutions:
– Use gluten-free flour for a gluten-free option
– Swap mozzarella with provolone or fontina for a different cheese flavor
– Use homemade marinara sauce instead of store-bought for a fresh taste
– Replace eggplant with zucchini or yellow squash for a lighter dish
These substitutions can help you adapt the recipe to what you have at home. Always remember, cooking is about creativity and personal taste.
Step-by-Step Instructions
Preparation of Eggplant
First, slice your eggplants into 1/2-inch thick rounds. Sprinkle salt on both sides. Let them sit for about 30 minutes. This step pulls out excess moisture and bitter taste. Rinse the slices under cool water. Pat them dry with paper towels to remove moisture.
Bread the Eggplant Slices
Set up a breading station. In one dish, add flour. In a second dish, pour the beaten eggs. In a third dish, mix breadcrumbs with dried oregano, garlic powder, and a pinch of salt and pepper. Ensure the mixture is well combined. Take each eggplant slice and coat it in flour. Then dip it in the eggs, letting excess drip off. Finally, coat the slice in seasoned breadcrumbs. Repeat until all slices are ready.
Frying the Eggplant
In a large skillet, heat enough olive oil over medium heat until hot. Carefully lay the breaded eggplant slices in the skillet. Fry in batches. Cook for about 3-4 minutes on each side until golden brown. Once done, transfer the cooked slices to a plate lined with paper towels. This helps absorb extra oil.
Assembling the Stacks
In a baking dish, spread marinara sauce on the bottom. This prevents sticking. Start with a layer of fried eggplant slices. Sprinkle mozzarella and Parmesan cheese over the top. Repeat the layers until all ingredients are used. Finish with a layer of marinara sauce and extra cheese on top.
Baking to Perfection
Cover the baking dish with aluminum foil. Bake in your preheated oven at 375°F (190°C) for 25 minutes. After that, remove the foil. Continue baking for another 15 minutes. Look for bubbling cheese that is golden brown.
Final Touches and Serving Suggestions
Once baked, let the dish rest for about 10 minutes. This helps the stacks hold together. Garnish with fresh basil leaves. Serve each stack on a warm plate. Pair it with a refreshing side salad for a balanced meal. For a special touch, drizzle more marinara sauce on top. Enjoy your Eggplant Parmesan Stacks!
Tips & Tricks
Best Practices for Salting Eggplant
Salting eggplant is key to a great dish. It draws out moisture and reduces bitterness. Start by slicing your eggplant into even rounds. Generously sprinkle salt on both sides. Let these slices rest for about 30 minutes. After this, rinse them under cool water. Finally, pat them dry with paper towels. This step helps your eggplant taste better and cook well.
Achieving the Perfect Crunch
To get a crunchy texture, use panko breadcrumbs. They create a light and crispy crust. Before breading, make sure the eggplant slices are dry. This prevents the breading from getting soggy. When frying, don’t overcrowd the pan. Fry in batches for even cooking. Keep the oil hot, but not smoking. This way, you’ll achieve a golden brown color and a satisfying crunch.
How to Prevent Sogginess
Sogginess can ruin your eggplant stacks. Salting helps, but there are more tips. After frying, place the eggplant on paper towels. This absorbs excess oil. When layering in the baking dish, spread marinara sauce evenly. Avoid too much sauce between layers. Less sauce means less moisture. This way, your stacks will hold their shape and stay delicious.
Cooking Techniques for Even Baking
For even baking, preheat your oven to 375°F (190°C) before you start. Use a baking dish that fits all your stacks snugly. Cover with foil for the first part of baking. This traps heat and helps cook the center. Remove the foil later to brown the cheese. This method ensures your eggplant stacks bake through evenly and become bubbly and golden.
Variations
Gluten-Free Eggplant Parmesan Stacks
To make gluten-free eggplant Parmesan stacks, swap out regular flour and breadcrumbs. Use almond flour or gluten-free flour for breading. For the breadcrumbs, try gluten-free panko. These changes keep the crunch while making it safe for those with gluten issues.
Adding Vegetables for Extra Nutrition
You can layer in more veggies to boost nutrition. Sliced zucchini or bell peppers work well. Spinach or kale can also be added between layers. This not only adds color, but it also packs in vitamins and minerals. Plus, it enhances the overall taste.
Using Different Cheeses for Unique Flavors
Experimenting with cheeses can change the whole dish. Try adding ricotta for creaminess or goat cheese for tang. A sprinkle of smoked mozzarella can give a different flavor profile. Mixing cheeses can create a delightful experience with every bite.
Storage Info
How to Store Leftover Eggplant Parmesan Stacks
After you enjoy your meal, store leftovers properly. Place the eggplant stacks in an airtight container. Make sure to cover them well to keep moisture inside. They will last in the fridge for about 3 to 4 days. If you notice any liquid, drain it before sealing the container. This helps to keep the layers intact and tasty.
Reheating Tips for Best Taste
To reheat, I suggest using the oven. Preheat it to 350°F (175°C). Place the stacks in a baking dish. Cover with foil to keep them from drying out. Heat for about 15-20 minutes. This method keeps the eggplant crispy and the cheese melty. You can also use a microwave, but it may make the stacks soggy. If you choose this method, heat in small bursts, checking often.
Freezing Instructions for Long-Term Storage
If you want to save your eggplant Parmesan stacks for later, freezing is a great option. First, let the stacks cool completely. Then, wrap each stack in plastic wrap tightly. Place the wrapped stacks in a freezer bag or container. This will keep them fresh for up to 3 months. When you’re ready to eat, thaw overnight in the fridge. Reheat as mentioned above for the best results.
FAQs
What is the best way to slice eggplant for this recipe?
Slice the eggplant into 1/2-inch thick rounds. This size helps them cook evenly. Thinner slices may burn, and thicker ones may not cook through. Use a sharp knife for clean cuts.
Can I make Eggplant Parmesan Stacks ahead of time?
Yes, you can prepare the stacks in advance. Assemble the layers and cover them. Store in the fridge for up to 24 hours. Bake just before serving for the best taste.
How can I make this dish vegan?
To make it vegan, swap the eggs for a mixture of flour and water. Use vegan cheese in place of mozzarella and Parmesan. These changes still create great flavor and texture.
Is it necessary to salt the eggplant before cooking?
Salting the eggplant is important. It removes excess moisture and bitterness. After salting, let the slices rest for 30 minutes. Rinse and pat them dry before cooking.
What sides pair well with Eggplant Parmesan Stacks?
A fresh side salad works great. You can also serve it with garlic bread or roasted vegetables. These sides complement the rich flavors of the stacks and add balance to the meal.
Eggplant Parmesan Stacks combine delightful layers of flavor and texture. We explored essential ingredients, tips for crispiness, and variations to suit any diet. Remember to salt eggplant for the best taste. Be creative with your own choices and make this dish truly yours. With the right preparation and techniques, you’ll impress everyone at the table. Enjoy cooking, and have fun sharing this delicious meal with friends and family. Your Eggplant Parmesan Stacks will be a hit!


![- 1 pre-made pie crust - 2 medium zucchinis, grated - 2 cups fresh spinach, chopped - 1 small onion, finely chopped - 3 large eggs - 1 cup milk I love using a pre-made pie crust for this quiche. It saves time and effort. The zucchinis bring a fresh taste, while the spinach adds color and nutrients. Eggs and milk create a rich, creamy texture that binds everything together. - 1 teaspoon garlic powder - Salt and pepper to taste - 1 tablespoon olive oil Garlic powder gives this dish a warm flavor. I always add salt and pepper to enhance the taste. Olive oil is perfect for cooking the veggies and adds a nice depth of flavor. - 1 cup shredded mozzarella cheese - 1/2 cup grated Parmesan cheese Cheese is key for a tasty quiche. Mozzarella melts beautifully, while Parmesan adds a sharp, salty kick. Together, they create a delightful flavor mix that elevates your dish. Don't forget to check the full recipe for complete details! First, heat olive oil in a skillet over medium heat. Add the finely chopped onion. Sauté it for about 3-4 minutes until it turns soft and clear. Next, add the grated zucchini and chopped spinach. Stir often and cook for about 5 minutes. The veggies should become tender, and any extra water will cook off. I love adding garlic powder, salt, and pepper to boost the flavor. After cooking, take it off the heat and let it cool for a moment. In a large bowl, whisk together the eggs and milk until they blend smoothly. This is where the magic begins! Next, add in the shredded mozzarella and grated Parmesan cheese. Fold them in gently. This mixture will bring richness to your quiche. It’s important that the cheese mixes well but still keeps some texture. Now, pour the vegetable and egg mixture into the prepared pie crust. Spread it out evenly to help it cook well. Place the quiche in your preheated oven. Bake for 30-35 minutes. You’ll know it’s ready when the edges turn golden brown and a toothpick inserted in the center comes out clean. Let it cool for about 10 minutes before slicing. This resting time helps enhance the flavors. You can find the full recipe in the previous section for all these steps! To get the best texture for your quiche, you must control moisture. Zucchini has a lot of water, which can make your quiche soggy. To fix this, grate the zucchini and lightly salt it. Let it sit for 10 minutes, then squeeze out the excess liquid. This step is key to a firm quiche. The cooking time can vary based on your oven. I find that checking it a few minutes early helps. If the edges look golden and a toothpick comes out clean, it's ready! For more flavor, consider adding fresh herbs like thyme or basil. A pinch of red pepper flakes can add a nice kick. You can also play with spices, like paprika or onion powder. Each of these can change the taste in a fun way. Cheese is another way to boost flavor. While mozzarella and Parmesan are great, try using feta or goat cheese for a tangy twist. These types add both creaminess and a bit of zest to the dish. When serving your zucchini spinach quiche, aim for a bright plate. A colorful plate makes a dish look more appealing. Add fresh basil or parsley on top for an eye-catching touch. You can also serve it with a light salad drizzled with citrus vinaigrette. This adds freshness and balance. For a photo-worthy presentation, slice the quiche into neat pieces. Arrange them in a circle on the plate. This simple trick makes your dish look polished and ready for sharing. Don't forget to snap a picture before you dig in! For the complete recipe, check out the [Full Recipe]. {{image_4}} You can switch up the veggies in your quiche. Broccoli, bell peppers, or mushrooms work great. Each veggie brings its own taste and texture. You can also try seasonal additions. In spring, add asparagus, and in fall, use roasted squash. This keeps your quiche fresh and exciting. If you need a gluten-free quiche, use a gluten-free crust. Many stores sell these now, or you can make your own. If you make your crust, use almond flour or coconut flour for a nice texture. You may need to adjust the liquid in the filling. This helps keep the quiche moist and tasty. Making mini quiches is fun and easy. You can use a muffin tin for individual servings. Just pour the mixture into each cup and fill them about three-quarters full. Bake for about 20-25 minutes. Keep an eye on them to avoid burning. These mini quiches are perfect for snacks or brunch. You can even freeze them for later! Check out the Full Recipe for more details. To keep your quiche fresh, store it in an airtight container. This helps keep moisture out. It stays fresh in the fridge for up to three days. If you plan to eat it later, cover it tightly with plastic wrap or foil. You can freeze your quiche before or after baking. If freezing before baking, wrap it well. This way, you can bake it fresh later. For freezing after baking, let it cool completely first. Store it in an airtight container. It can last up to three months in the freezer. When ready to eat, thaw it in the fridge overnight. For the best taste, reheat your quiche in the oven. Set it to 350°F (175°C) and heat for about 15-20 minutes. This keeps the crust crispy. You can also use a microwave for quick heating. However, the crust may not stay as crunchy. Heat slices for about 1-2 minutes. Always check that it's hot in the middle before serving. You can tell the quiche is done by looking for a few key signs. The edges should be golden brown, and the center should be firm. If you gently shake the quiche, it should not jiggle. Another great way to check is with a toothpick. Insert it into the center of the quiche. If it comes out clean, your quiche is ready to enjoy. Yes, you can use frozen spinach in this recipe. However, it’s important to make a few adjustments. First, thaw the spinach completely and drain any excess water. This helps prevent the quiche from becoming too watery. You may also want to chop the spinach further after thawing. This ensures even distribution in your quiche. Zucchini spinach quiche pairs well with many side dishes. A simple green salad with a light vinaigrette works great. You can also serve it with roasted vegetables for added flavor. If you want something heartier, serve it alongside a bowl of creamy tomato soup. This combination makes for a balanced and tasty meal. This blog post covers how to make a tasty zucchini and spinach quiche. You learned about the main ingredients, like pre-made crust and eggs, plus the best seasonings. I shared step-by-step instructions for preparing and baking. You also got tips for perfecting texture and ideas for variations. Making this dish can be easy and fun. Enjoy experimenting with flavors and ingredients. Whether you serve it for breakfast or dinner, this quiche will impress. Get cooking and enjoy your delicious creation!](https://goldendishy.com/wp-content/uploads/2025/06/2284a9f2-dfec-450d-ba9a-23981f99d5f6-768x768.webp)

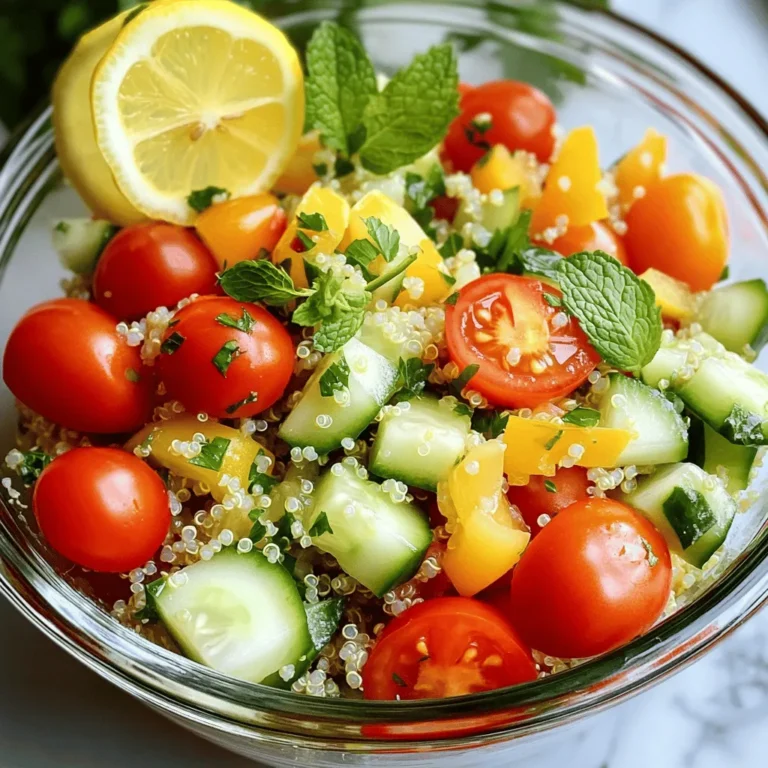
![- Bell peppers: Choose bright colors like red, yellow, or orange. These colors not only look great but also add natural sweetness. Each pepper holds the filling nicely and provides a tasty bite. - Quinoa: Rinse the quinoa well under cold water. This step removes the bitter coating called saponin. Rinsing ensures your quinoa has a clean, nutty flavor that shines in the dish. - Vegetable broth: Use low-sodium broth for better control of the flavor. It enhances the taste of quinoa and adds depth to the dish. You can also try homemade broth for a fresher taste. - Ground spices: Cumin, smoked paprika, and chili powder are key. Cumin gives an earthy flavor, while paprika adds a hint of smokiness. Chili powder can amp up the heat level, making your dish exciting. - Beans and corn: Black beans add protein and fiber, making the meal hearty. Corn brings sweetness and crunch, creating a balanced texture. Both ingredients make the filling more nutritious and filling. - Cheese alternatives: Depending on your diet, choose cheddar for a classic taste or opt for a dairy-free cheese. Both melt well and enhance the flavors, giving a creamy finish to each stuffed pepper. For the full list of ingredients, check the Full Recipe. Start by preheating your oven to 375°F (190°C). This step matters because the right heat cooks the peppers evenly and makes them tender. While the oven warms up, you can prepare the bell peppers. Cut the tops off and scoop out the seeds and membranes inside. Stand the peppers upright in a baking dish. This helps them stay stable while they bake. Next, it’s time to cook the quinoa. In a medium saucepan, add 1 cup of rinsed quinoa and 2 cups of vegetable broth. Bring it to a boil, then lower the heat. Cover and let it simmer for about 15 minutes. You want the quinoa to be fluffy and all the liquid should be gone. While the quinoa cooks, you can mix the filling. In a large bowl, combine the fluffy quinoa, black beans, corn, diced tomatoes, cumin, smoked paprika, and chili powder. Add salt and pepper to taste. Make sure everything is mixed well to ensure a consistent flavor in every bite. Now comes the fun part—stuffing the peppers! Use a spoon to fill each bell pepper with your quinoa mixture. Pack it down gently to fit as much filling as possible. Once filled, sprinkle a good amount of cheese on top of each pepper. Cover the baking dish with aluminum foil and place it in the oven. Bake for 25 minutes. After that, remove the foil and bake for another 10 minutes. This helps the cheese melt and become bubbly. The peppers should be tender but still hold their shape. Once done, take the dish out and let it cool for a few minutes. Right before serving, add fresh cilantro or parsley on top for a nice touch. For the full recipe, check out the details provided earlier. To achieve fluffy quinoa, rinse it well before cooking. Rinsing removes the bitter coating called saponin. Use a fine mesh strainer for this step. Then, cook the quinoa in the right ratio of water to quinoa. I recommend 2 cups of vegetable broth for every 1 cup of quinoa. Bring it to a boil, then simmer for 15 minutes. This way, the quinoa will be light and fluffy. When baking your stuffed peppers, timing is key. Start by covering the dish with foil for the first 25 minutes. This keeps the moisture in, helping the peppers cook evenly. After that, remove the foil and bake for an extra 10 minutes. This will make the cheese melt perfectly and the peppers tender but not mushy. For presentation, serve your stuffed peppers on a large platter. Sprinkle extra herbs like cilantro or parsley around for a fresh look. A drizzle of olive oil or a squeeze of lime juice adds brightness and flavor. As for side dishes, consider a simple green salad or some roasted vegetables. These pair well with the peppers and add color to your meal. A light white wine or sparkling water complements the dish nicely, enhancing your dining experience. For the full recipe, check out [Full Recipe]. {{image_4}} What can I use instead of black beans? You can swap in other legumes like chickpeas or kidney beans. Each offers unique flavors and textures. Chickpeas add a nutty taste, while kidney beans bring a soft bite. Both boost protein and fiber, making your meal heartier. Can I add meat to my stuffed peppers? Yes! Chicken or turkey works great. Use cooked ground meat for easy mixing. This adds a savory depth to your dish. Just remember to season the meat well for the best flavor. How can I change the spices? Explore with different spices to create new flavors. Try adding oregano for a Mediterranean twist or curry powder for a bold kick. Each spice changes the overall taste, making your stuffed peppers exciting. Can I use different veggies? Absolutely! Seasonal vegetables like zucchini, spinach, or mushrooms can enhance your filling. They add more nutrients and variety. Just chop them finely and mix them in with your quinoa and beans. For the full recipe, check out the details above. After enjoying your quinoa stuffed bell peppers, store leftovers in the fridge. Place them in an airtight container. This keeps them fresh for up to four days. If you plan to eat them later, consider freezing them. To freeze, wrap each pepper in plastic wrap. Then place them in a freezer-safe bag or container. Make sure to remove as much air as possible. Properly stored, they can last for up to three months in the freezer. When it’s time to enjoy your stuffed peppers again, you can reheat them in several ways. The oven is my favorite method. Preheat it to 350°F (175°C). Place the peppers in a baking dish and cover with foil. Bake for about 20 minutes, or until heated through. You can also use the microwave for quick reheating. Simply place a pepper on a microwave-safe plate. Cover it with a paper towel to keep moisture in. Heat it for about 2-3 minutes, checking to avoid overheating. If you prefer the stovetop, heat a skillet over medium heat and add a little water. Place the peppers in the skillet and cover. Heat for about 5-7 minutes, turning occasionally. To keep the texture nice, avoid sogginess. When reheating, do not add extra moisture or cover too tightly. This will help maintain that delightful crunch of the peppers. For the full recipe, visit the [Full Recipe]. How long do quinoa stuffed peppers last in the fridge? Quinoa stuffed peppers can last about 3 to 5 days in the fridge. Store them in an airtight container to keep them fresh. If you want to enjoy them later, just heat them up in the oven or microwave. Can I make quinoa stuffed peppers ahead of time? Yes, you can prepare quinoa stuffed peppers ahead of time. Stuff the bell peppers and store them in the fridge. Bake them when you’re ready to eat. This makes meal prep easy and convenient. What can I substitute for quinoa in this recipe? If you want to swap out quinoa, try using brown rice or couscous. Both options provide a nice texture. Just remember to adjust cooking times as needed for these ingredients. Are quinoa stuffed peppers healthy? Yes, quinoa stuffed peppers are healthy. They’re packed with protein, fiber, and vitamins. Quinoa is a complete protein, making this dish a great choice for a balanced meal. Gluten-free options: Ensuring a safe meal for all Quinoa is naturally gluten-free, so this dish is safe for gluten-sensitive people. Just check your labels for any added ingredients that might contain gluten. Vegetarian vs. vegan: Key differences in ingredients Vegetarian quinoa stuffed peppers include cheese, while vegan ones use dairy-free cheese. Both versions are delicious. Choose based on your dietary needs. Quinoa stuffed bell peppers use fresh ingredients and bold flavors for a tasty meal. First, choose colorful bell peppers and rinse the quinoa for the best taste. Use ground spices and beans to boost nutrition. Follow the steps closely for perfect results, and don’t forget to try different flavors and proteins. Store leftovers well to enjoy later. Healthy and easy, this dish fits any dinner. You can impress friends and family while eating well! So, get cooking and enjoy every bite of your delicious creation.](https://goldendishy.com/wp-content/uploads/2025/06/de4f4195-310c-4430-9b68-8374d14e079c-768x768.webp)