Sriracha Honey Glazed Salmon Bold and Flavorful Meal
![For this recipe, you need key ingredients to make the salmon shine. Here’s what to gather: - 4 salmon fillets (approximately 6 oz each) - 2 tablespoons Sriracha sauce - 3 tablespoons honey - 1 tablespoon soy sauce - 2 cloves garlic, finely minced - 1 tablespoon fresh ginger, finely grated - 2 tablespoons olive oil - Salt and freshly ground black pepper, to taste These main ingredients create a sweet and spicy glaze that makes the salmon pop. Seasoning is crucial in cooking. It helps to enhance the natural flavors of the fish. Use these simple items: - Salt - Freshly ground black pepper Make sure to season both sides of the salmon. This step adds depth to every bite. Garnishes make your dish look great and add extra flavor. For this salmon recipe, you will need: - 1 tablespoon sesame seeds - 2 green onions, thinly sliced Sprinkling these on top gives the meal a beautiful finish. The sesame seeds add crunch, while green onions bring freshness. To see the full details for cooking, check the [Full Recipe]. To make the glaze, grab a medium bowl. Combine 2 tablespoons of Sriracha sauce, 3 tablespoons of honey, and 1 tablespoon of soy sauce. Add 2 minced garlic cloves and 1 tablespoon of freshly grated ginger. Whisk these together until the mixture is smooth. This sweet and spicy glaze will add the perfect flavor to your salmon. Set this aside for later use. Next, take 4 salmon fillets and dry them with a paper towel. This step helps the skin get crispy. Now, sprinkle salt and pepper on both sides of each fillet. Make sure to cover every inch. This simple seasoning enhances the natural taste of the fish. Now, heat 2 tablespoons of olive oil in a large skillet over medium-high heat. Once the oil shimmers, carefully place the salmon fillets in the skillet, skin-side down. Sear them for about 4-5 minutes until the skin turns golden and crispy. Once that happens, gently flip the fillets over. Lower the heat to medium and pour the glaze over the salmon. Cook for another 4-5 minutes, basting the salmon occasionally with the glaze. When it is cooked through and caramelized, remove the fillets from the skillet. Enjoy every bite of this flavorful salmon dish! For the full recipe, check out the details above! To get that perfect crispy skin, start with dry salmon. Use a paper towel to pat it well. This removes extra moisture, which helps the skin crisp nicely. Heat your skillet until it shimmers before adding the salmon. Place the fillets skin-side down and don’t move them for the first few minutes. This helps create a nice golden crust. Sear for about 4-5 minutes, then flip gently to finish cooking. If you like a milder glaze, reduce the Sriracha amount. Start with 1 tablespoon instead of 2. You can also add extra honey to balance the heat. For spice lovers, add more Sriracha or a pinch of cayenne pepper. Taste the glaze before pouring it on the salmon. This way, you can adjust it to your liking. Using the right tools makes cooking easier. Here’s what I recommend: - Large skillet for searing - Mixing bowl for the glaze - Whisk for blending ingredients - Paper towels for drying salmon - Spatula for flipping fillets These tools help you create a delicious Sriracha honey glazed salmon from the [Full Recipe]. {{image_4}} You can switch up the Sriracha honey glaze if you want. Try a sweet soy glaze instead. Mix soy sauce, brown sugar, and ginger for a tasty alternative. You can also use teriyaki sauce for a different flavor. It adds a rich, savory taste that pairs well with salmon. Another option is a citrus glaze. Mix orange juice and honey for a bright, zesty twist. While salmon shines in this recipe, other fish work too. Try using trout, which has a similar flavor and texture. Mahi-mahi also holds up well to grilling and glazing. Cod is another great option, as it absorbs flavors nicely. Each fish brings its own unique taste, so feel free to experiment. Toppings can elevate your dish further. Try adding sliced avocados for creaminess. Chopped cilantro or parsley adds a fresh touch. You can also sprinkle crushed peanuts or cashews for crunch. For a spicy kick, add sliced jalapeños. These toppings can make your meal even more fun and flavorful. Enjoy customizing your Sriracha honey glazed salmon with these ideas! Store your leftover salmon in an airtight container. Make sure to let it cool first. Place a piece of parchment paper between layers if stacking. This keeps the fish from sticking together. Refrigerate the salmon for up to three days. If you plan to keep it longer, freezing is a better option. To reheat, use the oven for the best taste. Preheat to 350°F (175°C). Place the salmon on a baking sheet and cover it with foil. Heat for about 10 to 15 minutes. This keeps the salmon moist and tasty. You can also use the microwave. Heat it in short bursts of 30 seconds. Check often to avoid overcooking. If you want to freeze your salmon, do it right after cooking. Wrap each piece tightly in plastic wrap. Then, place them in a freezer bag. Remove as much air as you can before sealing. You can freeze it for up to three months. When ready to eat, thaw it in the fridge overnight before reheating. For more ideas, check out the Full Recipe. You can tell if the salmon is cooked when it flakes easily with a fork. The flesh should be opaque and no longer translucent. A good rule is to cook it for about 4-5 minutes per side, depending on thickness. Use a food thermometer if you want to be precise. The internal temperature should reach 145°F (63°C). Cooking it just right keeps it moist and tasty. Yes, you can prepare the glaze ahead of time. Just store it in the fridge in an airtight container. This makes cooking easier later. However, I recommend cooking the salmon fresh. This keeps it juicy and full of flavor. If you must, you can cook the salmon and store it in the fridge for up to 2 days. For a full meal, pair the salmon with fluffy jasmine rice or quinoa. Steamed broccoli or snap peas add color and crunch. You can also serve it with a fresh salad for a light touch. If you want something more filling, try roasted potatoes or sweet potatoes. These sides balance the bold flavors of the salmon well. Check out the Full Recipe for more details! This blog post shared key details about making Sriracha Honey Glazed Salmon. You learned what ingredients to use, including seasoning and garnishes. I outlined simple steps to prepare the glaze, season the fish, and achieve that perfect sear. Plus, you found helpful tips for crispy skin and spice adjustments. I also covered variations for sauces and fish, along with storage options for leftovers. Savor this dish and share it with others. Enjoy your cooking!](https://goldendishy.com/wp-content/uploads/2025/07/1e0cb0f2-d69e-43b4-ab0e-316143d411f1.webp)
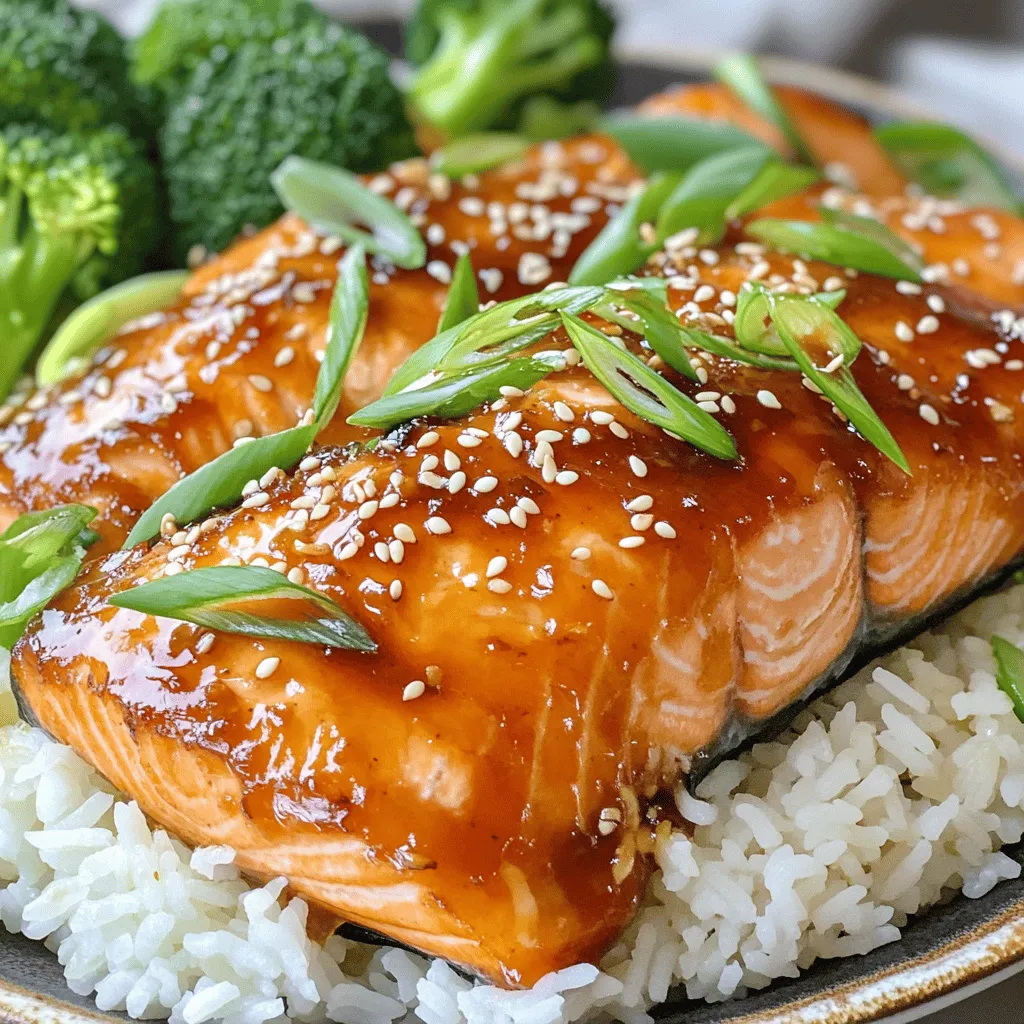
Ready to spice up your dinner? In this post, I’ll show you how to make Sriracha Honey Glazed Salmon, a bold and flavorful meal that’s sure to impress. With just a few simple ingredients and easy steps, you can create a dish packed with taste. Whether you’re cooking for family or entertaining friends, this salmon recipe will be a hit. Let’s dive in and get cooking!
Ingredients
Main ingredients for Sriracha Honey Glazed Salmon
For this recipe, you need key ingredients to make the salmon shine. Here’s what to gather:
– 4 salmon fillets (approximately 6 oz each)
– 2 tablespoons Sriracha sauce
– 3 tablespoons honey
– 1 tablespoon soy sauce
– 2 cloves garlic, finely minced
– 1 tablespoon fresh ginger, finely grated
– 2 tablespoons olive oil
– Salt and freshly ground black pepper, to taste
These main ingredients create a sweet and spicy glaze that makes the salmon pop.
Seasoning essentials
Seasoning is crucial in cooking. It helps to enhance the natural flavors of the fish. Use these simple items:
– Salt
– Freshly ground black pepper
Make sure to season both sides of the salmon. This step adds depth to every bite.
Garnishes for presentation
Garnishes make your dish look great and add extra flavor. For this salmon recipe, you will need:
– 1 tablespoon sesame seeds
– 2 green onions, thinly sliced
Sprinkling these on top gives the meal a beautiful finish. The sesame seeds add crunch, while green onions bring freshness.
Step-by-Step Instructions
Preparing the glaze
To make the glaze, grab a medium bowl. Combine 2 tablespoons of Sriracha sauce, 3 tablespoons of honey, and 1 tablespoon of soy sauce. Add 2 minced garlic cloves and 1 tablespoon of freshly grated ginger. Whisk these together until the mixture is smooth. This sweet and spicy glaze will add the perfect flavor to your salmon. Set this aside for later use.
Seasoning the salmon fillets
Next, take 4 salmon fillets and dry them with a paper towel. This step helps the skin get crispy. Now, sprinkle salt and pepper on both sides of each fillet. Make sure to cover every inch. This simple seasoning enhances the natural taste of the fish.
Searing and glazing the salmon
Now, heat 2 tablespoons of olive oil in a large skillet over medium-high heat. Once the oil shimmers, carefully place the salmon fillets in the skillet, skin-side down. Sear them for about 4-5 minutes until the skin turns golden and crispy. Once that happens, gently flip the fillets over. Lower the heat to medium and pour the glaze over the salmon. Cook for another 4-5 minutes, basting the salmon occasionally with the glaze. When it is cooked through and caramelized, remove the fillets from the skillet. Enjoy every bite of this flavorful salmon dish!
Tips & Tricks
How to achieve crispy skin
To get that perfect crispy skin, start with dry salmon. Use a paper towel to pat it well. This removes extra moisture, which helps the skin crisp nicely. Heat your skillet until it shimmers before adding the salmon. Place the fillets skin-side down and don’t move them for the first few minutes. This helps create a nice golden crust. Sear for about 4-5 minutes, then flip gently to finish cooking.
Adjusting spice levels
If you like a milder glaze, reduce the Sriracha amount. Start with 1 tablespoon instead of 2. You can also add extra honey to balance the heat. For spice lovers, add more Sriracha or a pinch of cayenne pepper. Taste the glaze before pouring it on the salmon. This way, you can adjust it to your liking.
Recommended cooking tools
Using the right tools makes cooking easier.
Variations
Alternative sauces and glazes
You can switch up the Sriracha honey glaze if you want. Try a sweet soy glaze instead. Mix soy sauce, brown sugar, and ginger for a tasty alternative. You can also use teriyaki sauce for a different flavor. It adds a rich, savory taste that pairs well with salmon. Another option is a citrus glaze. Mix orange juice and honey for a bright, zesty twist.
Different types of fish to use
While salmon shines in this recipe, other fish work too. Try using trout, which has a similar flavor and texture. Mahi-mahi also holds up well to grilling and glazing. Cod is another great option, as it absorbs flavors nicely. Each fish brings its own unique taste, so feel free to experiment.
Suggestions for additional toppings
Toppings can elevate your dish further. Try adding sliced avocados for creaminess. Chopped cilantro or parsley adds a fresh touch. You can also sprinkle crushed peanuts or cashews for crunch. For a spicy kick, add sliced jalapeños. These toppings can make your meal even more fun and flavorful. Enjoy customizing your Sriracha honey glazed salmon with these ideas!
Storage Info
How to store leftover salmon
Store your leftover salmon in an airtight container. Make sure to let it cool first. Place a piece of parchment paper between layers if stacking. This keeps the fish from sticking together. Refrigerate the salmon for up to three days. If you plan to keep it longer, freezing is a better option.
Reheating tips for optimal flavor
To reheat, use the oven for the best taste. Preheat to 350°F (175°C). Place the salmon on a baking sheet and cover it with foil. Heat for about 10 to 15 minutes. This keeps the salmon moist and tasty. You can also use the microwave. Heat it in short bursts of 30 seconds. Check often to avoid overcooking.
Freezing options and guidelines
If you want to freeze your salmon, do it right after cooking. Wrap each piece tightly in plastic wrap. Then, place them in a freezer bag. Remove as much air as you can before sealing. You can freeze it for up to three months. When ready to eat, thaw it in the fridge overnight before reheating.
FAQs
How do I know when the salmon is cooked?
You can tell if the salmon is cooked when it flakes easily with a fork. The flesh should be opaque and no longer translucent. A good rule is to cook it for about 4-5 minutes per side, depending on thickness. Use a food thermometer if you want to be precise. The internal temperature should reach 145°F (63°C). Cooking it just right keeps it moist and tasty.
Can I make this dish ahead of time?
Yes, you can prepare the glaze ahead of time. Just store it in the fridge in an airtight container. This makes cooking easier later. However, I recommend cooking the salmon fresh. This keeps it juicy and full of flavor. If you must, you can cook the salmon and store it in the fridge for up to 2 days.
What are the best side dishes to serve with Sriracha Honey Glazed Salmon?
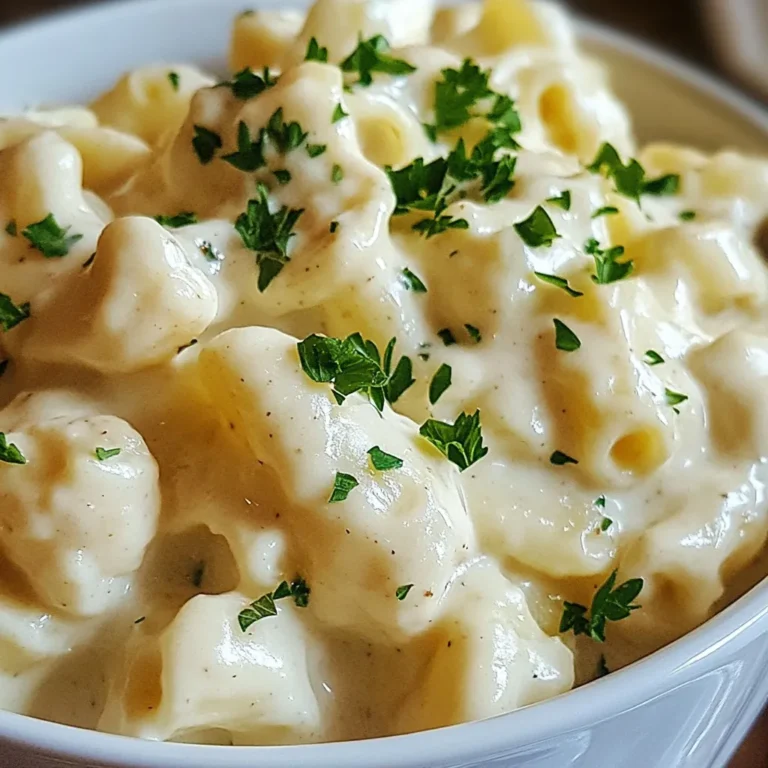
For a full meal, pair the salmon with fluffy jasmine rice or quinoa. Steamed broccoli or snap peas add color and crunch. You can also serve it with a fresh salad for a light touch. If you want something more filling, try roasted potatoes or sweet potatoes. These sides balance the bold flavors of the salmon well.
This blog post shared key details about making Sriracha Honey Glazed Salmon. You learned what ingredients to use, including seasoning and garnishes. I outlined simple steps to prepare the glaze, season the fish, and achieve that perfect sear. Plus, you found helpful tips for crispy skin and spice adjustments. I also covered variations for sauces and fish, along with storage options for leftovers.
Savor this dish and share it with others. Enjoy your cooking!
![For this recipe, you need key ingredients to make the salmon shine. Here’s what to gather: - 4 salmon fillets (approximately 6 oz each) - 2 tablespoons Sriracha sauce - 3 tablespoons honey - 1 tablespoon soy sauce - 2 cloves garlic, finely minced - 1 tablespoon fresh ginger, finely grated - 2 tablespoons olive oil - Salt and freshly ground black pepper, to taste These main ingredients create a sweet and spicy glaze that makes the salmon pop. Seasoning is crucial in cooking. It helps to enhance the natural flavors of the fish. Use these simple items: - Salt - Freshly ground black pepper Make sure to season both sides of the salmon. This step adds depth to every bite. Garnishes make your dish look great and add extra flavor. For this salmon recipe, you will need: - 1 tablespoon sesame seeds - 2 green onions, thinly sliced Sprinkling these on top gives the meal a beautiful finish. The sesame seeds add crunch, while green onions bring freshness. To see the full details for cooking, check the [Full Recipe]. To make the glaze, grab a medium bowl. Combine 2 tablespoons of Sriracha sauce, 3 tablespoons of honey, and 1 tablespoon of soy sauce. Add 2 minced garlic cloves and 1 tablespoon of freshly grated ginger. Whisk these together until the mixture is smooth. This sweet and spicy glaze will add the perfect flavor to your salmon. Set this aside for later use. Next, take 4 salmon fillets and dry them with a paper towel. This step helps the skin get crispy. Now, sprinkle salt and pepper on both sides of each fillet. Make sure to cover every inch. This simple seasoning enhances the natural taste of the fish. Now, heat 2 tablespoons of olive oil in a large skillet over medium-high heat. Once the oil shimmers, carefully place the salmon fillets in the skillet, skin-side down. Sear them for about 4-5 minutes until the skin turns golden and crispy. Once that happens, gently flip the fillets over. Lower the heat to medium and pour the glaze over the salmon. Cook for another 4-5 minutes, basting the salmon occasionally with the glaze. When it is cooked through and caramelized, remove the fillets from the skillet. Enjoy every bite of this flavorful salmon dish! For the full recipe, check out the details above! To get that perfect crispy skin, start with dry salmon. Use a paper towel to pat it well. This removes extra moisture, which helps the skin crisp nicely. Heat your skillet until it shimmers before adding the salmon. Place the fillets skin-side down and don’t move them for the first few minutes. This helps create a nice golden crust. Sear for about 4-5 minutes, then flip gently to finish cooking. If you like a milder glaze, reduce the Sriracha amount. Start with 1 tablespoon instead of 2. You can also add extra honey to balance the heat. For spice lovers, add more Sriracha or a pinch of cayenne pepper. Taste the glaze before pouring it on the salmon. This way, you can adjust it to your liking. Using the right tools makes cooking easier. Here’s what I recommend: - Large skillet for searing - Mixing bowl for the glaze - Whisk for blending ingredients - Paper towels for drying salmon - Spatula for flipping fillets These tools help you create a delicious Sriracha honey glazed salmon from the [Full Recipe]. {{image_4}} You can switch up the Sriracha honey glaze if you want. Try a sweet soy glaze instead. Mix soy sauce, brown sugar, and ginger for a tasty alternative. You can also use teriyaki sauce for a different flavor. It adds a rich, savory taste that pairs well with salmon. Another option is a citrus glaze. Mix orange juice and honey for a bright, zesty twist. While salmon shines in this recipe, other fish work too. Try using trout, which has a similar flavor and texture. Mahi-mahi also holds up well to grilling and glazing. Cod is another great option, as it absorbs flavors nicely. Each fish brings its own unique taste, so feel free to experiment. Toppings can elevate your dish further. Try adding sliced avocados for creaminess. Chopped cilantro or parsley adds a fresh touch. You can also sprinkle crushed peanuts or cashews for crunch. For a spicy kick, add sliced jalapeños. These toppings can make your meal even more fun and flavorful. Enjoy customizing your Sriracha honey glazed salmon with these ideas! Store your leftover salmon in an airtight container. Make sure to let it cool first. Place a piece of parchment paper between layers if stacking. This keeps the fish from sticking together. Refrigerate the salmon for up to three days. If you plan to keep it longer, freezing is a better option. To reheat, use the oven for the best taste. Preheat to 350°F (175°C). Place the salmon on a baking sheet and cover it with foil. Heat for about 10 to 15 minutes. This keeps the salmon moist and tasty. You can also use the microwave. Heat it in short bursts of 30 seconds. Check often to avoid overcooking. If you want to freeze your salmon, do it right after cooking. Wrap each piece tightly in plastic wrap. Then, place them in a freezer bag. Remove as much air as you can before sealing. You can freeze it for up to three months. When ready to eat, thaw it in the fridge overnight before reheating. For more ideas, check out the Full Recipe. You can tell if the salmon is cooked when it flakes easily with a fork. The flesh should be opaque and no longer translucent. A good rule is to cook it for about 4-5 minutes per side, depending on thickness. Use a food thermometer if you want to be precise. The internal temperature should reach 145°F (63°C). Cooking it just right keeps it moist and tasty. Yes, you can prepare the glaze ahead of time. Just store it in the fridge in an airtight container. This makes cooking easier later. However, I recommend cooking the salmon fresh. This keeps it juicy and full of flavor. If you must, you can cook the salmon and store it in the fridge for up to 2 days. For a full meal, pair the salmon with fluffy jasmine rice or quinoa. Steamed broccoli or snap peas add color and crunch. You can also serve it with a fresh salad for a light touch. If you want something more filling, try roasted potatoes or sweet potatoes. These sides balance the bold flavors of the salmon well. Check out the Full Recipe for more details! This blog post shared key details about making Sriracha Honey Glazed Salmon. You learned what ingredients to use, including seasoning and garnishes. I outlined simple steps to prepare the glaze, season the fish, and achieve that perfect sear. Plus, you found helpful tips for crispy skin and spice adjustments. I also covered variations for sauces and fish, along with storage options for leftovers. Savor this dish and share it with others. Enjoy your cooking!](https://goldendishy.com/wp-content/uploads/2025/07/1e0cb0f2-d69e-43b4-ab0e-316143d411f1-300x300.webp)

![To make vegan creamy pesto pasta, gather these fresh and simple ingredients. - 12 oz pasta (penne, spaghetti, or your favorite variety) - 2 cups fresh basil leaves, tightly packed - 1/2 cup raw cashews (soaked in water for at least 2 hours) - 1/4 cup nutritional yeast (for a cheesy flavor) - 3 cloves garlic, minced - 1/4 cup extra virgin olive oil - 1 tablespoon fresh lemon juice - Sea salt and freshly ground black pepper, to taste - 1 cup cherry tomatoes, halved (for topping) - Extra fresh basil leaves (for garnish) Each ingredient plays a vital role. The pasta is the base, while basil brings freshness. Cashews create a rich, creamy texture. Nutritional yeast adds a cheesy taste, perfect for vegan dishes. Garlic gives depth, while olive oil provides smoothness. Lemon juice brightens the flavors. Salt and pepper enhance everything. Cherry tomatoes add color and sweetness. Extra basil leaves make the dish look beautiful. For the full recipe, check out the link to ensure a delicious meal! First, fill a large pot with water and add a generous amount of salt. Bring the water to a rapid boil. This step is key; the salt helps flavor the pasta. Once boiling, add 12 ounces of your favorite pasta, like penne or spaghetti. Cook according to the package instructions. You want the pasta to be al dente, which means it should be tender but still firm to bite. Usually, this takes about 8 to 12 minutes. When the pasta is ready, drain it well and set it aside. Next, it’s time to make the vegan pesto. Grab your blender or food processor. Add 2 cups of fresh basil leaves, 1/2 cup of soaked raw cashews, and 1/4 cup of nutritional yeast. Also, include 3 cloves of minced garlic and 1 tablespoon of fresh lemon juice. Season with a pinch of sea salt and freshly ground black pepper. Blend this mixture until it becomes smooth and creamy. If it doesn't blend well, scrape down the sides of the blender and blend again until you get a silky texture. Now, combine the drained pasta with the creamy pesto sauce. Use a large mixing bowl for this. Pour the pesto over the pasta. With a pair of tongs or a spatula, toss everything together. Ensure that each piece of pasta gets coated with the vibrant pesto. If the sauce looks too thick, add a little water, one teaspoon at a time, until it reaches the desired consistency. Don't forget to taste! Adjust the seasoning with more salt, pepper, or lemon juice if needed. Finally, gently fold in 1 cup of halved cherry tomatoes for a fresh burst of flavor. Serve this delicious dish warm, garnished with extra basil leaves. Enjoy your vegan creamy pesto pasta! For the complete recipe, check the [Full Recipe]. Soaked cashews are the secret to a smooth and creamy sauce. They soften and blend well, making the pesto rich. Soak them in water for at least two hours before use. This step is key for a silky texture. If your pesto is too thick, don’t worry. Just add water! Start with a teaspoon at a time. Blend until you reach your desired creaminess. This helps the sauce hug the pasta perfectly. Don’t stop at just basil! You can spice it up with some red pepper flakes for heat. A pinch of black pepper adds depth. Try adding a bit of garlic powder for more flavor. Lemon juice adds freshness, but balance is key. If it’s too tangy, add a pinch of sugar or more cashews. This helps round out the flavors and brings the dish to life. Pair this pasta with roasted vegetables for a colorful plate. A side salad adds crunch and freshness. For a drink, consider a light white wine, like Sauvignon Blanc. As for portion sizes, aim for about one and a half cups per person. This ensures everyone leaves satisfied. Enjoy this dish warm for the best flavor experience! {{image_4}} You can change nuts or seeds in your pesto. Try using almonds or sunflower seeds. Each option brings a unique taste. For those avoiding gluten, select gluten-free pasta. Options like brown rice or chickpea pasta work well. Both choices give a nice texture and flavor. To mix up the flavor, add different herbs like parsley or spinach. These herbs bring extra freshness to your dish. You can also incorporate various vegan cheeses. Options like cashew cheese or nutritional yeast can enhance the creamy taste. This helps create layers of flavor in your pesto. Make your dish fresh by using seasonal veggies. For example, zucchini or asparagus can add crunch and color. You can also try different tomatoes. Roasted tomatoes can bring a sweet touch, while cherry tomatoes add a pop of freshness. Finish with garnishes like pine nuts or extra basil for a lovely look. For the complete recipe, check the Full Recipe. After enjoying your vegan creamy pesto pasta, store any leftovers in an airtight container. This keeps the pasta fresh and tasty. Place it in the fridge right away. The best storage time is up to 3 days. Beyond that, the pasta may lose its flavor and texture. To reheat your pasta, the best method is using a stovetop. Heat a pan over medium heat. Add a splash of water or olive oil to keep it moist. Stir gently to warm it up. When reheating, avoid high heat, as this can dry out the sauce. You want to keep that creamy goodness intact. Enjoy your delicious meal again! To make vegan creamy pesto pasta, follow these simple steps: 1. Cook the Pasta: Bring salted water to a boil. Add 12 oz of your pasta and cook until tender. This usually takes about 8-12 minutes. Drain and set aside. 2. Prepare the Pesto: In a blender, add 2 cups of fresh basil leaves, 1/2 cup of soaked raw cashews, and 3 minced garlic cloves. Pour in 1/4 cup of nutritional yeast and 1 tablespoon of lemon juice. Add a pinch of sea salt and black pepper. Blend until smooth. 3. Emulsify with Olive Oil: While blending, slowly add 1/4 cup of extra virgin olive oil. Keep blending until creamy. If it’s too thick, add water, one teaspoon at a time. 4. Combine Pasta and Pesto: In a large bowl, mix the drained pasta with your creamy pesto. Toss gently to coat the pasta well. 5. Final Touches: Taste the mix and adjust the seasoning. Fold in 1 cup of halved cherry tomatoes for a fresh touch. 6. Serve: Serve warm with extra basil leaves on top. Enjoy your delicious vegan creamy pesto pasta! Yes, you can freeze vegan creamy pesto pasta. Here are some tips to keep it tasty: - Cool Before Freezing: Let the pasta cool down before packing it. - Use Airtight Containers: Store the pasta in airtight containers or freezer bags. - Leave Space: Leave some room in the container for the pasta to expand. - Label and Date: Always label your containers with the date. Use within 2-3 months for best quality. When ready to eat, thaw in the fridge overnight. Reheat gently on the stove or in the microwave. Add a splash of water if it seems dry. If you don’t have nutritional yeast, try these alternatives: - Grated Vegan Cheese: Use a dairy-free cheese for a similar flavor. - Ground Flaxseed: This can add a nutty taste, though it won't mimic the cheese flavor. - T nutritional yeast: You can use this if you want a similar profile. - Parmesan Substitute: Some brands offer vegan parmesan that works well in pesto. Each substitute will change the flavor a bit, so adjust to your taste! This blog post covered how to make vegan creamy pesto pasta. You learned about ingredients, cooking pasta, and blending the pesto. We explored tips for smooth texture and flavor. I shared variations to keep things fresh, plus storage and reheating advice. In the end, making this dish is quick and fun. Enjoy experimenting with flavors and textures. This pasta will please vegans and non-vegans alike!](https://goldendishy.com/wp-content/uploads/2025/07/928f57b2-1357-48f3-b20e-4d7b01e4c937-768x768.webp)