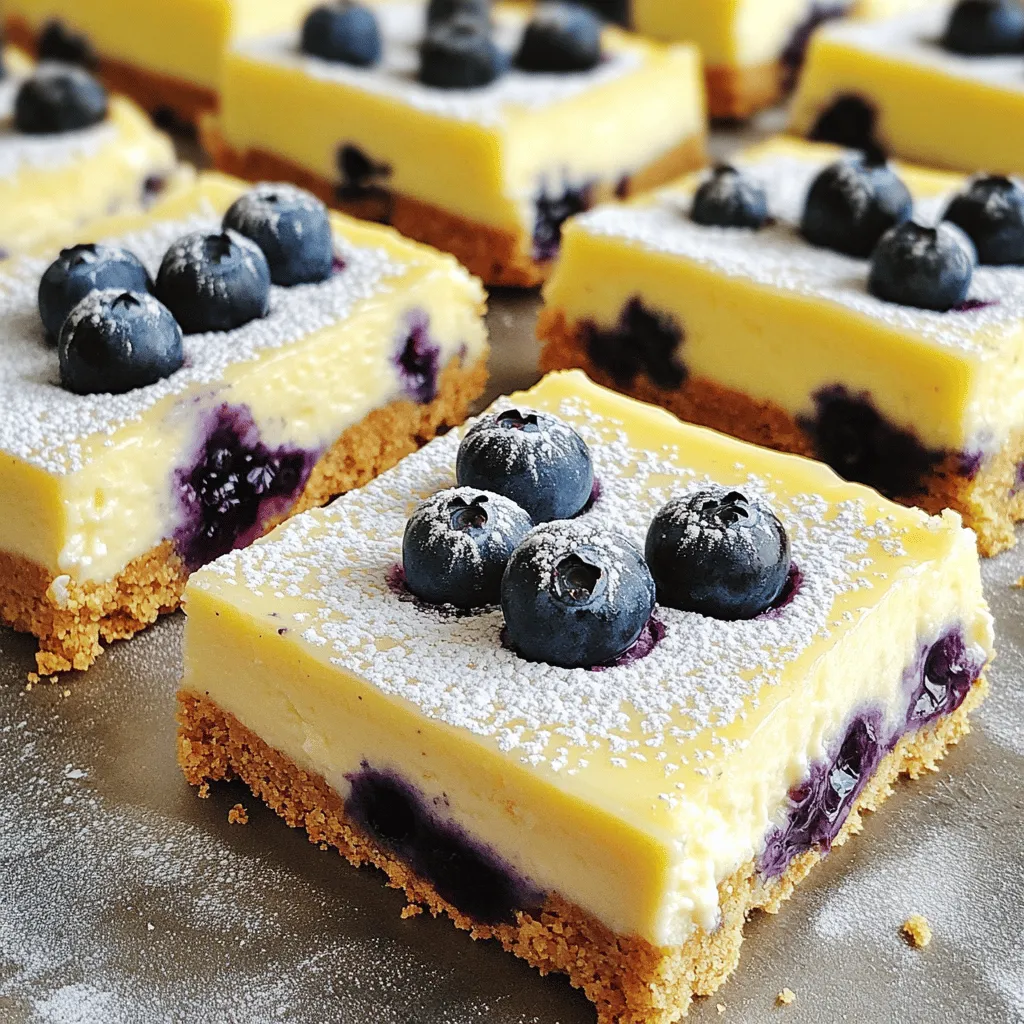
Lemon Blueberry Cheesecake Bars Delightful and Fresh
![- 1 ½ cups graham cracker crumbs - ½ cup unsalted butter, melted - 2 tablespoons granulated sugar - 16 oz cream cheese, softened to room temperature - 1 cup granulated sugar - 3 large eggs, at room temperature - 1 teaspoon pure vanilla extract - 2 tablespoons fresh lemon zest - ½ cup freshly squeezed lemon juice - 1 cup fresh blueberries - Powdered sugar for dusting (optional) The key to great Lemon Blueberry Cheesecake Bars lies in using fresh, high-quality ingredients. The combination of cream cheese and lemon creates a creamy texture with a bright flavor. The blueberries add bursts of sweetness and color. - If you need a gluten-free option, try almond flour or gluten-free cookies for the crust. - For a vegan version, you can use plant-based cream cheese. Look for brands that offer a similar taste. - If you want to cut sugar, use coconut sugar or a sugar substitute like stevia. These substitutions help you customize the recipe to fit your needs while keeping it delicious. For the full recipe, check the detailed instructions above. 1. First, preheat your oven to 350°F (175°C). This step is key for even baking. 2. Next, prepare an 8x8 inch baking pan. Line it with parchment paper. Let the paper hang over the sides. This helps when lifting the bars out later. 3. In a medium mixing bowl, combine 1 ½ cups of graham cracker crumbs, ½ cup melted unsalted butter, and 2 tablespoons of granulated sugar. Mix until it looks like damp sand. 4. Press this mixture firmly into the bottom of the pan. This forms your crust. Bake it for 8-10 minutes until it turns lightly golden. Remove it from the oven and let it cool slightly. 1. In a large bowl, use an electric mixer to beat 16 oz of softened cream cheese with 1 cup of granulated sugar. Mix until it is smooth and creamy. This should take about 2-3 minutes. 2. Add 3 large eggs, one at a time. Mix on low speed after each egg. Avoid overmixing to keep air bubbles out. 3. Now, stir in 1 teaspoon of vanilla extract, 2 tablespoons of fresh lemon zest, and ½ cup of freshly squeezed lemon juice. Make sure everything blends well. 4. Gently fold in 1 cup of fresh blueberries with a spatula. Be careful not to crush them; you want them whole in the bars. 1. Pour the cheesecake mixture over the cooled crust in the pan. Spread it evenly using a spatula. 2. Bake the mixture in the preheated oven for 25-30 minutes. The center should look set but still jiggle slightly. It will firm up more as it cools. 3. Once baked, take the pan out and let it cool to room temperature. After it cools, refrigerate for at least 4 hours. For best results, leave it overnight. 4. When you’re ready to serve, lift the cheesecake out of the pan using the parchment paper. Cut into squares and enjoy! You can dust the tops with powdered sugar for a nice touch. For the full recipe and more details, check out the [Full Recipe]. Avoiding cracks in the cheesecake To prevent cracks, do not overmix the batter. Overmixing adds air, which can create bubbles. Also, use room temperature ingredients. Cold cream cheese can make lumps. Bake the bars at a lower temperature for a longer time. A water bath can help keep the heat even. Achieving the perfect texture For a creamy texture, blend the cream cheese until smooth. Mix in the eggs one at a time. This keeps the batter light and fluffy. Do not rush this step. After baking, let the bars cool slowly to room temp. Chill them in the fridge for at least four hours. Creative ways to present the bars Cut the bars into squares and place them on a nice plate. You can garnish with fresh blueberries and lemon slices for color. A drizzle of lemon glaze adds shine and flavor. Serve them with a dollop of whipped cream for extra flair. Complementary toppings and sides Top each bar with a sprinkle of powdered sugar for sweetness. A scoop of vanilla ice cream pairs well, too. You can also serve with a side of lemon curd for a zesty punch. Fresh mint leaves add a pop of color and freshness. Fixing undercooked bars If the bars are too soft, return them to the oven. Bake for an additional 5-10 minutes. The center should have a slight jiggle but not be runny. Make sure to let them cool before checking the texture. Preventing overbaking Keep an eye on your bars as they bake. If the edges start to brown too much, cover them with foil. Use a toothpick to check doneness. It should come out mostly clean but with a bit of moist filling clinging to it. {{image_4}} You can mix up the flavors in your cheesecake bars easily. Swap blueberries for other berries like raspberries or strawberries. You can even use a mix of berries for a fun twist. If you love chocolate, add some chocolate chips. This makes the bars sweeter and richer. If you need gluten-free options, use gluten-free graham crackers for the crust. They work just as well and taste great. For those on a dairy-free diet, try using vegan cream cheese. It gives you a similar creamy texture without the dairy. Change the fruits based on what’s in season. In summer, use fresh peaches or cherries for a juicy taste. In the fall, think about adding pumpkin or apple flavors. You can also dress up the bars for holidays. Try adding whipped cream or holiday-themed sprinkles for fun. These variations let you enjoy lemon blueberry cheesecake bars in new ways. Don't forget to check out the Full Recipe for more details! To store leftover Lemon Blueberry Cheesecake Bars, place them in an airtight container. This keeps them fresh and tasty. You can also cover them with plastic wrap. Store them in the fridge for up to five days. For the best flavor, eat them within the first two days. You can freeze these cheesecake bars for longer storage. First, cut them into squares. Wrap each square in plastic wrap, then place them in a freezer-safe bag. They will last about three months in the freezer. When you're ready to enjoy them, take out the bars and place them in the fridge overnight to thaw. You can also let them sit at room temperature for about 30 minutes before serving. If you plan to serve these bars at a gathering, make them a day ahead. This allows the flavors to blend nicely. To keep the bars fresh, store them in the fridge until you're ready to serve. For a beautiful touch, dust the tops with powdered sugar just before serving. This keeps the bars looking fresh and inviting even a day later. For the full recipe, check out the Lemon Blueberry Cheesecake Bars section. Lemon Blueberry Cheesecake Bars are a creamy and tangy dessert. They combine smooth cheesecake with fresh blueberries and zesty lemon. The base is a crispy graham cracker crust that adds crunch. These bars are easy to slice and serve, making them perfect for gatherings. You can enjoy them chilled, which enhances the flavors. Each bite is a delightful mix of sweet and tart. Yes, you can make these bars ahead of time. They taste even better when chilled overnight. Prepare the bars and let them cool to room temperature. Place them in the fridge for at least four hours. If you want to make them days in advance, store them in an airtight container. Just remember to cut them into squares before serving. This way, you save time on the day of your event. You can tell when cheesecake bars are done by looking for a few signs. The edges should be set, while the center may jiggle slightly. This jiggle means they will firm up as they cool. Another sign is a light golden color around the edges. If you see cracks forming, they may be overbaked. Keep an eye on them during the last few minutes of baking. Yes, there are several substitutes for eggs in this recipe. You can use unsweetened applesauce; a quarter cup replaces one egg. Another option is silken tofu, blended until smooth. Use about one quarter cup for each egg needed. You can also try using flaxseed meal mixed with water. One tablespoon of flaxseed meal mixed with three tablespoons of water equals one egg. These alternatives keep your cheesecake rich and creamy. In this blog post, we covered how to create delicious lemon blueberry cheesecake bars. We started with the ingredients, explored substitutions, and shared step-by-step instructions. Tips for serving, variations, and storage were also discussed. These tips help ensure your cheesecake turns out perfectly every time. Remember, baking is fun, and experimenting with flavors leads to great treats. Enjoy your baking journey and share your creations with friends and family!](https://goldendishy.com/wp-content/uploads/2025/07/2e10f80d-a440-4f9c-b53b-c6e4b2946195.webp)
Looking for a dessert that bursts with flavor and freshness? You’ll love these Lemon Blueberry Cheesecake Bars! They blend creamy cheesecake, zesty lemon, and juicy blueberries for a treat that’s both tangy and sweet. Perfect for any occasion, these bars are easy to make and delicious to eat. Let’s dive into the recipe and bring a little sunshine to your dessert table!
Ingredients
List of Ingredients
– 1 ½ cups graham cracker crumbs
– ½ cup unsalted butter, melted
– 2 tablespoons granulated sugar
– 16 oz cream cheese, softened to room temperature
– 1 cup granulated sugar
– 3 large eggs, at room temperature
– 1 teaspoon pure vanilla extract
– 2 tablespoons fresh lemon zest
– ½ cup freshly squeezed lemon juice
– 1 cup fresh blueberries
– Powdered sugar for dusting (optional)
The key to great Lemon Blueberry Cheesecake Bars lies in using fresh, high-quality ingredients. The combination of cream cheese and lemon creates a creamy texture with a bright flavor. The blueberries add bursts of sweetness and color.
Ingredient Substitutions
– If you need a gluten-free option, try almond flour or gluten-free cookies for the crust.
– For a vegan version, you can use plant-based cream cheese. Look for brands that offer a similar taste.
– If you want to cut sugar, use coconut sugar or a sugar substitute like stevia.
These substitutions help you customize the recipe to fit your needs while keeping it delicious.
Step-by-Step Instructions
Preparation Steps
1. First, preheat your oven to 350°F (175°C). This step is key for even baking.
2. Next, prepare an 8×8 inch baking pan. Line it with parchment paper. Let the paper hang over the sides. This helps when lifting the bars out later.
3. In a medium mixing bowl, combine 1 ½ cups of graham cracker crumbs, ½ cup melted unsalted butter, and 2 tablespoons of granulated sugar. Mix until it looks like damp sand.
4. Press this mixture firmly into the bottom of the pan. This forms your crust. Bake it for 8-10 minutes until it turns lightly golden. Remove it from the oven and let it cool slightly.
Cheesecake Filling Steps
1. In a large bowl, use an electric mixer to beat 16 oz of softened cream cheese with 1 cup of granulated sugar. Mix until it is smooth and creamy. This should take about 2-3 minutes.
2. Add 3 large eggs, one at a time. Mix on low speed after each egg. Avoid overmixing to keep air bubbles out.
3. Now, stir in 1 teaspoon of vanilla extract, 2 tablespoons of fresh lemon zest, and ½ cup of freshly squeezed lemon juice. Make sure everything blends well.
4. Gently fold in 1 cup of fresh blueberries with a spatula. Be careful not to crush them; you want them whole in the bars.
Baking Instructions
1. Pour the cheesecake mixture over the cooled crust in the pan. Spread it evenly using a spatula.
2. Bake the mixture in the preheated oven for 25-30 minutes. The center should look set but still jiggle slightly. It will firm up more as it cools.
3. Once baked, take the pan out and let it cool to room temperature. After it cools, refrigerate for at least 4 hours. For best results, leave it overnight.
4. When you’re ready to serve, lift the cheesecake out of the pan using the parchment paper. Cut into squares and enjoy! You can dust the tops with powdered sugar for a nice touch.
Tips & Tricks
Baking Tips
Avoiding cracks in the cheesecake
To prevent cracks, do not overmix the batter. Overmixing adds air, which can create bubbles. Also, use room temperature ingredients. Cold cream cheese can make lumps. Bake the bars at a lower temperature for a longer time. A water bath can help keep the heat even.
Achieving the perfect texture
For a creamy texture, blend the cream cheese until smooth. Mix in the eggs one at a time. This keeps the batter light and fluffy. Do not rush this step. After baking, let the bars cool slowly to room temp. Chill them in the fridge for at least four hours.
Serving Suggestions
Creative ways to present the bars
Cut the bars into squares and place them on a nice plate. You can garnish with fresh blueberries and lemon slices for color. A drizzle of lemon glaze adds shine and flavor. Serve them with a dollop of whipped cream for extra flair.
Complementary toppings and sides
Top each bar with a sprinkle of powdered sugar for sweetness. A scoop of vanilla ice cream pairs well, too. You can also serve with a side of lemon curd for a zesty punch. Fresh mint leaves add a pop of color and freshness.
Troubleshooting Common Issues
Fixing undercooked bars
If the bars are too soft, return them to the oven. Bake for an additional 5-10 minutes. The center should have a slight jiggle but not be runny. Make sure to let them cool before checking the texture.
Preventing overbaking
Keep an eye on your bars as they bake. If the edges start to brown too much, cover them with foil. Use a toothpick to check doneness. It should come out mostly clean but with a bit of moist filling clinging to it.
Variations
Flavor Variations
You can mix up the flavors in your cheesecake bars easily. Swap blueberries for other berries like raspberries or strawberries. You can even use a mix of berries for a fun twist. If you love chocolate, add some chocolate chips. This makes the bars sweeter and richer.
Dietary Variations
If you need gluten-free options, use gluten-free graham crackers for the crust. They work just as well and taste great. For those on a dairy-free diet, try using vegan cream cheese. It gives you a similar creamy texture without the dairy.
Seasonal Variations
Change the fruits based on what’s in season. In summer, use fresh peaches or cherries for a juicy taste. In the fall, think about adding pumpkin or apple flavors. You can also dress up the bars for holidays. Try adding whipped cream or holiday-themed sprinkles for fun.
These variations let you enjoy lemon blueberry cheesecake bars in new ways.
Storage Info
Refrigeration Tips
To store leftover Lemon Blueberry Cheesecake Bars, place them in an airtight container. This keeps them fresh and tasty. You can also cover them with plastic wrap. Store them in the fridge for up to five days. For the best flavor, eat them within the first two days.
Freezing Instructions
You can freeze these cheesecake bars for longer storage. First, cut them into squares. Wrap each square in plastic wrap, then place them in a freezer-safe bag. They will last about three months in the freezer. When you’re ready to enjoy them, take out the bars and place them in the fridge overnight to thaw. You can also let them sit at room temperature for about 30 minutes before serving.
Best Practices for Serving Later
If you plan to serve these bars at a gathering, make them a day ahead. This allows the flavors to blend nicely. To keep the bars fresh, store them in the fridge until you’re ready to serve. For a beautiful touch, dust the tops with powdered sugar just before serving. This keeps the bars looking fresh and inviting even a day later.
FAQs
What are Lemon Blueberry Cheesecake Bars?
Lemon Blueberry Cheesecake Bars are a creamy and tangy dessert. They combine smooth cheesecake with fresh blueberries and zesty lemon. The base is a crispy graham cracker crust that adds crunch. These bars are easy to slice and serve, making them perfect for gatherings. You can enjoy them chilled, which enhances the flavors. Each bite is a delightful mix of sweet and tart.
Can I make these bars ahead of time?
Yes, you can make these bars ahead of time. They taste even better when chilled overnight. Prepare the bars and let them cool to room temperature. Place them in the fridge for at least four hours. If you want to make them days in advance, store them in an airtight container. Just remember to cut them into squares before serving. This way, you save time on the day of your event.
How do I know when cheesecake bars are done?
You can tell when cheesecake bars are done by looking for a few signs. The edges should be set, while the center may jiggle slightly. This jiggle means they will firm up as they cool. Another sign is a light golden color around the edges. If you see cracks forming, they may be overbaked. Keep an eye on them during the last few minutes of baking.
Is there a substitute for eggs in this recipe?
Yes, there are several substitutes for eggs in this recipe. You can use unsweetened applesauce; a quarter cup replaces one egg. Another option is silken tofu, blended until smooth. Use about one quarter cup for each egg needed. You can also try using flaxseed meal mixed with water. One tablespoon of flaxseed meal mixed with three tablespoons of water equals one egg. These alternatives keep your cheesecake rich and creamy.
In this blog post, we covered how to create delicious lemon blueberry cheesecake bars. We started with the ingredients, explored substitutions, and shared step-by-step instructions. Tips for serving, variations, and storage were also discussed. These tips help ensure your cheesecake turns out perfectly every time. Remember, baking is fun, and experimenting with flavors leads to great treats. Enjoy your baking journey and share your creations with friends and family!
![- 1 ½ cups graham cracker crumbs - ½ cup unsalted butter, melted - 2 tablespoons granulated sugar - 16 oz cream cheese, softened to room temperature - 1 cup granulated sugar - 3 large eggs, at room temperature - 1 teaspoon pure vanilla extract - 2 tablespoons fresh lemon zest - ½ cup freshly squeezed lemon juice - 1 cup fresh blueberries - Powdered sugar for dusting (optional) The key to great Lemon Blueberry Cheesecake Bars lies in using fresh, high-quality ingredients. The combination of cream cheese and lemon creates a creamy texture with a bright flavor. The blueberries add bursts of sweetness and color. - If you need a gluten-free option, try almond flour or gluten-free cookies for the crust. - For a vegan version, you can use plant-based cream cheese. Look for brands that offer a similar taste. - If you want to cut sugar, use coconut sugar or a sugar substitute like stevia. These substitutions help you customize the recipe to fit your needs while keeping it delicious. For the full recipe, check the detailed instructions above. 1. First, preheat your oven to 350°F (175°C). This step is key for even baking. 2. Next, prepare an 8x8 inch baking pan. Line it with parchment paper. Let the paper hang over the sides. This helps when lifting the bars out later. 3. In a medium mixing bowl, combine 1 ½ cups of graham cracker crumbs, ½ cup melted unsalted butter, and 2 tablespoons of granulated sugar. Mix until it looks like damp sand. 4. Press this mixture firmly into the bottom of the pan. This forms your crust. Bake it for 8-10 minutes until it turns lightly golden. Remove it from the oven and let it cool slightly. 1. In a large bowl, use an electric mixer to beat 16 oz of softened cream cheese with 1 cup of granulated sugar. Mix until it is smooth and creamy. This should take about 2-3 minutes. 2. Add 3 large eggs, one at a time. Mix on low speed after each egg. Avoid overmixing to keep air bubbles out. 3. Now, stir in 1 teaspoon of vanilla extract, 2 tablespoons of fresh lemon zest, and ½ cup of freshly squeezed lemon juice. Make sure everything blends well. 4. Gently fold in 1 cup of fresh blueberries with a spatula. Be careful not to crush them; you want them whole in the bars. 1. Pour the cheesecake mixture over the cooled crust in the pan. Spread it evenly using a spatula. 2. Bake the mixture in the preheated oven for 25-30 minutes. The center should look set but still jiggle slightly. It will firm up more as it cools. 3. Once baked, take the pan out and let it cool to room temperature. After it cools, refrigerate for at least 4 hours. For best results, leave it overnight. 4. When you’re ready to serve, lift the cheesecake out of the pan using the parchment paper. Cut into squares and enjoy! You can dust the tops with powdered sugar for a nice touch. For the full recipe and more details, check out the [Full Recipe]. Avoiding cracks in the cheesecake To prevent cracks, do not overmix the batter. Overmixing adds air, which can create bubbles. Also, use room temperature ingredients. Cold cream cheese can make lumps. Bake the bars at a lower temperature for a longer time. A water bath can help keep the heat even. Achieving the perfect texture For a creamy texture, blend the cream cheese until smooth. Mix in the eggs one at a time. This keeps the batter light and fluffy. Do not rush this step. After baking, let the bars cool slowly to room temp. Chill them in the fridge for at least four hours. Creative ways to present the bars Cut the bars into squares and place them on a nice plate. You can garnish with fresh blueberries and lemon slices for color. A drizzle of lemon glaze adds shine and flavor. Serve them with a dollop of whipped cream for extra flair. Complementary toppings and sides Top each bar with a sprinkle of powdered sugar for sweetness. A scoop of vanilla ice cream pairs well, too. You can also serve with a side of lemon curd for a zesty punch. Fresh mint leaves add a pop of color and freshness. Fixing undercooked bars If the bars are too soft, return them to the oven. Bake for an additional 5-10 minutes. The center should have a slight jiggle but not be runny. Make sure to let them cool before checking the texture. Preventing overbaking Keep an eye on your bars as they bake. If the edges start to brown too much, cover them with foil. Use a toothpick to check doneness. It should come out mostly clean but with a bit of moist filling clinging to it. {{image_4}} You can mix up the flavors in your cheesecake bars easily. Swap blueberries for other berries like raspberries or strawberries. You can even use a mix of berries for a fun twist. If you love chocolate, add some chocolate chips. This makes the bars sweeter and richer. If you need gluten-free options, use gluten-free graham crackers for the crust. They work just as well and taste great. For those on a dairy-free diet, try using vegan cream cheese. It gives you a similar creamy texture without the dairy. Change the fruits based on what’s in season. In summer, use fresh peaches or cherries for a juicy taste. In the fall, think about adding pumpkin or apple flavors. You can also dress up the bars for holidays. Try adding whipped cream or holiday-themed sprinkles for fun. These variations let you enjoy lemon blueberry cheesecake bars in new ways. Don't forget to check out the Full Recipe for more details! To store leftover Lemon Blueberry Cheesecake Bars, place them in an airtight container. This keeps them fresh and tasty. You can also cover them with plastic wrap. Store them in the fridge for up to five days. For the best flavor, eat them within the first two days. You can freeze these cheesecake bars for longer storage. First, cut them into squares. Wrap each square in plastic wrap, then place them in a freezer-safe bag. They will last about three months in the freezer. When you're ready to enjoy them, take out the bars and place them in the fridge overnight to thaw. You can also let them sit at room temperature for about 30 minutes before serving. If you plan to serve these bars at a gathering, make them a day ahead. This allows the flavors to blend nicely. To keep the bars fresh, store them in the fridge until you're ready to serve. For a beautiful touch, dust the tops with powdered sugar just before serving. This keeps the bars looking fresh and inviting even a day later. For the full recipe, check out the Lemon Blueberry Cheesecake Bars section. Lemon Blueberry Cheesecake Bars are a creamy and tangy dessert. They combine smooth cheesecake with fresh blueberries and zesty lemon. The base is a crispy graham cracker crust that adds crunch. These bars are easy to slice and serve, making them perfect for gatherings. You can enjoy them chilled, which enhances the flavors. Each bite is a delightful mix of sweet and tart. Yes, you can make these bars ahead of time. They taste even better when chilled overnight. Prepare the bars and let them cool to room temperature. Place them in the fridge for at least four hours. If you want to make them days in advance, store them in an airtight container. Just remember to cut them into squares before serving. This way, you save time on the day of your event. You can tell when cheesecake bars are done by looking for a few signs. The edges should be set, while the center may jiggle slightly. This jiggle means they will firm up as they cool. Another sign is a light golden color around the edges. If you see cracks forming, they may be overbaked. Keep an eye on them during the last few minutes of baking. Yes, there are several substitutes for eggs in this recipe. You can use unsweetened applesauce; a quarter cup replaces one egg. Another option is silken tofu, blended until smooth. Use about one quarter cup for each egg needed. You can also try using flaxseed meal mixed with water. One tablespoon of flaxseed meal mixed with three tablespoons of water equals one egg. These alternatives keep your cheesecake rich and creamy. In this blog post, we covered how to create delicious lemon blueberry cheesecake bars. We started with the ingredients, explored substitutions, and shared step-by-step instructions. Tips for serving, variations, and storage were also discussed. These tips help ensure your cheesecake turns out perfectly every time. Remember, baking is fun, and experimenting with flavors leads to great treats. Enjoy your baking journey and share your creations with friends and family!](https://goldendishy.com/wp-content/uploads/2025/07/2e10f80d-a440-4f9c-b53b-c6e4b2946195-300x300.webp)